Kenwood VR-4700 Connection Manual
Digital audio/video receiver
Show thumbs
Also See for VR-4700:
- How to operate (118 pages) ,
- User manual (114 pages) ,
- Connection and setup manual (62 pages)
1
2
3
4
5
6
7
8
9
10
11
12
13
14
15
16
17
18
19
20
21
22
23
24
25
26
27
28
29
30
31
32
33
34
35
36
37
38
39
40
41
42
43
44
45
46
47
48
49
50
51
52
53
54
55
56
57
58
59
60
61
62
63
64
65
66
67
68
69
70
71
72
73
74
75
76
77
78
79
80
81
82
83
84
85
86
87
88
89
90
91
92
93
94
95
96
97
98
99
100
101
102
103
104
105
106
107
108
109
110
111
112
113
114
115
116
117
118
119
120
121
122
123
124
125
126
127
128
129
130
131
132
133
134
135
136
137
138
139
140
141
142
143
144
145
146
147
148
149
150
151
152
153
154
155
156
157
158
159
160
161
162
163
164
165
166
167
168
169
170
171
172
173
174
175
176
177
178
179
180
Chapters
Table of Contents

Related Manuals for Kenwood VR-4700


Summary of Contents for Kenwood VR-4700
- Page 1 VR-4900/VR-4700 KRF-V9993D This instruction manual is used to describe multiple models listed above. ‰ Model availability and features (functions) may differ depending on the country and sales area. B60-4502-10 01 CH (K, P, T, M, X, Y) OC 9911...
- Page 2 The VR-4900, VR-4700 and KRF-V9993D incorporate a VR-4900 and VR-4700 are sold in USA and Canada. KRF- high performance DSP to provide very high resolution from V9993D is sold in other countries.
-
Page 3: Before Applying Power
Before Applying Power Read this section carefully to ensure safe operation. VR-4900/VR-4700/KRF-V9993D is designed for operation *AC voltage selection AC voltage selector switch as follows. The AC voltage selector switch on the rear panel is set to the AC 110 ~120V / AC220 ~ 240V U.S.A. - Page 4 If any accessories are missing, or if the receiver is damaged or fails to operate, notify your dealer immediately. If your receiver was shipped to you directly, notify your shipper immediately. Kenwood recommends that you retain the original carton and packing...
-
Page 5: Table Of Contents
To Connect Front Speakers Only: To Connect a DVD Player: To Connect Front and Surround Sound Speakers: What if I Have Several Kenwood Devices (System Connecting Your CD-R Recorder ......18 Control Chaining)? .......... 30 What if I Have a Powered Subwoofer? - Page 6 Additional Functions? Connecting an External Infrared Receiver and IR Repeaters ............48 Storing Radio Stations in Memory (optional) ... 40 To Connect a KENWOOD IR-9991 IR Storing RDS Stations Automatically Receiver: (VR-4900 and KRF-V9993D) To Connect any other IR Receiver:...
-
Page 7: Chapter One: Connecting Your Devices
The connection scheme in this manual shows the most typi- S-Video S-Video the Kenwood USA Web site: www.kenwoodusa.com (for cal example with a receiver. But the receiver can also be con- USA and Canada only). Component Component nected and used in several ways other than the example. - Page 8 Chapter One : Connecting Your Devices The following diagram shows the entire back of the VR-4900/VR-4700/KRF-V9993D. Note that some component jacks are linked to Jacks surrounded by a solid thick specific digital jacks. For example, if you connect line are present only on the VR-...
-
Page 9: Noting Your Devices
Chapter One : Connecting Your Devices Noting Your Devices Jack Set Device Manufacturer Model # Setup Code PHONO MD/TAPE1 CD2/TAPE2 MONITOR CD-R MONITOR OUT (TV on PowerTouch) VIDEO1 VIDEO2 VIDEO3 VIDEO4 Use this table and the diagram on the preceding page to You will need this information later, when you set up your plan your connections before you make them, or use it to PowerTouch (see “Identifying Devices For PowerTouch Con-... -
Page 10: Connecting Your Speakers
Chapter One : Connecting Your Devices Connecting Your Speakers CENTER FRONT FRONT SURROUND SURROUND POWERED SUBWOOFER RF REMOTE ANTENNA SIGNAL REPEATER COMPONENT VIDEO S VIDEO VIDEO AUDIO AUDIO PRE OUT FRONT ANTENNA SYSTEM DIGITAL OUT CONTROL IR OUT LCD IR RECEIVER IN VIDEO1 PHONO PLAY... -
Page 11: To Connect Front Speakers Only
The speakers must have a nominal impedance of between 1. Loosen the speaker wire binding posts. RIGHT SURROUND post. Repeat for the negative plug. and 16 (VR-4900/VR-4700) or between 4 and 16 2. Insert the wire from the positive jack on the RIGHT (KRF-V9993D for Europe and U.K.). -
Page 12: Speakers
Chapter One : Connecting Your Devices What if I Have an Amplifier? FRONT FRONT Power Amp RF REMOTE ANTENNA SIGNAL REPEATER COMPONENT VIDEO S VIDEO VIDEO AUDIO AUDIO PRE OUT FRONT ANTENNA SYSTEM DIGITAL OUT CONTROL IR OUT LCD IR RECEIVER IN VIDEO1 PHONO PLAY... -
Page 13: Speakers
Chapter One : Connecting Your Devices What if I Have an Amplifier?, continued You can use supplemental power amplifiers for any of the channels instead of the receiver’s built-in amplifiers. Do not plug in the amplifiers or the receiver to AC power until all connections have been made. -
Page 14: Connecting Your Tv
Chapter One : Connecting Your Devices Connecting Your TV RF REMOTE ANTENNA SIGNAL COMPONENT VIDEO S VIDEO VIDEO AUDIO AUDIO PRE OUT FRONT ANTENNA SYSTEM DIGITAL OUT CONTROL VIDEO1 PHONO PLAY IR O RECEIVER SL 16 TEXT DC12V 20mA VIDEO 4 IN VIDEO2 PLAY... -
Page 15: To Connect A Tv
This section focuses on the connections from your TV to 3. If your TV does not have any video input connections, the VR-4900/VR-4700/KRF-V9993D. Please refer to your TV’s you must purchase an RF modulator. The modulator instructions for more detail about its connection jacks and will convert the video signal from the receiver to an RF capabilities. -
Page 16: Connecting Your Cable Tv Or Satellite Tuner
Chapter One : Connecting Your Devices Connecting Your Cable TV or Satellite Tuner Note that video device jacks are linked to specific digital jacks. For example, if you connect a satellite tuner with a digital cable, you should connect the analog cables to the VIDEO3 video device jacks and the digital cable to the VIDEO3 digital jack. -
Page 17: To Connect A Cable Tv Tuner With A
2. Connect the audio and video cables from the cable tuner’s digital output jack and the receiver’s VIDEO2, satellite tuner to the VR-4900/VR-4700/KRF-V9993D. Please tuner’s Audio and Video Out jacks to the receiver’s VIDEO3 or VIDEO4 digital input jack as shown in the refer to your tuner’s instructions for more detail about its... -
Page 18: Connecting Your Vcr(S)
Chapter One : Connecting Your Devices Connecting Your VCR(s) RF REMOTE ANTENNA SIGNAL S-VIDEO IN COMPONENT VIDEO S VIDEO VIDEO AUDIO AUDIO PRE OUT FRONT ANTENNA SYSTEM DIGITAL OUT CONTROL VIDEO1 S-VIDEO OUT PHONO PLAY RELAY TV O IR OUT RECEIVER CONTROL SENS... -
Page 19: To Connect A Primary Vcr
OUT and PLAY IN jacks as shown to the left. 3. Go to “Noting Your Devices” on page 3 and note which the VR-4900/VR-4700/KRF-V9993D. Please refer to your 3. Be sure to connect the VCR VIDEO IN cable to the jack jack you used to connect your VCR. -
Page 20: Connecting Your Primary Cd Player
PLAY VIDEO CENTER SUBWOOFER SECOND ROOM OPTICAL COAXIAL DVD/6 CH. INPUT PRE OUT DIGITAL IN *KENWOOD CD-3280M, OUTPUT A (CD1) CD-2280M, DPF-J9010, DPF-J9020 or DPF-J9030 OUTPUT B (CD2)* ONLY SYSTEM CONTROL CABLE - KENWOOD ONLY COMMUNICATION CABLE - KENWOOD ONLY... -
Page 21: What If I Have A Video Cd-Compatible Cd Player
3. If you are connecting a Kenwood CD Player with sys- its connection jacks and capabilities. 2. Connect the digital cable from the changer to the tem control, connect the system control cable from the receiver’s CD1 digital jack as shown to the left. -
Page 22: Connecting Your Dvd Player
Chapter One : Connecting Your Devices Connecting Your DVD Player DIGITAL OUT - COAXIAL OR OPTICAL RF REMOTE ANTENNA SIGNAL COMPONENT VIDEO S VIDEO VIDEO AUDIO AUDIO PRE OUT FRONT ANTENNA SYSTEM DIGITAL OUT CONTROL VIDEO1 PHONO PLAY Remove protective cap RELAY TV ON IR OUT... -
Page 23: To Connect A Dvd Player
This section focuses on the connections from your DVD tion methods—do not connect both. shown to the left. player to the VR-4900/VR-4700/KRF-V9993D. Please refer If you use the optical digital cable, be sure to remove to your DVD player’s instructions for more detail about its... -
Page 24: Connecting Your Cd-R Recorder
Chapter One : Connecting Your Devices Connecting Your CD-R Recorder DIGITAL RECORD IN - COAXIAL OR OPTICAL Remove protective cap RF REMOTE ANTENNA before connecting. SIGNAL REPEATER COMPONENT VIDEO S VIDEO VIDEO AUDIO AUDIO PRE OUT FRONT ANTENNA SYSTEM DIGITAL OUT CONTROL IR OUT LCD IR RECEIVER IN VIDEO1... -
Page 25: To Connect A Cd-R Recorder
IN jacks to the receiver’s CD-R REC OUT jacks, as shown This section focuses on the connections from your CD-R to the left. recorder to the VR-4900/VR-4700/KRF-V9993D. Please re- 3. Connect the digital cable (either coaxial or optical) from fer to your CD-R recorder instructions for more detail about the CD-R’s digital jack to the appropriate digital jack on... -
Page 26: Connecting Your Md Recorder Or Primary Tape Deck
PLAY FRONT MONITOR VIDEO3 SURROUND CD-R VIDEO4 PLAY VIDEO CENTER SUBWOOFER SECOND ROOM OPTICAL COAXIAL DVD/6 CH. INPUT PRE OUT DIGITAL IN DIGITAL OUT - COAXIAL OR OPTICAL RECORD IN (ANALOG) PLAY OUT (ANALOG) SYSTEM CONTROL CABLE - KENWOOD ONLY... -
Page 27: To Connect An Md Recorder
VR-4900/VR-4700/KRF-V9993D. 3. Connect the digital cable (either coaxial or optical) from 3. If you are connecting a Kenwood tape deck with system Please refer to your MD recorder or tape deck’s instructions the MD’s digital jack to the appropriate digital jack on control, connect the system control cable from the tape for more detail about its connection jacks and capabilities. -
Page 28: Connecting Your Secondary Cd Player Or Tape Deck
Chapter One : Connecting Your Devices Connecting Your Secondary CD Player or Tape Deck RF REMOTE ANTENNA SIGNAL COMPONENT VIDEO S VIDEO VIDEO AUDIO AUDIO PRE OUT FRONT ANTENNA SYSTEM DIGITAL OUT CONTROL VIDEO1 PHONO PLAY RELAY TV O IR OUT RECEIVER CONTROL SENS... -
Page 29: To Connect A Secondary Cd Player
2. Go to “Noting Your Devices” on page 3 and note which or tape deck to the VR-4900/VR-4700/KRF-V9993D. Please jacks you used to connect your CD player. In addition, Do not connect the system control cable from the sec- refer to your CD player or tape deck’s instructions for more... -
Page 30: Connecting Your Laser Disc Player (With Ac-3 Rf Output)
Chapter One : Connecting Your Devices Connecting Your Laser Disc Player (with AC-3 RF Output) COAX. AC-3 RF OUT RF REMOTE ANTENNA OPTICAL SIGNAL DIGITAL COMPONENT VIDEO S VIDEO VIDEO AUDIO AUDIO PRE OUT FRONT ANTENNA SYSTEM DIGITAL OUT CONTROL VIDEO1 PHONO PLAY... -
Page 31: To Connect An Ac-3 Rf Output Laser Disc Player
Chapter One : Connecting Your Devices Connecting Your Laser Disc Player (with AC-3 RF Output), continued To Connect an AC-3 RF Output Laser Disc 5. Connect the coaxial digital cable from the demodulator’s DIGITAL OUTPUT COAX. jack to the receiver’s VIDEO4 Player: COAXIAL jack. -
Page 32: Connecting Your Laser Disc Player (Without Ac-3 Rf Output)
Chapter One : Connecting Your Devices Connecting Your Laser Disc Player (without AC-3 RF Output) Note that video device jacks are linked to specific digital jacks. For example, if you connect a laser disc player with a digital cable, you should connect the analog cables to the VIDEO3 or VIDEO4 video device jacks and the digital cable to the VIDEO3 or VIDEO4 digital jack. -
Page 33: To Connect A Pcm Digital Output Laser Disc Player
Chapter One : Connecting Your Devices Connecting Your Laser Disc Player (without AC-3 RF Output), continued To Connect a PCM Digital Output Laser 4. Connect the digital cable (either coaxial or optical) from the laser disc player’s digital jack to the appropriate digi- Disc Player: tal jack on the receiver as shown to the left. -
Page 34: Connecting Your Turntable/Record Player
Do not plug in the receiver to AC power until you have connected all your devices. This section focuses on the connections from your turntable/ record player to the VR-4900/VR-4700/KRF-V9993D. Please AUDIO OUT refer to your turntable/record player’s instructions for more detail about its connection jacks and capabilities. -
Page 35: Connecting A Camcorder Or Additional Vcr
Connecting a Camcorder or Additional VCR This section focuses on the connections from your camcorder or VCR to the front of the VR-4900/VR-4700/ KRF-V9993D. Please refer to your camcorder or VCR’s in- structions for more detail about its connection jacks and capabilities. -
Page 36: What If I Have Several Kenwood Devices (System Control Chaining)
Chapter One : Connecting Your Devices What if I Have Several Kenwood Devices (System Control Chaining)? Connecting system control cords after connecting a KENWOOD audio component system lets you take advan- tage of convenient system control operations. Make sure the units are connected to the correct jacks on This unit is compatible only with the [SL16] mode. -
Page 37: Connecting The Antennas
To prevent hum interference, keep the AM antenna wires FM 75 ANTENNA away from speaker wires, AC power cords, the TV chassis, and the receiver. Kenwood recommends a permanently installed outdoor FM antenna for best FM reception. To connect an outdoor FM antenna:... -
Page 38: Chapter Two: Setting Up Powertouch
For more infor- 1. Press down and back on the battery cover to remove it. mation , call 1-800-KENWOOD or visit the Kenwood Web site at http://www.kenwoodusa.com. (For USA and Canada 3. Close the cover. -
Page 39: Calibrating The Touch Screen
2. Use the stylus to press the blue button at the bottom of the battery case: RC-R1110: RC-R1010: (For VR-4900/VR-4700) (For KRF-V9993D) If you are replacing batteries and complete the battery re- placement within 3 minutes, you do not need to calibrate When you touch each calibration point, you should hear a the screen;... -
Page 40: Navigating Powertouch Interface
The PowerTouch has four basic menus as shown below. For the rest of this chapter, you will be using the various • Macro (VR-4900/VR-4700/KRF-V9993D Users’ Guide). settings on the Setup menu. The Setup menu includes the This menu setting allows you to create custom macros... -
Page 41: Sp Selection
L=left front, R=right front, C=Center, LS=left surround, open the Speaker Selection menu: nected, that signal is sent to left and right front speak- and RS=right surround. 2. Kenwood provides two ways to set up your speakers: ers. a. Touch on the Speaker Selection menu: Quick Setup: Use this method for a simplified setup •... -
Page 42: Sp Distance
Chapter Two : Setting Up PowerTouch c. If you set your left and right front speakers to Lrg SP Distance SP Level and want to send bass to the subwoofer in all Listen 1. Measure the distance from each speaker to the seat you In this step you will use your ears to balance the volume level most often use and note it below: of all the system’s speakers except the subwoofer for your room... -
Page 43: Surround Sp Type
Chapter Two : Setting Up PowerTouch Surround SP Type 12. To turn off the test noise, touch until the Test Tone 7. Touch to select the next speaker. display reads “Off.” 1. If you are not already there, touch 8. Carefully listen to the volume level of the test noise. If Setting the Subwoofer Level: Because of the way hu- the Setup Surround menu to open the Surround SP Type the noise is a different volume than the noise from the... -
Page 44: What If I Connected A Cd Player To The Jack
4. Touch to return to the Setup menu. • If you have a Kenwood Dual-Play 200-Disc CD Changer, you will need to set both CD1 and CD2/ How Do I Replace a Setup Code with a New TAPE2 to the correct code for this device (“Sys-... -
Page 45: What If My Device Does Not Work With Any Of
Chapter Two : Setting Up PowerTouch What if my device does not work with any 4. When a button which can be renamed is selected, of the codes on the list? (Name Input) button is displayed with black charac- What if I Want PowerTouch to Control ters. -
Page 46: Storing Radio Stations In Memory (Optional)
Chapter Two : Setting Up PowerTouch Storing Radio Stations in Memory (optional) Your new PowerTouch provides two ways to store radio sta- Storing RDS Station Name (PS Read) tions: (VR-4900 and KRF-V9993D) • Manual Memory, which allows you to enter and store •... -
Page 47: Storing Stations Manually
Chapter Two : Setting Up PowerTouch 3. Touch at the top of the screen: 7. Touch a storage button. Use to access more storage buttons. If you choose a storage button that already has a station assigned, the new station will replace the previously- stored station. - Page 48 Chapter Two : Setting Up PowerTouch...
-
Page 49: Chapter Tree : Setting Up On The Receiver
SET UP key repeatedly until “SETUP FIXED” is speaker selection display appears automatically. displayed. VR-4900/KRF-V9993D VR-4700 Selecting the CENTER speaker: For details on the SW RE-MIX and the selection of 5 Press the SET UP key to display “CENTER LARGE speakers, please see page 36. - Page 50 Chapter Three: Setting Up on the Receiver 2. Adjusting the speaker volumes 3. Setting the speaker distances Storing Radio Stations in Memory Adjust the volume balance between the speakers in the sys- Measure the distance between each speaker and the listen- (optional) tem by actually listening to them.
-
Page 51: Chapter Four: Setting Up Multiple Rooms
This chapter discusses some of the connection con- figurations and additional PowerTouch setup neces- sary if you want to take full advantage of the Receiver’s multiple-room capabilities. It contains the following sec- Kenwood recommends hiring a competent installer to make tions: multiple-room connections and setup. Making Connections... -
Page 52: Making Connections
Before you read section discusses how to connect a second TV/Monitor and this section, Kenwood recommends reading “Connecting how to connect an IR Receiver, IR Repeaters, Relays, and a Scenario 1: Surround Sound in Room A only or Stereo in Room A and Stereo in Room B (Using the Receiver’s Speaker B Outputs) -
Page 53: Setting Up The Powertouch
You can operate equipment from two different rooms us- 4. Touch the to highlight it. ing your Kenwood PowerTouch. To do so: 1. Make sure you have identified all the connected devices 5. Room A and Room B can be alternated each time the to your PowerTouch. -
Page 54: Connecting An External Infrared Receiver And Ir Repeaters
Chapter Four: Setting Up Multiple Rooms Connecting an External Infrared Receiver and IR Repeaters IR RECEIVER IR RECEIVER IR-9991 IR-9991 ADAPTOR ADAPTOR IR OUT In case of use in ROOM B N I T N I T IR IN IR IN IR OUT RF REMOTE ANTENNA SIGNAL... -
Page 55: To Connect A Kenwood Ir-9991 Ir Receiver
3. To activate the IR receiver connections, you need to press INPUT MODE key on the front panel of the receiver for more than 2 seconds. • VR-4900/VR-4700 : You will see “RF OFF” on the receiver display. • KRF-V9993D : You will see “DATA REAR IN ” on... -
Page 56: Connecting And Setting Up On/Off Sensors Or Relay Controls
Chapter Four: Setting Up Multiple Rooms Connecting and Setting Up On/Off Sensors or Relay Controls (VR-4900 and KRF-V9993D) RF REMOTE ANTENNA SIGNAL REPEATER COMPONENT VIDEO S VIDEO VIDEO AUDIO AUDIO PRE OUT FRONT FM 75 ANTENNA SYSTEM DIGITAL OUT CONTROL IR OUT LCD IR RECEIVER IN VIDEO1 PHONO... -
Page 57: To Connect Relay Controls
Chapter Four: Setting Up Multiple Rooms Connecting and Setting Up On/Off Sensors or Relay Controls (VR-4900 and KRF-V9993D), continued The VR-4900 and KRF-V9993D supports 2 types of addi- To Connect Relay Controls: To Connect TV ON/OFF Sensors: tional external controls: 1. -
Page 58: Chapter Five: Warnings And Specifications
Loudness Control FCC Compliance Notice Volume at -30 dB level ..+6 dB (100 Hz), +3 dB (10 kHz) Audio-video Receiver, VR-4900 and VR-4700 These devices comply with Part 15 of FCC Rules. Digital Audio Section Operation is subject to the following two conditions: Sampling Frequency ..... - Page 59 Weight (Net) ................ 18 kg Coaxial ............0.5 Vp-p / 75 Kenwood follows a policy of continuous advancements in development. For this reason, specifications may be changed without notice. Full performance may not be exhibited in extremely cold locations (below 0 deg. C).
- Page 60 Numerics coaxial cable left speakers 200-Disc CD Changer ......15 front, connecting ........5 200-Disc CD Changer deleting, PowerTouch setup codes ....38 DVD player ..........17 surround, connecting ......... 5 connecting ..........15 devices LD player ..........25, 27 connecting SL16 text cable ......
- Page 61 speaker distance, setting ......36 second tape deck speaker level, setting ........ 36 connecting ..........21 tape deck speaker type, setting ......... 37 connecting audio cable ......21 connecting ..........20 storing radio stations ....... 40 connection warning ......... 23 identifying to PowerTouch ......
- Page 62 For your records Record the serial number, found on the back of the unit, in the spaces designated on the warranty card, and the space provided below. Refer to the model and serial numbers whenever you call upon your dealer for information or service on this product.
- Page 63 VR-4900/VR-4700 KRF-V9993D B60-4660-10 01 CH (K, T, M, X) 9911...
- Page 64 Welcome to the Users’ Guide for your new Kenwood Audio-Video Re- ceiver. This manual covers three models: The VR-4700 connects all your current audio and video components. It allows you to control them all with Kenwood’s remarkable PowerTouch touch screen remote—a graphical user interface without having to use...
- Page 65 Table of Contents Chapter One: Moving Around ......... 1 What’s on the Front Panel of Your Kenwood Audio - Video Receiver? ................... 2 What’s on PowerTouch? ............3 What’s on PowerTouch’s Screen? ..........4 The Quick Access Menu: ............4 How is PowerTouch Powered? ..........5 How Do I Use PowerTouch? .............
- Page 66 VCR ..................36 DVD Player ................37 Laser Disc Player ..............38 Music Devices ................. 39 Kenwood 200-Disc CD Changer ........... 39 Displaying Disc and Track Titles ........... 40 Single or Rotary CD Player ............ 45 CD-R Recorder ............... 47 MD Recorder or Tape Deck ...........
- Page 67 How Do I Adjust PowerTouch’s Display? ....... 62 How Do I See PowerTouch in the Dark? ......62 How Do I See PowerTouch’s Screen More Clearly? ..... 63 How Do I Turn the Beeping On or Off? ....... 63 Using PowerTouch to Dim or Brighten the Receiver’s Front Panel ...................
- Page 68 Chapter Four: Troubleshooting ......90 Sound ..................92 I don’t hear any sound at all ..........92 Audio is not output only when a 96k fs compatible disc is played................. 92 I can’t hear sound from one or more of the speakers, or the sound is abnormally low ..........
- Page 69 PowerTouch ................97 I don’t see icons for all my devices ........97 I don’t see icons for all the devices I set up ......97 When I select a device icon, I don’t see any commands ................. 97 My PowerTouch is slow to respond—sometimes I have to press buttons or select commands several times ....
-
Page 71: Chapter One: Moving Around
PowerTouch. The chapter also includes an expla- nation of how to navigate the convenient graphical display on your new PowerTouch. It includes the following sections: What’s on the Front Panel of Your Kenwood Audio - Video Receiver? page 2 What’s on PowerTouch? page 3... -
Page 72: What's On The Front Panel Of Your Kenwood Audio-Video Receiver
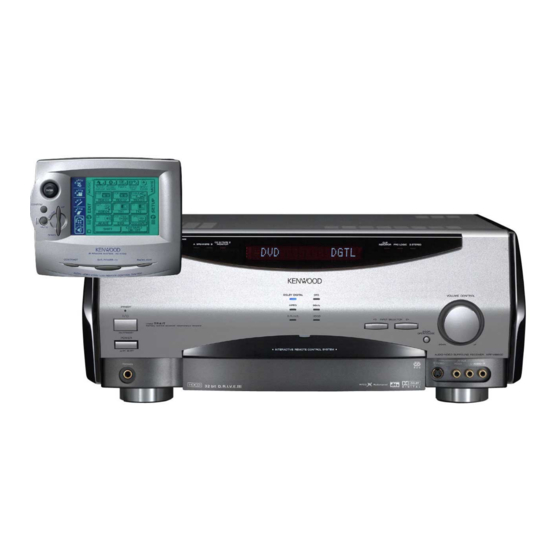
What’s on PowerTouch? What’s on the Front Panel of Your Kenwood Audio-Video Receiver? “ CLIP CD 2 / TAPE 2 SPEAKERS INDICATOR PRO LOGIC 3 STEREO MONITOR KRF-V9993D DOLBY DIGITAL MPEG 96k fs STANDBY D.R.I.V.E. HDCD POWER ¤ INPUT SELECTOR ‹... - Page 73 What’s on PowerTouch? 10. SOUND key 11. MULTI CONTROL (Up/Down) keys 12. P. CALL (Up/Down) keys 13. MEMORY key 14. AUTO key 15. BAND key 16. AV-AUX input jacks 17. DOOR OPEN/CLOSE key VOLUME CONTROL 18. VOLUME CONTROL knob 19. INPUT SELECTOR keys 20.
- Page 74 What’s on PowerTouch?
-
Page 75: What's On Powertouch
What’s on PowerTouch? What’s on PowerTouch? (Touch Panel 2-way IR Remote) ENTER CONFIRM MUTE DOWN CONTRAST SYS.POWER BACKLIGHT 1. Joystick (see page 7) 2. Confirm button 3. Mute button (see page 15) 4. Volume up/down button (see page 11) 5. Contrast button 6. -
Page 76: What's On Powertouch's Screen
What’s on PowerTouch? How is PowerTouch Powered ? What’s on PowerTouch’s Screen? PowerTouch’s LCD display screen is divided into two sections: the Quick Access Menu and the Device Control/Menu Section. Use the stylus to touch the buttons in each area. Device Quick Access Control/Menu... -
Page 77: How Is Powertouch Powered
If you use PowerTouch outside of this range, PowerTouch’s display may show incorrect information, or may not operate. (VR-4900/VR-4700) : The remote control signal received by the main unit is only the RF signal. The control distance of the RF remote signal is about 10 meters provided there is no obstacle. -
Page 78: How Do I Use Powertouch
As you use PowerTouch, be aware of the following: • When PowerTouch’s operating range gets shorter or PowerTouch dis- plays a low battery alarm, replace all 4 batteries (VR-4900, VR-4700) or 6 batteries (KRF-V9993D). (see “Installing the Batteries” on page 32 of the Connections and Setup Guide.) •... -
Page 79: How Do I Move Around
How Do I Use PowerTouch ? How is PowerTouch Powered ? Do not block the IR transmitter on the front panel of the receiver or on PowerTouch. Even a brief blockage while it is transmitting (such as some- one walking by) can cause the communication and feedback to become erratic temporarily. -
Page 80: How Do I Enter Text
How Do I Use PowerTouch ? How is PowerTouch Powered ? How Do I Enter Text? Many of the control menus allow you to assign your own names to list items (such as radio stations, CD titles, etc.). To enter text for names: 1. -
Page 81: Chapter Two: Using Powertouch
How Do I Adjust the Sound? Chapter Two: Using PowerTouch Your new receiver comes with the easiest—and most innovative— remote you’ve ever seen. Its palm-sized illuminated screen displays clear icons and menus. Because PowerTouch maintains two-way communication with your receiver, it shows the result of your action right on its screen. PowerTouch is a universal remote that can control hundreds of devices, and is the first of its kind to offer infra-red compatibility with X-10, Lutron lighting, and Makita drapery control systems, making it perfect for con-... -
Page 82: How Do I Adjust The Sound
To turn on the front A (Room A with the VR-4900/KRF-V9993D) speak- ers, press the DOOR OPEN/CLOSE key (VR-4900/KRF-V9993D) or press the lower part of the door (VR-4700) to open the door and press the SPEAKERS A key inside the door. -
Page 83: Adjusting The Volume
How Do I Adjust the Sound? Adjusting the Volume Use one of the following methods to adjust the volume. • Turn the volume knob on the front panel of the receiver. • Press in the appropriate direction on PowerTouch. DOWN Adjusting the Loudness (Stereo mode Only) The Loudness control increases the bass and treble at low volume control settings. -
Page 84: Adjusting The Tone (Front Left And Right Speakers Only)
How Do I Adjust the Sound? Adjusting the Tone (Front Left and Right Speakers Only) Use the Sound menu to adjust the bass or treble tone of your front left and right speakers manually. In addition to setting bass and treble tone adjustment values, you can completely bypass the tone control circuitry for a purer sound. -
Page 85: Adjusting Speaker Levels
How Do I Adjust the Sound? 3. Touch to turn the tone settings on or off. 4. If you selected “on” in the above, touch the left or right arrow next to a tone setting (Treble or Bass) to adjust it. A readout between the arrows shows the current setting. - Page 86 How Do I Adjust the Sound? 1. Touch (sound) on the Quick Access menu to open the Sound menu: 2. Touch (Sp Level) to open the SP Level menu: Although icons for the front speakers appear here, notice that they do not have buttons.
-
Page 87: Muting Sound
How Do I Adjust the Sound? Operation on the receiver: 1. Press the SOUND key inside the door repeatedly until the name of the speaker(s) to be adjusted is displayed. C : center speaker LS/RS : surround speakers SW : subwoofer 2. -
Page 88: Midnight Theater Function (Only Dolby Digital Mode)
How Do I Adjust the Sound? Midnight Theater Function (Only Dolby Digital mode) Any time you don’t want to experience the loud and soft volume extremes of recorded sound (for example, late at night), use midnight Theater func- tion to reduce volume extremes. This feature keeps loud, dramatic sound from being too loud (perhaps disturbing family members or neighbors) while ensuring that you can still hear whispered dialog or other soft sounds. -
Page 89: What Are Listen Modes
SOUND key repeatedly until returning to the previous menu. What are Listen Modes? You can experience true home-theater sound with your Kenwood Audio- Video Receiver. This receiver incorporates several listen modes to let you enjoy surround sound with a wide variety of program sources. Each pro- duces multiple channels of surround-sound, but each does it differently. - Page 90 How Do I Adjust the Sound? • MPEG: MPEG, which stands for “Moving Pictures Experts Group”, is an international standard of digital video and audio compression and decompression in media. It is the most efficient encoding method for compressed multi-channel audio which provides the highest sound quality to deliver the best movie theater sound into the home.
- Page 91 How Do I Adjust the Sound? You cannot select the Input Analog mode if you are playing DTS-en- coded media. You cannot listen to DTS-encoded media in Room B. (VR-4900/KRF- V9993D only) When playing DTS-encoded media, wait until “DTS” appears on the receiver display before proceeding.
- Page 92 How Do I Adjust the Sound? 2. Touch . This displays the Input Sound Status screen, which shows the signal being displayed. During Dolby Digital, MPEG or DTS playback, the program’s encoded channel configuration is shown using the L, C, R, LS, RS, S and LFE icons.
-
Page 93: Input Modes
How Do I Adjust the Sound? Input Modes: The listen mode should usually be set to Full Auto. However, the listen mode can also be set manually when you want to fix the inputs as analog signals, etc. (see "To Set the Input Mode manually" on page 22). FULL AUTO : The receiver detects the input signal format auto- (Full Auto) -
Page 94: To Set The Input Mode Manually
How Do I Adjust the Sound? To Set the Input Mode manually: To fully enjoy the sonic benefits of specially-encoded DVD AUDIO discs played on a compatible DVD player, you must set the receiver’s input to 6CH INPUT. To do so, select 1. -
Page 95: To Set The Listen Mode Manually
How Do I Adjust the Sound? To Set the Listen Mode manually: 1. Touch (listen mode) on the Quick Access menu to open the Lis- ten Mode menu. 2. Select a Listen Mode you want. Operation on the receiver: 1. Press the LISTEN MODE key inside the door repeatedly until the lis- ten mode to be set is displayed. -
Page 96: Applying Digital Signal Processor (Dsp) Effects
How Do I Adjust the Sound? Applying Digital Signal Processor (DSP) Effects The DSP mode creates the reverberation devices (elements of sound ech- oed in various spaces) which determine the feeling of presence. Since DSP uses digital processing, it can produce these effects without spoiling the sound quality of the original music or video source. -
Page 97: To Set A Dsp Effect
How Do I Adjust the Sound? To set a DSP effect: 1. Touch (listen mode) on the Quick Access menu to open the Lis- ten Mode menu: 2. Touch 3. Touch a DSP mode icon button. 4. (Optional) Touch to adjust the wall type, room size, and effect level to your taste. - Page 98 How Do I Adjust the Sound? • Wall Type changes the quality of the simulated walls. • Room Size switches the simulated room size. • Effect Level adjusts the amount of DSP presence in the overall sound. Lower numbers decrease the amount of presence, higher numbers increase it.
-
Page 99: Hdcd And D.r.i.v.e. Effects
HDCH signals by connecting a CD player through digital connection, even when it does not incorporate the HDCD circuitry. D.R.I.V.E. is a KENWOOD original technology for reproducing signals with high resolution by instant switching of the internal filters according to the input signal. This receiver incorporate a high performance DSP to provide very high resolution from 32-bit DRIVE III circuitry, achieving stereo audio reproduction with the best quality ever reached. -
Page 100: Headphone Operation
How Do I Adjust the Sound? Headphone Operation Insert the headphone plug into the receiver’s PHONES jack and adjust the listening level. VOLUME CONTROL STANDBY ON/STANDBY POWER -ON –OFF When listening through headphones, set SPEAKERS A and B to OFF. -
Page 101: How Do I Operate Devices
How Do I Operate Devices? How Do I Operate Devices? Your PowerTouch makes it easy for you to control the different devices connected to your receiver. Its easy-to-use LCD screen provides a choice of command buttons similar to those found on the devices’ own remotes. Use these buttons to control your home entertainment equipment by following these easy steps: 1. -
Page 102: Operating Powertouch Without Sending Commands To The Receiver(Operations Using The Shift Key)
3. Touch the desired operation button within 5 seconds after above. By touching the SHIFT button and executing an operation, any device can be controlled without sending the command signal to the receiver. The above operation is not available with devices connected using the KENWOOD system control cable. -
Page 103: Movie Devices
How Do I Operate Devices? Movie Devices Use this menu to operate devices that provide video, such as DVD play- ers, VCRs, etc. This menu controls the following (note which device you have connected to the jack in the space provided): to control this device... - Page 104 How Do I Operate Devices? To operate a standard TV: 1. Touch (Movie) on the Quick Access menu. 2. Touch the TV icon button to which you assigned the TV. This accesses the TV controls: 3. Use this screen as your TV remote. The available buttons may vary depending on the setup code you assigned to this icon.
- Page 105 2. Press the Video icon button to which you assigned the satellite TV receiver. This accesses the satellite controls: For VR-4900/VR-4700 3. Use one of these screens as your satellite TV remote (depending on the service you receive). The available buttons may vary depending on the setup code you assigned to this icon.
- Page 106 How Do I Operate Devices? For more information on teaching commands to PowerTouch, see “What if my device does not work with any of the codes on the list? What if I Want PowerTouch to Control Additional Functions?” on page 39 of the Connections and Setup Guide. For more inforamtion on device macros, see “How Do I Perform Several Actions at Once?”...
- Page 107 How Do I Operate Devices? 3. Use this screen as your cable TV remote. The available buttons may vary depending on the setup code you assigned to this icon. Touch (more) to access any customized commands you have taught PowerTouch for this device and to access this device’s macros. Touch the command or macro name to use it.
-
Page 108: Vcr
How Do I Operate Devices? VCR (Video Recorder) To operate the VCR: 1. Touch (Movie) on the Quick Access menu. 2. Touch the Video icon to which you assigned the VCR. This accesses the VCR controls: 3. Use this screen as your VCR remote. The available buttons may vary depending on the setup code you assigned to this icon. -
Page 109: Dvd Player
How Do I Operate Devices? DVD Player 1. Touch (Movie) on the Quick Access menu. 2. Select the icon you assigned to your DVD player. This accesses the DVD controls: 3. Use this screen as your DVD player remote. The available buttons may vary depending on the setup code you assigned to this icon. -
Page 110: Laser Disc Player
How Do I Operate Devices? Laser Disc Player To operate a laser disc player: 1. Touch (movie) on the Quick Access menu. 2. Select the icon you assigned to the laser disc player. This accesses the laser disc controls: The figure shows a typical example. 3. -
Page 111: Music Devices
(use this space to note your devices) Kenwood 200-Disc CD Changer Kenwood 200-Disc CD Changers have many different features that make them ideal complements to your Kenwood receiver. Some changer mod- els can store disc and track titles for all loaded discs, and then download this information to your receiver for display on PowerTouch’s screen. -
Page 112: Displaying Disc And Track Titles
V9993D only) Displaying Disc and Track Titles Kenwood 200-Disc CD Changers allow you to easily search for and select a particular CD or song by title from any disc you’ve loaded into the unit. PowerTouch can display these disc and track titles on its LCD display,... - Page 113 How Do I Operate Devices? You have to assign disc and track titles to the discs in your CD player before you can transfer them to PowerTouch. See your CD player’s in- struction manual for more information about assigning disc and track titles.
- Page 114 How Do I Operate Devices? 6. Touch to return to the CD controls. 7. Touch (music) on Quick Access menu to return to the Music menu. To read the loaded track titles and store them in PowerTouch: 1. Make sure you have followed the previous instructions to read disc data.
- Page 115 How Do I Operate Devices? Entering Disc and Track Titles: You can also use PowerTouch to enter disc or track titles, if they are not already stored on the changer. The titles you add are stored in memory on both PowerTouch and the changer. To enter disc or track titles: 1.
- Page 116 How Do I Operate Devices? To play discs and tracks by title: 1. Touch (music) on the Quick Access menu. 2. Touch button. 3. Touch . This accesses the disc commands: 4. Titles of all discs in the changer are displayed in numerical order. 5.
-
Page 117: Single Or Rotary Cd Player
How Do I Operate Devices? Single or Rotary CD Player To operate a single CD player: 1. Touch (music) on the Quick Access menu. 2. Touch . This accesses the CD controls: 3. Use this screen as your CD player remote. The available buttons may vary depending on the setup code you assigned to this icon. - Page 118 How Do I Operate Devices? To operate rotary 5-disc CD players: 1. Touch (music) on the Quick Access menu. 2. Touch . This accesses the CD controls: 3. Use this screen as your CD player remote. The available buttons may vary depending on the setup code you assigned to this icon.
-
Page 119: Cd-R Recorder
How Do I Operate Devices? CD-R Recorder To play CD-R Recorder: 1. Touch (music) on the Quick Access menu. 2. Touch This accesses the CD-R Recorder controls: 3. Use this screen as your CD-R Recorder player remote. The available buttons may vary depending on the setup code you assigned to this icon. -
Page 120: Md Recorder Or Tape Deck
How Do I Operate Devices? MD Recorder or Tape Deck To operate an MD recorder: 1. Touch (music) on the Quick Access menu. 2. Touch . This accesses the MD recorder controls: 3. Use this screen as your MD recorder remote. The available buttons may vary depending on the setup code you assigned to this icon. - Page 121 How Do I Operate Devices? Entering Disc and Track Titles: If you have Kenwood MD-2070 or DMF-9020, you can also use PowerTouch to enter disc or track titles. To enter disc or track titles: 1. Touch (music) on the main or Quick Access menu.
- Page 122 How Do I Operate Devices? To operate a Tape Deck: 1. Touch (music) on the Quick Access menu. 2. Touch . This accesses the tape deck controls: 3. Use this screen as your tape deck remote. The available buttons may vary depending on the setup code you assigned to this icon.
-
Page 123: Turntable
Second CD Player or Tape Deck These instructions are for operating a second CD player or tape deck from a single-Room installation (VR-4700) or from Room A (VR-4900/KRF- V9993D). For more information on operating devices in a multi-Room setup, see “Chapter Three: Using PowerTouch in Multiple Rooms”. -
Page 124: Tuner
How Do I Operate Devices? 5. Touch (music) on Quick Access menu to return to the MUSIC menu. To select the input on the receiver, use the CD2/TAPE2 MONITOR key inside the door. The CD2/TAPE2 MONITOR indicator lights up when it is selected. After completion of playback, press the CD2/TAPE2 MONITOR key again so that the CD2/TAPE2 MONITOR indicator goes out. - Page 125 How Do I Operate Devices? • Touch the left or right arrow to tune in a station. • Touch and enter the broadcast frequency using the 10key pad. (e.g.; To select FM 87.5 MHz, enter 8, 7, 5, 0 and •...
- Page 126 How Do I Operate Devices? RDS (Radio Data System) VR-4900 and KRF-V9993D : RDS (Radio Data System) is a system where radio stations transmit digital data for FM broad- casts along with the broadcast signal. Tuners and receivers designed for RDS reception can extract the data from the broadcast signal for use with various functions such as automatic display of the station name.
- Page 127 How Do I Operate Devices? To search for a specific type of music or radio program: 1. Touch (music) on the Quick Access menu. 2. Touch button. 3. Touch at the top of the screen. This accesses RDS commands: 4. Touch 5.
- Page 128 How Do I Operate Devices? For U.S.A. and Canada Program Type Name Receiver Display News NEWS Information INFORM Sports SPORTS Talk TALK Rock ROCK Classic Rock CLS ROCK Adult Hits ADLT HIT Soft Rock SOFT RCK Top 40 TOP 40 Country COUNTRY Oldies...
- Page 129 How Do I Operate Devices? For Europe and U.K. Program Type Name Receiver Display Pop Music POP M Rock Music ROCK M Easy Music EASY M Light Classical Music LIGHT M Serious Classical Music CLASSICS Other Music OTHER M Weather WEATHER Finance FINANCE...
- Page 130 How Do I Operate Devices? 6. Touch • If the tuner cannot find the program type you want, “NO PRO- GRAM” appears on the receiver display. The display returns to its original screen after several seconds. • If the tuner locates a station playing the program type you want, reception begins.
-
Page 131: How Do I Record (Edit Mode)
How Do I Record (Edit Mode)? How Do I Record (Edit Mode)? PowerTouch provides a simple yet powerful editing procedure that lets you quickly and easily specify the source and destination devices. To record: 1. Touch (edit) on the Quick Access menu to open the Edit menu:... - Page 132 How Do I Record (Edit Mode)? 2. Touch a source device. This will be the device you are recording from, like a DVD or CD player. PowerTouch displays the destinations able to record from that source: 3. Select the recording destination device and touch .
-
Page 133: Digital To Digital Recording
How Do I Record (Edit Mode)? • If you’re recording from a digital source, any action other than adjust- ing the volume may cause the sound to “clip” on the recording. • You cannot record from the component you are using to record. For example, if you’re recording on a VCR connected to the VIDEO1 jacks, select a source other than Video 1. -
Page 134: How Do I Adjust Powertouch's Display
How Do I Adjust PowerTouch’s Display? How Do I Adjust PowerTouch’s Display? How Do I See PowerTouch in the Dark? You can use your PowerTouch in the dark. When you turn on the back light, your PowerTouch screen will light up, making navigation easier if you need to operate PowerTouch in dim or nonexistent light. -
Page 135: How Do I See Powertouch's Screen More Clearly
How Do I Adjust PowerTouch’s Display? How Do I See PowerTouch’s Screen More Clearly? You can also adjust the contrast to suit your viewing angle. To adjust the contrast: CONTRAST 1. Press (CONTRAST) until “Contrast” message appears on the screen: 2. -
Page 136: Using Powertouch To Dim Or Brighten The Receiver's Front Panel
How Do I Adjust PowerTouch’s Display? Using PowerTouch to Dim or Brighten the Receiver’s Front Panel 1. Touch (Sepup) on the Quick Access menu. 2. Touch to make the receiver display illumination dim and less noticeable. It is also possible to disable some indicators (DTS, 96 kfs, HDCD, DOLBY DIGITAL, MPEG and D.R.I.V.E.) on the receiver. -
Page 137: How Do I Perform Several Actions At Once
How Do I Perform Several Actions at Once? How Do I Perform Several Actions at Once? PowerTouch uses sophisticated processing to make it easy for you to per- form several actions at once using the Macro menu. Once you create the macros, specifying which devices should receive which commands at what interval, a single touch can lower curtains, dim lights, and turn on and start devices. -
Page 138: Creating Macros
How Do I Perform Several Actions at Once? Creating Macros PowerTouch provides a simple way to create macros: 1. Think about the sequence of events you want to set up. You may even want to note down which devices should turn on first and how much time you think should pass between each step. - Page 139 How Do I Perform Several Actions at Once? 6. Touch 7. Touch a blank space (all spaces are blank in the initial status). (Optional) To delete a function: a. Touch a macro function line you want to delete. b. Verify that this is the correct function. Touch (Optional) To insert a function: a.
- Page 140 How Do I Perform Several Actions at Once? 8. Touch a device, then touch an available function. PowerTouch inserts the function then returns you to the Macro De- vice menu. 9. Repeat step 7 to insert all the devices and functions you want to use. 10.
- Page 141 How Do I Perform Several Actions at Once? To insert a delay (which is stored on its own line as a separate action): a. Touch the device line whose function did not occur. b. Touch c. Touch a delay time. PowerTouch inserts the delay then returns you to the Macro Function menu.
-
Page 142: Using Macros
How Do I Perform Several Actions at Once? Using Macros Once you have defined macros, you can use them directly from the basic menus (Music, Movie) for one-touch operation of several devices. The VR-4900 and KRF-V9993D has “Perfect Macro” capability. This senses if video devices connected via the composite jacks, or video monitors with an optional power sensing device attached are on or off, and will ensure that the macro works properly. - Page 143 How Do I Perform Several Actions at Once? There are two ways to use the macros you defined • from the Macro Summary menu, which displays all the available macros • from the More screen for each device, which displays the macros as- sociated with that device To run a macro from the Macro Summary menu: 1.
-
Page 144: How Do I Control Home Automation Equipment
Simply aim PowerTouch at the device you want to control, then touch the icon buttons and settings for the tasks you want to perform. Do not aim PowerTouch at your Kenwood receiver—none of the home automa- tion devices are connected to it. - Page 145 How Do I Control Home Automation Equipment? To run your X-10 Home Automation System using PowerTouch: 1. Access either the Music or Movie menu and touch to open the Home Automation menu: 2. Touch to access the X-10 commands: 3. Touch the numbered button that corresponds to the X-10 module you want to control.
-
Page 146: Lutron
How Do I Control Home Automation Equipment? 4. Touch to return to the Home Automation menu. 5. Touch any Quick Access menu to change to that menu. The X-10 IR-543 Converter is compatible with your PowerTouch. Contact X-10 at www.x-10.com, or at [email protected]. In addition, Radio Shack also sells a compatible converter (product number RSU 10037703). - Page 147 How Do I Control Home Automation Equipment? 2. Touch to access Lutron commands. Touch to access either the Spacer (shown) or GRAFIK Eye control screens, depending on which system you use. 3. Use PowerTouch’s screen as your Lutron remote. Refer to your Lutron manual for more information on these commands.
- Page 148 How Do I Control Home Automation Equipment? To assign names to the 8 available GRAFIK Eye scenes: 1. Access either the Music or Movie menu and touch to open the Home Automation menu: 2. Touch to access Lutron commands. 3. If necessary, touch to access the GRAFIK Eye control screen.
-
Page 149: Makita
How Do I Control Home Automation Equipment? 7. Touch to return to the Lutron GRAFIK Eye controls. Press it again to return to the Home Automation menu. 8. Touch any Quick Access menu to change to that menu. Lutron models SP-HT-WH, GRX-IT, and GRX-8IT are compatible with your PowerTouch. - Page 150 How Do I Control Home Automation Equipment? To operate your Makita device using PowerTouch: 1. Access either the Music or Movie menu and touch to open the Home Automation menu: 2. Touch to access the Makita controls: 3. Use this screen as your Makita remote. If you want to control more than 1 Makita device, touch to cycle through the additional screens.
- Page 151 How Do I Control Home Automation Equipment? To assign names to curtain devices: 1. Access either the Music or Movie menu and touch to open the Home Automation menu: 2. Touch to access the Makita controls. 3. Touch to access the Name Input screen: 4.
-
Page 152: Accessories Control
714-522-8194 (facsimile) [email protected] The products and companies listed previously are not owned by or affili- ated with Kenwood in any way. Please contact these com-panies directly for further information or to find a retailer near you. Accessories Control PowerTouch includes 8 additional buttons for controlling virtually any device that accepts IR codes. - Page 153 How Do I Control Home Automation Equipment? To teach one of PowerTouch’s preset IR codes to a device: 1. Access either the Music or Movie menu and touch to open the Accessories menu: 2. See the device’s manual for specific information about programming it with PowerTouch’s accessory codes.
- Page 154 How Do I Control Home Automation Equipment? To teach functions to the accessory codes: 1. Access either the Music or Movie menu and touch to open the Accessories menu: 2. Touch to access the Accessories Function Modify menu. 3. Touch a button. This button will control the accessory once you are done.
- Page 155 How Do I Control Home Automation Equipment? 4 inches (10 cm) 5. Touch on PowerTouch, then press the button on the device’s re- mote that corresponds to the command you want PowerTouch to learn. The device’s remote will send the code to PowerTouch, which will save it as the command for the button you selected.
- Page 156 How Do I Control Home Automation Equipment? 6. (Optional) Change the button name. Touch a button name you want to change and touch . See “How Do I Enter Text?” on page 8 for more information on changing names. 7. Touch to return to the Accessories menu.
-
Page 157: Chapter Three: Using Powertouch In Multiple Rooms (Vr-4900/Krf-V9993D)
How Do I Switch Control Modes? Chapter Three: Using PowerTouch in Multiple Rooms (VR-4900/KRF-V9993D) The VR-4900 and KRF-V9993D offers dual-room output and control, which enables you to use a single receiver to control devices and speak- ers for 2 rooms. Due to its advanced features and controls, you can listen to music in one room while a movie plays in the other! Depending on your tastes and budget, you can set up one of the follow- ing “sound scenarios”... -
Page 158: How Do I Switch Control Modes
How Do I Switch Control Modes? How Do I Switch Control Modes? You can use PowerTouch to operate your receiver and source devices from 2 different rooms. To do so, you need to switch control modes to control the devices from each room. (VR-4900/KRF-V9993D) To make operations from Room B easier, we recommend that you pur- chase a second PowerTouch. -
Page 159: Why Don't I See All My Devices
Room B (and keep it there). Why Don’t I See All My Devices? Your Kenwood PowerTouch displays icon buttons for each of the devices in your home audio-video system that you have identified to the PowerTouch. If you have not identified a device to the PowerTouch, its icon button will appear blank (the buttons will be there, but it will not contain an icon). -
Page 160: How Do I Operate Devices
To control a second CD player from Room A, use , unless you are using a Kenwood 200-Disc CD Changer (see below). Kenwood CD-3280M, CD-2280M, DPF-J9010, DPF-J9020 or DPF-J9030 200-Disc CD Changers are specifically designed to work with the VR- 4900/KRF-V9993D in a dual-room environment. - Page 161 How Do I Operate Devices?
-
Page 162: Chapter Four: Troubleshooting
Chapter Four: Troubleshooting Troubleshooting is how you determine what part of a complex system (like a home theater system) is at fault when the system isn’t working how you think it should. When you troubleshoot a system, you diagnose a problem by examining and eliminating possible causes until there’s only one left. - Page 163 3. Go over all device connections slowly and methodically. Double- check the settings on your remote. Wrong or loose connections are the most likely cause of the most common home entertainment problem: no sound. Use the Connec- tion and Setup Guide to double-check your connections for each de- vice.
-
Page 164: Sound
The CD2/Tape2 MONITOR input has not been selected. (If it has, the CD2/Tape2 MONITOR indicator on the receiver’s front panel will be lit). See “What’s on the Front Panel of Your Kenwood Audio - Video Receiver?” on page 2 of this manual. -
Page 165: I Can't Hear Sound From One Or More Of The Speakers, Or The Sound Is Abnormally Low
The CD2/TAPE2 MONITOR input has not been selected. (If it has, the CD2/TAPE2 MONITOR indicator on the receiver’s front panel will be lit). See “What’s on the Front Panel of Your Kenwood Audio - Video Receiver?” on page 2 of this manual. -
Page 166: Sound From One (Or More) Of My Devices Is Abnormally Loud Or Soft
2. Touch (setup) on the main menu. 3. Select VR-4900/KRF-V9993D VR-4700 4. Touch . Every time you select the button the volume will cycle between 0dB, -3dB, -6dB and back up to 0dB. Select the level that best matches that of the other sources. -
Page 167: (Vr-4900 And Krf-V9993D Only) I Can't Hear Any Sound In Room B
Sound (VR-4900 and KRF-V9993D only) I can’t hear any sound in Room B Check that: • The volume in Room B is turned up. See “How Do I Switch Control Modes?” on page 86 of this manual. • The Room B speakers are turned on if using Speaker B outputs for Room B (as opposed to Second Room Pre Outs). -
Page 168: With A Dolby Digital Program, The Loud Sounds Aren't Very Loud And The Quiet Sounds Aren't Very Quiet
Video With a Dolby Digital program, the loud sounds aren’t very loud and the quiet sounds aren’t very quiet Check that volume extremes are not automatically being balanced. See “Midnight Theater Function” on page 16 of this manual. All I hear is loud static when I play DTS discs •... -
Page 169: Powertouch
PowerTouch • Check that the correct video input on the TV is selected. • Check that the video software you record does not have copy guard protection. PowerTouch I don’t see icons for all my devices You must identify devices for PowerTouch control for them to appear in the icon bar on PowerTouch. -
Page 170: My Powertouch Is Not Responding
PowerTouch My PowerTouch is not responding • Make sure you are within the operating range for PowerTouch. See “How is PowerTouch Powered ?” on page 5 of this manual. • Replace the batteries. See Chapter Two of the Connections and Setup Guide. -
Page 171: Receiver/Tuner
4 Continue until you have isolated and replaced the shortedwire. 5 See Chapter One of the Connections and Setup Guide. If none of the above solutions work, reset the microprocessor: (For VR-4900 and VR-4700) 1. Turn the receiver off. 2. Unplug the receiver. - Page 172 PowerTouch The following settings are cleared: • The device set as input (Tuner is selected by default)—see “How Do I Operate Devices?” on page 29 of this manual. • The volume setting (-65dB is selected by default)—see “Adjusting the Volume” on page 11 of this manual •...
-
Page 173: The Sound Is Distorted, And The Clip Indicator On The
Occasional brief flashing of the CLIP indicator is okay). 1. Select the icon for the source device. For CD1, VIDEO2, VIDEO3, and VIDEO4, also select the Input Analog icon. 2. Touch (setup) on the main menu. 3. Select VR-4900/KRF-V9993D VR-4700... -
Page 174: I Can't Access Any Rds (Radio Data System) Functions (Vr-4900/Krf-V9993D)
I can’t access any RDS (Radio Data System) functions (VR-4900/ KRF-V9993D) • Make sure your receiver is a VR-4900/KRF-V9993D and that your PowerTouch is set to Model 1; the VR-4700 does not support RDS. See “Selecting the Model Type” on page 33 of the Connections and Setup Guide. •... -
Page 175: I Can't Receive A Radio Station
Receiver/Tuner I can’t receive a radio station Check that: • The appropriate antenna is connected. See Chapter One of the Con- nections and Setup Guide. • The broadcast band is correct. See “Tuner” on page 52 of this manual. • The tuner is set to the correct frequency. -
Page 176: Macro Is Not Running As I Programmed
• On or Off command for audio devices may not work correctly if they are not Kenwood components connected via system control cables. (For VR-4900/KRF-V9993D) • Depending on the video signals of the connected video devices, TV power sensing may not work correctly. - Page 177 Index Numerics 200-Disc CD Changer devices introductory information ..39 checklist ......31, 39 operating ........ 40 identifying to Powertouch ..29 operating in multiple rooms . 88 operating ......29, 88 playing CDs ......40 devices controlling from each room .. 88 reading and storing disc titles ..
- Page 178 joystick operating moving around on PowerTouch devices ........29 ..........7 home automation on PowerTouch ......3 equipment ......72 macros ........70 range ......... 5 laser disc player, operating ..... 38 listen modes defined ........17 Perfect Macro ........70 Dolby 3 Stereo .......
- Page 179 satellite TV, operating ..... 33 searching operating ........ 36 specific radio programs ..55 volume setting adjusting ......... 11 DSP effects ......25 control knob ......2 listen mode manually .... 23 sound adjusting ......... 10 X-10 Home Automation System scenarios in multiple rooms ..