
Related Manuals for Emerson HD8116


Summary of Contents for Emerson HD8116
- Page 1 Personal CD-R/RW Player with 60 Second Electronic Anti-Skip Protection, and Stereo AM/FM Radio OWNER’ S MANUAL HD8116 Visit our web site at www.emersonradio.com HD8116_B100305.p65 4/10/2005, 15:28...
- Page 2 Thank you... For purchasing this Emerson Personal CD Player with AM/FM Radio. The CD player has a 20 track programmable memory so you can listen to the songs on your favorite CD's in any order you choose. Or you can use the Random playback feature and let the player select the playback order for you.
-
Page 3: Important Notes
IMPORTANT NOTES WARNING: TO PREVENT FIRE OR SHOCK HAZARD, DO NOT EXPOSE THIS UNIT TO RAIN OR MOISTURE. Avoid installing the unit in locations described below: • Places exposed to direct sunlight or close to heat radiating appliances such as electric heaters. CLASS 1 LASER PRODUCT CLASS 1 LASER PRODUCT APPAREIL Á... -
Page 4: Preparation For Use
PREPARATION FOR USE Remove The Transit Card This personal CD player is shipped with a dummy CD ‘ transit card’ inside the CD compartment. The purpose of this card is to prevent the laser from moving during shipment of the product. This card must be removed before using the CD player. Slide the OPEN switch to the right to unlock the CD door. - Page 5 Connecting The Optional AC Adapter (Not Included) 1.) Connect the small female plug of the optional AC adapter to the DC 4.5V jack on the left side of the CD player. 2.) Connect the adapter housing to your 120V AC 60Hz outlet. NOTES: •...
-
Page 6: Installing The Batteries
Installing The Batteries 1.) Open the battery compartment door on the bottom cabinet by sliding it in the direction of the arrow and then lifting it open. To prevent loss, the door cannot be removed from the unit. 2.) Insert 2 "AA" batteries (not included) into the compartment. - Page 7 Connecting The Stereo Headphones Connect the plug of the supplied stereo headphones to the headphone jack on the right side of the cabinet. NOTE: Make sure the headphone plug is inserted into the headphone jack as far as it will go. If the plug is not fully inserted, you may only hear sound from one side of the headphones.
-
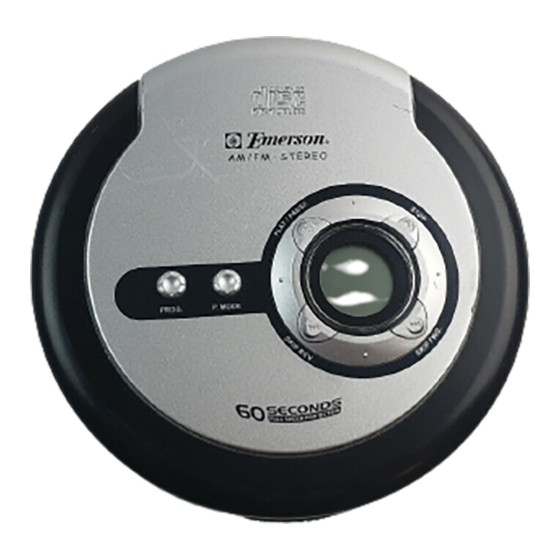
Page 8: Location Of Controls And Indicators
LOCATION OF CONTROLS AND INDICATORS PROG. HD8116_B100305.p65 A M / F M - S T E R E O P. MODE 4/10/2005, 15:28... - Page 9 OPEN Switch – Slide to the right to unlock and open the CD door. 2.) Battery Compartment (on bottom cabinet). 3.) SKIP REV. Button. 4.) P. MODE Button – Selects the playback mode: Repeat 1/All, Shuffle, or Intro. 5.) PROG. (Program) Button. 6.) DC 4.5V Input Jack –...
-
Page 10: Lcd Display Indicators
LCD DISPLAY INDICATORS 1.) Time Display – Shows elapsed time and total playing time on the CD. 2.) ST (Stereo) Indicator – Appears when tuned in FM Stereo station. 3.) Track Number Display – Shows the track which is being played, and the total tracks on the CD. -
Page 11: Hold Switch
OPERATING INSTRUCTIONS HOLD Switch The HOLD switch (on the right side cabinet) must be in the ‘ Off’ (left) position to start the CD player. If you plan to carry the CD player in a handbag, briefcase, school bag, back pack, etc, slide the HOLD switch to the ‘... - Page 12 Electronic Anti-Skip Protection This CD player is equipped with automatic 60 second Electronic Anti-Skip Protection and that will eliminate virtually all skipping during most active uses. When you press the PLAY/PAUSE button to begin playback, the player immediately begins to store 60 seconds of music in a solid state memory that is impervious to shock.
-
Page 13: Normal Cd Playback
Normal CD Playback • Make sure you have installed the batteries. • Make sure the HOLD switch is set to the ‘ Off’ (left) position. • Make sure to set the VOLUME control to a low setting before you put on the headphones. - Page 14 5.) Press the PLAY/PAUSE show two flashing dashes “– –” as the player reads the disc. The total tracks and playing time will appear briefly in the display and then the playback will begin on track “01”. The display will show the elapsed playing time of the track being played. 6.) Adjust the VOLUME control to your listening preference.
- Page 15 Skip/Search ( ) Controls Press the SKIP FWD. or SKIP REV. buttons repeatedly during playback to skip to higher or lower numbered tracks. Playback will begin on the selected track. To search within a track at high speed to locate a specific musical passage depress and hold either the SKIP FWD.
-
Page 16: Mode Button
P. MODE Button Pressing the P. MODE button during CD playback cycles the player through the following four special playback modes: Repeat Repeat Playback. Repeat Playback The player can be programmed to continuously repeat a single track or the entire disc automatically. - Page 17 INTRO (Intro Scan) Playback The Intro Scan feature plays only the first 10 seconds of each track on the disc. This feature is useful when you are trying to find a particular song but you cannot remember the title. 1.) Load your disc in the player as usual and press the PLAY/PAUSE to begin playback.
-
Page 18: Programmed Playback
Programmed Playback You can program up to 20 tracks on a disc to play in any desired order. Note: You can program a disc either during Playback or in Stop mode. 1.) Press the PROG. button once. The Program Number “01”... -
Page 19: Listening To The Radio
Listening To The Radio Tuner Information This system features a normal AM/FM analog tuning system. Unlike a digital tuner it does not automatically lock in on the exact frequency of a station. However instead of a dial scale and a moving dial pointer we have included a digital frequency display to help you tune more accurately. -
Page 20: Care And Maintenance
CARE AND MAINTENANCE Cleaning the Cabinet Wipe with a soft cloth. If the cabinet is very dirty, dampen the cloth with a weak solution of neutral detergent and water, and then wipe clean. Cleaning the Lens A dirty lens will cause sound skipping and, if the lens is very dirty, the CD may not work. -
Page 21: Troubleshooting Guide
Try another disc. Clean or replace disc. Set Function switch to AM or FM position as desired. Extend headphone cord fully. reception is obtained. SERVICE PLEASE CALL: 1-800-898-9020 Emerson Radio Corp. Consumer Affairs Dept., 5101 Statesman Drive, Irving, TX 75063. 4/10/2005, 15:28... - Page 22 For repair or replacement, pack your unit in a padded box, enclose your check or money order payable to Emerson Radio Corp. in the amount of $9.00 (not required by California residents) to cover shipping and handling costs, and enclose a copy of your proof of purchase.
- Page 23 EMERSON Part No. 16-2986B Printed in China 510-01 HD8116_B100305.p65 4/10/2005, 15:28...