Asus PadFone Station Quick Start Manual
Padfone station quick start guide
Hide thumbs
Also See for PadFone Station:
- User manual (106 pages) ,
- Quick start manual (10 pages) ,
- User manual (71 pages)

Related Manuals for Asus PadFone Station


Summary of Contents for Asus PadFone Station
- Page 1 Station Quick Start Guide...
- Page 2 No part of this manual, including the products and software described in it, may be reproduced, transmitted, transcribed, stored in a retrieval system, or translated into any language in any form or by any means, except documentation kept by the purchaser for backup purposes, without the express written permission of ASUS Telecom (“ASUS”).
- Page 3 Before you start, ensure that you have read all the safety information and operating instructions in the Important Notices bundled with your PadFone to prevent injury or damage to your device. NOTE: This bundled Quick Start Guide is for reference only and is subject to change without prior notice. For the latest updates and more detailed information, please visit www.asus.com.
- Page 4 Overview PadFone door latch LED indicator Power key 9 10 Air vent PadFone bay PadFone flashbulb hole PadFone camera hole Speaker Audio jack Volume key Microphone Hinge holes 40-pin USB port...
- Page 5 Charging your PadFone Station We strongly recommend that you charge your PadFone Station fully before you use it with your PadFone. To charge your PadFone Station: Connect the power plug into the USB charger. Ensure that the power plug is attached securely in place.
- Page 6 Inserting your PadFone into the PadFone Station To insert your PadFone into your PadFone Station: 1. Hold your PadFone Station upside-down then push the latch to open the PadFone bay. Bay latch...
- Page 7 Align your PadFone into the PadFone bay sliding track. Orient your PadFone so that it matches the silhouette guide in the bay. Sliding track Sliding track Silhouette guide...
- Page 8 Firmly insert your PadFone into the PadFone Station until the PadFone is secured in place. NOTE Your PadFone Station briefly vibrates when the connection is secured.
- Page 9 Close the PadFone bay door and ensure that the latch firmly locks in place.
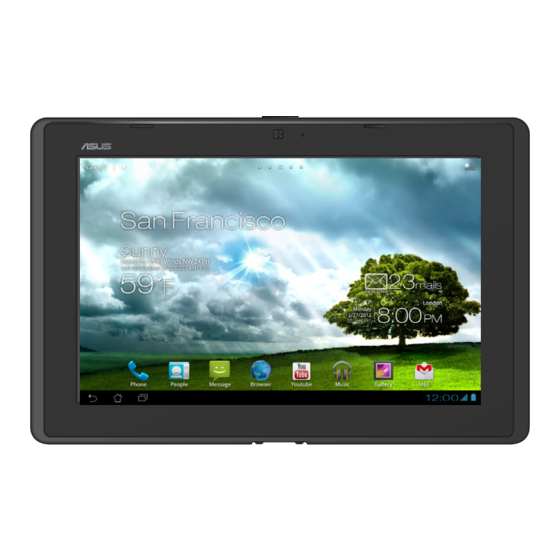
- Page 10 After successfully inserting your PadFone into the PadFone Station, Android automatically adjusts the screen and apps to work on a tablet environment. If an app was designed for a smaller screen, a zoom control will appear beside the clock. NOTE: The following screen is for reference only and may appear differently from your device.
- Page 11 Removing your PadFone from the PadFone Station To remove your PadFone from the PadFone Station: Hold your PadFone Station upside-down then push the bay latch to open the PadFone bay. Bay latch...
- Page 12 Push the PadFone bay door up to a ninety-degree (90 ) angle until the PadFone detaches completely from the connectors. IMPORTANT: Pushing the PadFone bay door up to a ninety-degree (90 ) angle allows the specially designed push levers to eject the PadFone properly from the PadFone Station.
- Page 13 Gently remove the PadFone out (A) then close the PadFone bay door (B).
- Page 16 15060-05S00000...