Dell DIMENSION 5100 User Manual
Dell personal computer user manual
Hide thumbs
Also See for DIMENSION 5100:
- Owner's manual (162 pages) ,
- Service manual (117 pages) ,
- Setup (2 pages)
Table of Contents
Quick Links
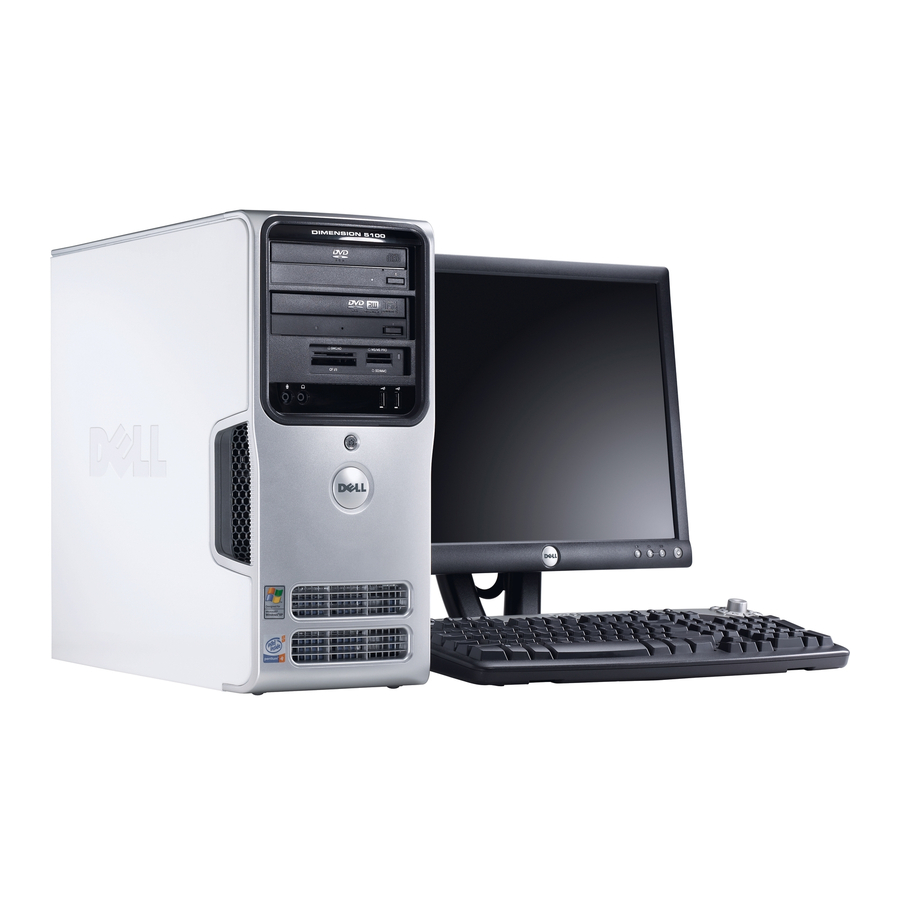
Service Tag
CD or DVD eject button
CD or DVD activity light
FlexBay for optional
floppy drive or Media
Card Reader
microphone connector
headphone connector
diagnostic lights
hard-drive activity light
power button/
power activity light
USB 2.0 connectors (2)
network
adapter
Model DCSM
w w w . d e l l . c o m | s u p p o r t . d e l l . c o m
Dell™ Dimension™ 5100
cover latch
release
power connector
sound connectors (integrated) (5)
VGA video connector (integrated)
USB 2.0 connectors (5)
card slots for PCI Express x16 (1),
PCI (2), PCI Express x1 (1)
Table of Contents
Troubleshooting

Related Manuals for Dell DIMENSION 5100


Summary of Contents for Dell DIMENSION 5100
- Page 1 Dell™ Dimension™ 5100 Service Tag CD or DVD eject button CD or DVD activity light FlexBay for optional floppy drive or Media Card Reader microphone connector headphone connector diagnostic lights hard-drive activity light power button/ power activity light USB 2.0 connectors (2)
- Page 2 Trademarks used in this text: Dell, the DELL logo, Inspiron, Dell Precision, Dimension, OptiPlex, Latitude, PowerEdge, PowerVault, PowerApp, DellNet, and PowerConnect are trademarks of Dell Inc.; Intel and Pentium are registered trademarks of Intel Corporation; Microsoft, Windows, and Outlook are registered trademarks of Microsoft Corporation.
-
Page 3: Table Of Contents
Contents Finding Information Setting Up and Using Your Computer Setting Up a Printer Printer Cable ......Connecting a Printer Connecting to the Internet Setting Up Your Internet Connection... - Page 4 Solving Problems Troubleshooting Tips Battery Problems ......Drive Problems ......CD and DVD drive problems Hard drive problems E-Mail, Modem, and Internet Problems...
- Page 5 ® Using Microsoft Windows Using Dell™ PC Restore by Symantec Removing and Installing Parts Before You Begin ......
- Page 6 Drive Panel ....... . Removing the Drive Panel Removing the Drive-Panel Insert Replacing the Drive-Panel Insert Replacing the Drive Panel.
- Page 7 CDs and DVDs ......Dell Technical Support Policy (U.S. Only) Definition of "Dell-Installed" Software and Peripherals Definition of "Third-Party"...
- Page 8 Contents...
-
Page 9: Finding Information
What Are You Looking For? • Warranty information • Safety instructions • Regulatory information • Ergonomics information • End User License Agreement • How to set up my computer Find It Here Dell™ Product Information Guide Setup Diagram Finding Information... - Page 10 • Desktop System Software (DSS)— If you reinstall the operating system for your computer, you should also reinstall the DSS utility. DSS provides critical updates for your operating system and support for Dell™ ® 3.5-inch USB floppy drives, Intel processors, optical drives, and USB devices. DSS is necessary for correct operation of your Dell computer.
-
Page 11: Setting Up And Using Your Computer
Setting Up and Using Your Computer Setting Up a Printer NOTICE: Complete the operating system setup before you connect a printer to the computer. See the documentation that came with the printer for setup information, including how to: • Obtain and install updated drivers •... -
Page 12: Connecting A Printer
Connecting a Printer NOTE: You can connect USB devices while the computer is turned on. 1 Complete the operating system setup, if you have not already done so. 2 Install the printer driver if necessary. See the documentation that came with your printer. 3 Attach the USB printer cable to the USB connectors on the computer and the printer. -
Page 13: Setting Up Your Internet Connection
If you are using a dial-up connection, connect a telephone line to the modem connector on your computer and to the telephone wall jack before you set up your Internet connection. If you are using a DSL or cable modem connection, contact your ISP for setup instructions. Setting Up Your Internet Connection To set up an AOL or MSN connection: 1 Save and close any open files, and exit any open programs. -
Page 14: Playing Cds And Dvds
Playing CDs and DVDs NOTICE: Do not press down on the CD or DVD tray when you open or close it. Keep the tray closed when you are not using the drive. NOTICE: Do not move the computer when you are playing CDs or DVDs. 1 Press the eject button on the front of the drive. -
Page 15: Adjusting The Volume
A DVD player includes the following basic buttons: Stop Restart the current chapter Play Fast forward Pause Fast reverse Advance a single frame while in pause mode Go to the next title or chapter Continuously play the current title or chapter Go to the previous title or chapter Eject For more information on playing CDs or DVDs, click Help on the CD or DVD player (if available). -
Page 16: Adjusting The Picture
DVD/CD-RW combo drive. NOTE: The types of CD or DVD drives offered by Dell may vary by country. The following instructions show how to make an exact copy of a CD or DVD. You can also use Sonic RecordNow for other purposes, including creating CDs from audio files on your computer and creating MP3 CDs. -
Page 17: Using Blank Cd-Rs And Cd-Rws
4 To copy the CD or DVD: • If you have one CD or DVD drive, ensure that the settings are correct and click Copy. The computer reads your source CD or DVD and copies it to a temporary folder on your computer hard drive. -
Page 18: Using A Media Card Reader (Optional)
Using a Media Card Reader (Optional) Use the Media Card Reader to transfer data directly to your computer. The Media Card Reader supports the following memory types: • xD-Picture Card • SmartMedia (SMC) • CompactFlash Type I and II (CF I/II) •... -
Page 19: Connecting Two Monitors
To use the Media Card Reader: 1 Check the media or card to determine the proper orientation for insertion. 2 Slide the media or card into the appropriate slot until it is completely seated in the connector. If you encounter resistance, do not force the media or card. Check the card orientation and try again. -
Page 20: Connecting One Monitor With A Vga Connector And One Monitor With A Dvi Connector
3 Connect the other monitor to the optional DVI adapter and connect the DVI adapter to the DVI (white) connector on the back of the computer. optional DVI adapter *May not be present on your computer. Connecting One Monitor With a VGA Connector and One Monitor With a DVI Connector 1 Follow the procedures in "Before You Begin"... -
Page 21: Changing The Display Settings
Changing the Display Settings 1 After you connect the monitor(s) or TV, turn on the computer. ® ® The Microsoft Windows 2 Enable clone mode or extended desktop mode in the display settings. • In clone mode, both monitors display the same image. •... -
Page 22: Network Setup Wizard
Network Setup Wizard ® The Microsoft Windows through the process of sharing files, printers, or an Internet connection between computers in a home or small office. 1 Click the Start button, point to All Programs click Network Setup Wizard. 2 On the welcome screen, click Next. 3 Click Checklist for creating a network. -
Page 23: Hibernate Mode
Because hibernate mode requires a special file on your hard drive with enough disk space to store the contents of the computer memory, Dell creates an appropriately sized hibernate mode file before shipping the computer to you. If the computer’s hard drive becomes corrupted, Windows XP recreates the hibernate file automatically. -
Page 24: Hyper-Threading
• Presentation — If you want your computer to run without interruption (using no power conservation). • Minimal Power Management — If you want your computer to run with minimal power conservation. • Max Battery — If your computer is a portable computer and you run your computer from batteries for extended periods of time. - Page 25 You can enable or disable Hyper-Threading through system setup. For more information on accessing system setup, see page 105. For more information on Hyper-Threading, search the Knowledge Base on the Dell Support website at support.dell.com. Setting Up and Using Your Computer...
- Page 26 Setting Up and Using Your Computer...
-
Page 27: Solving Problems
— If you have to repeatedly reset time and date information after turning on the computer, or if an incorrect time or date displays during start-up, replace the battery (see page 98). If the battery still does not work properly, contact Dell (see page 118). Drive Problems... -
Page 28: Cd And Dvd Drive Problems
E S T T H E D R I V E — • Insert another floppy disk, CD, or DVD to eliminate the possibility that the original one is defective. • Insert a bootable floppy disk and restart the computer. L E A N T H E D R I V E O R D I S K H E C K T H E C A B L E C O N N E C T I O N S U N T H E... -
Page 29: Hard Drive Problems
Hard drive problems H E C K I S K — Click the Start button and click My Computer. Right-click Local Disk C:. Click Properties. Click the Tools tab. Under Error-checking, click Check Now. Click Scan for and attempt recovery of bad sectors. Click Start. -
Page 30: Error Messages
E R I F Y T H A T T H E M O D E M I S C O M M U N I C A T I N G W I T H Click the Start button and click Control Panel. Click Printers and Other Hardware. -
Page 31: Media Card Reader Problems
BIOS setup. L O S E S O M E P R O G R A M S A N D T R Y A G A I N — Contact Dell (see page 118). — — Close all... -
Page 32: Keyboard Problems
Keyboard Problems CAUTION: Before you begin any of the procedures in this section, follow the safety instructions in the Product Information Guide. H E C K T H E K E Y B O A R D C A B L E •... -
Page 33: A Program Stops Responding
A program stops responding N D T H E P R O G R A M — Presssimultaneously. Click Applications. Click the program that is no longer responding. Click End Task. A program crashes repeatedly NOTE: Software usually includes installation instructions in its documentation or on a floppy disk or CD. H E C K T H E S O F T W A R E D O C U M E N T A T I O N A program is designed for an earlier Microsoft U N T H E... -
Page 34: Other Software Problems
(see page 65). • Reseat the memory modules (see page 65) to ensure that your computer is successfully communicating with the memory. • Run the Dell Diagnostics (see page 46). Solving Problems — F L O P P Y D I S K S... -
Page 35: Mouse Problems
• Ensure that you are following the memory installation guidelines (see page 65). • Your computer supports DDR2 memory. For more information about the type of memory supported by your computer, see "Memory" on page 101. • Run the Dell Diagnostics (see page 46). Mouse Problems CAUTION: Before you begin any of the procedures in this section, follow the safety instructions in the Product Information Guide. -
Page 36: Network Problems
Network Problems CAUTION: Before you begin any of the procedures in this section, follow the safety instructions in the Product Information Guide. H E C K T H E N E T W O R K C A B L E C O N N E C T O R both the network connector on the back of the computer and the network jack. -
Page 37: Printer Problems
— The computer is either turned off or is not receiving power. F T H E P O W E R L I G H T I S O F F • Reseat the power cable into both the power connector on the back of the computer and the electrical outlet. -
Page 38: Scanner Problems
H E C K T H E P R I N T E R C A B L E C O N N E C T I O N S • See the printer documentation for cable connection information. • Ensure that the printer cables are securely connected to the printer and the computer (see page 11). E S T T H E E L E C T R I C A L O U T L E T device, such as a lamp. -
Page 39: Sound And Speaker Problems
E R I F Y T H A T T H E S C A N N E R I S R E C O G N I Z E D B Y Click the Start button, click Control Panel, and then click Printers and Other Hardware. Click Scanners and Cameras. -
Page 40: No Sound From Headphones
E I N S T A L L T H E S O U N D D R I V E R U N T H E A R D W A R E No sound from headphones H E C K T H E H E A D P H O N E C A B L E C O N N E C T I O N into the headphone connector (see page 55). -
Page 41: If The Screen Is Difficult To Read
If the screen is difficult to read H E C K T H E M O N I T O R S E T T I N G S contrast and brightness, demagnetizing (degaussing) the monitor, and running the monitor self-test. O V E T H E S U B W O O F E R A W A Y F R O M T H E M O N I T O R ensure that the subwoofer is at least 60 cm (2 ft) away from the monitor. - Page 42 Solving Problems...
-
Page 43: Troubleshooting Tools
Continue until you have identified a faulty module or reinstalled all modules without error. • If available, install properly working memory of the same type into your computer (see page 65). • If the problem persists, contact Dell (see page 118). Troubleshooting Tools... - Page 44 No memory modules are • If you have two or more memory modules detected. • If available, install properly working • If the problem persists, contact Dell (see Memory modules are detected, • Ensure that no special memory but a memory configuration or compatibility error exists.
- Page 45 (such as the floppy drive or hard drive); check system setup (see page 105) to make sure the boot sequence is correct for the devices installed on your computer. • If the problem persists, contact Dell (see page 118). None. Troubleshooting Tools...
-
Page 46: Dell Diagnostics
If you cannot resolve the error condition, contact Dell (see page 118). NOTE: The Service Tag for your computer is located at the top of each test screen. If you contact Dell, technical support will ask for your Service Tag. -
Page 47: Drivers
Parameters Allows you to customize the test by changing the test settings. 4 Close the test screen to return to the Main Menu screen. To exit the Dell Diagnostics and restart the computer, close the Main Menu screen. Drivers What Is a Driver? A driver is a program that controls a device such as a printer, mouse, or keyboard. -
Page 48: Identifying Drivers
Reinstalling Drivers NOTICE: The Dell Support website at support.dell.com provides approved drivers for Dell™ computers. If you install drivers obtained from other sources, your computer might not work correctly. Using Windows XP Device Driver Rollback If a problem occurs on your computer after you install or update a driver, use Windows XP Device Driver Rollback to replace the driver with the previously installed version. -
Page 49: Resolving Software And Hardware Incompatibilities
• Dell PC Restore by Symantec restores your hard drive to the operating state it was in when you purchased the computer. Dell PC Restore permanently deletes all data on the hard drive and removes any applications installed after you received the computer. -
Page 50: Using Microsoft ® Windows ® Xp System Restore
NOTE: The procedures in this document were written for the Windows default view, so they may not work if you set your Dell™ computer to the Windows Classic view. Creating a Restore Point 1 Click the Start button and click Help and Support. -
Page 51: Using Dell™ Pc Restore By Symantec
Dell PC Restore is not available in all countries. Use Dell PC Restore by Symantec only as the last method to restore your operating system. PC Restore restores your hard drive to the operating state it was in when you purchased the computer. - Page 52 5 When prompted, click Finish to reboot the computer. NOTE: Do not manually shut down the computer. Click Finish and let the computer completely reboot. 6 When prompted, click Yes. The computer restarts. Because the computer is restored to its original operating state, the screens that appear, such as the End User License Agreement, are the same ones that appeared the first time the computer was turned on.
-
Page 53: Removing And Installing Parts
You have performed the steps in "Turning Off Your Computer" (see page 53) and "Before Working Inside Your Computer" (see page 54). • You have read the safety information in your Dell™ Product Information Guide. • A component can be replaced or—if purchased separately—installed by performing the removal procedure in reverse order. -
Page 54: Before Working Inside Your Computer
NOTICE: Only a certified service technician should perform repairs on your computer. Damage due to servicing that is not authorized by Dell is not covered by your warranty. NOTICE: When you disconnect a cable, pull on its connector or on its strain-relief loop, not on the cable itself. -
Page 55: Front View Of The Computer
Computer Cover" on page 60. Use the Service Tag to identify your computer when you access the Dell Support website or call technical support. Press to eject a disk from the CD or DVD drive. The drive light is on when the computer reads data from the CD or DVD drive. - Page 56 diagnostic lights (4) hard-drive activity light power button, power light USB 2.0 connectors (2) vents Removing and Installing Parts Use the lights to help you troubleshoot a computer problem based on the diagnostic code. For more information, see "Diagnostic Lights" on page 43. The hard drive activity light is on when the computer reads data from or writes data to the hard drive.
-
Page 57: Back View Of The Computer
Back View of the Computer voltage selection switch (may not be available on all computers) power connector back panel connectors card slots See the safety instructions in the Product Information Guide for more information. Insert the power cable. Plug USB, audio, and other devices into the appropriate connector. Access connectors for any installed PCI and PCI Express cards. - Page 58 On computers with a sound card, use the connector on the card. micro-phone/side Use the pink and silver connector to attach a personal computer microphone for surround connector voice or musical input into a sound or telephony program.
- Page 59 center/subwoofer Use the yellow connector to attach a speaker to a Low Frequency Effects (LFE) connector audio channel. VGA video connector If your monitor has a VGA connector, plug it into the VGA connector on the computer. USB 2.0 connectors (5) Use the back USB connectors for devices that typically remain connected, such as printers and keyboards.
-
Page 60: Removing The Computer Cover
Removing the Computer Cover CAUTION: Before you begin any of the procedures in this section, follow the safety instructions in the Product Information Guide. CAUTION: To guard against electrical shock, always unplug your computer from the electrical outlet before removing the cover. 1 Follow the procedures in "Before You Begin"... -
Page 61: Inside View Of Your Computer
5 Grip the sides of the computer cover and pivot the cover up, using the bottom hinges as leverage points. 6 Release the cover from the hinge tabs and set it aside in a secure location. Inside View of Your Computer CAUTION: Before you begin any of the procedures in this section, follow the safety instructions in the Product Information Guide. -
Page 62: System Board Components
System Board Components password jumper (PSWD) processor fan connector (FAN) floppy drive connector (DSKT2) PCI connectors (2) PCI Express x16 connector (PEG) PCI Express x1 connector (PCI_E1) network connector (NIC) and USB connectors (2) (USB2) USB connectors (3) (USB2) Removing and Installing Parts processor connector (CPU) video connector (VGA) Media Card Reader... -
Page 63: Memory
Memory You can increase your computer memory by installing memory modules on the system board. Your computer supports DDR2 memory. For additional information on the type of memory supported by your computer, see "Memory" on page 101. DDR2 Memory Overview DDR2 memory modules should be installed in pairs of matched memory size, speed, and technology. -
Page 64: Addressing Memory With 4-Gb Configurations
Dell. If possible, do not pair an original memory module with a new memory module. Otherwise, your computer may not start properly. You should install your original memory modules in pairs either in DIMM connectors 1 and 2 or DIMM connectors 3 and 4. -
Page 65: Installing Memory
Installing Memory CAUTION: Before you begin any of the procedures in this section, follow the safety instructions in the Product Information Guide. NOTICE: To prevent static damage to components inside your computer, discharge static electricity from your body before you touch any of your computer’s electronic components. You can do so by touching an unpainted metal surface on the computer chassis. -
Page 66: Removing Memory
5 Insert the module into the connector until the module snaps into position. If you insert the module correctly, the securing clips snap into the cutouts at each end of the module. 6 Replace the computer cover. NOTICE: To connect a network cable, first plug the cable into the network device and then plug it into the computer. -
Page 67: Cards
You can do so by touching an unpainted metal surface on the computer chassis. Your Dell™ computer provides the following slots for PCI and PCI Express cards: •... - Page 68 Installing a PCI Card 1 Follow the procedures in "Before You Begin" on page 53. card retention door 2 Gently push the release tab on the card retention door from the inside to pivot the door open. Because the door is captive, it will remain in the open position. 3 If you are installing a new card, remove the filler bracket to create a card-slot opening.
- Page 69 CAUTION: Some network adapters automatically start the computer when they are connected to a network. To guard against electrical shock, be sure to unplug your computer from its electrical outlet before installing any cards. 6 Place the card in the connector and press down firmly. Ensure that the card is fully seated in the slot.
- Page 70 7 Before you close the card retention door, ensure that: • The tops of all cards and filler brackets are flush with the alignment bar. • The notch in the top of the card or filler bracket fits around the alignment guide. 8 Close the card retention door by snapping it into place to secure the card(s).
- Page 71 3 If you are removing the card permanently, install a filler bracket in the empty card-slot opening. If you need a filler bracket, contact Dell (see page 118). NOTE: Installing filler brackets over empty card-slot openings is necessary to maintain FCC certification of the computer.
-
Page 72: Pci Express Cards
PCI Express Cards Your computer supports one PCI Express x16 card and one PCI Express x1 card. If you are installing or replacing a PCI Express card, follow the procedures in the next section. If you are removing but not replacing a card, see "Removing a PCI Express Card" on page 76. If you are replacing a card, remove the current driver for the card from the operating system. - Page 73 on the top. Gently pull the securing tab, grasp the card by its top corners, and then ease it out of its connector. PCI Express x16 card PCI Express x16 card slot 6 Prepare the card for installation. See the documentation that came with the card for information on configuring the card, making internal connections, or otherwise customizing it for your computer.
- Page 74 8 Place the card in the connector and press down firmly. Ensure that the card is fully seated in the slot. not fully seated card fully seated card alignment guide alignment bar 9 If you replaced a card that was already installed in the computer and you removed the retention mechanism, you may reinstall the retention mechanism.
- Page 75 NOTICE: Do not route card cables over or behind the cards. Cables routed over the cards can prevent the computer cover from closing properly or cause damage to the equipment. NOTICE: To connect a network cable, first plug the cable into the network device and then plug it into the computer.
- Page 76 4 If you are removing the card permanently, install a filler bracket in the empty card-slot opening. If you need a filler bracket, contact Dell (see page 118). NOTE: Installing filler brackets over empty card-slot openings is necessary to maintain FCC certification of the computer.
-
Page 77: Drive Panel
Drive Panel CAUTION: Before you begin any of the procedures in this section, follow the safety instructions in the Product Information Guide. CAUTION: To guard against electrical shock, always unplug your computer from the electrical outlet before removing the cover. Removing the Drive Panel 1 Follow the procedures in "Before You Begin"... -
Page 78: Removing The Drive-Panel Insert
Removing the Drive-Panel Insert drive panel 1 Turn the drive panel sideways and find the tip of the drive-panel insert tab that latches over a tab on the right side of the drive panel. 2 Pull the inner tip of the drive-panel insert tab away from the drive panel. 3 Pivot the drive-panel insert out and away from the drive panel. -
Page 79: Replacing The Drive Panel
Replacing the Drive Panel. 1 Follow the procedures in "Before You Begin" on page 53. sliding plate lever sliding plate drive panel 2 Align the drive panel tabs with the side-door hinges. 3 Rotate the drive panel toward the computer until it snaps into place on the front panel. Removing and Installing Parts... -
Page 80: Drives
Drives Your computer supports a combination of these devices: • Up to two serial ATA hard drives • One FlexBay drive (may contain an optional floppy drive or an optional Media Card Reader) • Up to two CD or DVD drives CD/DVD drive(s) FlexBay for optional floppy drive or... -
Page 81: Drive Interface Connectors
Drive Interface Connectors Most interface connectors are keyed for correct insertion; that is, a notch or a missing pin on one connector matches a tab or a filled-in hole on the other connector. Keyed connectors ensure that the pin-1 wire in the cable (indicated by the colored stripe along one edge of the IDE cable—serial ATA cables do not use a colored stripe) goes to the pin-1 end of the connector. -
Page 82: Connecting And Disconnecting Drive Cables
Connecting and Disconnecting Drive Cables When removing an IDE drive data cable, grasp the colored pull tab and pull until the connector detaches. When connecting and disconnecting a serial ATA data cable, disconnect the cable using the pull-tab. Like IDE connectors, the serial ATA interface connectors are keyed for correct insertion; that is, a notch or a missing pin on one connector matches a tab or a filled-in hole on the other connector. -
Page 83: Removing A Hard Drive
Removing a Hard Drive 1 Follow the procedures in "Before You Begin" on page 53. 2 Disconnect the power and data cables from the drive. NOTICE: Use the pull-tab to remove the data cable from your hard drive or from the system board. 3 Press in on the blue tabs on each side of the drive and slide the drive up and out of the computer. -
Page 84: Installing A Hard Drive
Installing a Hard Drive 1 Unpack the replacement hard drive, and prepare it for installation. 2 Check the documentation for the drive to verify that it is configured for your computer. NOTE: If your replacement hard drive does not have the hard drive bracket attached, remove the bracket from the old drive by unsnapping it from the drive. -
Page 85: Adding A Second Hard Drive
NOTICE: To connect a network cable, first plug the cable into the network wall jack and then plug it into the computer. 7 Connect your computer and devices to electrical outlets, and turn them on. See the documentation that came with the drive for instructions on installing any software required for drive operation. -
Page 86: Floppy Drive
Floppy Drive CAUTION: Before you begin any of the procedures in this section, follow the safety instructions in the Product Information Guide. CAUTION: To guard against electrical shock, always unplug your computer from the electrical outlet before removing the cover. NOTE: If you are adding a floppy drive, see "Installing a Floppy Drive"... - Page 87 4 Slide the drive latch release toward the bottom of the computer and, without releasing the drive latch release, slide the floppy drive out through the front of the computer. drive latch release sliding plate floppy drive Removing and Installing Parts...
-
Page 88: Installing A Floppy Drive
Installing a Floppy Drive NOTE: In the event the replacement or new floppy drive does not have the shoulder screws, use the screws located within the drive panel insert. 1 Follow the procedures in "Before You Begin" on page 53. 2 Remove the drive panel (see page 77). - Page 89 See the documentation that came with the drive for instructions on installing any software required for drive operation. 11 Enter system setup (see page 105) and select the appropriate Diskette Drive option. 12 Verify that your computer works correctly by running the Dell Diagnostics (see page 46). data cable Removing and Installing Parts...
-
Page 90: Media Card Reader
Media Card Reader For information on using the Media Card Reader, see "Using a Media Card Reader (Optional)" on page 18. Removing a Media Card Reader CAUTION: Before you begin any of the procedures in this section, follow the safety instructions located in the Product Information Guide. - Page 91 5 Disconnect the FlexBay USB cable on the back of the Media Card Reader from the Media Card Reader connector on the system board (see page 62) and route the cable through the cable routing clip. drive latch release sliding plate Media Card Reader 6 Slide the drive latch release toward the bottom of the computer and, without releasing the drive latch release, slide the Media Card Reader out through the front of the computer.
-
Page 92: Installing A Media Card Reader
Installing a Media Card Reader CAUTION: Before you begin any of the procedures in this section, follow the safety instructions located in the Product Information Guide. NOTICE: To prevent static damage to components inside your computer, discharge static electricity from your body before you touch any of your computer’s electronic components. You can do so by touching an unpainted metal surface on the computer chassis. -
Page 93: Cd/Dvd Drive
Media Card Reader 8 Insert the Media Card Reader and slide it into place until it is fully seated. 9 Route the FlexBay USB cable through the cable routing clip. 10 Replace the computer cover (see page 99). CD/DVD Drive CAUTION: Before you begin any of the procedures in this section, follow the safety instructions located in the Product Information Guide. -
Page 94: Removing A Cd/Dvd Drive
Removing a CD/DVD Drive 1 Follow the procedures in "Before You Begin" on page 53. 2 Remove the computer cover (see page 60). 3 Remove the drive panel (see page 77). 4 Disconnect the power and data cables from the back of the drive. power cable data cable Removing and Installing Parts... - Page 95 5 Slide the drive latch release toward the bottom of the computer and, without releasing the drive latch release, slide the CD/DVD drive out through the front of the computer. drive latch release sliding plate CD/DVD drive Removing and Installing Parts...
-
Page 96: Installing A Cd/Dvd Drive
Installing a CD/DVD Drive 1 Follow the procedures in "Before You Begin" on page 53. 2 If you are installing a new CD/DVD drive rather than replacing a drive, remove the drive- panel inserts (see page 78). 3 Gently slide the drive into place until you feel a click or feel the drive securely installed. NOTE: If you are installing a new CD/DVD drive rather than replacing a drive, remove the drive panel inserts and slide the drive into place. - Page 97 See the documentation that came with the drive for instructions on installing any software required for drive operation. 9 Enter system setup (see page 105) and select the appropriate Drive option. 10 Verify that your computer works correctly by running the Dell Diagnostics (see page 46). power cable data cable...
-
Page 98: Battery
Battery Replacing the Battery CAUTION: Before you begin any of the procedures in this section, follow the safety instructions located in the Product Information Guide. NOTICE: To prevent static damage to components inside your computer, discharge static electricity from your body before you touch any of your computer’s electronic components. You can do so by touching an unpainted metal surface on the computer chassis. -
Page 99: Replacing The Computer Cover
6 Replace the computer cover (see page 99). NOTICE: To connect a network cable, first plug the cable into the network device and then plug it into the computer. 7 Connect your computer and devices to electrical outlets, and turn them on. 8 Enter system setup (see page 105) and restore the settings you recorded in step 1. - Page 100 Removing and Installing Parts...
-
Page 101: Appendix
Appendix Specifications Processor Processor type Level 1 (L1) cache Level 2 (L2) cache Memory Type Memory connectors Memory capacities Minimum memory Maximum memory BIOS address Computer Information Chipset DMA channels Interrupt levels BIOS chip (NVRAM) System clock ® ® Intel Pentium 4 with Hyper-Threading technology NOTE:... - Page 102 Video Type Audio Type Expansion Bus Bus type Bus speed connectors connector size connector data width (maximum) PCI Express connector connector size connector data width (maximum) PCI Express connector connector size connector data width (maximum) Appendix Integrated Intel Graphics Media Accelerator 950 (GMA950) Sigmatel STAC9220 PCI 2.3 PCI Express x1 and x16...
- Page 103 Drives Externally accessible: Available devices Internally accessible: Connectors External connectors: Video Network adapter Audio System board connectors: Primary IDE drive Serial ATA FlexBay Drive Floppy drive PCI 2.3 PCI Express x1 PCI Express x16 one 3.5-inch drive bay (FlexBay) two 5.25-inch drive bays Serial ATA drives (2), floppy drive, USB memory devices, CD drive, CD-RW drive, DVD drive, DVD-RW drive, DVD and CD-RW combo drive, and Media Card Reader...
- Page 104 Controls and Lights Power button Power light Hard-drive access light Link integrity light (on integrated network adapter) Activity light (on integrated network adapter) Diagnostic lights Standby power light Power DC power supply: Wattage Heat dissipation Voltage (see the safety instructions located in the Product Information Guide for important voltage setting information)
-
Page 105: System Setup
Environmental Temperature: Operating Storage Relative humidity Maximum vibration: Operating Storage Maximum shock: Operating Storage Altitude: Operating Storage System Setup Overview Use system setup as follows: • To change the system configuration information after you add, change, or remove any hardware in your computer •... -
Page 106: Entering System Setup
Entering System Setup 1 Turn on (or restart) your computer. 2 When the blue DELL™ logo is displayed, you must watch for the F2 prompt to appear. 3 Once this F2 prompt appears, pressimmediately. NOTE: The F2 prompt indicates that the keyboard has initialized. This prompt can appear very quickly, so you must watch for it to display, and then press . -
Page 107: System Setup Options
System Setup Options NOTE: Depending on your computer and installed devices, the items listed in this section may not appear, or may not appear exactly as listed. System Displays the System name, BIOS Version number, BIOS Date, Service Tag, System Info Express Service Code, and Asset Tag. - Page 108 Drives Diskette Drive (Internal default) Drives 0 through 3 (On default) Drives 4 through 5 (On default) SATA Operation (Normal default) Onboard Devices Integrated NIC (On default) Integrated Audio Controller USB Controller (On default) Appendix Enables and disables the floppy drives and sets read permission for the internal floppy drive.
- Page 109 Enables or disables the front USB ports. Front USB Ports (On default) On enables internal USB for FlexBay. USB for Flexbay NOTE: (On default) Video Specifies which video controller is primary when two video controllers are Primary Video present on the computer. Auto enables the add-in video controller. Onboard (Auto default) enables the integrated video controller.
- Page 110 Drive 0-5 Password (Not Set default) Password Changes Execute Disable (On default) Power Management AC Recovery (Off default) Auto Power On (Off default) Auto Power Time Suspend Mode Appendix Displays the current status of the drive's password security feature and allows a new drive password to be assigned and verified, if the drive supports a password.
-
Page 111: Boot Sequence
Maintenance Restores System Setup options to their factory defaults. Load Defaults Allows you to view the Event Log. Entries are marked R for Read and U for Event Log Unread. Mark All Entries Read puts an R to the left of all the entries. Clear Log clears the Event Log. - Page 112 • USB Flash Device — Insert the memory device into a USB port and restart the computer. When F12 = Boot Menu BIOS detects the device and adds the USB flash option to the boot menu. NOTE: To boot to a USB device, the device must be bootable. To make sure that your device is bootable, check the device documentation.
-
Page 113: Clearing Forgotten Passwords
Clearing Forgotten Passwords CAUTION: Before you begin any of the procedures in this section, follow the safety instructions located in the Product Information Guide. 1 Follow the procedures in "Before You Begin" on page 53. 2 Locate the 3-pin password jumper (PSWD) on the system board (see page 62), and attach the jumper plug to pins 2 and 3 to clear the password. -
Page 114: Clearing Cmos Settings
7 Disconnect the computer power cable from the electrical outlet, and press the power button to ground the system board. 8 Open the computer cover (see page 60). 9 Locate the 3-pin password jumper (PSWD) on the system board (see page 62) and attach the jumper to pins 1 and 2 to reenable the password feature. -
Page 115: Mouse
NOTICE: Do not wipe the display screen with any soap or alcohol solution. Doing so may damage the antiglare coating. • To clean your monitor screen, lightly dampen a soft, clean cloth with water. If possible, use a special screen-cleaning tissue or solution suitable for the monitor’s antistatic coating. •... -
Page 116: Cds And Dvds
Dell, as well as the verification of appropriate functionality of the computer and all Dell-installed hardware. In addition to this technician-assisted technical support, online technical support is available at support.dell.com. -
Page 117: Definition Of "Third-Party" Software And Peripherals
Third-party software and peripherals include any peripheral, accessory, or software program sold by Dell not under the Dell brand (printers, scanners, cameras, games, and so on). Support for all third- party software and peripherals is provided by the original manufacturer of the product. -
Page 118: Fcc Identification Information
If you do not see a telephone number listed that is specific for Inspiron XPS computers, you may contact Dell through the technical support number listed and your call will be routed appropriately. - Page 119 Tech Support Services Sales Aruba General Support Australia (Sydney) E-mail (Australia): [email protected] International Access Code: 0011 E-mail (New Zealand): [email protected] Country Code: 61 Home and Small Business City Code: 2 Government and Business Preferred Accounts Division (PAD) Customer Care Technical Support (portables and desktops)
- Page 120 International Access Code: 00 E-mail for French-speaking Customers: support.euro.dell.com/be/fr/emaildell/ Country Code: 32 Technical Support for Inspiron XPS computers only City Code: 2 Technical Support for all other Dell computers Technical Support Fax Customer Care Corporate Sales Switchboard Bermuda General Support...
- Page 121 Customer Technical Support (Penang, Malaysia) Country Code: 673 Customer Service (Penang, Malaysia) Transaction Sales (Penang, Malaysia) Canada (North York, Ontario) Online Order Status: www.dell.ca/ostatus International Access Code: 011 AutoTech (automated technical support) Customer Care (Home Sales/Small Business) Customer Care (med./large business, government) Technical Support (Home Sales/Small Business) Technical Support (med./large bus., government)
- Page 122 Country Code: 86 Technical Support E-mail: [email protected] City Code: 592 Customer Care E-mail: [email protected] Technical Support Fax Technical Support (Dell™ Dimension™ and Inspiron) Technical Support (OptiPlex™, Latitude™, and Dell Precision™) Technical Support (servers and storage) Technical Support (projectors, PDAs, switches,...
- Page 123 Website: support.euro.dell.com International Access Code: 00 E-mail: support.euro.dell.com/dk/da/emaildell/ Country Code: 45 Technical Support for Inspiron XPS computers only Technical Support for all other Dell computers Customer Care (Relational) Home/Small Business Customer Care Switchboard (Relational) Switchboard Fax (Relational) Switchboard (Home/Small Business)
- Page 124 E-mail: support.euro.dell.com/fr/fr/emaildell/ Country Code: 33 Home and Small Business City Codes: (1) (4) Technical Support for Inspiron XPS computers only Technical Support for all other Dell computers Customer Care Switchboard Switchboard (calls from outside of France) Sales Fax (calls from outside of France)
- Page 125 Hong Kong Website: support.ap.dell.com International Access Code: 001 Technical Support E-mail: [email protected] Country Code: 852 Technical Support (Dimension and Inspiron) Technical Support (OptiPlex, Latitude, and Dell Precision) Technical Support (PowerApp™, PowerEdge™, PowerConnect™, and PowerVault™) Customer Care Large Corporate Accounts Global Customer Programs...
- Page 126 E-mail: [email protected] Country Code: 353 Technical Support for Inspiron XPS computers only City Code: 1 Technical Support for all other Dell computers U.K. Technical Support (dial within U.K. only) Home User Customer Care Small Business Customer Care U.K. Customer Care (dial within U.K. only) Corporate Customer Care Corporate Customer Care (dial within U.K.
- Page 127 Technical Support (Dimension and Inspiron) Technical Support outside of Japan (Dimension and Inspiron) Technical Support (Dell Precision, OptiPlex, and Latitude) Technical Support outside of Japan (Dell Precision, OptiPlex, and Latitude) Technical Support (PDAs, projectors, printers, routers) Technical Support outside of Japan (PDAs,...
- Page 128 Country Code: 853 Customer Service (Xiamen, China) Transaction Sales (Xiamen, China) Malaysia (Penang) Website: support.ap.dell.com International Access Code: 00 Technical Support (Dell Precision, OptiPlex, and Latitude) Country Code: 60 Technical Support (Dimension, Inspiron, and City Code: 4 Electronics and Accessories)
- Page 129 Netherlands (Amsterdam) Website: support.euro.dell.com International Access Code: 00 Technical Support for Inspiron XPS computers only Country Code: 31 Technical Support for all other Dell computers City Code: 20 Technical Support Fax Home/Small Business Customer Care Relational Customer Care Home/Small Business Sales...
- Page 130 Country (City) International Access Code Country Code City Code Nicaragua General Support Norway (Lysaker) Website: support.euro.dell.com International Access Code: 00 E-mail: support.euro.dell.com/no/no/emaildell/ Country Code: 47 Technical Support Relational Customer Care Home/Small Business Customer Care Switchboard Fax Switchboard Panama General Support...
- Page 131 Singapore (Singapore) Website: support.ap.dell.com International Access Code: 005 Technical Support (Dimension, Inspiron, and Electronics and Accessories) Country Code: 65 Technical Support (OptiPlex, Latitude, and Dell Precision) Technical Support (PowerApp, PowerEdge, PowerConnect, and PowerVault) Customer Service (Penang, Malaysia) Transaction Sales Corporate Sales Slovakia (Prague) Website: support.euro.dell.com...
- Page 132 Country (City) International Access Code Country Code City Code Spain (Madrid) Website: support.euro.dell.com International Access Code: 00 E-mail: support.euro.dell.com/es/es/emaildell/ Country Code: 34 Home and Small Business City Code: 91 Technical Support Customer Care Sales Switchboard Corporate Technical Support Customer Care...
- Page 133 Technical Support (PowerApp, PowerEdge, PowerConnect, and PowerVault) Transaction Sales Corporate Sales Thailand Website: support.ap.dell.com International Access Code: 001 Technical Support (OptiPlex, Latitude, and Dell Precision) Country Code: 66 Technical Support (PowerApp, PowerEdge, PowerConnect, and PowerVault) Customer Service (Penang, Malaysia) Corporate Sales...
- Page 134 Country (City) International Access Code Country Code City Code U.K. (Bracknell) Website: support.euro.dell.com International Access Code: 00 Customer Care website: support.euro.dell.com/uk/en/ECare/Form/Home.asp Country Code: 44 City Code: 1344 E-mail: [email protected] Technical Support (Corporate/Preferred Accounts/PAD [1000+ employees]) Technical Support (direct and general)
- Page 135 Employee Purchase Program (EPP) Customers Dell Sales Dell Outlet Store (Dell refurbished computers) Software and Peripherals Sales Spare Parts Sales Extended Service and Warranty Sales Dell Services for the Deaf, Hard-of-Hearing, or Speech-Impaired U.S. Virgin Islands General Support Venezuela General Support...
- Page 136 Appendix...
-
Page 137: Index
55 microphone, 55 USB, 56 copying CDs and DVDs, 16 cover removing, 60 replacing, 99 Dell contacting, 118 Dell Diagnostics, 46 support policy, 116 support site, 10 diagnostic lights, 43 diagnostics Dell, 46 lights, 43, 56 documentation End User License... - Page 138 86 hard drive activity light, 56 installing, 84 installing second, 85 problems, 29 removing, 83 hardware Dell Diagnostics, 46 Hardware Troubleshooter, 49 headphone connector, 55 hibernate mode, 23-24 Hyper-Threading, 24 installing parts before you begin, 53 recommended tools, 53...
- Page 139 27 blue screen, 33 CD drive, 28 CD-RW drive, 28 computer crashes, 32-33 computer stops responding, 32 Dell Diagnostics, 46 diagnostic lights, 43 drives, 27 DVD drive, 28 e-mail, 29 error messages, 30 general, 32 hard drive, 29...
- Page 140 102 memory, 101 physical, 104 power, 104 processor, 101 technical, 101 video, 102 standby mode, 22 support contacting Dell, 118 policy, 116 support.dell.com, 10 system board, 62 System Restore, 49-50 system setup about, 105 entering, 106 options, 107...
- Page 141 Windows XP (continued) reinstalling, 50 scanner, 39 System Restore, 49-50 wizards Files and Settings Transfer Wizard, 24 Network Setup Wizard, 22 Program Compatibility Wizard, 33 Index...
- Page 142 Index...