D-Link DNS-321 User Manual
2-bay network storage enclosure
Hide thumbs
Also See for DNS-321:
- Quick install manual (13 pages) ,
- User manual (71 pages) ,
- Quick install manual (17 pages)
Table of Contents
Table of Contents

Related Manuals for D-Link DNS-321


Summary of Contents for D-Link DNS-321
-
Page 2: Table Of Contents
Quotas ... 26 Network Access ... 29 FTP Server ... 31 UPnP AV Server ... 34 iTunes Server ... 35 D-Link DNS-31 User Manual Table of Contents DHCP Server ... 37 LLTD ... 38 Tools ... 39 Admin ... 39 Time ... -
Page 3: Product Overview
CAT5 Ethernet Cable Note: Using a power supply with a different voltage than the one included with the DNS-321 will cause damage and void the warranty for this product. If any of the above items are missing, please contact your reseller. -
Page 4: Introduction
3 Note that use of an FTP Server to access files over the Internet does not provide for secure or encrypted transmissions. 4 D-Link cannot guarantee full compatibility or proper playback with all codecs. Playback capability depends on the codec support of the UPnP™ AV media player. -
Page 5: Features
3 Note that use of an FTP Server to access files over the Internet does not provide for secure or encrypted transmissions. 4 D-Link cannot guarantee full compatibility or proper playback with all codecs. Playback capability depends on the codec support of the UPnP™ AV media player. -
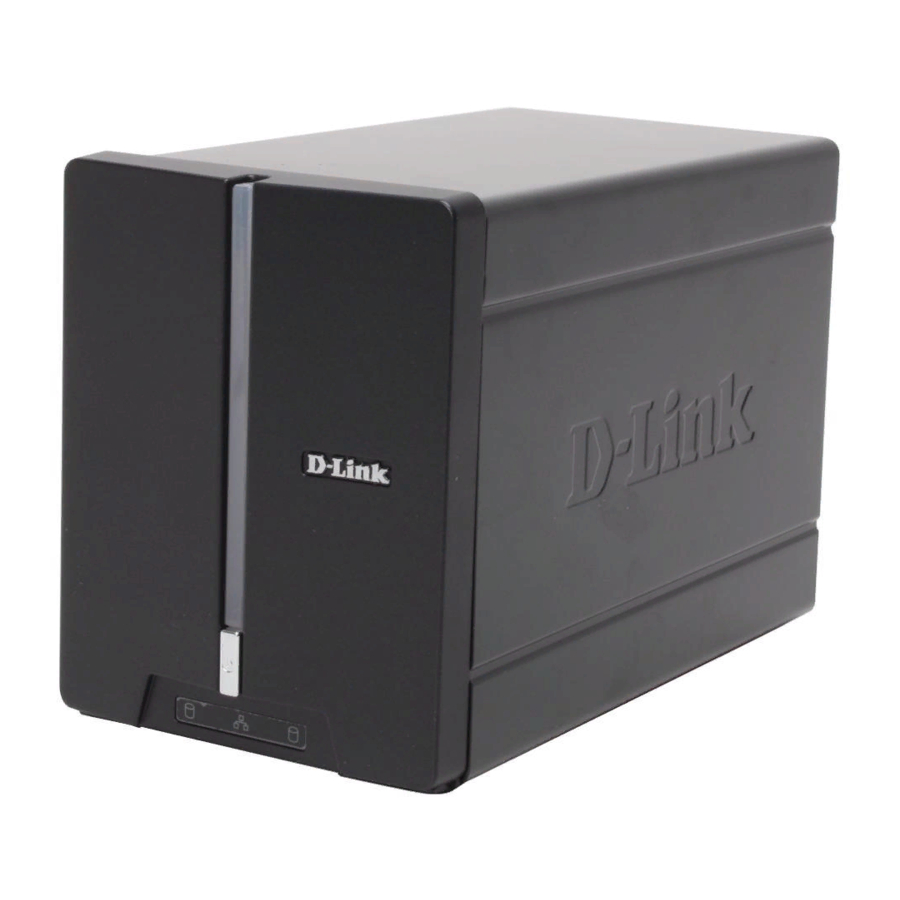
Page 6: Hardware Overview
Network Activity Light Power Button: Press once to power on the DNS-321. Press and hold the button until it begins to blink to power down the DNS-321. Drive Light: These lights will be solid BLUE when drives are connected but inactive. The lights will blink when the drives are being accessed, formatted or synchronized. -
Page 7: Rear Panel (Connections)
The supplied power adapter connects here. Ethernet Port: A Gigabit Ethernet port that connects the DNS-321 to a network. Drive Eject Lever: Use the provided levers to eject the hard drives. The front panel must be removed before ejecting the drives. -
Page 8: Installation
This section provides installation information for the DNS-321. To install the DNS-321 on your local network, refer to the steps below: 1. Slide the faceplate up until it unlatches from the device. 2. Once the faceplate is unlatched, pull it off the device, exposing the drive bays. - Page 9 Make sure to align the drive connector to the SATA connector on the bottom edge inside the drive bay of the DNS-321. Gently push the drive in until it connects. When a drive is inserted properly, you will feel it “seat” into the connector.
- Page 10 5. Connect an Ethernet cable to the available Ethernet port. This cable should connect the DNS-321 to your local network via a router or switch, or directly to a computer for configuration. 6. Connect the power adapter to the power receptacle.
-
Page 11: Configuration
It is recommended to use the included D-Link Easy Search Utility when accessing and configuring the DNS-321 for the first time. If you want to change the IP address before logging in or if you are unable to connect to the DNS-321 IP address, you can use the Easy Search Utility provided on the product CD to locate the device on your network and make any needed changes. -
Page 12: Getting Started
To run the Easy Search Utility, insert the DNS-321 CD into your CD-ROM drive: Click Easy Search Utility. Highlight an available DNS-321 and click Configuration to access the web-based utility. D-Link DNS-31 User Manual Getting Started... - Page 13 When logging into the DNS-321 for the first time, you will be asked to choose a drive configuration type and format the drives.There are four options: Standard, JBOD, RAID 0 and RAID 1. Standard configures each disk as a separate volume, while JBOD combines both disks into a single volume.
- Page 14 Select the type of hard drive configuration, Standard, JBOD, RAID 0 or RAID 1. A warning message appears informing you that your drives will be formatted and all data will be erased. Click OK to continue. D-Link DNS-31 User Manual...
- Page 15 Type admin for the username and leave the password field blank. Click Configuration Note: After logging in to the DNS-321 for the first time it is recommended to add a password to the admin account. (See page 39 for details.) D-Link DNS-31 User Manual...
- Page 16 Section 3 - Configuration After login, you will be redirected to the DNS-321 web UI: D-Link DNS-31 User Manual...
-
Page 17: Web Ui
The DNS-321 web UI defaults to the Setup page. The main categories for configuration are located in the menu tabs at the top of the page. These categories include: Setup - Contains the DNS-321 setup wizard, as well as the LAN configuration settings and device ... -
Page 18: Setup
The DNS-321 has a setup Wizard that allows you to quickly configure some of the basic device settings. When running the DNS-321 setup wizard, the welcome screen details the five steps of the wizard. Click Next to continue. It is recommended you set an admin password here. - Page 19 Set the appropriate Time Zone and click Next to continue. Edit or change the DNS-321 LAN information, or keep the current settings, click Next to continue. D-Link DNS-31 User Manual...
- Page 20 Section 3 - Configuration Enter a workgroup, name, and description for the DNS-321, or leave the default values and click Next to continue. When the wizard completes, click Back to go back and make changes or click Restart to restart the DNS-321 and save the configuration.
- Page 21 Section 3 - Configuration When the login prompt appears, login using the new administrator password. D-Link DNS-31 User Manual...
-
Page 22: Lan
The Local Area Network settings for the DNS-321 can be configured on the LAN page. Link Speed The LAN Link Speed is set to Auto by default, but can be manually set to 100Mbps or 1000Mbps. DHCP Client Selecting DHCP Client will cause... -
Page 23: Device Settings
The device settings page allows you to assign a workgroup, name and description to the DNS-321. Workgroup Assign a workgroup name to the DNS-321. Name Assign a unique name to the DNS-321. The name can be used to access the device from a web browser instead of using the IP address. -
Page 24: Advanced
To add a user to a user group, under Group Settings: • Select an available group from the Select Group drop-down menu • Highlight the user from List of all users • Click the Add>> button D-Link DNS-31 User Manual Advanced Users/Groups... -
Page 25
• Click the <
Page 26: Quotas
The DNS-321 supports storage quotas for both groups and individual users. Assigning a quota to a group or user will limit the amount of storage they are allocated. By default, users and groups do not have a quota. User Quota User quotas are displayed here.- Page 27 By default, all users and groups are displayed on the Quota Settings page and cannot be deleted. The default quota setting is “Unlimited”. To add a quota: Click the notepad icon of the user you want to add a quota. Set a quota amount (MB) for the user and click Apply. D-Link DNS-31 User Manual Configuring Quotas...
- Page 28 The user, amount of used storage, and storage limit are displayed. Click Enabled to turn quota function on. Once enabled, the status will change to Started. D-Link DNS-31 User Manual...
Page 29: Network Access
By default Windows Vista ™ files from the DNS-321, you may try to improve performance by setting Oplocks to No (off). D-Link DNS-31 User Manual Network Access has Oplocks enabled and cannot be disabled. If you are having network performance issues with applications sharing...- Page 30 Section 3 - Configuration Map Archive When enabled, the file attribute ”Archive” will be copied as the file is being stored on the DNS-321. Certain backup software attach this attribute to files that are being stored as backups. Comment Enter a comment for reference or description of the rule.
Page 31: Ftp Server
The DNS-321 is equipped with a built in FTP Server. The server is easy to configure and allows users access to important data whether they are on the local network or at a remote location. The FTP server can be configured to allow user access to specific directories, and will allow up to 10 users to access the DNS-321 simultaneously.- Page 32 Cyrillic codepage support has been added for non standard FTP clients that are capable of supporting these character sets. Apply Click Apply to save your rule. FTP Access List List all defined FTP Rules. D-Link DNS-31 User Manual FTP Server Settings...
- Page 33 If you are behind a router, you will need to forward the FTP port from the router to the DNS-321. Additional filtering and firewall settings may need to be modified on your router to allow FTP Access to the DNS-321 from the Internet.
Page 34: Upnp Av Server
The DNS-321 features a UPnP AV Server. This server provides the ability to stream photos, music and videos to UPnP AV compatible network media players. If the server is enabled, the DNS-321 will be automatically detected by UPnP AV compatible media players on your local network.Page 35: Itunes Server
The DNS-321 features an iTunes Server. This server provides the ability to share music and videos to computers on the local network running iTunes. If the server is enabled, the DNS-321 will be automatically detected by the iTunes program and the music and videos contained in the specified directory will be available to stream over the network.- Page 36 After enabling the iTunes server on the DNS-321, launch iTunes. In your iTunes utility, select the DNS-321 and enter the iTunes server password if required. Select the DNS-321. When prompted, enter in the iTunes server password. Click OK. Media stored on the DNS-321 will then be available for use in iTunes.
Page 37: Dhcp Server
The DNS-321 can be used as a DHCP Server. As a DHCP server, it can be used to serve IP addresses to devices on your local network. However, this feature should not be enabled if you already have a DHCP server, such as a router on your local network.Page 38: Lltd
The DNS-321 supports LLTD (Link Layer Topology Discovery) and is used by the Network Map application that is included in Windows Vista ™ LLTD Select to enable or disable LLTD on your DNS-321. D-Link DNS-31 User Manual LLTD...Page 39: Tools
The Admin menu allows you to set a password for the admin account. It is recommended to set an admin account password when first configuring the DNS-321. The administrator user name is User Name admin, and this cannot be changed.Page 40: Time
The DNS-321 Time page contains several different options for setting the device’s internal clock. It is important that accurate time is set so that scheduled backups and downloads will be accurate. Time Zone Select your time zone from the drop-down menu.Page 41: System
The DNS-321 System menu provides options for system restarts, saving and loading configuration settings, and idle times setting. Restart Click Restar t to reboot the DNS-321. Restore Click Restore to reset the DNS-321 Defaults to its factory default settings. This will erase all previous configuration changes.Page 42: Firmware
The DNS-321 Firmware menu makes it simple to check for new firmware releases and upload them to the device. This section provides a link to Firmware check for new firmware on the Upgrade D-Link support website. If a new firmware is available, download the file to your local computer.Page 43: E-Mail Alerts
With the DNS-321 E-Mail Alerts, you can configure e-mails to be sent alerting you to certain operational conditions and drive status conditions. These alerts can prove helpful with the management and safeguarding of important data. T h i s s e c t i o n c o n t a i n s t h e...- Page 44 Enter the e-mail address you want to E-Mail send the alerts to. This address must correspond with the SMTP server configured above. Test E-Mail Click the Test E-Mail button to send a test alert and confirm your settings are correct. D-Link DNS-31 User Manual...
- Page 45 Firmware has An alert will be sent if the firmware been Upgraded is upgraded. System An alert will be sent if the DNS-321 Temperature device temperature exceeds the set Exceeded threshold. After the alert has been sent, the DNS-321 will power off for safety.
Page 46: Power Management
The DNS-321 Power Management feature allows you to configure the drives to shut down while power remains constant to the device. The drives will power up again when data is accessed. Power E n a b l e o r D i s a b l e Po w e r Management Management on the DNS-321.Page 47: Raid
The DNS-321 supports four different disk configuration types: Standard, where each drive is a unique volume, JBOD, which combines both drives in a linear fashion to create one volume, as well as RAID 0 and RAID 1. RAID Settings Click Set RAID Type and Re-Format to change the current drive configuration.Page 48: What Is Raid
RAID, short for Redundant Array of Independent Disks, is a combination of two or more disks with the aim of providing fault tolerance and improving performance. There are several different levels of RAID, with each providing a different method of sharing or distributing data amongst the drives. The DNS-321 supports RAID levels 0 and 1. RAID 0...Page 49: Ddns
Dynamic DNS. The timeout period is measured in hours Status Displays your DDNS status. * If a key is provided and utilized by your DDNS provider, enter the key in all three fields (username, password, and verify password). D-Link DNS-31 User Manual DDNS...Page 50: Status
LAN Info Displays the local network settings of the DNS-321. Device Info Displays the workgroup, name, description and current temperature of the DNS-321. Hard Drive Displays the hard drive information, Info including the disk mode, total size, used and remaining drive space.Page 51: Support
Section 3 - Configuration Support The DNS-321 Support page provides a menu of Support topics explaining the features of the device. D-Link DNS-31 User Manual...Page 52: Mapping A Drive
Section 3 - Configuration Mapping a Drive You can use the D-Link Easy Search Utility to map drives to your computer. Insert the DNS-321 CD into your CD-ROM drive. Click Easy Search Utility. The Easy Search Utility will load and detect any DNS-321 devices that are on the local network. If the DNS-321 you are working with does not show up in the device list, click Refresh.- Page 53 If the DNS-321 you are working with does not show up in the device list, click Refresh. Highlight an available DNS-321. Available volumes will be displayed under Drive Mapping. Highlight the volume you want to map. Select an available drive letter from the drop-down menu and click Connect.
- Page 54 Double-click the My Computer icon on your desktop. Double-click on the mapped drive to access the files and folders. D-Link DNS-31 User Manual...
Page 55: Download Scheduling
The DNS-321 Download Scheduling feature allows you to schedule folder or file downloads and backup sessions. Begin by accessing the configuration page of the DNS-321: Click Easy Search Utility. Highlight an available DNS-321 and click Configuration to access the web-based utility.- Page 56 The DNS-321 login screen will appear: Type admin for the username and leave the password field blank. Click Downloads The DNS-321 Download Scheduling configuration page will appear. D-Link DNS-31 User Manual...
Page 57: Schedule Downloads
Section 3 - Configuration Schedule Downloads Scheduling Configure download and backup schedules Settings here. Schedule List The Schedule List will display all completed, active, and pending scheduled downloads and backups. D-Link DNS-31 User Manual...Page 58: Scheduling Settings
By default all local backups and file/folder downloads are in Overwrite mode, meaning that identical files in the destination Backup folder will be overwritten by the source files. Checking Incremental Backup will have the DNS-321 compare identical file names at the source and destination. Files will only be overwritten if the source file is more recent.Page 59: Replacing Or Adding A New Hard Drive
(JBOD, RAID 0 mode). Adding a New Hard Drive: The DNS-321 is able to work with one single hard drive under Standard mode. Please make sure the power is off before installing a second hard drive.Page 60: Contacting Technical Support
• Hardware Revision (located on the label on the bottom of the device (e.g. rev A1)) • Serial Number (s/n number located on the label on the bottom of the device). You can find software updates and user documentation on the D-Link website as well as frequently asked questions and answers to technical issues.Page 61: Gnu/Linux Gpl
The Open Source Software licenses can be found in the gpl.pdf file, other materials accompanying the software package, the documentation or corresponding source files available from http://support.dlink.com/GPL.asp. D-Link DNS-31 User Manual GNU/Linux GPL...Page 62: Gnu General Public License
If the software is modified by someone else and passed on, we want its recipients to know that hat they have is not the original, so that any problems introduced by others will not reflect on the original authors’ reputations. D-Link DNS-31 User Manual Version 2, June 1991...- Page 63 Section 1 above, provided that you also meet all of these conditions: a) You must cause the modified files to carry prominent notices stating that you changed the files and the date of any change. D-Link DNS-31 User Manual...
- Page 64 Accompany it with the information you received as to the offer to distribute corresponding source code. (This alternative is allowed only for noncommercial distribution and only if you received the program in object code or executable form with such an offer, in accord with Subsection b above.) D-Link DNS-31 User Manual...
- Page 65 If any portion of this section is held invalid or unenforceable under any particular circumstance, the balance of the section is intended to apply and the section as a whole is intended to apply in other circumstances. D-Link DNS-31 User Manual...
- Page 66 AND FITNESS FOR A PARTICULAR PURPOSE. THE ENTIRE RISK AS TO THE QUALITY AND PERFORMANCE OF THE PROGRAM IS WITH YOU. SHOULD THE PROGRAM PROVE DEFECTIVE, YOU ASSUME THE COST OF ALL NECESSARY SERVICING, REPAIR OR CORRECTION. D-Link DNS-31 User Manual...
- Page 67 OR DATA BEING RENDERED INACCURATE OR LOSSES SUSTAINED BY YOU OR THIRD PARTIES OR A FAILURE OF THE PROGRAM TO OPERATE WITH ANY OTHER PROGRAMS), EVEN IF SUCH HOLDER OR OTHER PARTY HAS BEEN ADVISED OF THE POSSIBILITY OF SUCH DAMAGES. D-Link DNS-31 User Manual END OF TERMS AND CONDITIONS...
Page 68: Warranty
Any repair or replacement will be rendered by D-Link at an Authorized D-Link Service Office. The replacement hardware need not be new or have an identical make, model or part. D-Link may, at its option, replace the defective Hardware or any part thereof with any reconditioned product that D-Link reasonably determines is substantially equivalent (or superior) in all material respects to the defective Hardware.Page 69: Limited Software Warranty
Warranty Period and is subject to the same limitations and exclusions. If a material non-conformance is incapable of correction, or if D-Link determines in its sole discretion that it is not practical to replace the non-conforming Software, the price paid by the original licensee for the non-conforming Software will be refunded by D-Link;...Page 70: Disclaimer Of Other Warranties
• The customer is responsible for all in-bound shipping charges to D-Link. No Cash on Delivery (“COD”) is allowed. Products sent COD will either be rejected by D-Link or become the property of D-Link. Products shall be fully insured by the customer and shipped to D-Link Systems, Inc., 17595 Mt.Page 71: Limitation Of Liability
This Limited Warranty provides specific legal rights and you may also have other rights which vary from state to state. Trademarks: D-Link is a registered trademark of D-Link Systems, Inc. Other trademarks or registered trademarks are the property of their respective owners.Page 72: Fcc Statement
• Connect the equipment into an outlet on a circuit different from that to which the receiver is connected. • Consult the dealer or an experienced radio/TV technician for help. For detailed warranty information applicable to products purchased outside the United States, please contact the corresponding local D-Link office. D-Link DNS-31 User Manual...Page 73: Registration
Appendix C - Registration Registration Product registration is entirely voluntary and failure to complete or return this form will not diminish your warranty rights. Version 1.0 March 20, 2008 D-Link DNS-31 User Manual...