Yamaha DTXTREME IIs Owner's Manual
Drum trigger module
Hide thumbs
Also See for DTXTREME IIs:
- Mode d'emploi (103 pages) ,
- Data list (28 pages) ,
- Installation manual (8 pages)
Table of Contents
Quick Links
Chapters
Table of Contents

Related Manuals for Yamaha DTXTREME IIs


Summary of Contents for Yamaha DTXTREME IIs
- Page 1 OWNER’S MANUAL...
-
Page 2: Special Message Section
This product should be used only with the components supplied or; a cart, rack, or stand that is recommended by Yamaha. If a cart, etc., is used, please observe all safety markings and instructions that accompany the accessory product. - Page 3 1. IMPORTANT NOTICE: DO NOT MODIFY THIS UNIT! This product, when installed as indicated in the instructions contained in this manual, meets FCC requirements. Modifications not expressly approved by Yamaha may void your authority, granted by the FCC, to use the product. 2. IMPORTANT: When connecting this product to accessories and/or another product use only high quality shielded cables.
- Page 4 • Use the specified adaptor (PA-5C or PA-5D or an equivalent recommended by Yamaha) only. Using the wrong adaptor can result in damage to the instrument or overheating. • Check the electric plug periodically and remove any dirt or dust which may have accumulated on it.
-
Page 5: Saving Data
Yamaha cannot be held responsible for damage caused by improper use or modifications to the instrument, or data that is lost or destroyed. Always turn the power off when the instrument is not in use. -
Page 6: Introduction
How to Use This Manual This manual describes all features and aspects of the DTXTREME IIs — for Playing (page 22), Editing (page 33), and global, or Utility functions (page 73). To familiarize yourself with the Instrument, refer to the following: •... -
Page 7: Features
These jacks can connect to any Yamaha triggering gear including traditional DTX/DTXPRESS drum pads, DT-series trigger pickups, and the latest drum pads. • Combined with the latest drum pads, DTXTREME IIs enables manual control of the drum voice tone with a built-in knob. -
Page 8: Music Sequencer
Music Sequencer • A wide variety of Preset songs. Also, the DTXTREME IIs has internal memory space for up to 32 User songs. • Song playback. In addition to a main song that is controlled by the panel transport buttons or external MIDI events, DTXTREME IIs can play up to four pad-controlled songs assigned to a drum kit (pad songs). -
Page 9: Table Of Contents
Edit Section ....33 DTXTREME IIs as Drum System ..33 From Trigger Input to Sound Output . . . 33 Memory, Buffer, and Store Operation . -
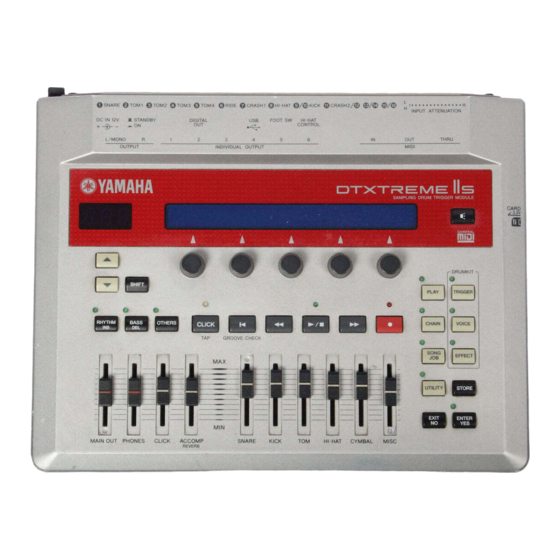
Page 10: Panel Map
C C C C PHONES jack fi Connect headphones here to monitor the PHONES stereo mix of the DTXTREME IIs sounds. D D D D AUX IN jack Connect the line output from an external audio device here. You can play along with an external audio source (page 17), as well as record external audio as a waveform sample (page 83). -
Page 11: Side Panel
Audition button Data entry knob Press this button to audition a Use each knob to set the target voice while editing a drum corresponding parameter value kit, just like hitting a pad for that shown above it in the LCD. By voice. -
Page 12: Rear Panel
MIDI I/O MIDI IN, OUT, and THRU terminals Panel Map Use the MIDI terminals to transfer MIDI events between the DTXTREME IIs and an external device such as sequencer or tone generator, for an extended MIDI system (page 18). Rear Panel... - Page 13 OUTPUT L/MONO and R jacks Outputs line level stereo-mixed audio signals from the DTXTREME IIs to other audio equipment (amp, mixer, etc.). Use a pair of shielded cables with a 1/4-inch phone plug on one or both ends. Connect those cables to both L/MONO and R jacks if you want to output in stereo.
-
Page 14: Setup
S e t u p Pads and Triggers Compatible Products You can use the DTXTREME IIs with any currently available Yamaha pad products. Since each pad is designed for a specific purpose and has its own specifications, you’ll need to check which product is most suitable for connecting to a specific DTXTREME IIs trigger input. - Page 15 A t t a c h i n g a D r u m Tr i g g e r To use an acoustic drum as a triggering device, you will need to attach a Yamaha DT-series drum trigger. Observe the following precautions and attach the trigger properly as described in the diagrams below.
- Page 16 Trigger Connections Referring to the following table, connect each pad to the appropriate trigger input jack on the DTXTREME IIs rear panel. Appropriate names are printed beside each jack, making it easy to make the relevant pad connections. Pad-to-Input Matching Chart Trigger input Rim configurations...
-
Page 17: Peripherals
This all-in-one self-contained system makes it possible to play the DTXTREME IIs system right out of the box — once you finish pad connections and turn the system on. What’s more, the system can easily be expanded with other peripheral devices since the instrument supports various types of connections. -
Page 18: Midi Connections
(page 79). n You cannot use USB and MIDI ports simultaneously. When you connect a USB cable to the DTXTREME IIs, the MIDI ports are automatically disabled. If you make MIDI and USB connections at the same time, external devices connected to any MIDI port will not function. -
Page 19: Power
Always use the supplied AC power adapter (PA-5C or PA-5D). Use of a power adapter other than the type specified may cause a malfunction or result in damage to the DTXTREME IIs. Also, unplug the power adapter from the AC outlet if the DTXTREME IIs is not used for an extended period of time. -
Page 20: Basic Operations
NO button to cancel the store operation. n Since most settings are automatically stored into the memory of the DTXTREME IIs, you do not need to execute the store operation unless prompted. Basically, this is all you need to know to start working with and playing your DTXTREME IIs. -
Page 21: Matching Trigger Inputs With Connected Pads
When you complete the setting, press the EXIT/NO button and return to PLAY mode. Now you are ready to start playing with the DTXTREME IIs drum kit. Go to the Play Section to learn some of the performance functions of the DTXTREME IIs. -
Page 22: Play Section
The DTXTREME IIs conveniently always enters the Play mode when it is turned on. The Play mode is where you can start working and playing with the DTXTREME IIs — simply select a drum kit and song to play (or edit in other modes). -
Page 23: Basic Items
Sets the playback tempo of the song or click. ❏ Settings: 30~300 n TEMPO is not adjustable when “ =ext” is displayed, or in other words, when DTXTREME IIs is synchronized to an external clock (page 82). n Since every song contains information about the playback tempo, your tempo setting might be overwritten when you start or select a song or reset the playback position to the song beginning. -
Page 24: Playback Controls
Song Playback In addition to the basic start/stop control of the song, the DTXTREME IIs lets control how the song is played, which part is played, and so on. Transport Control Press the Start/Stop button 4 to start playback of the current song. - Page 25 Enables or disables playback of parts other than rhythm and bass parts. n DTXTREME IIs uses MIDI channel 10 for the rhythm part, channel 3 for the bass part, and the rest (channels 1, 2, 4 to 9, 11 to 16) for other parts.
-
Page 26: Slider Controls
Slider Controls DTXTREME IIs incorporates a simple but powerful mixer. There are ten sliders on the top panel for adjusting the volume balance, reverb effect, and the levels of the Individual Outputs. Adjusting the Volume Balance The following sliders let you control the volume balance... - Page 27 Adjusting the Reverb Effect You can control the amount of reverb (system effect) applied to a rhythm instrument by moving the associated volume slider while holding down the SHIFT button. The relevant sliders must be set appropriately to control reverb beforehand (page 75).
-
Page 28: Tap Tempo Feature
Tap Tempo Feature This convenient function lets you automatically set the tempo by tapping out the beats on a pad or the Audition button. This is especially useful when you want to intuitively set the tempo by “feel” during song playback or click playback. Open the Tap Tempo screen by simultaneously holding down the SHIFT button and pressing the TAP (CLICK) button. -
Page 29: Groove Check Feature
Groove Check Feature When playing the drum kit or tapping the Audition button along with a song or click, you can check how far off your timing is. Specify the length of the note — this is used as the basis for measuring the timing accuracy of your play, to a resolution of 1/96 quarter note. -
Page 30: Chain Feature
The DTXTREME IIs can memorize up to 32 chains for instant recall them whenever you want them. - Page 31 3 Type Specify what you want to assign to the currently selected step (in Step 2 above). Available settings are: drum kit (kit), song (song), linking to another chain (jump), and end mark at this step (END). ❏ Settings: song, kit, jump, END n If you make a chain with a jump point on the way to the final step, the chain will not play the steps after the jump point.
-
Page 32: Playing A Chain
Playing a Chain To play back a chain, simply turn the knob to select each step. You can also select a step while playing the drum kit by increasing/decreasing the step number with a pad (page 77) or a foot switch (page 46). Chain Play Screen Once you create a chain, play it from the Chain Play display. -
Page 33: Edit Section
DTXTREME IIs enables a creative rhythm-oriented musical performance beyond what you can expect from traditional acoustic drums. From Trigger Input to Sound Output Before getting deep inside the DTXTREME IIs system, let’s take a look at its mechanism, structure, and basic ideas. 1 Trigger input using pad... - Page 34 TRIGGER, VOICE, and EFFECT outlined by DRUMKIT. When you press one of these buttons, you can start editing that part of the current drum kit. Your drum kits can be stored as up to 40 User kits (U1 to U40) in the DTXTREME IIs...
-
Page 35: Memory, Buffer, And Store Operation
Every time you select (recall) a Preset kit or a User kit from the DTXTREME IIs internal memory or an external memory card, the drum kit data is copied to the working buffer. -
Page 36: Trigger Settings
In the first seven pages you can set up each trigger input on the DTXTREME IIs rear panel. This means you actually have seven pages for each of the sixteen inputs. However, you can easily switch to other inputs by turning the leftmost knob, while staying in the same page. -
Page 37: [Trgsens1] Type
Select the pad type for the target input 1. The list below shows the pad types that can be set for the connected pads or trigger pickups. ❏ Settings: Refer to the following table. DTXTREME IIs Pad Types KP65/60/80S/80 TP-1/Snr TP120SD/100 (*1) -
Page 38: [Trgsens2] Level(100%)
6 Level Set the range of trigger levels for the target input 1, as minimum and maximum values. Trigger levels within the specified range are accordingly converted into velocity values. If the trigger signal is below the minimum level, no sound is output. -
Page 39: Input=16
[TrgSens3] Rejection This page contains three different settings to prevent “false hits” — such as double triggering caused by stick rebound, or crosstalk caused by pad vibration or interference between trigger inputs. Trigger signals detected as such false hits do not produce any sounds. -
Page 40: Song
Setting a Pad Song You can play up to four pad songs from one drum kit. If you have already specified four pad songs for other trigger inputs, the following parameters 3~5 cannot be set and “---” is shown in the display. 3 Song Select a song for the pad song. -
Page 41: [Trgmidi2] Note Note# Gatetime Channel Input=16
n Withpad mode does not demand that you play a real open rimshot (hitting the pad rim and head at the same time). It lets you play both the pad and rim sounds by only hitting the rim. 3 TrgAltG Specify the trigger alternate group number to which the target input 1 belongs. - Page 42 3 Note# Assign a note number for the note 2 of the target input 1. Since the note number is shown with its note name (key and octave), both will change accordingly as you turn the associated knob. Also refer to the column below for more about the note number.
-
Page 43: [Trgmidi3] Note Velxfade Input=16 1St
U s i n g a n E x t e r n a l M I D I K e y b o a r d You can assign a note or multiple notes such as a chord using an external MIDI keyboard connected to MIDI IN on the rear panel. -
Page 44: Kit
[TrgCopy1] & [TrgCopy2] Trigger Copy You can copy trigger settings to create a drum kit for a similar configuration of pads. Use the [TrgCopy1] page to copy settings from a specific trigger input. Use the [TrgCopy2] page to copy setting from the drum kit you are currently working (editing) with. -
Page 45: Midi
[FootCtrl1] & [FootCtrl2] HH Controller Function These two pages let you specify the function of a hi-hat controller (Yamaha HH series), connected to the HI-HAT CONTROL jack on the rear panel. [FootCtl1] Func Sens HiHat [FootCtl2] HHInput MIDI 10ch n You may not have hi-hat sounds or lose control of them if you... -
Page 46: [Footsw2]Onvalue Offvalue 127
[FootSw1] & [FootSw2] Foot Switch Function These two pages let you specify the function of a foot switch (Yamaha FC4 or FC5) that is connected to the FOOT SW jack on the rear panel. [FootSw1] Func Velocity MIDI HiHat ----... -
Page 47: [Common1] Volume Wavedir No Card
[COMMON1] & [COMMON2] Kit Common Settings These two pages let you make basic settings for the drum kit you are currently working (editing) with. For this reason, some parameters are not directly related to trigger settings. [COMMON1] Volume WaveDir No Card [COMMON2] Song Tempo 9to10... -
Page 48: Voice Settings
Voice Settings Press the VOICE button on the top panel, designated by DRUMKIT, to start editing voice settings for the drum kit you are currently working with. VOICE [Voice1] Type Voice 42* Volume Tuning 38 D1 AcSnr1 MCA55 n The first page that appears (the one last called up) may be different from the display shown above (page 76). -
Page 49: [Voice1] Type Voice 42* Volume Tuning 38 D1
[Voice1] Voice Basics This page lets you assign a basic drum voice and adjust its output volume and pitch. Voices are categorized by types so that you can choose them easily, while viewing the information about the voice such as whether it is two-layered, looped, and so on. -
Page 50: Wave1
S e t t i n g a n E x t r a S n a r e D r u m Extra Snare is a special snare drum voice that you can select when you specify XtrSnr for the voice category. Moreover, you can customize the snare drum using the following parameters. -
Page 51: [Voice4] Attack
Determines how the same voice is played in response to multiple notes. ❏ Settings: • poly: No limitation until the DTXTREME IIs tone generator reaches maximum polyphony. • semi8: Up to eight polyphonic notes — every initial note will be muted to play the 9th note. - Page 52 3 AltGrp You can put multiple note numbers 1 in a specific alternate group. By including several note numbers in the same numbered group here, prevents them from playing simultaneously. For realistic hi-hat sounds using several voices, assign HHpedal to the foot-closed voice and HHpad to other hi-hat voices triggered by the hi-hat pad and rims.
-
Page 53: [Voice6] Output Revsend Chosend 49C#2 Stereo
[Voice6] Output Routing This page lets you set an output routing for the voice assigned to the note number. Though your basic options are one of the INDIVIDUAL OUTPUT (1 to 6) jacks for parallel output or a pair of OUTPUT jacks for stereo output, you can use them for more variations in conjunction with effect settings (page 55). -
Page 54: [Midi1] Transmit
[MIDI1], [MIDI2] & [MIDI3] MIDI Setup Use these three pages to make settings for a MIDI ensemble using the built-in tone generator or external sound modules. The setting data will be sent to MIDI parts internally or externally (via MIDI OUT or USB) when you recall and play the drum kit you are currently editing. -
Page 55: Effect Settings
Effect Settings DTXTREME IIs provides reverb and chorus as system effects, as well as two different insertion effects, and a three- dimensional Localizer effect. Reverb This system effect includes 12 reverb types that let you recreate the ambience of a performance space — from a small room to a large concert hall. - Page 56 (Continued from previous page) 4 C o m p l e t e l y S e p a r a t e E f f e c t s If you specifically set the output of each drum voice, system effects and two insertion effects can be used as four completely separate effects.
- Page 57 [Effect] Effect Basics Press the EFFECT button on the top panel, designated by DRUMKIT, to start editing effect settings for the drum kit you are currently working with. EFFECT Category [Effect]Localizer RevSend ChoSend n The first page that appears (the one last called up) may be different from the display shown above (page 76).
- Page 58 [Chorus] System Chorus Effect Configure the system chorus effect. This setting data will be sent to the built-in tone generator when you recall and play the drum kit you are currently editing. This setting data is shared not only with each drum voice (MIDI channel 10), but also with all other parts from the built-in tone generator.
- Page 59 7 Angle Determines the amount of stereo width (left to right) of the sounds of the DTXTREME IIs. With the center at zero, the sounds will expand to a maximum width of 180 degrees. ❏ Settings: 0~180 (center to left and right, unit: degree) Once you’ve finished making the desired effect...
-
Page 60: Song Recording And Editing
Each track can contain any event on any MIDI channel (1 to 16). This means you can connect a keyboard to the DTXTREME IIs MIDI IN and (with the help of a keyboard playing friend) record both the keyboard performance and your drum kit playing in real time onto separate tracks. -
Page 61: Recording Mode
Set any of the following as desired, using the utility features. • Two-measure count before actual recording (page 82): By default, you can lead into the recording with a two- measure click count. • Click count during recording (page 81): By default, you can have the click count play throughout recording at the tempo and beat specified in step1. -
Page 62: Recording Operations
R e s o l u t i o n a n d Q u a n t i z e If you set Quantize 4 to some value other than off (determining the shortest note for real-time recording), your performance will be auto-corrected while recording according to the selected timing (resolution). -
Page 63: Step Recording
Step Recording Press the Start/Stop button to call up the timeline display. The following blank timeline appears if no MIDI data has been recorded previously. M001-01-16|----|----|----|----|----|---- Empty n A dot (•) in the display indicates that MIDI data already exists at the location. -
Page 64: Control Change
Available MIDI Events in Step Recording You can record the following MIDI events in step recording. Note On Specify a Note On event with note number and a combination of velocity and note length. M001-01-16| ---| ---| ---| ---| ---|---- Ch=10 NoteOn Note On... -
Page 65: Song Job Features
Tempo Change Set this if you want to change the tempo in the middle of the song. M001-01-16|---_ - --:-------:-------:----- Tempo =100 Tempo change Tempo value n You can set the initial tempo as song setting data at the beginning of a song (page 67). - Page 66 [Song12] Transmit Volume VOICE [Song13] BankMSB BankLSB VOICE [Song14] Filter RevSend ChoSend VOICE Use the leftmost knob to jump to the first page of each category, then immediately open the desired page by scrolling up or down with the Page buttons. [Song1] Copy From Song SONG Horizon...
- Page 67 [Song3] Song Set This page allows you to make basic settings for the current User song. Song name Cursor [Song3] Name "no name " Tempo SONG < !"> Cursor movement 1 Name As shown in the above diagram, use the second-to-left knob to move the cursor to the entry position, then use the center knob to enter a character at that position.
- Page 68 [Song5] Mix Track This lets you merge all data on both tracks in the current song into either track 1 or 2. [Song5] Mix Track1 + Track2 TRACK 1 Track Specify the track to which the mixed data will be written. Any track not selected here becomes empty after the mix operation.
-
Page 69: Copy From
[Song8] Copy Measure This allows you to copy data from the specified measures in a track of a Preset or User song to a specified measure (and beyond) in a track of the current song. Any data in the destination measures will be overwritten and erased by the copied data. -
Page 70: Delete Operation
[Song9] Create Measure This allows you to insert an empty measure of the specified time signature at any point in the specified track of the current User song. [Song9] Create Track Beat MEASURE 001 x ( 16/16 ) 1 Create Determines the number of empty measures to be inserted. - Page 71 Similar MIDI part settings also exist for the User kits (page 54). If you enable both MIDI part settings, settings for your MIDI parts will change, both on the DTXTREME IIs’ built-in tone generator and the connected external sound modules — every time you select a User song or a User kit.
- Page 72 3 Volume Determines the value for controller number 007 (volume). If used for the built-in tone generator, this determines the volume of each part. ❏ Settings: 000~127 4 Pan Determines the value for controller number 010 (pan). If used for the built-in tone generator, this determines the stereo panning of each part.
-
Page 73: Utility Features
U t i l i t y F e a t u r e s Utility features include overall settings of the DTXTREME IIs system, waveform sampling using the AUX IN jack on the front panel, and memory card functions. Press the UTILITY button on the top panel to access these features. - Page 74 Use the leftmost knob to jump to the first page of each category, then immediately open the desired page by scrolling up or down with the Page buttons. [UT 1] Low(Freq Gain) Mid(Freq Gain) 100Hz 800Hz Also, refer to Basic Operations on page 20. [UT 1] &...
- Page 75 [UT 3] & [UT 4] Tone Generator The Tone Generator pages determine the output settings for the sounds of the built-in tone generator. [UT 3] MasterTune SwapL/R RevBypas +000.0 [UT 4] IndivOut Slider AuxIn manual RevSend st+ph 1 MasterTune Determines the master pitch for the tone generator in 0.1-cent increments.
- Page 76 [UT 5] System Utility The System Utility page contains a variety of convenient system preference settings for easily and efficiently using the DTXTREME IIs system. [UT 5] LCDcont LEDdisp Learn JumpRecent SYSTEM drumkit always 1 LCDcont Determines the brightness and contrast of the LCD display.
- Page 77 An “Are You Sure?” confirmation message appears in the display. Press the ENTER/YES button again to actually execute the factory set operation. The DTXTREME IIs will automatically reboot and restore itself to the status it was in when you turned it on for the first time. Press the EXIT/NO button to cancel the operation.
-
Page 78: Receiving Bulk Data
Receiving Bulk data. completed. n When using one DTXTREME IIs unit to send bulk data to another DTXTREME IIs, make sure that the device number of both devices is set to the same value. - Page 79 ❏ Settings: off, on n The Merge function is useful when you have an external MIDI controller and want to use both it and the DTXTREME IIs to control a connected tone generator.
- Page 80 ❏ Settings: off, on 4 SysEx Enable or disable reception of System Exclusive data. Set this to off if you do not want the DTXTREME IIs to receive bulk data or parameter change messages. ❏ Settings: off, on [UT 12] MIDI Send The MIDI Send page lets you set how the built-in controllers affect the instrument.
- Page 81 [UT 13] Click Basics The Click Basics page lets you determine under what circumstances the click is played and what sound it uses. [UT 13] VoiceSet Output Mode CLICK CowBell phones play&rec off 1 VoiceSet Allows you to select from nine preset click sounds, or your favorite voice.
-
Page 82: Sampling Feature
• external: The built-in sequencer runs in sync to MIDI timing clock (F8) received via MIDI IN or USB. n If you want DTXTREME IIs to completely sync to an external device, set MIDICtl 1 to on and SyncMode 2 to external. The built-in sequencer will start or stop in sync to an external rhythm machine or sequencer, while running at that device's tempo. - Page 83 User kit is occupying memory space, you’ll need to delete it beforehand (page 84). Recording a Sample Once you’ve set up the DTXTREME IIs for sampling, start recording. n If you attempt a series of recording, the second recording will be done by erasing the sample from the first recording.
- Page 84 [UT 21] Deleting a Sample You can use the third WAVE page ([UT 21]) to delete all waveform data and sample data currently residing in the DTXTREME IIs memory. This helps free up additional memory for sample recording. [UT 21]...
-
Page 85: Memory Card Feature
Memory Card Feature You can store up to 40 drum kits (U1 to U40), up to 32 songs (U1 to U32), and 32 chains in the DTXTREME IIs internal memory. Moreover, an external memory card (SmartMedia) allows for storing many more kits, songs, and chains — as many as you want. - Page 86 CARD operation. n User voices are created using external System Exclusive parameter change data. Since they cannot be created on the DTXTREME IIs itself, you will not normally select allVoice. ) The AUTOLOAD directory is used to load sample files.
-
Page 87: Save Operation
(subdirectory) in the same location, the create operation cannot be executed. Specify another name for the new volume. In addition, you cannot rename an existing volume on the DTXTREME IIs, but you can do so on a computer. [UT 23] Saving a Data File You can save specific data in the DTXTREME IIs memory as... - Page 88 [UT 22] Loading a Data File You can load a specific data file from the memory card. [UT 22] Load FileName CARD allChain "DTXSET01" 1 Load Determines the data type to be loaded into the DTXTREME IIs memory. If you select one data, it will be loaded in the working buffer (page 35).
- Page 89 [UT 25] Renaming a Data File You can rename a specific data file on the memory card. This operation will use two displays, one for specifying the target file and the other for specifying a new file name. [UT 25] Rename FromFile CARD...
-
Page 90: Appendix
Do not reuse the seal that is peeled off. ■ Data Backup For maximum data security Yamaha recommends that you keep two copies of important data on separate Memory Cards. This gives you a backup if one Memory Card is lost or damaged. -
Page 91: Troubleshooting
The DTXTREME IIs is Not Making a Sound or a Triggered Sound ● Make sure the pads and triggers are connected correctly to the input jacks of the DTXTREME IIs. ● Make sure the connectors from the DTXTREME IIs OUTPUT jack (and NOT the INDIV. OUT jack) are plugged correctly to the input jacks of the amplifier or mixer. - Page 92 Double-triggering ● If you are using a sensor made by other manufacturers, it may be sending a large signal causing double- triggering. ● Make sure the head is not causing irregular vibration. If it is, it is necessary to mute the head. ●...
- Page 93 ● A data error has occurred. Turn the power OFF and then ON while holding the Play and Trigger buttons and the DTXTREME IIs will reset to its initial settings. Beware that all the data will be lost. Frequent data back- up storage to external MIDI devices such as the Yamaha MDF3 is recommended to prevent lost data.
-
Page 94: Error Messages
WARNING: All data initialized push [ENTER] All setting data is initialized because the backup battery inside the DTXTREME IIs may be running short. Consult your nearest Yamaha dealer on replacing the battery. WARNING : Battery voltage is low push [ENTER] The backup battery inside the DTXTREME IIs may be running low. - Page 95 ERROR : File is unknown format push [ENTER] The DTXTREME IIs cannot recognize the specified file (file format). Check if the file is suitable for the DTXTREME IIs and is not corrupted. ERROR : Can't edit preset song push [ENTER]...
-
Page 96: Specifications
❏ CD-ROM (USB-MIDI driver) Specifications and descriptions in this product brochure are for information purposes only. YAMAHA Corp. reserves the right to change or modify products or specifications at any time without prior notice. Since specifications, equipment or options may not be the same in every region, please check with your YAMAHA dealer. -
Page 97: Index
I n d e x Numerics 11to12 ...47 9to10 ...47 ACCOMP slider ...26 ACCOMP/REVERB slider ...10 AcpSens ...59 AltGrp ...52 Angle ...59 Attack ...51 Audio Connections ...17 Audition button ...11 AUX IN jack ...10 AUX IN VOL control ...10 AuxIn ...75 Balance ...50 BankMSB &... - Page 98 Key On Mode ...40 KeyMode ...51 KICK slider ...11 KIT ...23 Kit Common Settings ...47 KitName ...47 (to) Kit ...44 Layer ...50 LCDcont ...76 Learn ...76 LEDdisp ...76 Level ...38 Load ...88 Load (data file) ...88 Load operation ...88 Local ...80 Localizer ...
- Page 99 Slider Control ...26 SNARE slider ...11 SONG ...23 Song ...40 About ...25 Clear operation ...66 Copy operation ...66 Song Clear ...66 Song Copy ...66 Song Job ...65 Basic operations ...65 Edit pages ...65 SONG JOB button ...11 Song Playback ...24 Song Recording ...60 Preparation ...60 Real-time Recording ...62...
- Page 100 For details of products, please contact your nearest Yamaha or the authorized distributor listed below. Pour plus de détails sur les produits, veuillez-vous adresser à Yamaha ou au distributeur le plus proche de vous figurant dans la liste suivante. NORTH AMERICA CANADA Yamaha Canada Music Ltd.
- Page 101 Strings, Guitar & Percussion Division, Yamaha Corporation © 2003 Yamaha Corporation V908960 Printed in Taiwan...