
Related Manuals for GE Amersham Imager 680


Summary of Contents for GE Amersham Imager 680
- Page 1 Amersham ™ Imager 680 Operating Instructions Original instructions Translation disc enclosed...
- Page 2 Page intentionally left blank...
-
Page 3: Table Of Contents
Date and time ..........................4.3.2 Focus ..............................4.3.3 Instrument indicator ........................4.3.4 Service ..............................4.3.5 Log in ..............................Network ..............................4.4.1 Network setup ..........................4.4.2 Network access from instrument .................... 4.4.3 Instrument access from network .................... Amersham Imager 680 Operating Instructions 29271308 AB... - Page 4 5.8.6 Summary ............................Turn off the instrument ........................Analysis software ....................Software installation and activation .................... 6.1.1 Amersham Imager 680 Analysis Software installation ..........6.1.2 Amersham Imager 680 Analysis Software registration ..........Software operation ..........................6.2.1 Lane creation ........................... 6.2.2 Background subtraction ......................
- Page 5 Table of Contents Health and Safety Declaration Form ................... Index ........................Amersham Imager 680 Operating Instructions 29271308 AB...
- Page 6 Page intentionally left blank...
-
Page 7: Introduction
This chapter contains important user information, description of safety notices, regula- tory information, and a general description of the intended use of Amersham Imager 680. In this chapter Section See page 1.1 About this manual 1.2 Important user information 1.3 Regulatory information Amersham Imager 680 Operating Instructions 29271308 AB... -
Page 8: About This Manual
Purpose of this manual The Operating Instructions provide you with the instructions needed to operate, and maintain Amersham Imager 680 in a safe way. Typographical conventions Software items are identified in the text by bold italic text. A colon separates menu levels, thus File:Open refers to the Open command in the File menu. -
Page 9: Important User Information
Amersham Imager 680 is a CCD camera system that produces digitial images of samples in gels or membranes in three different modes: chemiluminescence, colorimetric, and fluorescence. Amersham Imager 680 is intended for research use only, and shall not be used in clinical procedures, or for diagnostic purposes. Prerequisites... - Page 10 Notes and tips Note: A note is used to indicate information that is important for trouble-free and optimal use of the product. Tip: A tip contains useful information that can improve or optimize your procedures. Amersham Imager 680 Operating Instructions 29271308 AB...
-
Page 11: Regulatory Information
1 Introduction 1.3 Regulatory information Regulatory information Introduction This section describes the directives and standards fulfilled by Amersham Imager 680. Manufacturing information The table below summarizes the required manufacturing information. Requirement Information Name and address of manufacturer GE Healthcare Bio-Sciences AB, Björkgatan 30, SE 751 84 Uppsala, Sweden... -
Page 12: Eu Directives
Operating Instructions or user manuals, and • used in the same state as it was delivered from GE, except for alterations described in the Operating Instructions or user manuals. Amersham Imager 680 Operating Instructions 29271308 AB... -
Page 13: Eurasian Customs Union
GE Healthcare Life Sciences Presnenskaya nab., 10C, 12th floor RU-123 317 Moscow, Russian Federation Telephone 1: + 7 495 411 9714 Fax nr: + 7 495 739 6932 Email: [email protected] Amersham Imager 680 Operating Instructions 29271308 AB... -
Page 14: Regulations For Usa And Canada
1.3.3 Regulations for USA and Canada NRTL certification This symbol indicates that Amersham Imager 680 has been certified by a Nationally Recognized Testing Laboratory (NRTL). NRTL means an organization, which is recognized by the US Occupational Safety and Health Administration (OSHA) as meeting the legal requirements of Title 29 of the Code of Federal Regulations (29 CFR), Part 1910.7. -
Page 15: Notification - Products Containing Mercury (Canada)
For safe handling procedures and the measures to be taken in case of accidental • breakage, and for options available for disposal and recycling, please refer to https://www.ec.gc.ca/mercuremercury/Default.asp?lang=En&n=DB6D2996-1. If additional support is needed, please contact your GE representative. This product should be disposed of or recycled in accordance with the applicable • laws. - Page 16 Pour obtenir une aide supplémentaire, veuillez communiquer avec votre représentant GE. Ce produit doit être éliminé ou recyclé en conformité avec les lois applicables. • Amersham Imager 680 Operating Instructions 29271308 AB...
-
Page 17: Other Regulations And Standards
EN 60529 Degrees of protection provided by enclosures IEC/EN 61326-1 Electrical Equipment for Measurement, Control, and Laboratory Use-EMC requirements-Part 1: General re- quirements (Emission according to CISPR 11, Group 1, class A) Amersham Imager 680 Operating Instructions 29271308 AB... - Page 18 The safety of the LED light sources in this instrument has been assessed by risk analysis in accordance with EN 61010-1. Amersham Imager 680, depending on configuration, is equipped with some or all light sources in the table below: Light sources...
-
Page 19: Safety Instructions
2 Safety instructions Safety instructions About this chapter This chapter describes safety precautions, safety labels, and emergency procedures for the Amersham Imager 680 instrument, in addition to information on the safe disposal of the instrument. Important WARNING Before installing, operating or maintaining the product, all users must read and understand the entire contents of this chapter to become aware of the hazards involved. -
Page 20: Safety Precautions
Safety precautions Introduction Amersham Imager 680 is powered by mains voltage, may be equipped with a UV light source, and is used to capture images of samples that may be hazardous. Before in- stalling, operating or maintaining the system, you must be aware of the hazards described in this manual. - Page 21 Do not damage the power supply cord by bending, twisting, heating or allowing them to become pinned under the equipment. Using damaged power cords could result in fire or electric shock. If the power supply cords are damaged, contact your local GE representative for replacements. WARNING Access to power switch and power cord with plug.
- Page 22 Installation WARNING As the equipment is heavy, contact a GE service person when moving or relocating the main body of the equipment. If the equipment drops, it may be broken, or you may get seriously injured if it drops on your foot.
- Page 23 The use of extension cords or multiple loads on one electrical outlet could result in fire and electric shock. CAUTION Amersham Imager 680 must be secured before transport or relo- cation. Contact GE for instructions before transporting the instru- ment.
- Page 24 Do not put your hand into the upper tray position. The gap is small and you may injure your hand. CAUTION Always use appropriate Personal Protective Equipment (PPE) during operation and maintenance of Amersham Imager 680. • Protective eyewear •...
- Page 25 Do not disable the interlock of the equipment as UV light can be emitted if the door is opened. NOTICE Both the Amersham Imager 680 Control Software and Amersham Imager 680 Analysis Software do not analyze image files other than those captured and generated by Amersham Imager 680.
- Page 26 Do not add and/or remove any files in the folder generated by Amersham Imager 680 with Amersham Imager 680 Control Software and Amersham Imager 680 Analysis Software. Do not modify any folders in which files have been added or removed. This may prevent a correct analysis afterwards.
- Page 27 Maintenance WARNING Electrical shock hazard. All instrument repairs or modifications should be performed by service personnel authorized by GE. Do not open any covers or replace parts unless specifically stated in the user documentation. Amersham Imager 680 Operating Instructions 29271308 AB...
- Page 28 Do not use excessive amounts of liquids for cleaning the Amersham Imager 680 instrument. This may result in instrument malfunction or electric shock. CAUTION Always use appropriate Personal Protective Equipment (PPE) during operation and maintenance of Amersham Imager 680. • Protective eyewear • Protective gloves •...
- Page 29 2 Safety instructions 2.1 Safety precautions NOTICE When performing maintenance of the equipment, remove the tablet computer. There is risk of injury if it falls on your foot. Amersham Imager 680 Operating Instructions 29271308 AB...
-
Page 30: Labels
System label The following illustration shows an example of the system label that is attached to the Amersham Imager 680 instrument. The system label identifies the product and shows electrical data and regulatory compliance. Manufacturing date Manufacturing year and month are determined by the serial number on the system label. - Page 31 Serial production number Example: A product with serial number YMM = 364 is manufactured in April 2013. For information regarding shelf life please contact your local GE representative. Symbols used on the labels The following symbols can be found on the label on the instrument:...
- Page 32 The registration number of the product will appear beside the symbol. This equipment has been tested and found to comply with the limits for a Class A digital device. Position of label and additional symbols Amersham Imager 680 Operating Instructions 29271308 AB...
- Page 33 For details on symbols see Section 3.4 Instrument hardware description, on page 43. Symbol Description On/Off switch Power switch I: Power ON O: Power OFF DVI-D Connector for DVI-D monitor USB port Ethernet port Caution, hot surface Amersham Imager 680 Operating Instructions 29271308 AB...
-
Page 34: Emergency Procedure
Access to power switch and power cord with plug. Do not block access to the power switch and power cord. The power switch must always be easy to access. The power cord with plug must always be easy to disconnect. Amersham Imager 680 Operating Instructions 29271308 AB... -
Page 35: Recycling Information
Recycling of hazardous substance The lamps in Amersham Imager 680 configurations: 680 QC, 680 UV, and 680 RGB contain mercury vapour. These must be recyled or disposed of in a manner compliant with na- tional and local environmental regulations. - Page 36 Follow local and/or national/federal requirements for disposal of the Amersham Imager 680 Cabinet and the system cabinet. Dispose of electronic components as specified by local regulations depending on material used in the construction of the components.
-
Page 37: Declaration Of Hazardous Substances (Dohs)
EFUP shall be done in accordance with the Product Maintenance Procedures. This product must not be disposed of as unsorted municipal waste, and must be collected separately and handled properly after decommissioning. Amersham Imager 680 Operating Instructions 29271308 AB... - Page 38 Indicates that this hazardous substance contained in at least one of the homogeneous materials used for this part is above the limit requirement in GB/T 26572. Data listed in the table represents best information available at the time of publication. • Amersham Imager 680 Operating Instructions 29271308 AB...
-
Page 39: Instrument Description
3 Instrument description Instrument description About this chapter This chapter presents an overview of Amersham Imager 680 features and different in- strument configurations. It also contains descriptions of hardware components, software displays, and functions. Note: Due to cosmetic changes to the software, the screen captures in this manual may differ sligtly compared to the acutal software. -
Page 40: Introduction
3.1 Introduction Introduction Amersham Imager 680 is an imaging instrument designed to identify and quantify pro- teins or DNA in gels or membranes. A cooled 3.2 megapixel CCD camera is used to capture high resolution digital images of protein and DNA bands in gels and on mem- branes obtained by electrophoresis or western blotting separation methods. -
Page 41: Feature Overview
3 Instrument description 3.2 Feature overview Feature overview The following features are offered by Amersham Imager 680: • A highly sensitive CCD camera with 3.2 megapixels • Fast detector cooling capacity • Ready-to-use within 5 minutes after start-up • Tablet computer interface •... -
Page 42: Illustration Of The Instrument
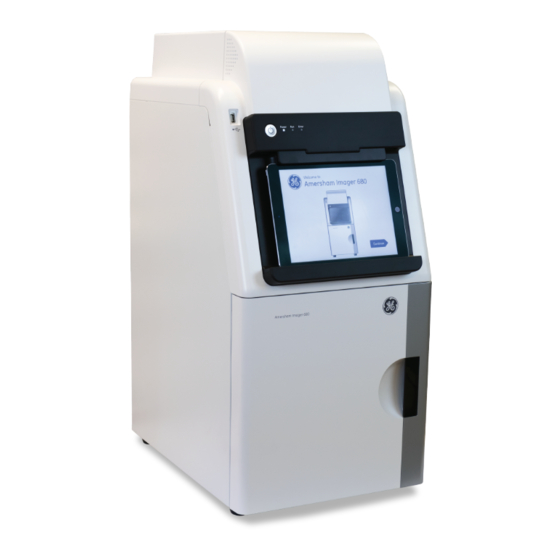
3.3 Illustration of the instrument Illustration of the instrument The Amersham Imager 680 instrument is operated from a wireless connected tablet computer. It may also be operated from a wired touchscreen or a monitor with mouse. The illustration below displays Amersham Imager 680 setup with tablet computer. -
Page 43: Instrument Hardware Description
Instrument hardware description Main components in each configuration Amersham Imager 680 is available in four different configurations. Different parts and functions of Amersham Imager 680 are available depending on configuration. The table below describes the functions and components of the different instrument configurations. - Page 44 Run: The LED is lit (blue) when the instrument is operating, or if the Instrument indicator is selected. Error: The LED is lit (red) when the instrument is malfunctioning. Amersham Imager 680 Operating Instructions 29271308 AB...
- Page 45 Port for connecting a digital only DVI monitor. USB port Port for additional external devices, for exam- ple a printer. Note: The tablet computer cannot be recharged with the instrument. Ethernet port Connector for a network cable. Amersham Imager 680 Operating Instructions 29271308 AB...
- Page 46 For configurations 680, 680 UV, and 680 QC: White light source For configuration 680 RGB: White light plus Blue, Green, and Red light sources Epi light source White light Filter changer Filter changer unit Amersham Imager 680 Operating Instructions 29271308 AB...
- Page 47 ON = 0.5 s / OFF = 1.5 s Mount iPad Air attachment The description below gives the necessary information for the fitting and removing of the iPad Air attachment to Amersham Imager 680. Fitting the attachment Note: Place the attachment as illustrated below.
- Page 48 Push the attachment upward firmly into the guide until you hear a clicking sound. Connect an iPad Air to the attachment. Removing the attachment Step Action Push the center of the attachment to release the lock points. Amersham Imager 680 Operating Instructions 29271308 AB...
- Page 49 3 Instrument description 3.4 Instrument hardware description Step Action Pull the attachment downward. Amersham Imager 680 Operating Instructions 29271308 AB...
-
Page 50: Instrument Software Description
Instrument software description Introduction The Amersham Imager 680 software is designed to guide you through the workflow of capturing images and analyzing the image data. The software is normally operated on a wireless connected tablet computer placed in the docking support on the instrument front. -
Page 51: Description Of The Capture Tab
Description of the Capture tab Capture view The Capture tab is displayed as the default start screen when Amersham Imager 680 and the tablet computer are turned on and the start up procedure has completed. It al- lows you to select image capturing method and set details for the exposure. The display changes depending on the choice of method. - Page 52 Depending on system configuration you may or may not have access to all methods. The following section describes all available method displays in the Amersham Imager 680 product family. For details on system configurations see Section 3.4 Instrument hardware description, on page 43.
- Page 53 68. Start button: use the button to start capturing. High dynamic range checkbox: use the check box for image capture with high dynamic range. Binning: Click Change button to change binning. Amersham Imager 680 Operating Instructions 29271308 AB...
- Page 54 The illustration below shows the specific components of the Capture tab with the Fluo- rescence image capturing method. Depending on selected options, the display changes and unavailable options are hidden (greyed out). For more details of the general components, see Capture view, on page 51. Amersham Imager 680 Operating Instructions 29271308 AB...
- Page 55 Manual • Advanced • Note: For more information on manual settings see Set exposure time, on page 68. High dynamic range checkbox: Use the check box for image capture with high dynamic range. Amersham Imager 680 Operating Instructions 29271308 AB...
-
Page 56: Description Of The Library Tab
Search field: use the field to search for specific files Clear button: use the button to clear the search field Scroll buttons and bar: use the bar or buttons to navigate among files in the displayed list of stored files Amersham Imager 680 Operating Instructions 29271308 AB... - Page 57 Delete button: use the button to delete the selected (marked) file or files. Rename button: use the button to rename a saved file. Copy/Move button: use the button to copy or move selected files. Open button: use the button to open the selected file. Amersham Imager 680 Operating Instructions 29271308 AB...
-
Page 58: Description Of The Image View
Display of the captured image. Note: Incremental and Advanced exposures may result in several images being displayed two at a time as they are exposed. Navigate among the images using forward and backward arrows. Amersham Imager 680 Operating Instructions 29271308 AB... - Page 59 Blue, Green, and Red. Information icon: use to access additional image and exposure information such as image file name and exposure time. Amersham Imager 680 Operating Instructions 29271308 AB...
- Page 60 A dialog appears asking to confirm the cancellation. This prevents deleting images by accident. Save button: use the button to save the image. See Section 5.7 Save and manage image files, on page 167 for further details. Amersham Imager 680 Operating Instructions 29271308 AB...
- Page 61 Print button: use the button to print the image. Note: The print function requires that the instrument is connected to a USB con- nected printer. For installation of a printer contact a representative from Amersham Imager 680 Operating Instructions 29271308 AB...
-
Page 62: Description Of The Analysis Workflow
Image view button: Use the button to activate the image view. Lane profile button: Use the button to display separate graphical lane profiles. Zoom out button: Use the button to zoom out. Zoom in button: Use the button to zoom in. Amersham Imager 680 Operating Instructions 29271308 AB... - Page 63 Lane Creation is used to define and position lanes to be used in the subsequent analysis. Open the background subtraction step with the button Background is used to select method for background subtraction. Amersham Imager 680 Operating Instructions 29271308 AB...
- Page 64 MW Calibration is used to create a molecular weight calibration curve based on a selected standard marker. Open the normalization step with the button Normalization is used to select bands to be used for normalization. Amersham Imager 680 Operating Instructions 29271308 AB...
- Page 65 Open the summary with the button Summary is used to present an overview of the result data from the analysis. Use the Save button to save the analysis data together with the image file. Amersham Imager 680 Operating Instructions 29271308 AB...
-
Page 66: Description Of Settings Views
Date & Time button: Use to set date and time on the instrument Focus button: Use to adjust focus Sleep button: Use to set the time when the automatic CCD cooling shall stop after periods of non-use. Amersham Imager 680 Operating Instructions 29271308 AB... - Page 67 Clear button: Use the button to remove all typed text in the text field. Keyboard area: Use the keyboard to type text. Delete button: Use the button to delete one letter at a time. Enter button: Use the button to create a new row. Amersham Imager 680 Operating Instructions 29271308 AB...
- Page 68 Exposure time button or Interval time button. It allows you to set the exposure time manually. The illustration below shows the main components of the Set exposure time view. Amersham Imager 680 Operating Instructions 29271308 AB...
- Page 69 Use the numeric keys to set the time in the selected field. Arrow buttons: Use the buttons to navigate between hours, minutes, sec- onds, and 1/10 s in the time units area. Set button: Use the button to save the changes made. Amersham Imager 680 Operating Instructions 29271308 AB...
-
Page 70: Accessories
3 Instrument description 3.6 Accessories Accessories Accessories delivered with the instrument The following table shows the accessories of Amersham Imager 680. Depending on configuration the included accessories may vary. Part Description Code no. Relevant for con- figuration: Black tray, marked... - Page 71 All configurations translations of Amersham Imager 680 Operating Instructions Amersham Imager 29272479 All configurations 680 Analysis Software AC power cord (for 19244801 All configurations North America) AC power cord (for 80648033 All configurations Europe) Amersham Imager 680 Operating Instructions 29271308 AB...
- Page 72 AI 600/680 upgrade to UV 29083422 600/680 AI 600/680 upgrade UV to QC 29083424 600/680 UV AI 600/680 upgrade QC to RGB 29083425 600/680 QC AI 600/680 upgrade UV to RGB 29083426 600/680 UV Amersham Imager 680 Operating Instructions 29271308 AB...
-
Page 73: Installation
4 Installation Installation About this chapter This chapter contains information on how to prepare the site for Amersham Imager 680, how to set up network connections, and set system settings. Note: Installation or transport of the Amersham Imager 680 instrument must be performed by GE authorized personnel. -
Page 74: Site Requirements
Access to power cord. Do not block access to the power cord. The power cord must always be easy to disconnect. NOTICE This equipment is not intended for use in residential environments and may not provide adequate protection to radio reception in such environments. Amersham Imager 680 Operating Instructions 29271308 AB... - Page 75 Dust in the atmosphere should be kept to a minimum • The equipment must not be excessively exposed to vibration or impacts • Exposure to corrosive gas must be avoided The installation site must comply with the following specifications. Amersham Imager 680 Operating Instructions 29271308 AB...
- Page 76 Do not use the instrument in a room with a temperature above +28°C. Higher temperatures does not allow the CCD to cool down properly (to -25°C). For environmental requirements, see Environmental requirements, on page 245. Amersham Imager 680 Operating Instructions 29271308 AB...
-
Page 77: Instrument Setup
Introduction Amersham Imager 680 is initially installed by GE service representatives. Amersham Imager 680 must be secured before long distance transports. Contact GE for instructions before transport or relocation of the instrument. For connecting additional monitors or peripheral equipment contact GE for instructions. -
Page 78: System Settings
Capture and Library tabs. For the general components of the Settings view see Section 3.5.5 Description of settings views, on page 66 Amersham Imager 680 Operating Instructions 29271308 AB... -
Page 79: Date And Time
Change date To change the date setting on the instrument, select the plus or minus buttons next to the Year, Month, and/or Day field, to change the value of year, month or day. Amersham Imager 680 Operating Instructions 29271308 AB... - Page 80 Hour or Minute field, to change the value of hour or minute. Save the changes to date and time Select the Ok button to save the changes to the Date & time view. Select the Cancel button to leave the view without saving changes. Amersham Imager 680 Operating Instructions 29271308 AB...
-
Page 81: Focus
Estimated focus in mm above (+) or below (-) the default focus. The brightness value. Plus and minus buttons: Use the buttons to adjust the brightness value. OK button: Use the button to save the new settings. Amersham Imager 680 Operating Instructions 29271308 AB... - Page 82 No button cancels the adjustments to focus and the normal fixed focus setting (default) is once again in use. CAUTION Do not put your hand into the upper tray position. The gap is small and you may injure your hand. Amersham Imager 680 Operating Instructions 29271308 AB...
-
Page 83: Instrument Indicator
4.3.3 Instrument indicator 4.3.3 Instrument indicator The Instrument indicator is a useful tool when several Amersham Imager 680 instruments are used in the same location. It identifies which instrument is connected to a certain tablet computer. Select the Instrument indicator button. This activates the Run LED light on the instrument it is connected to. -
Page 84: Service
FPGA version The view also displays buttons for software update and export log functions. Update software Follow the instructions below to update the software for Amersham Imager 680. Step Action Connect a USB flash drive containing the update file provided by GE stored at the root level of the USB flash drive. - Page 85 To return to the Settings window select the OK button. Confirm that the software, Firmware and FPGA version numbers are correctly updated. Export log Follow the instructions below to export a log from Amersham Imager 680. Step Action Select the Export log button.
-
Page 86: Log In
To set a password follow the following steps. Step Action In the Settings menu, click Log in. In the Log in window, click On. Enter a password and click Done. Note: The default password is AI600user Amersham Imager 680 Operating Instructions 29271308 AB... - Page 87 To change a password follow the following steps. Step Action In the Settings menu, click Log in. To change password click the Change Password button. Enter current password, new password, confirm new password, then click Amersham Imager 680 Operating Instructions 29271308 AB...
- Page 88 To turn off password protected login follow the following steps. Step Action In the Settings menu, click Log in. To turn off log in functionality, select Off. Enter the current password and click Done to turn it off. Amersham Imager 680 Operating Instructions 29271308 AB...
-
Page 89: Network
This section contains information on network setup options, virus protection, network settings, and file access. In this section Section See page 4.4.1 Network setup 4.4.2 Network access from instrument 4.4.3 Instrument access from network Amersham Imager 680 Operating Instructions 29271308 AB... -
Page 90: Network Setup
4.4.1 Network setup 4.4.1 Network setup Virus protection The technical solution for Amersham Imager 680 protects it from virus transfer from in- fected USB flash drives. Each restart of the instrument resets the software to its original installation. Note: If you, for any reason, suspect that the instrument has been infected by a computer virus, restart the instrument as soon as possible. - Page 91 Result: The Network view will appear. Select the type of network connection and follow the separate instructions below. Connect to a DHCP network Follow the instructions below, to connect to a DHCP network: Amersham Imager 680 Operating Instructions 29271308 AB...
- Page 92 Result: An automatic connection to the DHCP network is established within a couple of seconds. Tip: Reserve the IP address to Amersham Imager 680 for easier access of its net- work resources. Connect to a Static IP network Follow the instructions below, to connect to a Static IP network:...
- Page 93 Gateway field and use the keypad to enter the router. • Workgroup field and use the keypad to enter the workgroup. • Select OK to save the changes. Result: The connection to the network will be established within a couple of seconds. Amersham Imager 680 Operating Instructions 29271308 AB...
-
Page 94: Network Access From Instrument
4.4.2 Network access from instrument 4.4.2 Network access from instrument To be able to store and access files on a network location, Amersham Imager 680 must have access permission to the specific computer or server where the files are to be stored. - Page 95 If password-protected sharing is turned on, you must have a user account and password on your computer for full access to shared items. Password- protected sharing is located in the Control panel under Advanced sharing settings. Password protection is turned on by default. Amersham Imager 680 Operating Instructions 29271308 AB...
-
Page 96: Instrument Access From Network
Amersham Imager 680 is equipped with a web tool which allows instrument access from a network. The web tool can be used to copy or delete files on the instrument from a remote location. To be able to access Amersham Imager 680 web tool the following conditions must be fulfilled: •... - Page 97 The password can be changed. Click Option in the Login window and follow the instruction in the Options window. Type the default password: and select Login. AI600user Result: This opens the Amersham Imager 680 web tool page. Amersham Imager 680 Operating Instructions 29271308 AB...
- Page 98 Select the Delete button to delete the selected files. • Note: The copied files will be downloaded as a zip-file with an automatically gener- ated name. The download location and procedure will vary with the chosen web browser's download settings. Amersham Imager 680 Operating Instructions 29271308 AB...
-
Page 99: Operation
About this chapter This chapter describes how to operate Amersham Imager 680. Prior to operating the Amersham Imager 680 system it is important that you have read and understood the safety information. Make sure to read the relevant safety instructions prior to operation. -
Page 100: Operation Flow Chart
The general flow of operation is as follows: Stage Description Turn on the instrument Select a tray and place sample Place the tray in the instrument Capture the image Save the image file Analyze the image Amersham Imager 680 Operating Instructions 29271308 AB... -
Page 101: Turn On The Instrument
If relevant, connect a USB flash drive to the instrument for file storage. The USB flash driver is automatically installed when the USB flash drive is connected to Amersham Imager 680. Note: Password protected USB flash drives are not supported. Amersham Imager 680 Operating Instructions 29271308 AB... - Page 102 5 Operation 5.2 Turn on the instrument Step Action Select the icon for Amersham Imager 680 on the desktop screen of the connected tablet computer. Result: 1. A welcome screen appears. 2. The following screen will be displayed. 3. If Log in is turned On then password prompt is displayed on welcome screen.
- Page 103 5 Operation 5.2 Turn on the instrument Step Action Select the Continue button. Result: The following screen will be displayed. Amersham Imager 680 Operating Instructions 29271308 AB...
- Page 104 5 Operation 5.2 Turn on the instrument Step Action Wait for the CCD status to turn green. Result: Image capturing can begin. Amersham Imager 680 Operating Instructions 29271308 AB...
-
Page 105: Select Tray
Gel sheet 680 RGB NOTICE With regards to third party patents related to sample preparation etcetera, it is recommended that you consult a lawyer or patent attorney for information on obtaining appropriate licenses. Amersham Imager 680 Operating Instructions 29271308 AB... -
Page 106: Place The Tray In The Instrument
Place the tray in the instrument Place the tray This section describes how to place the sample on the tray and how to place the tray in the correct tray position in Amersham Imager 680. Step Action Select a tray and accessories suitable for the capturing method. - Page 107 2 The other side of the White Insert indicates the maximum field of view of 16 x 22 cm for the lower tray position. Use the lower tray position for a larger field of view for one to four samples. Amersham Imager 680 Operating Instructions 29271308 AB...
- Page 108 Open the instrument door. Insert the tray in the correct tray position. Note: For Chemiluminescence capturing you may also select the upper tray position (1 in the illustration below). Close the door. Amersham Imager 680 Operating Instructions 29271308 AB...
-
Page 109: Capture An Image
Capture an image This section describes how to capture an image with any of the available methods. In this section Section See page 5.5.1 Available methods 5.5.2 Chemiluminescence capture 5.5.3 Colorimetric capture 5.5.4 Fluorescence capture Amersham Imager 680 Operating Instructions 29271308 AB... -
Page 110: Available Methods
5.5 Capture an image 5.5.1 Available methods 5.5.1 Available methods This section describes how to capture an image. The table below describes the available methods for each Amersham Imager 680 con- figuration: Method Chemiluminescence Chemiluminescence - with colorimetric marker Colorimetric - Epi-illumination... -
Page 111: Chemiluminescence Capture
Introduction The chemiluminescence image capture method is available in all configurations of Amersham Imager 680. The instrument captures the light which is emitted during the chemical reaction on the membrane. When a colorimetric marker is present in the sample, an additional color image can be captured using a white light source. - Page 112 The software automatically calculates the optimal exposure time for the specified area. To use the full dynamic range of the image file, check High dynamic range. To minimize exposure time, leave High dynamic range unchecked. Amersham Imager 680 Operating Instructions 29271308 AB...
- Page 113 Binning needs to be Select Change and choose desired binning option changed: Note: Do not open the door during exposure as this will stop the exposure and the data will not be saved. Amersham Imager 680 Operating Instructions 29271308 AB...
- Page 114 In the Capture tab, select Chemiluminescence. Result: The options available for Chemiluminescence capturing are displayed to the right on the screen. Automatic exposure is selected by default and the Exposure options field displays Auto. Amersham Imager 680 Operating Instructions 29271308 AB...
- Page 115 Lower position: Upper position: Choose the desired binning option and click OK. If your sample contains a colorimetric marker, then select the check box Colorimetric marker. Amersham Imager 680 Operating Instructions 29271308 AB...
- Page 116 Note: Selecting Cancel will cancel the exposure and the Capture view will appear. Amersham Imager 680 Operating Instructions 29271308 AB...
- Page 117 Step Action When the exposure is finished the image view appears displaying the im- age(s). Amersham Imager 680 creates a folder containing the created image files which can be saved. For details see File formats, on page 174. If... Then...
- Page 118 To use the full dynamic range of the image file, check High dynamic range. To minimize exposure time, leave High dynamic range unchecked. Select Semi-Auto exposure in the exposure drop down menu. Select Next and wait for the pre-exposure to finish. Amersham Imager 680 Operating Instructions 29271308 AB...
- Page 119 Choose (blue arrows) to adjust the lower range of the grayscale in the displayed image indicated by the blue line in the image histogram. Amersham Imager 680 Operating Instructions 29271308 AB...
- Page 120 Result: The selected area is highlighted with a square. Use the right hand side arrow buttons to move the highlighted point or area. Select Start exposure and wait for the exposure to finish. Amersham Imager 680 Operating Instructions 29271308 AB...
- Page 121 Step Action When the exposure is finished the image view appears displaying the im- age(s). Amersham Imager 680 creates a folder containing the created image files which can be saved. For details see File formats, on page 174. If... Then...
- Page 122 Result: The options available for chemiluminescence capturing are displayed to the right on the screen. If your sample contains a colorimetric marker, then check the check box Colorimetric marker. Select Manual exposure in the exposure drop down list. To change Binning use the Change button. Amersham Imager 680 Operating Instructions 29271308 AB...
- Page 123 Enter the new time and select Set to return to the previous view. For detailed instructions see Section 3.5.5 Description of settings views, on page 66. Select Start and wait for the exposure to finish. Amersham Imager 680 Operating Instructions 29271308 AB...
- Page 124 Select both tabs simultaneously to see a composite color image • of the Sample and Marker images. Select the Save button to save the images. For other options after capturing see Options after capturing, on page 135. Amersham Imager 680 Operating Instructions 29271308 AB...
- Page 125 Check the check box Stop when saturated if you wish the exposure to stop when the pixel intensity of the accumulated exposed images reaches satu- ration. Note: The Stop when saturated function overrides the set repetitive exposures. Amersham Imager 680 Operating Instructions 29271308 AB...
- Page 126 Result: This opens the Set interval time view. Enter the value and select Set to to save the value and to return to the pre- vious view. The Reset button resets the value to zero. Amersham Imager 680 Operating Instructions 29271308 AB...
- Page 127 Use the intensity tool to check pixel intensity and the contrast tool to adjust contrast and brightness. Amersham Imager 680 creates a folder containing the created image files which can be saved. For details see File formats, on page 174.
- Page 128 In the Capture tab, select Chemiluminescence. Result: The options available for chemiluminescence capturing are displayed to the right on the screen. If your sample contains a colorimetric marker, then check the Colorimetric marker check box. Amersham Imager 680 Operating Instructions 29271308 AB...
- Page 129 The table below shows the available combinations for the lower tray position. Colorimetric marker No colorimetric marker Tray position Lower Lower Binning 4 levels 4 levels Image area 1 area 4 areas No. of captures 1 - 12 Amersham Imager 680 Operating Instructions 29271308 AB...
- Page 130 Binning is pre-selected to Default. Click the Change button to choose another binning setting. A pop-up window displays the binning options. Note: The Binning function increases sensitivity by binning pixels and results in lower image resolu- tion. Amersham Imager 680 Operating Instructions 29271308 AB...
- Page 131 Select an area in Image area. This is only available for image capture in the lower tray position with standard sensitivity without colorimetric maker. Set the number of repetitive exposures in Number of captures by using the plus and minus buttons. Amersham Imager 680 Operating Instructions 29271308 AB...
- Page 132 Set the exposure time by pressing value. Result: the Set exposure time view opens Enter the value and select Set to save the value and to return to the previous view. The Reset button resets the value to zero. Amersham Imager 680 Operating Instructions 29271308 AB...
- Page 133 5 Operation 5.5 Capture an image 5.5.2 Chemiluminescence capture Step Action Select Start exposure. Amersham Imager 680 Operating Instructions 29271308 AB...
- Page 134 When the exposure is finished the image view appears dis- playing the image. Amersham Imager 680 creates a folder for the image files. For details see File formats, on page 174. Select the Save to save the images.
- Page 135 Amersham Imager 680 creates a folder for the image files. For details see File formats, on page 174. Use the Select to select the images to be saved then Save to save the images.
- Page 136 See Section 5.8 Analyze the image, on page 181 for further instructions. • To print the image, select Print. • To discard the image without saving select Done and confirm the following dialog. Amersham Imager 680 Operating Instructions 29271308 AB...
-
Page 137: Colorimetric Capture
Both options use white light imaging sources. For Epi-illumination the light source is lo- cated at the top of the Amersham Imager 680 interior. For Trans-illumination the sample is illuminated from the light source at the bottom of the instrument interior. When using Trans-illumination, the intensity data is converted to optical density (OD values), which provides a more quantitative result compared to Epi-illumination. - Page 138 Follow the instructions in the table to perform colorimetric capture. Step Action In the Capture tab, select Colorimetric. Result: The options available for colorimetric capturing are displayed to the right on the screen. Amersham Imager 680 Operating Instructions 29271308 AB...
- Page 139 For Trans-illumination place a diffuser board at the bottom of the instrument with the matte side up, before capturing. Select Start. Result: A progress bar appears on the screen indicating the time remaining of the imaging process. Amersham Imager 680 Operating Instructions 29271308 AB...
- Page 140 Action When the exposure is finished the image view appears displaying the im- ages. Amersham Imager 680 creates a folder containing the created image files which can be saved. For details see File formats, on page 174. Select the relevant tab of Sample and Color for the image you wish to display.
-
Page 141: Fluorescence Capture
Fluorescence capturing is performed using a light source and emission filter. Note: Fluorescence capture is only available with Lower tray position. The methods available in Amersham Imager 680 configurations are described in the following table: 680 UV 680 QC... - Page 142 Semi-automatic exposure is not available for multichannel fluorescence capture. The intensity of the im- Select Manual exposure and set the exposure time man- age is inadequate after ually. automatic exposure or a known exposure time is required Amersham Imager 680 Operating Instructions 29271308 AB...
- Page 143 To use the full dynamic range of the image file, check High dynamic range. To minimize exposure time, leave High dynamic range unchecked. Note: This function is only effective with the Auto and Semi-Auto exposure settings. Amersham Imager 680 Operating Instructions 29271308 AB...
- Page 144 If more than one detection channel was selected, the Exposure time button displays Set. If only one detection channel was selected, the button displays the latest set exposure time. Result: This opens the Set exposure time view. Amersham Imager 680 Operating Instructions 29271308 AB...
- Page 145 Result: This will close the view. For details see, Set exposure time, on page 68. Select Start. A progress bar appears on the screen indicating the time re- maining of the imaging process and the selected exposure option. Amersham Imager 680 Operating Instructions 29271308 AB...
- Page 146 Action When the exposure is finished the image view displays the images. Amersham Imager 680 creates a folder containing image files which can be saved. The display and number of images created depends on the number of detection channels selected in step 2.
- Page 147 Result: The options available for fluorescence capturing are displayed to the right on the screen. Check the Epi-RGB radio button, and then check the relevant check box of Blue, Green, or Red. Check the Colorimetric marker check box. Amersham Imager 680 Operating Instructions 29271308 AB...
- Page 148 Proceed to the final step of this instruction. If Semi-Auto exposure was chosen, select Next and wait for the pre-exposure to finish. Result: A pre-exposed image appears. Amersham Imager 680 Operating Instructions 29271308 AB...
- Page 149 Choose (red arrows) to adjust the upper range of the grayscale in the displayed image indicated by the red line in the image histogram. Amersham Imager 680 Operating Instructions 29271308 AB...
- Page 150 Select Start exposure and wait for the exposure to finish. When the exposure is finished the image view appears displaying the images. Amersham Imager 680 creates a folder containing the created image files which can be saved. For details see File formats, on page 174.
- Page 151 Advanced exposure mode is available with only one channel of Epi RGB or a custom channel under Fluorescence RGB capture. If the sample contains a colorimetric marker, then check the Colorimetric marker box. Amersham Imager 680 Operating Instructions 29271308 AB...
- Page 152 The table below shows the available combinations. Colorimetric marker No Colorimetric marker Tray position Lower Lower Binning 3 levels 3 levels Image area 1 area 4 areas Number of captures 1 - 12 Amersham Imager 680 Operating Instructions 29271308 AB...
- Page 153 The Binning increases sensitivity by binning pixels and results in lower image resolution. Select an area in Image area. This is only available for image capture in the lower tray position without colorimetric maker. Amersham Imager 680 Operating Instructions 29271308 AB...
- Page 154 Result: this opens the Set waiting time view. Enter the value and select Set to save the value and to return to the previous view. The Reset button resets the value to zero. Amersham Imager 680 Operating Instructions 29271308 AB...
- Page 155 Set the exposure time by pressing value. Result: the Set exposure time view opens Enter the value and select Set to save the value and to return to the previous view. The Reset button resets the value to zero. Amersham Imager 680 Operating Instructions 29271308 AB...
- Page 156 5 Operation 5.5 Capture an image 5.5.4 Fluorescence capture Step Action Select Start exposure. Amersham Imager 680 Operating Instructions 29271308 AB...
- Page 157 When the exposure is finished the image view appears dis- playing the image. Amersham Imager 680 creates a folder for the image files. For details see File formats, on page 174. Select the Save to save the images.
- Page 158 The Custom option is designed to allow for various customized combinations of wave- lengths of the illuminating light and filters. Please contact your GE representative for more details as the customized methods require service. Amersham Imager 680 Operating Instructions 29271308 AB...
- Page 159 Follow the instructions below to perform fluorescence capture using Fluorescence UV. Step Action In the Capture tab, select Fluorescence. The options available for Fluores- cence capturing are displayed to the right on the screen. Choose the UV. Amersham Imager 680 Operating Instructions 29271308 AB...
- Page 160 Result: A progress bar appears on the screen indicating the time remaining of the imaging process and the exposure time. Proceed to the final step of this instruction. If Semi-Auto exposure was selected, select Next. Result: A low resolution preview appears. Amersham Imager 680 Operating Instructions 29271308 AB...
- Page 161 Choose (blue arrows) to adjust the lower range of the grayscale in the displayed image indicated by the blue line in the image histogram. Amersham Imager 680 Operating Instructions 29271308 AB...
- Page 162 Imager 680 creates a folder containing the image files which can be saved. For details see File formats, on page 174. Select the Save button to save the images. For other options after capturing see Options after capturing, on page 135. Amersham Imager 680 Operating Instructions 29271308 AB...
-
Page 163: View The Image
A non displayed channel is indicated with a black text and gray frame. Image tools menu: Use the buttons to choose tools to modify the image display and to examine the image. The selected image tool options. Amersham Imager 680 Operating Instructions 29271308 AB... - Page 164 If a different tool is selected when the image is zoomed in, the selected zoom will be kept until saved. Use the Reset button to return to the original zoom view. Amersham Imager 680 Operating Instructions 29271308 AB...
- Page 165 Note: For samples with colorimetric marker, use the contrast tool for setting the contrast of the chemiluminescent sample. The selected contrast is saved with the combined color im- age. Amersham Imager 680 Operating Instructions 29271308 AB...
- Page 166 Image files may be printed directly from the result image screen. The printing option requires a printer to be connected to the instrument. Print using the Print button. Contact your GE representative for further details on printer installations. Amersham Imager 680 Operating Instructions 29271308 AB...
-
Page 167: Save And Manage Image Files
After capturing the image(s) can be saved. You can also copy, move, rename, delete, search, sort, and open files. If the Amersham Imager 680 instrument is connected to a network, you can access and manage files stored on the network location. -
Page 168: Save Locations
On the instrument Note: Amersham Imager 680 is equipped with a flash drive that allows for storage of a finite number of images on the instrument. It is necessary to regularly remove images from the instrument to ensure available storage space. If the instrument flash drive runs full, the oldest images will automatically be removed when a new image is captured. - Page 169 For information on how to configure a network, see Section 4.4 Network, on page 89. In the Choose save location view, mark the network folder you wish to add and select the Use this location button. Amersham Imager 680 Operating Instructions 29271308 AB...
- Page 170 The network settings must be properly configured before a network folder can be added as a location for saving files. For information on how to configure a network, see Section 4.4 Network, on page 89. Amersham Imager 680 Operating Instructions 29271308 AB...
- Page 171 5 Operation 5.7 Save and manage image files 5.7.1 Save locations Step Action To save the changes, select the OK button. Amersham Imager 680 Operating Instructions 29271308 AB...
-
Page 172: Save Images
Follow the instructions below to save the image(s). Step Action Select Save to save the image or images. Result: The Save view opens. The automatically generated image name(s) are displayed in the lower part of the view. Note: Amersham Imager 680 Operating Instructions 29271308 AB... - Page 173 To personalize the image file name, select the Optional image name prefix: field to add a prefix to the auto generated image file name. This opens a keypad view. Type your text and then select Done to return to the previous view. Amersham Imager 680 Operating Instructions 29271308 AB...
- Page 174 To optimize the instrument's life time and to minimize unnecessary power consumption, shut down the instrument when image captures and analyses have been completed for the day. If the Amersham Imager 680 instrument is used around the clock, make sure to restart the system at least once a day to remove temporary files that may take up unnecessary memory space.
- Page 175 • .jpg trast, for presentation purposes Note: The .jpg image is included in the folder but it is not displayed on the screen. Amersham Imager 680 Operating Instructions 29271308 AB...
- Page 176 Marker image in color, and • .jpg with set contrast, for presentation purpos- Note: The .jpg image is included in the folder but it is not displayed on the screen. Amersham Imager 680 Operating Instructions 29271308 AB...
- Page 177 Blue + Green + Red: A composite • .jpg image of fluorescence data, in color, and with set contrast Note: The composite image is displayed if two or three tabs are selected simultaneously. Amersham Imager 680 Operating Instructions 29271308 AB...
-
Page 178: File Manage Options
The Select all and Deselect all buttons are used to select or deselect all of the files in the library. Delete files Follow the instruction to delete files from the device. Step Action Select the file(s) to delete. Select the Delete button. Result: The following window will appear: Amersham Imager 680 Operating Instructions 29271308 AB... - Page 179 Select the Copy/Move button. The following window will appear: Select the location to copy or move the file(s) to in the drop down menu in the Move (or copy) selected files to: field. Amersham Imager 680 Operating Instructions 29271308 AB...
- Page 180 If desired, use the Image tools to adjust the view of the image. For detailed information on the Image tools, see Image tools, on page 164. When finished, select the Done button to go back to the Library tab. Amersham Imager 680 Operating Instructions 29271308 AB...
-
Page 181: Analyze The Image
This section describes how to analyze the image using the analysis tool. The analysis workflow in Amersham Imager 680 allows you to perform a step-by-step analysis of the image data and to save the analysis results. The workflow is performed in five steps and the final result is presented in a summary. - Page 182 5 Operation 5.8 Analyze the image Part Function Illustration The current step in the analysis workflow (highlighted). Back button: Use the button to close the analysis workflow. Amersham Imager 680 Operating Instructions 29271308 AB...
- Page 183 Options and steps associated to the current step in the analysis. Help icon: Use to reveal additional information on the selected step in the analysis. Next button: Use to open the next step in the analysis workflow. Amersham Imager 680 Operating Instructions 29271308 AB...
-
Page 184: Lane Creation
Select the minus and plus buttons adjacent to Number of lanes to increase or decrease the number of grid lanes to correspond with the number of lanes in the image. Select a grid corner circle. Result: The selected corner circle is highlighted. Amersham Imager 680 Operating Instructions 29271308 AB... - Page 185 When you are done select the Next button or select the Background button in the workflow. The Back button will bring you back to the captured image. Amersham Imager 680 Operating Instructions 29271308 AB...
-
Page 186: Background Subtraction
Rubber band Use this option to subtract the background below a base- line between the lowest points on the lane profile, as though a rubber band was stretched under the profile. Amersham Imager 680 Operating Instructions 29271308 AB... - Page 187 If an image of the sample is displayed, select the lane profile button. Result: A screen will appear displaying the lane profile graphically, with the current lane number displayed in the drop down list and the lane profile button in blue. Amersham Imager 680 Operating Instructions 29271308 AB...
- Page 188 Rolling ball, and then select the Radius plus or minus buttons to set the • radius for the virtual rolling ball eraser to set the new baseline of the graph. Tip: The smaller the radius the more background will be removed. Amersham Imager 680 Operating Instructions 29271308 AB...
- Page 189 To view the result in any lane, select the lane number to view in the drop down menu. When you are done select the Next button or select the Bands button in the workflow. The Previous button will bring you back to the previous step. Amersham Imager 680 Operating Instructions 29271308 AB...
-
Page 190: Band Detection
Tip: Shift between lane profile, image view, and image tabs to verify the result of the band detection. If the band detection is satisfactory, then proceed to the final step in this table. Amersham Imager 680 Operating Instructions 29271308 AB... - Page 191 Repeat actions in step 3 for other detection channels, if relevant. When you are done detecting bands click the Next button or select the MW button in the workflow. The Previous button will bring you back to the previ- ous step. Amersham Imager 680 Operating Instructions 29271308 AB...
-
Page 192: Molecular Weight Assignment
Add a missing marker by selecting Add new... button. See instructions • below. Edit a marker by selecting the Edit button. See instruction below. • Deselect any missing bands in the sample marker lane by unchecking rele- vant check boxes. Amersham Imager 680 Operating Instructions 29271308 AB... - Page 193 Select the unit from the Unit drop down menu. Type a value, and select the Add button. Result: The value will appear in the bottom of the list to the left on the screen. Amersham Imager 680 Operating Instructions 29271308 AB...
- Page 194 Select the Save button to save the edited values and to return to the MW Calibration view. Select Cancel to leave without saving changes. Delete will delete the entire marker group. Note: To delete a value, select the X next to the value. Amersham Imager 680 Operating Instructions 29271308 AB...
-
Page 195: Normalization
Control bands can only be selected in single channel view. When you are done select the Next button or select the Summary button in the workflow. The Previous button will bring you back to the previous step. Amersham Imager 680 Operating Instructions 29271308 AB... -
Page 196: Summary
Summary button is highlighted in the workflow. The illustration and table below describe the summary view. Part Function The analyzed image Tabs for displaying details. Print button: Use to print the summary on a connected printer. Amersham Imager 680 Operating Instructions 29271308 AB... - Page 197 Done button to save the changes. If desired, add a comment by selecting the Comment: field. Type the com- ment using the appearing keypad and select the Done button to save the changes. Amersham Imager 680 Operating Instructions 29271308 AB...
- Page 198 In addition to the image file(s), analyzed data is saved with a CSV file and the summary view is saved as a pdf file. See Section 5.7 Save and manage image files, on page 167 for details. Amersham Imager 680 Operating Instructions 29271308 AB...
-
Page 199: Turn Off The Instrument
To optimize the instrument's life time and to minimize unnecessary power consumption, shut down the instrument when image captures and analyses have been completed for the day. If the Amersham Imager 680 instrument is used around the clock, make sure to restart the system at least once a day to remove temporary files that may take up unnecessary memory space. -
Page 200: Analysis Software
Imager 680 Analysis Software can be installed on computers using Windows 7, Windows 8.1, or Windows 10 operating system. The Amersham Imager 680 Analysis Software can be used with images generated by both the Amersham Imager 600 and Amersham Imager 680 instruments. -
Page 201: Software Installation And Activation
1 Install the Amersham Imager 680 Analysis Software. 2 A registration number is presented by the Amersham Imager 680 Analysis Software. 3 Go the main instrument to create a license key with the Amersham Imager 680 Control Software. 4 Activate the Amersham Imager 680 Analysis Software by registering with the license key. -
Page 202: Amersham Imager 680 Analysis Software Installation
6.1.1 Amersham Imager 680 Analysis Software installation Step Action Insert the installation DVD In the Installer, locate and double-click the file, Amersham Imager 680 Analysis Software.msi Result: Amersham Imager 680 Analysis Software InstallShieldWizard dialog box appears. Click Next. Read the license agreement. If the license agreement is not acceptable, please contact your GE representative. - Page 203 6 Analysis software 6.1 Software installation and activation 6.1.1 Amersham Imager 680 Analysis Software installation Step Action Define the software destination folder in the Destination Folder dialog as described below. If the default folder C:\Program Files (x86)\ is acceptable, click Next.
- Page 204 6 Analysis software 6.1 Software installation and activation 6.1.1 Amersham Imager 680 Analysis Software installation Step Action Click Finish in InstallShield Wizard. Amersham Imager 680 Operating Instructions 29271308 AB...
-
Page 205: Amersham Imager 680 Analysis Software Registration
6.1 Software installation and activation 6.1.2 Amersham Imager 680 Analysis Software registration 6.1.2 Amersham Imager 680 Analysis Software registration Follow the instructions below to register the Amersham Imager 680 Analysis Software. Step Action After the installation, the software starts automatically and shows the Reg- istration dialogue box. - Page 206 6.1 Software installation and activation 6.1.2 Amersham Imager 680 Analysis Software registration Step Action Select to open the Setting Screen on the Amersham Imager 680 Control Software. Select Analysis software license Result: Analysis software license appears. Enter the Serial number and the Registration number.
- Page 207 6 Analysis software 6.1 Software installation and activation 6.1.2 Amersham Imager 680 Analysis Software registration Step Action Click Register. Click Yes when confirmation of the registration appears. Result: The 10-digit License key number is generated. Make a note of the 10-digit License key number.
- Page 208 6 Analysis software 6.1 Software installation and activation 6.1.2 Amersham Imager 680 Analysis Software registration Step Action Enter the Serial number and the License key to the registration screen. Amersham Imager 680 Operating Instructions 29271308 AB...
- Page 209 6 Analysis software 6.1 Software installation and activation 6.1.2 Amersham Imager 680 Analysis Software registration Step Action Click Register. The registration of the analysis software is now complete. Note: The software license screen shows the number of licenses generated. Amersham Imager 680 Operating Instructions 29271308 AB...
-
Page 210: Software Operation
Amersham Imager 680 Analysis Software. The analysis software runs independently on a Windows PC. The workflow in the Amersham Imager 680 Analysis Software allows you to perform a step-by-step analysis of the image data and to save the results in the same way as with the Image analysis function in the Amersham Imager 680 Control Software. - Page 211 The image file opens in the analysis workflow. The following illustration and table describe the start view of the analysis workflow. Part Function The current step in the analysis workflow is highlighted in blue Amersham Imager 680 Operating Instructions 29271308 AB...
- Page 212 Use the Close button to close the analysis workflow Image tools button: Use to access the image tools which modify display settings and to view image details. Display Zoom Contrast Intensity For more information see Image tools, on page 164. Amersham Imager 680 Operating Instructions 29271308 AB...
- Page 213 Options and steps associated with the current step in the analysis. Help icon: Use to show additional information about the selected step in the analysis. Next button: Use to proceed to the next step in the analysis workflow. Amersham Imager 680 Operating Instructions 29271308 AB...
-
Page 214: Lane Creation
Select the minus and plus buttons adjacent to Number of lanes to increase or decrease the number of grid lanes to correspond with the number of lanes in the image. Select a grid corner circle. Result: The selected corner circle is highlighted. Amersham Imager 680 Operating Instructions 29271308 AB... - Page 215 If the value is 100% then the grid contains only the lanes. Using a lesser per- centage creates an empty space between lanes. When you are done select the Next button or select the Background button in the workflow. The Previous button returns you to the captured image. Amersham Imager 680 Operating Instructions 29271308 AB...
-
Page 216: Background Subtraction
Use this option when no background should be subtracted from the image. Rubber Use this option to subtract the background below a baseline between the band lowest points on the lane profile, as though a rubber band was stretched under the profile. Amersham Imager 680 Operating Instructions 29271308 AB... - Page 217 Rolling Use this option to subtract the background below the graph as if erasing it ball using the radius of a ball. A small radius will subtract more background than a large. Amersham Imager 680 Operating Instructions 29271308 AB...
- Page 218 To confirm that each background subtraction options works, check Show background check box This function shows the background level calculated by each option. Amersham Imager 680 Operating Instructions 29271308 AB...
- Page 219 If Rolling ball is selected, use the Radius plus or minus buttons to set the radius of the virtual rolling ball eraser. Tip: The smaller the radius the more background will be removed. Result: The lane profile view is displayed with the background subtracted. Amersham Imager 680 Operating Instructions 29271308 AB...
- Page 220 To view the result in any lane, select the lane number in the drop down menu. When ready, click Next or select the Bands in the workflow. Clicking Previous takes you back one step. Amersham Imager 680 Operating Instructions 29271308 AB...
-
Page 221: Band Detection
Tip: Shift between lane profile, image view, and image tabs to verify the result of the band detection. If the band detection is satisfactory, then proceed to the final step in this table. Amersham Imager 680 Operating Instructions 29271308 AB... - Page 222 Repeat actions in step 3 for other detection channels, if relevant. When you are done detecting bands click the Next button or select the MW button in the workflow. The Previous button will bring you back to the previ- ous step. Amersham Imager 680 Operating Instructions 29271308 AB...
-
Page 223: Molecular Weight Assignment
Add a missing marker by selecting Add new... button. See instructions • below. Edit a marker by selecting the Edit button. See the instructions below. • Deselect any missing bands in the sample marker lane by unchecking rele- vant check boxes. Amersham Imager 680 Operating Instructions 29271308 AB... - Page 224 Select the unit from the Unit drop down menu. Type a value, and select the Add button. Result: The value will appear in the bottom of the list to the left on the screen. Amersham Imager 680 Operating Instructions 29271308 AB...
- Page 225 Select the Save button to save the edited values and to return to the MW Calibration view. Select Cancel to leave without saving changes. Delete will delete the entire marker group. Note: To delete a value, select the X next to the value. Amersham Imager 680 Operating Instructions 29271308 AB...
-
Page 226: Normalization
Control bands can only be selected in single channel view. When you are done select the Next button or select the Summary button in the workflow. The Previous button will bring you back to the previous step. Amersham Imager 680 Operating Instructions 29271308 AB... -
Page 227: Summary
Summary button is highlighted in the workflow. The illustration and table below describe the summary view. Part Function The analyzed image Tabs for displaying details. Print button: Use to print the summary on a connected printer. Amersham Imager 680 Operating Instructions 29271308 AB... - Page 228 Rf - the relative mobility of the band Finalize and save analysis Step Action Review the summary. If the analysis is completed, click Save Result: The save view appears where comments can be added to the file. Amersham Imager 680 Operating Instructions 29271308 AB...
- Page 229 Result: In addition to the image file(s), analyzed data is saved with a CSV file and the summary view is saved as a pdf file. See Section 5.7 Save and manage image files, on page 167 for details. Amersham Imager 680 Operating Instructions 29271308 AB...
-
Page 230: Maintenance
7 Maintenance Maintenance About this chapter To ensure optimal performance, Amersham Imager 680 and accessories should be maintained regularly. This chapter describes the maintenance that should be performed on a regular basis. For all safety cautions and notices relevant to maintenance please see Maintenance, on page 27. -
Page 231: Instrument
7.1 Instrument Instrument Use a soft dry cloth to clean the exterior of Amersham Imager 680. For marks that are hard to remove, wipe with a soft cloth slightly dampened with water and a neutral de- tergent, or 70% ethanol, then wipe with a new clean, dry cloth. -
Page 232: Accessories
7 Maintenance 7.2 Accessories Accessories Introduction Amersham Imager 680 accessories must be cleaned after use. This section describes recommended cleaning agents and how to clean the accessories. Recommended cleaning agents NOTICE Cleaning agents should be for biochemical use to avoid that residues fluoresce when images are captured. - Page 233 Cleaning gel sheets After use, wash the gel sheet with mild detergent, rinse with water then dry well. Note: A gel sheet can be reused about 20 times. Amersham Imager 680 Operating Instructions 29271308 AB...
-
Page 234: Regular Inspections
7 Maintenance 7.3 Regular inspections Regular inspections Regularly inspect Amersham Imager 680 to ensure the following: • The power supply plug is firmly secured in the power outlet. • The power cord and supply plug do not become overheated. •... -
Page 235: Troubleshooting
Power switch on the right hand side, and turn it back on again after about ten seconds. 3 If the error persists refer to this troubleshooting guide for possible solutions. 4 If the error cannot be resolved with this troubleshooting guide, contact your GE representative. Amersham Imager 680 Operating Instructions 29271308 AB... -
Page 236: General Problems
GE representative The LED blinks If... Then... The ERROR LED blinks a hardware error If an error code is displayed, make a note occurred of it and contact your GE representative. Amersham Imager 680 Operating Instructions 29271308 AB... - Page 237 The instrument does not appear to re- The instrument is not connected to the spond to software control tablet computer Use the flash indicator tool to identify which instrument is connected to a cer- tain tablet computer Amersham Imager 680 Operating Instructions 29271308 AB...
-
Page 238: Problems With Image Quality
The focus is not correct- Adjust the focus temporarily. See Section 4.3.2 Focus, on ly adjusted page 81. If the problem persists contact your GE representative. The tray, white insert or Clean the tray, white insert or the window covering the window covering the light source. - Page 239 Unevenness appears on the image If... Then... The LED is deteriorated Turn off the instrument and contact your GE representa- from age tive A lamp in the UV transil- Turn off the instrument and contact your GE representa- luminator is broken...
-
Page 240: Problems With The Software
The buttons do not appear on an external monitor If... Then... The monitor resolution is too low Use monitors with SVGA resolution or higher Amersham Imager 680 Operating Instructions 29271308 AB... - Page 241 No or few button presses are registered. Use gentle and distinct touches on the tablet computer to control buttons in the software. A light and short tap is best registered by the software. Amersham Imager 680 Operating Instructions 29271308 AB...
- Page 242 8 Troubleshooting 8.3 Problems with the software If... Then... The Amersham Imager 680 icon has been Connect to the same network as accidently removed from the tablet Amersham Imager 680. Open the Safari™ computer. web browser and type in the IP address of the instrument in the address field.
-
Page 243: Reference Information
9 Reference information Reference information About this chapter This chapter lists the technical specifications of Amersham Imager 680. The chapter also includes ordering information, and Health and Safety Declaration form for service. In this chapter This chapter contains the following sections:... -
Page 244: Specifications
Dynamic range 4.8 orders of magnitude Capture control Binning, crop, and programmed capture Image output Gray scale 16 bit tif Color image jpg Gray scale jpg Emission filters Cy2: 525BP20 Cy3/EtBr: 605BP40 Cy5:705BP40 Amersham Imager 680 Operating Instructions 29271308 AB... - Page 245 Temperature: 18°C to 28°C (with temperature fluctuation below 10ºC conditions per hour or lower) Humidity: 20% to 70% RH (no dew condensation) Note: When the above conditions cannot be satisfied, take appropriate actions. Amersham Imager 680 Operating Instructions 29271308 AB...
- Page 246 4 Do not install the equipment near a window. Avoid direct sunlight. Ensure blinds are attached to nearby windows. 5 Do not place objects near the power outlet to ensure easy access to the power cord for disconnection in case of emergency. Amersham Imager 680 Operating Instructions 29271308 AB...
- Page 247 Service Ticket #: To make the mutual protection and safety of GE service personnel and our customers, all equipment and work areas must be clean and free of any hazardous contaminants before a Service Engineer starts a repair. To avoid delays in the servicing of your equipment, please complete this checklist and present it to the Service Engineer upon arrival.
- Page 248 To make sure the mutual protection and safety of GE personnel, our customers, transportation personnel and our environment, all equipment must be clean and free of any hazardous contaminants before shipping to GE. To avoid delays in the processing of your equipment, please complete this checklist and include it with your return.
- Page 249 Intended use, 9 Safety notices, 10 Intensity tool, 164 Safety precautions iPad Air attachment, 47 Installation precautions, 22 introduction, 20 Mainenance precautions, 27 Keypad, 67 Operation precautions, 24 Sample and tray combina- tions, 105 Amersham Imager 680 Operating Instructions 29271308 AB...
- Page 250 User information, important, 9 File formats, 174 Keypad, 67 Space requirements, 74 Virus protection, 90 Specifications, 244 Standards, 17 Start screen, 51 Web tool, 96 Windows 7, 94 Tool Web, 96 Zoom tool, 164 Amersham Imager 680 Operating Instructions 29271308 AB...
- Page 251 Page intentionally left blank...
- Page 252 GE, the GE Monogram, Amersham, Cy and ECL Plex are trademarks of General For local office contact information, visit Electric Company. www.gelifesciences.com/contact Safari is a trademark of Apple Inc. iPad Air is a registered trademark of Apple Inc. GE Healthcare Bio-Sciences AB SYBR is a trademark of Life Technologies Corporation.