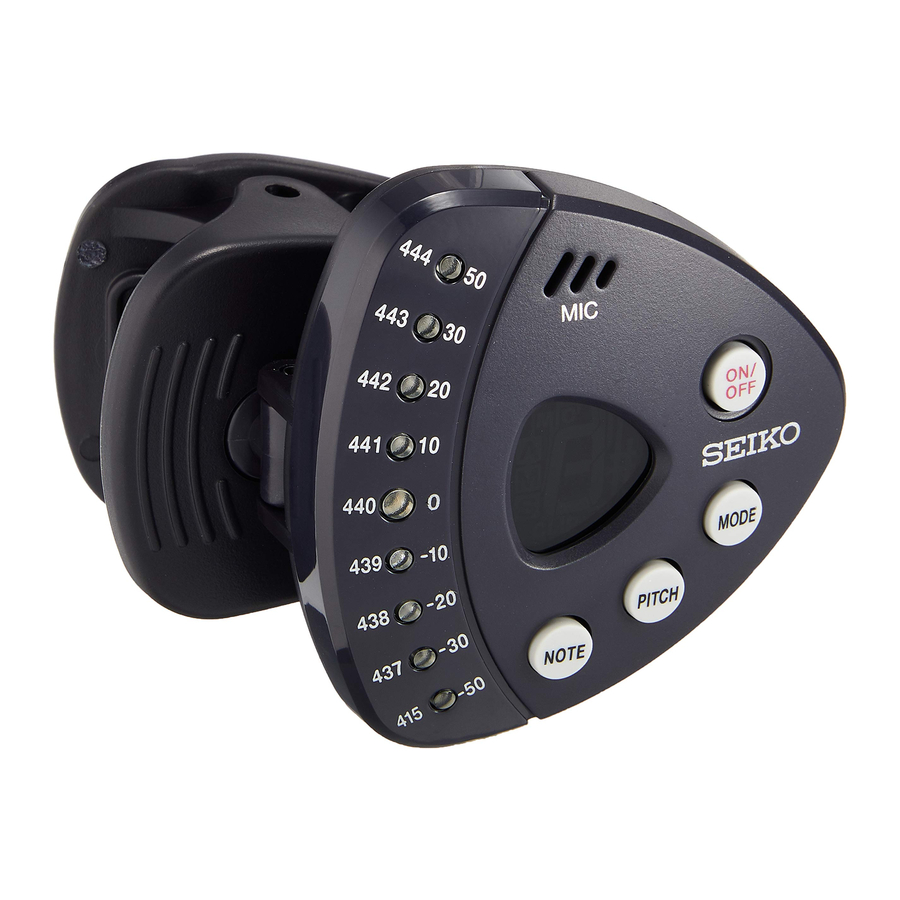
NAME AND OPERATION OF PARTS
Before use, pull out the insulating sheet from the battery compartment, as shown in the illustration below. If the sheet is torn off and left inside the compartment, open the battery hatch by referring to "BATTERY CHANGE" below, and remove the remainder of the sheet completely. Otherwise, the tuner will not be turned on.

Note: The battery included with the tuner is a monitor battery, and the battery life may be shorter than the specified period.

- Power button
With each press, the tuner stands by for "CLIP" and "MIC" input, and is turned off in order.
- CLIP input method:
The vibration sensor![]() senses the vibrations generated when the instrument gives out a note, and tuning is made using them. This input method is convenient for the tuning in noisy environments or in a situation where other instruments are played nearby.
senses the vibrations generated when the instrument gives out a note, and tuning is made using them. This input method is convenient for the tuning in noisy environments or in a situation where other instruments are played nearby. - MIC input method:
Tuning is made using the note of the instrument input through the built-in microphone![]() .
.
 senses the vibrations generated when the instrument gives out a note, and tuning is made using them. This input method is convenient for the tuning in noisy environments or in a situation where other instruments are played nearby.
 .
.- Mode button
Use the button to select the tuning mode from auto (![]() ), manual (
), manual ( ![]() ) and sound (
) and sound ( ![]() ).
).
 ), manual (
  ) and sound (
  ).
).| Auto mode | By playing a note, the tuner automatically identifies and indicates the note having the pitch closest to it. It also indicates that the pitch of the input note is lower or higher than that of the indicated note. |
| Manual mode | Set the note you wish to tune, and then, play a note. The tuner indicates that the pitch of the input note is lower or higher than that of the note you have set. |
| Sound mode | The tuner gives out the note you have set. Tune the instrument on the basis of the reference note the tuner produces. |
- Pitch button
Use the button to set the reference pitch (frequency of A4).
By pressing the button, an LED of reference pitch LED display![]() flashes for a certain period of time to show the current pitch setting. With each press of the button while the LED is flashing, the reference pitch increases by 1 Hz. It increases continuously if the button is kept pressed.
flashes for a certain period of time to show the current pitch setting. With each press of the button while the LED is flashing, the reference pitch increases by 1 Hz. It increases continuously if the button is kept pressed.
*If the tuner is left untouched with an LED flashing, the reference pitch indicated by the LED is automatically registered in a certain period of time.
 flashes for a certain period of time to show the current pitch setting. With each press of the button while the LED is flashing, the reference pitch increases by 1 Hz. It increases continuously if the button is kept pressed.
- Settable range:


- Note button
Use the button to set the note you wish to tune.
With each press, the note changes over at one-semitone step. It changes continuously by keeping the button pressed.
*In the auto mode, the note button is disabled as the tuner automatically identifies and indicates the input note.
- Settable range:
Manual mode: C ~ B (12 notes)
Sound mode: C4 ~ B4 (12 notes)
- Liquid crystal display
- Note indication
| Auto mode | By playing a note, the tuner automatically identifies and indicates the note having the pitch closest to it. (The difference in octave is not indicated.) |
| Manual/sound mode | The note you have set is indicated. (The octave cannot be set.) |
- Input method indication
The input method you have selected is indicated. - Mode indication
![]() : Auto mode
: Auto mode
![]() : Manual mode
: Manual mode
![]() : Sound mode
: Sound mode


- Tuning guide/ reference pitch LED display
In the auto and manual modes, the difference in pitch between the note indicated on the display and the note given by the instrument is indicated by the LED that lights up. (See the numeral on the right of the LED that lights up.) The LED display also indicates the reference pitch you have set. (See the numeral on the left of the LED that lights up.) - Built-in microphone
Use it to input a note directly from the instrument in the "MIC" input method. When the "CLIP" input method is selected, the built-in microphone is disabled. - Vibration sensor/built-in speaker
In the "CLIP" input method, it senses the vibration generated by the instrument. When the "MIC" input method is selected, the vibration sensor/built-in speaker is disabled. In sound mode, the reference note you have set is produced from the built-in speaker. - Clip
Attach the tuner to the instrument using it to sense the vibration it generates.
HOW TO TUNE THE INSTRUMENT
Auto/manual mode
Play a note with the instrument, and tune it according to the note indication  and the tuning guide
  .
.
- Press the power button
![]() to select the "CLIP" or "MIC" input method. When the "CLIP" input method is selected, attach the tuner to the instrument using the clip
to select the "CLIP" or "MIC" input method. When the "CLIP" input method is selected, attach the tuner to the instrument using the clip ![]() .
. - Select the tuning mode. Press the mode button
![]() to set the tuning mode to the auto (
to set the tuning mode to the auto ( ![]() ) or manual (
) or manual ( ![]() ).
). - When the manual mode is selected, press the note button
![]() to set the note you wish to tune.
to set the note you wish to tune. - To change the reference pitch, press the pitch button
![]() to set the desired pitch.
to set the desired pitch. - Play the instrument to give a note. When the "MIC" input method is selected, bring the instrument close to the built-in microphone
![]() .
. - Tune the instrument until the LED at the center of the tuning guide
![]() lights up in green. In the auto mode, also check the input note with the note indication
lights up in green. In the auto mode, also check the input note with the note indication ![]() .
.

 to select the "CLIP" or "MIC" input method. When the "CLIP" input method is selected, attach the tuner to the instrument using the clip
  .
. to set the tuning mode to the auto (
  ) or manual (
  ).
). to set the note you wish to tune.
 to set the desired pitch.
 .
. lights up in green. In the auto mode, also check the input note with the note indication
Sound mode
The tuner gives out the note you wish to tune, and tune the instrument on the basis of the reference note the tuner produces.
- Press the power button
![]() to select the "CLIP" or "MIC" input method.
to select the "CLIP" or "MIC" input method.
(The sound mode is available irrespective of the input method selected.) - Select the tuning mode.
Press the mode button![]() to set the tuning mode to the sound (
to set the tuning mode to the sound ( ![]() ).
). - Press the note button
![]() to set the note you wish to tune.
to set the note you wish to tune. - To change the reference pitch, press the pitch button
![]() to set the desired pitch.
to set the desired pitch.
 ).
).- Precautions on tuning
- The tuner may pick up noise from the surrounding environment or thehum noise generated by electric appliances, and shows indications as if a note is played. This is not a malfunction, and the tuner operates properly when a note is played.
- When the "MIC" input method is used, it is recommended that the tuning procedure be performed in a quiet environment for accurate tuning. Also, bring the instrument close to the tuner to register a note.
- If you find it difficult to tune the instrument with the "CLIP" input method, re-attach the tuner in such a position to the instrument that the vibrations are transmitted to the tuner more clearly.
AUTO POWER-OFF FUNCTION
The tuner is equipped with an auto power-off function as described below to save the battery energy.
Auto/manual mode
- If none of the buttons
![]() ,
, ![]() and
and ![]() is pressed, if no note is input in the built-in microphone
is pressed, if no note is input in the built-in microphone ![]() or if the vibration sensor
or if the vibration sensor ![]() senses no vibrations for approximately 10 seconds while the power is turned on, the liquid crystal display becomes slightly dim. (Power save mode, Phase 1)
senses no vibrations for approximately 10 seconds while the power is turned on, the liquid crystal display becomes slightly dim. (Power save mode, Phase 1) - If the tuner is left untouched further for approximately five more minutes without sensing a note or vibrations, the liquid crystal display becomes black, and the green LED at the center of the tuning guide
![]() starts flashing. (Power save mode, Phase 2)
starts flashing. (Power save mode, Phase 2) - If the tuner is left untouched further for approximately 15 more minutes without sensing a note or vibrations, the tuner is turned off automatically. (Auto power-off function)
 senses no vibrations for approximately 10 seconds while the power is turned on, the liquid crystal display becomes slightly dim. (Power save mode, Phase 1)
Sound mode
- If none of the buttons and
![]() is pressed for approximately 10 seconds while the power is turned on, the liquid crystal display becomes slightly dim.
is pressed for approximately 10 seconds while the power is turned on, the liquid crystal display becomes slightly dim. - If the tuner is left untouched for approximately 5 more minutes, the tuner is turned off automatically. (Auto power-off function)
MEMORY BACKUP FUNCTION
Even after the tuner is turned off, the settings you have made are stored in memory and will not be erased. If the battery is replaced with a new one, the tuner will return to the following initial settings.
| | [CLIP] |
| | [AUTO] |
| | [440 Hz] |
| | [A] |
MOVABLE RANGES OF THE CLIP PORTION
The clip portion of the tuner can be moved within the range shown in the illustration. Please note that if the clip portion is moved or rotated forcibly beyond those movable ranges, the tuner may be damaged.

BATTERY CHANGE
When the battery nears its end, the liquid crystal display and the tuning guide will become dim. In that case, replace the battery with a new one immediately. If the battery is exhausted, the tuner may not operate properly.
- Turn off the power.
- Loosen and remove the screw fixing the battery hatch, and turn it counterclockwise to remove it.
- Take out the old battery, and insert a new one with its (+) side up.
![]()
- Turn the battery hatch clockwise to close it, and tighten the screw to fix the hatch.
- Press the power button
![]() repeatedly to turn on and off the tuner, and check if it operates properly.
repeatedly to turn on and off the tuner, and check if it operates properly.
Note: Be sure to follow this procedure. Otherwise, the tuner may not operate properly.

*Be sure to use the specified battery (CR2032).
*Check that the battery is inserted with the (+) side up. Otherwise, it may result in a malfunction.
*Keep the old battery and the battery hatch beyond the reach of children. If a child swallows either of them, consult the doctor immediately.
*When disposing of the old battery, observe the regulations of the authorities concerned.
CAUTION ON USING THE TUNER
If the power button  is not pressed properly, or if the battery change procedure is not performed properly, the tuner may malfunction. In that case, press the power button to turn off the tuner immediately. Then, press it again, and check if the tuner operates properly.
SPECIFICATIONS
| | Microphone, built-in sensor |
| | Auto mode/manual mode/sound mode |
| | Liquid crystal display and tuning guide |
| | A0 (27.5 Hz) ~ C8 (4186.0 Hz) (when A4 is set to 440 Hz) |
| | ±1 cent |
| | C4 ~ B4 (at one-semitone steps) |
| | 415 Hz and 438 Hz ~ 445 Hz (at 1 Hz steps) |
| | Auto power off (in 20 min. in auto/manual mode and 5 min. in sound mode), memory backup |
| | Lithium battery CR2032 (3 V), 1 piece |
| 77 (W) x 55 (H) x 72 (D) mm, 70 g (including battery) |
| Monitor battery (lithium battery CR2032), 1 piece and instruction manual |
*The design and specifications are subject to change without prior notice for product improvement.

Documents / ResourcesDownload manual
Here you can download full pdf version of manual, it may contain additional safety instructions, warranty information, FCC rules, etc.
Thank you! Your question has been received!


Need Assistance?
Do you have a question about the STX1 that isn't answered in the manual? Leave your question here.