Frigidaire FFBC4622QS - Beverage Center Manual
- Use & care manual (11 pages) ,
- Use & care manual (12 pages)
- 1 IMPORTANT SAFETY INSTRUCTIONS
- 2 INSTALLATION
- 3 TEMPERATURE CONTROLS
- 4 FEATURES
- 5 CARE AND CLEANING
- 6 BEFORE YOU CALL
- 7 Documents / Resources
IMPORTANT SAFETY INSTRUCTIONS
Read and Save These Instructions
This Owner's Guide provides specific operating instructions for your model. Use your Beverage Cooler only as instructed in this guide. These instructions are not meant to cover every possible condition and situation that may occur. Common sense and caution must be practiced when installing, operating, and maintaining any appliance.
Record Your Model and Serial Numbers
Record the model and serial numbers in the space provided below. The serial plate is located on the upper left wall inside the cabinet.
Model Number:
Serial Number:
Purchase Date:

Please read all instructions before using this Beverage Cooler.
Definitions
 This is the safety alert symbol. It is used to alert you to potential personal injury hazards. Obey all safety messages that follow this symbol to avoid possible injury or death.

DANGER indicates an imminently hazardous situation which, if not avoided, will result in death or serious injury.
WARNING indicates a potentially hazardous situation which, if not avoided, could result in death or serious injury.

CAUTION indicates a potentially hazardous situation which, if not avoided, may result in minor or moderate injury.

IMPORTANT indicates installation, operation or maintenance information which is important but not hazard-related.

DANGER Risk of fire or explosion. Flammable refrigerant used. Do not use mechanical devices to defrost refrigerator. Do not puncture refrigerant tubing.
DANGER Risk of fire or explosion. Flammable refrigerant used. To be repaired only by trained service personnel. Do not puncture refrigerant tubing.
CAUTION Risk of fire or explosion. Flammable refrigerant used. Consult repair manual/ owners guide before attempting to service this product. All safety precautions must be followed.
CAUTION Risk of fire or explosion. Dispose of property in accordance with federal or local regulations. Flammable refrigerant used.
CAUTION- Risk of fire or explosion due to puncture of refrigerant tubing; Follow handling instructions carefully. Flammable refrigerant used.

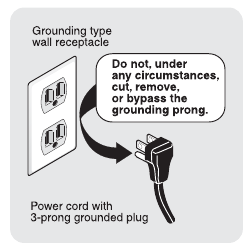
Electrical Information
Child Safety
Proper Disposal of your Beverage Cooler
Risk of child entrapment
Child entrapment and suffocation are not problems of the past. Junked or abandoned appliances are still dangerous – even if they will sit for "just a few days". If you are getting rid of your old appliance, please follow the instructions below to help prevent accidents. We strongly encourage responsible appliance recycling/ disposal methods. Check with your utility company or visit www.recyclemyoldfridge.com for more information on recycling your old appliance. Before you throw away your old beverage cooler:
INSTALLATION
This Use & Care Guide provides general operating instructions for your model. Use the appliance only as instructed in this Use & Care Guide.
Before starting the appliance, follow these important first steps.
Location
- Choose a place that is near a grounded electrical outlet. Do Not use an extension cord or an adapter plug.
- For optimal performance, it is recommended that you install the appliance where the ambient temperature is between 70 and 78 degrees Fahrenheit.
- Allow space around the unit for good air circulation. Leave a 2 inch space on the back and sides of the wine cooler for adequate circulation.
- Be sure the appliance stays in the upright position during transport.
- Keep the appliance from any hazardous or combustible agents.
![]() NOTE
NOTE
The exterior walls of the beverage cooler may become quite warm as the compressor works to transfer heat from the inside. Temperatures as much as 30°F warmer than room temperature can be expected. For this reason it is particularly important in hotter climates to allow enough space for air circulation around your appliance.
Leveling
The beverage cooler must have all bottom corners resting firmly on solid floor. The floor must be strong enough to support a fully loaded beverage cooler.
NOTE: It is Very Important for your appliance to be level in order to function properly. If the appliance is not leveled during installation, the door may be misaligned and not close or seal properly, causing cooling, frost, or moisture problems.
To Level Your Beverage Cooler:
After removing all interior and exterior packaging materials, use a carpenter's level to level the beverage cooler from front-to-back. Adjust the leveling legs in front, ½ bubble higher, so that the door closes easily when left halfway open.
Cleaning
- Wash any removable parts of the beverage cooler interior, and exterior with mild detergent and warm water. Wipe dry. Do not use harsh cleaners on these surfaces.
- Do not use razor blades or other sharp instruments, which can scratch the appliance surface when removing adhesive labels. Any glue left from the tape can be removed with a mixture of warm water and mild detergent, or touch the residue with the sticky side of tape already removed. Do not remove the serial plate.
Important Safeguards: Do not store food in your wine cooler as interior temperature may not get cool enough to prevent spoilage. In summer months or areas of high humidity, the glass door may build up moisture. To remove the moisture, wipe it away.
Handle Installation

- Place handle over the two mounting studs located at top of door.
- Use hex head screw driver or Allen wrench to tighten set screws from bottom to secure handle to door.
Reversing the door swing
The glass door can be opened from left to right and vice versa. Should you desire to change the opening direction, please follow these instructions.
 NOTE
NOTE
All parts removed must be saved to do the reinstallation of the door.
- Remove top cap. Remove the three screws that hold the upper hinge (right side) to the top of the cabinet. See Fig. 1.

- Carefully remove top hinge (See Fig. 1.), then lift the door up off of bottom hinge and place it on a padded surface to prevent scratching it. See Fig. 2.

- Remove the three button plugs from the upper left corner of the cabinet and transfer them to the holes on the opposite side. Be sure to press the button plugs firmly into the holes. See Fig. 1.
- Remove three screws that hold the bottom hinge to lower end of cabinet. Remove the three button plugs from lower LH corner and transfer to holes where bottom hinge was just removed. See Fig. 3.

- Unscrew pins from both hinges and transfer to threaded hole on opposite side. See Fig. 4. Re-install bottom hinge in LH corner of cabinet using same three screws removed in Step 4.

- On bottom edge of door, transfer door stop bracket and bushing to holes on opposite side. See Fig. 6.

- On top edge of door, transfer the button plugs and bushing to hole on opposite side. See Fig. 7.

- Place bottom LH corner of door onto lower hinge, then install top hinge to cabinet. Make sure door is level and it seals properly against cabinet, then securely fasten three screws. See Fig. 7. Snap top


ENERGY SAVING TIPS

TEMPERATURE CONTROLS
Cool Down Period
For best performance, allow 4 hours for the wine/beverage cooler to cool down completely. The wine/beverage cooler will run continuously for the first several hours.
Temperature Control

![]() Press this button once to increase temperature 1°F/C.
Press this button once to increase temperature 1°F/C.
![]() Press this button once to decrease temperature 1°F/C.
Press this button once to decrease temperature 1°F/C.
- The beverage cooler can be operated by adjusting the temperature control buttons (up arrow and down arrow) to the various settings.
- The new desired temperature will flash on the display for a few seconds and then switch back to the actual temperature which will gradually change until setpoint is reached.
The temperature range MIN and MAX is 33° - 50°F (1° - 10°C).
![]() : Temperature display
: Temperature display
Temperature display
Light: This button turns the light ON and OFF.
Power: This buttons turns the power ON and OFF.
Press both Light and Power buttons at the same time to change between Fahrenheit and Celsius temperatures.
- The default temperature for the beverage cooler is 41°F (5°C). The temperature after power failure will be the temperature set before the power failure.
- To prolong the life of compressor, please wait for at least 5 minutes before the unit is restarted after power failure. Failure display
- If "E" and "F" are displayed, please contact local service personnel for repair.
- If the temperature in the cooler is too low, it will display "L".
- If the temperature in the cooler is too high, the screen will display "H" and will flash. Under this state, the buzzer will buzz for 30 seconds. One minute later, the buzzer will continue to buzz for the next 30 seconds. After three times, the alarm will not buzz any more. You can press any key to cancel sound alarm.
- Storing too many cans or bottles in the cooler may cause the temperature in the cooler to rise temporarily.
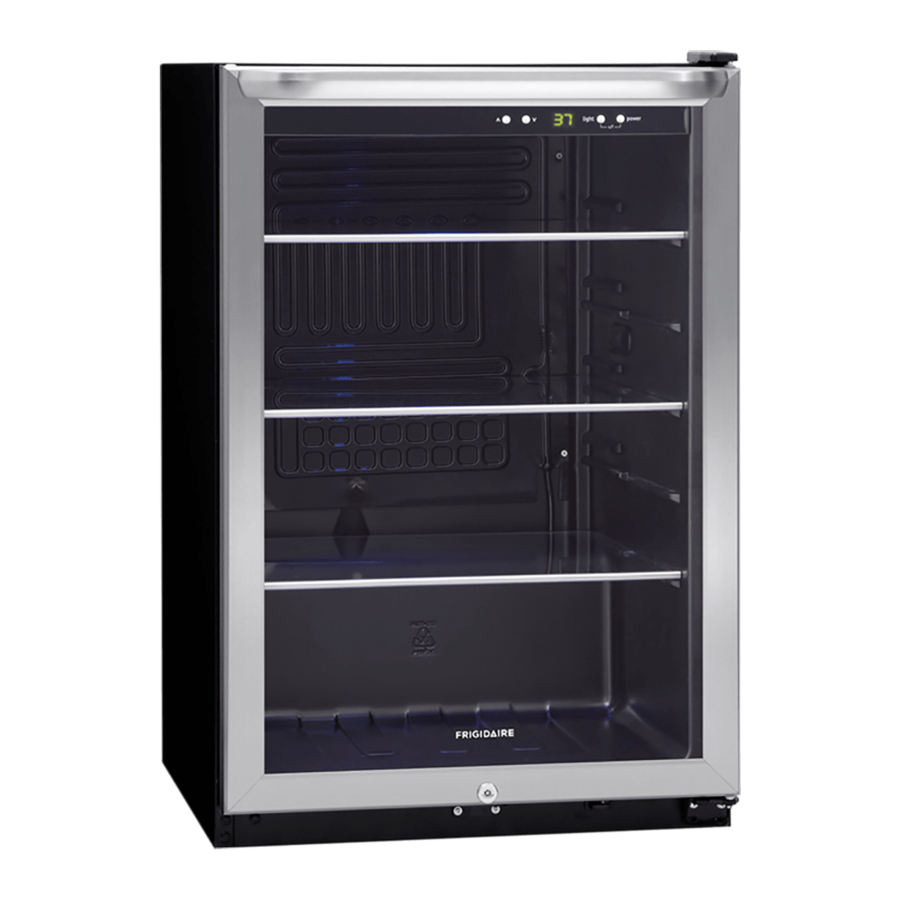
FEATURES
Adjustable Interior Shelves
Multi-position adjustable interior shelves can be moved to any position for larger or smaller packages. The shipping spacers that stabilize the shelves for shipping should be removed and discarded. The Beverage Cooler comes equipped with three glass shelves.
Interior Light (Some models)
The light comes on automatically when the door is opened. The light can also be turned on and off by pressing the "Light" button on the control panel. Press the button twice to keep the light on when the door is closed.
Door Lock
This unit is equipped with a lock near the bottom of the door. Two keys are provided. Keep the keys out of reach of children.
CARE AND CLEANING

| Beverage Cooler | |
| 1 | Handle |
| 2 | Control panel |
| 3 | Glass shelves |
| 4 | Glass door |
| 5 | Light switch |
| 6 | Adjustable legs |
Cleaning the beverage cooler
- Before cleaning, turn the temperature control to OFF, unplug the beverage cooler and remove the bottles.
- Clean your beverage cooler once every two months.
Inside: Wash inside surfaces of the beverage cooler with a solution of two tablespoons of baking soda in one quart (1.136 liters) warm water. Rinse and dry. Wring excess water out of the sponge or cloth when cleaning in the area of the controls, or any electrical parts.
Wash the removable parts with the baking soda solution mentioned above, or mild detergent and warm water. Rinse and dry. Never use metallic scouring pads, brushes, abrasive cleaners, or alkaline solutions on any surface. Do not wash removable parts in a dishwasher.
Outside: Wash the cabinet with warm water and mild liquid detergent. Rinse well and wipe dry with a clean soft cloth.
Care of plastic parts
- Be sure and protect the door gasket. It should be kept clean at all times.
- If the plastic parts in the beverage cooler remain contaminated by oil (animal or vegetable) for a long period of time, they will age and crack easily. Please clean them on a regular basis.
Vacation and Moving Tips
Vacations:
If the beverage cooler will not be used for several months:
- Remove all wine bottles and unplug the power cord.
- Clean and dry the interior thoroughly.
- Leave the wine cooler door open slightly, blocking it open if necessary, to prevent odor and mold growth.
Moving: When moving the beverage cooler, follow these guidelines to prevent damage:
- Disconnect the power cord plug from the wall outlet.
- Remove wine bottles and clean the beverage cooler.
- Secure all loose items by taping them securely in place to prevent damage.
- In a moving vehicle, secure the beverage cooler in an upright position to prevent movement. Also, protect the outside of the beverage cooler with a blanket or similar item.
If leaving the beverage cooler door open while on vacation, make certain that children cannot climb inside and become entrapped.
BEFORE YOU CALL
1-800-944-9044 (United States)
1-800-265-8352 (Canada)
Visit our web site at www.frigidaire.com.
| PROBLEM | CAUSE | CORRECTION |
WINE COOLER OPERATION | ||
Beverage Cooler does not run | | |
| Beverage Cooler runs too much or too long | | |
| Interior temperature is too cold | | |
| Interior temperature is too warm | | |
| External surface temperature is warm | | |
SOUND AND NOISE | ||
Louder sound levels when wine cooler is on | | |
| Longer sound levels when compressor comes on. | | |
| Fan runs when room temperature is below 45°. | | |
| Popping or cracking sound when compressor comes on. | | |
| Boiling or gurgling sound, like water boiling. | | |
| Vibrating or rattling noise. | | |
| Snapping sound. | | |
WATER/MOISTURE/FROST INSIDE BEVERAGE COOLER | ||
Moisture forms on inside walls | | |
WATER/MOISTURE/FROST OUTSIDE BEVERAGE COOLER | ||
Moisture forms on outside of Beverage Cooler | | |
ODOR IN BEVERAGE COOLER | ||
Odors in Beverage Cooler | | |
DOOR PROBLEMS | ||
Door will not close | | |
www.frigidaire.com
USA 1-800-944-9044
www.frigidaire.ca
Canada 1-800-265-8352

Documents / Resources
References
Download manual
Here you can download full pdf version of manual, it may contain additional safety instructions, warranty information, FCC rules, etc.
Thank you! Your question has been received!


Need Assistance?
Do you have a question about the FFBC4622QS that isn't answered in the manual? Leave your question here.