
Summary of Contents for fafnir GL-X300B
- Page 1 WIRELESS GATEWAY GL-X300B Wireless Gateway for VISY-Command WEB Installation and configuration Version: Edition: 2023-04 Art. no.: 350302 FAFNIR GmbH • Schnackenburgallee 149 c • 22525 Hamburg • Germany • T: +49 / 40 / 39 82 07-0 • Web: www.fafnir.com...
- Page 2 © Copyright: Reproduction and translation are permitted only with the written consent of the FAFNIR GmbH. The FAFNIR GmbH reserves the right to carry out product alterations without prior notice. Table of contents...
-
Page 3: Table Of Contents
Table of contents Introduction ......................1 Scope of wireless gateway .................. 2 Hardware installation ................... 3 Configuration ......................5 Admin Panel..........................5 Internet section ........................8 Connecting VISY-Command Web to the wireless gateway ........13 Table of contents... -
Page 4: Introduction
1 Introduction This manual describes how to install and configure the wireless gateway that can be con- nected to VISY-Command Web. The external wireless gateway enables internet connectivity to a VISY-Command WEB located at forecourts where internet connection via LAN network is not possible. -
Page 5: Scope Of Wireless Gateway
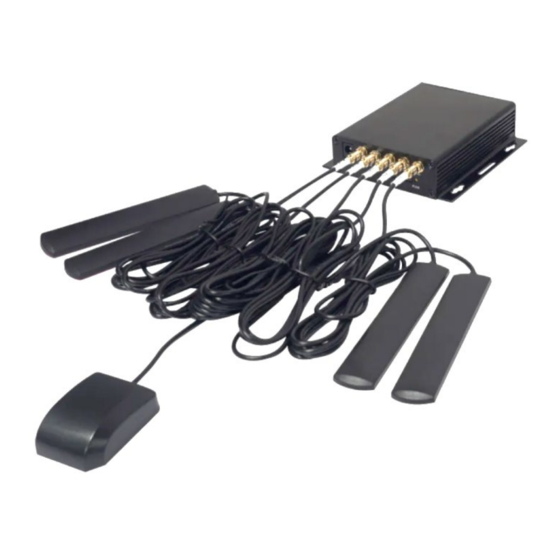
* Components inside the box are subject to change Items not included with the wireless gateway: 1. SIM card The gateway is tested from FAFNIR with the Thingsmobile SIM card. It is recommended to use 4G internet connectivity for uninterrupted data transfer to the SECON-Server. -
Page 6: Hardware Installation
Hardware installation The following steps are required for proper hardware installation of the product. 1. Remove SIM tray using the SIM eject pin and place the SIM card on the SIM tray properly. The SIM card must be installed without power supply of the Wireless Gateway! Replace the SIM tray in the SIM tray slot. - Page 7 GPS Antenna – 1 unit (if needed) • 4. Connect the power adapter to the power supply. In a couple of minutes, the LED’s of Power and Wi-Fi are turned ON. For more information please refer to: https://static.gl-inet.com/www/images/products/gl-x300b/x300b_user-man- ual_20220527.pdf Hardware installation Page 4/16...
-
Page 8: Configuration
Use the provided LAN cable to connect the gateway with the laptop (or) • Search for a Wi-Fi signal named “GL-X300B-…” and establish a connection with this • signal. When prompted for a password, please enter ”goodlife” (All characters in lower case). - Page 9 3. The language setting webpage will be displayed where you need to select the desired language. Select your preferred language and click “Next” 4. The password setting page will be displayed next. There is no default password for the admin panel. Set your desired password and then click “Submit”. Note: This password only applies for the admin panel and it does not change the Wi-Fi password.
- Page 10 5. After the initial setup, you will then enter the web Admin panel of the gateway. By default, you will be in the “Internet” section (see left side of the admin panel). This section provides information on the active status of the gateway, LAN Clients, WLAN clients, 3G/4G modem (SIM-card) and the possibility to set up the SIM card and LAN connection.
-
Page 11: Internet Section
Internet section 1. For SIM cards without any security PIN, the connection to internet should be estab- lished automatically in a couple of minutes. The screen will look like the below in- dicating “4G” when Internet is available. 2. If there is no internet connection, click the “Auto Setup” option. The SIM card should then be setup automatically and internet should be available. - Page 12 • Under the option “Device”, select “/dev/cdc-wdm0” or “/dev/ttyUSB3” • Under the option “APN”, type the APN from your SIM card provider. Search for the APN via internet or contact your mobile service provider for assistance. For example, if you are using a Vodafone SIM card in Germany, the APN is “web.voda- fone.de”...
- Page 13 Configuration Page 10/16...
- Page 14 • Once a connection to the internet is established your admin panel screen will look like the below. 4. The wireless gateway has only one WAN port and one LAN port. It is recommended to use the converter function of the gateway to change the WAN port into a LAN port.
- Page 15 FIREWALL – To set up port forwarding, opening ports on gateway etc. • VPN – To set up various options using VPN • MORE SETTINGS – To change admin password, reset the gateway etc. • To learn how to use these options please visit: https://static.gl-inet.com/www/images/products/gl-x300b/x300b_user-man- ual_20220527.pdf Configuration Page 12/16...
-
Page 16: Connecting Visy-Command Web To The Wireless Gateway
Connecting VISY-Command Web to the wireless gateway Use another LAN cable (if the provided LAN cable is being used for configuration) to connect the WAN port (settings changed to LAN) of the gateway to the LAN port of the VISY-Command WEB. In the VISY-Command WEB, go to “Configuration ... - Page 17 The network data for the VPN connection should be entered here. This configura- tion establishes a secure VPN tunnel for remote connection to the SECON-Server. For this network data, please contact your IT network administrator. Once you have entered the data, click “Save” and the VPN should have been established. The lock symbol on the top of the display indicates an established VPN connection.
- Page 18 Restart the VISY-Command WEB (or) unplug the display wire and reconnect it. Once the display is completely rebooted, go to the menu item “Configuration Tools Ping” to test the proper functioning of the internet connection. Enter a sample IP address “8.8.8.8” of google and click “Start”. You should get a similar screen (see below) with data transmitted and received which indicates a working internet connection.
- Page 19 No. 350340 c. After logging into the Admin mode, the configuration of the VISY-Command Web can be performed remotely To learn more about the remote configuration, please visit the download section of our website www.fafnir.com Configuration Page 16/16...
- Page 20 FAFNIR GmbH Schnackenburgallee 149 c 22525 Hamburg, Germany T: +49 / 40 / 39 82 07-0 E-mail: [email protected] Web: www.fafnir.com...