Omron M2 Basic - Digital Automatic Blood Pressure Monitor Manual
- Instruction manual (101 pages) ,
- Manual (23 pages) ,
- New product information sheet (22 pages)
Before using the unit
Introduction
Thank you for purchasing the OMRON M2 Basic Upper Arm Blood Pressure Monitor.
The OMRON M2 Basic is a fully automatic blood pressure monitor, operating on the oscillometric principle. It measures your blood pressure and pulse rate simply and quickly. For comfortable controlled inflation without the need of pressure pre-setting or re-inflation the device uses its advanced "IntelliSense" technology.
The unit also stores the last measurement value in memory.
Intended Use
This product is designed to measure the blood pressure and pulse rate of people within the range of the designated arm cuff, following the instructions in this instruction manual.
It is mainly designed for general household use. Please read the Important Safety Information in this instruction manual before using the unit.
Please read this instruction manual thoroughly before using the unit. For specific information about your own blood pressure, CONSULT YOUR DOCTOR.
Important Safety Information
Consult your doctor prior to using in pregnancy or if diagnosed with arrhythmia or arteriosclerosis.
Please read this section carefully before using the unit.

(General Usage)
(AC Adapter Usage)
(Battery Usage)

(General Usage)
(AC Adapter Usage)
(Battery Usage)
General Precautions
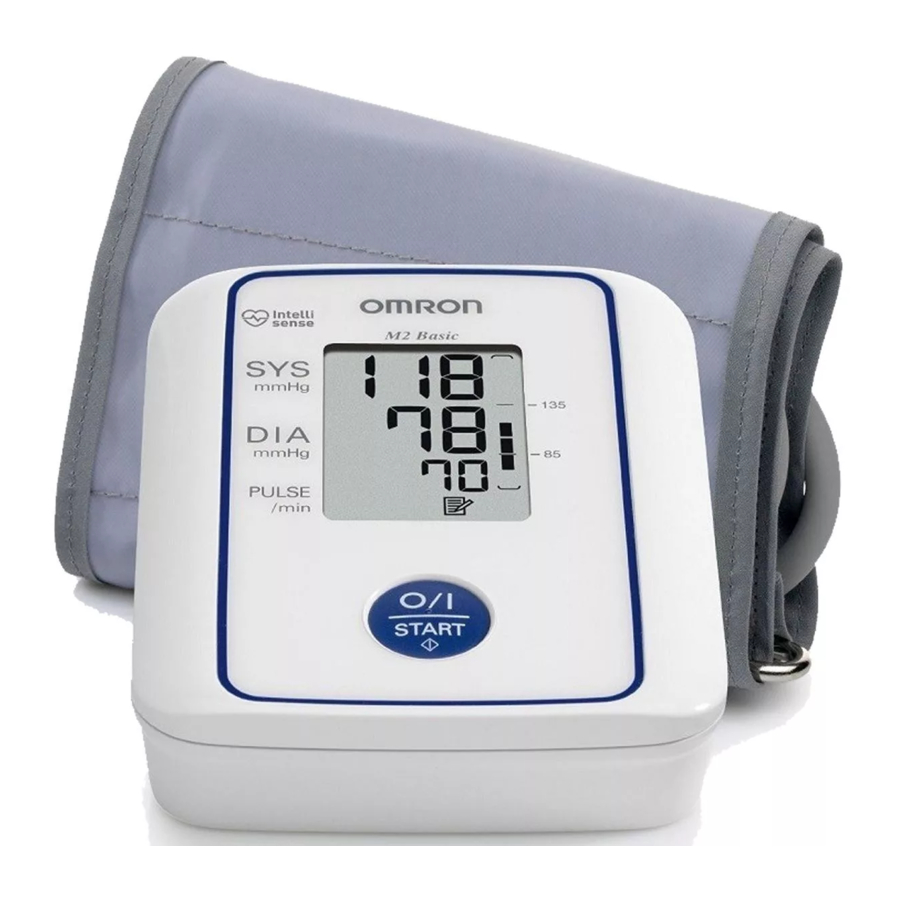
Overview
Main Unit

Arm Cuff

- Arm cuff
(Medium cuff: arm circumference 22-32 cm)
Display

- Heartbeat symbol
(Flashes during measurement)
Package Contents (others)

Preparation
Installing/Replacing the Batteries
-
Turn the main unit upside down.
-
Slide the battery cover in the direction of the arrow while pressing the ribbed part of the cover.
-
Install or replace four "AAA" size batteries so that the + (positive) and - (negative) polarities match the polarities indicated on the battery compartment.

-
Put the battery cover back in place.
Slide the battery cover as indicated, until it clicks into place.


Note:
The measurement values continue to be stored in memory even after the batteries are replaced.
Battery Life & Replacement

If the battery low symbol (  ) appears on the display, replace all four batteries at the same time.
- When the battery low symbol (
![]() ) starts to blink, you will still be able to use the unit for a short while. You should replace the batteries with new ones as soon as possible.
) starts to blink, you will still be able to use the unit for a short while. You should replace the batteries with new ones as soon as possible. - When the symbol (
![]() ) remains lit, the batteries are exhausted. You should replace the batteries with new ones at once. Turn the unit off before replacing the batteries.
) remains lit, the batteries are exhausted. You should replace the batteries with new ones at once. Turn the unit off before replacing the batteries.
Four new "AAA" alkaline batteries will last for approximately 300 measurements, when used to take two measurements a day.
Since the supplied batteries are for monitoring use only, they may have a shorter life and do not last for 300 measurements.
Using the Unit
How to Sit Correctly When Taking a Measurement
Correct posture during measurement is necessary to get accurate results.
Notes:
- Measurements should be taken in a quiet place and you should be in a relaxed, seated position. Make sure that the room is not too hot or too cold.


Note:
You can take a measurement on either your left or right arm. The blood pressure can differ between the right arm and the left arm and therefore also the measured blood pressure values can be different. OMRON recommends to always use the same arm for measurement. If the values between the two arms differ substantially, please check with your physician which arm to use for your measurement.
Incorrect Posture
- Sitting on a sofa or at a low table so that you tend to lean forward
![]()

These situations could lead to higher blood pressure values due to strain or the arm cuff being lower than the heart.
If the arm cuff is at a lower position than your heart use cushions etc., to adjust the height of your arm.

Applying the Arm Cuff
Be sure to wrap the arm cuff correctly so that you get accurate results.
Measurements can be taken in light clothing. However, please remove thick clothes, such as sweaters, before taking a reading.
-
Insert the air plug into the air jack on the left side of the main unit.
![]()
-
Put your left arm through the cuff loop.
![]()


Note:
If the cuff is not assembled, pass the end of the cuff furthest from the tubing through the metal D-ring to form a loop. The smooth cloth should be on the inside of the cuff loop.

- Position the arm correctly.
![]()

Taking Measurements on the Right Arm
Apply the cuff so that the air tube is at the side of your elbow.

Taking a Reading
- Press the O/I START button to turn the unit on.
The cuff starts to inflate automatically.

Sit in a chair with your feet flat on the floor and place your arm on a table so that the cuff will be at the same level as your heart. Keep still and do not talk during measurement
Note:
To cancel a measurement, press the O/I START button to turn the unit off and to release the air in the arm cuff. - Inflation stops and the measurement starts with deflating. As the cuff deflates, the heartbeat symbol (
![]() ) flashes at every heartbeat.
) flashes at every heartbeat. - Check the measurement results
The unit automatically stores blood pressure and pulse rate into its memory. Refer to the Chapter "Using the Memory Function".
![]()

 ) flashes at every heartbeat.
Note:
Wait 2-3 minutes before taking another blood pressure measurement. Waiting between readings allows the arteries to return to the condition prior to taking the blood pressure measurement.
Self-diagnosis of measured results and treatment are dangerous. Please follow the instructions of your doctor.
Common Causes of Inaccurate Results
-
Arm cuff is too loose.
![]()
-
Movement or talking during measurement.
![]()
-
Leaning forwards.
![]()


Note:
If the arm cuff is at a lower position than your heart use cushions etc., to adjust the height of your arm.

- Press the O/I START button to turn the unit off.
Note: If you forget to turn the unit off, it will automatically shut itself off after five minutes.

Recent research suggests that the following values can be used as a guide to high blood pressure for measurements taken at home.

| Systolic Blood Pressure | Above 135 mmHg |
| Diastolic Blood Pressure | Above 85 mmHg |
This criteria is for home blood pressure measurement. For professional office blood pressure measurement criteria, please refer to Chapter "Some Useful Information about Blood Pressure".
Instructions for Special Conditions
If your systolic pressure is known to be more than 220 mmHg, press and hold the O/I START button until the arm cuff inflates 30 to 40 mmHg higher than your suspected systolic pressure.
-
Press the O/I START button to turn the unit on. Measurement starts.
![]()
-
When the cuff starts to inflate, press the O/I START button and keep it pressed until the pressure is 30 to 40 mmHg higher than your suspected systolic pressure.
Note:
You cannot inflate the cuff above 299 mmHg. (An error will be displayed if you try to inflate the cuff above 299 mmHg.) -
Release the O/I START button when the cuff has been inflated to the desired pressure.
The cuff starts to deflate and measurement starts. -
The rest of the procedure is the same as for normal measurement. Refer to the Chapter "Taking a reading", steps 2 to 6.
Note:
Do not apply more pressure than necessary.

Using the Memory Function
The unit automatically stores the last measurement values (blood pressure and pulse rate) in the memory.
-
Press and hold the O/I START button until the last measurement value is displayed along with the memory symbol.
![]()
-
Press the O/I START button to turn the unit off.
Note:
If you forget to turn the unit off, it will automatically shut itself off after five minutes.

To Delete the Value Stored in Memory
-
To delete stored readings, first press and hold the O/I START button until the last measurement value is displayed. Then keep the button pressed down for about 10 seconds. All readings will then be deleted.
![]()
-
Press the O/I START button to turn the unit off.
Note: If you forget to turn the unit off, it will automatically shut itself off after five minutes.

Quick Reference Guide
If you are using this device for the first time, please read carefully chapter 3 of this instruction manual. To help ensure a reliable reading, avoid eating, drinking alcohol, smoking, or exercising for at least 30 minutes before taking a measurement.
Note:
Remove any tight-fitting clothing from your upper arm.
-
Sit on a chair with your feet flat on the floor and place your arm on a table so that the arm cuff will be at the same level as your heart.
![]()
-
Apply the arm cuff to your upper arm. The marker should be centred on the inside of your arm and point down the inside of the arm, so that the air tube runs down the inside of your forearm and is in line with your middle finger.
-
Secure the cuff around your arm using the fabric fastener strip.
-
Press the O/I START button.
When measurement is complete, the monitor displays your blood pressure and pulse rate, and automatically deflates the cuff.
![]()


Note:
Always wait at least 2-3 minutes before taking another blood pressure measurement.
Handling Errors and Problems
Error Messages
| Error Display | Cause | Remedy |
 | Cuff is under inflated. | Carefully read and repeat the steps listed under Instructions for Special Conditions |
 | Movement during measurement. | Repeat measurement. Remain still and do not talk during measurement. Refer to section Taking a Reading |
| Air plug disconnected. | Insert the air plug securely. Refer to section Applying the Arm Cuff | |
| Arm cuff not applied correctly. | Apply the arm cuff correctly. Refer to section Applying the Arm Cuff | |
| Clothing is interfering with the arm cuff. | Remove any clothing interfering with the arm cuff. Refer to section Applying the Arm Cuff | |
| Air is leaking from the arm cuff. | Replace cuff with new one. Refer to Optional Parts | |
 | The arm cuff was inflated above 299 mmHg when inflating the cuff manually. | Do not inflate the arm cuff above 299 mmHg. Refer to section Instructions for Special Conditions |
 Blinks or appears continuously | Battery power is low. | Replace all four "AAA" batteries with new ones. Refer to section Installing/Replacing the Batteries |
 | Device error. | Contact your OMRON retail outlet or distributor. |
Troubleshooting
| Problem | Cause | Remedy |
| The reading is extremely low (or high). | Arm cuff not applied correctly. | Apply the arm cuff correctly. Refer to section Applying the Arm Cuff |
| Movement or talking during measurement. | Remain still and do not talk during measurement. Refer to section Taking a Reading | |
| Clothing is interfering with the arm cuff. | Remove any clothing interfering with the arm cuff. Refer to section How to Sit Correctly When Taking a Measurement | |
| Arm cuff pressure does not rise. | The air plug is not securely inserted into the main unit. | Make sure that the air plug is connected securely. Refer to section Applying the Arm Cuff |
| Air is leaking from the arm cuff. | Replace the arm cuff with a new one. Refer to Optional Parts | |
| Arm cuff deflates too soon. | The arm cuff is loose. | Apply the cuff correctly so that it is firmly wrapped around the arm. Refer to section Applying the Arm Cuff |
| Cannot measure or readings are too low or too high. | The arm cuff has not been inflated sufficiently. | Inflate the cuff so that it is 30 to 40 mmHg above your previous measurement result. Refer to section Instructions for Special Conditions |
| The unit loses power during measurement. | The batteries are empty. | Replace the batteries with new ones. |
Nothing happens when you press the buttons. | The batteries are empty. | Replace the batteries with new ones. |
| The batteries have been inserted incorrectly. | Insert the batteries with the correct (+/ -) polarity. | |
Other problems. | Press the O/I START button and repeat measurement. If the problem continues, try replacing the batteries with new ones. If this still does not solve the problem, contact your OMRON retail outlet or distributor. | |
Maintenance and Storage
Maintenance
To protect your unit from damage, please observe the following:
- Do not carry out repairs of any kind by yourself. If a defect occurs, consult your OMRON retail outlet or distributor as mentioned on the packaging.
![]()

Calibration and Service
Storage
Unplug the air tube from the air jack. Gently fold the air tube into the arm cuff.

Note:
Do not bend the air tube excessively.
Do not store the unit in the following situations:
Optional Parts
Wide Range Cuff
Arm circumference 22 - 42 cm

Medium Arm Cuff
Arm circumference 22 - 32 cm

Large Arm Cuff
Arm circumference 32 - 42 cm

AC Adapter S

Using the Optional AC Adapter
Insert batteries into the battery compartment even when using the AC adapter.
Notes:
-
Insert the AC adapter plug into the AC adapter jack on the right side of the main unit.

-
Plug the AC adapter into an electrical outlet.

To disconnect the AC adapter, unplug the AC adapter from the electrical outlet first and then immediately remove the AC adapter plug from the main unit.
Technical Data
| Product Description | Digital Automatic Blood Pressure Monitor | |
| Model | OMRON M2 Basic (HEM-7116-E2(V)) | |
| Display | LCD Digital Display | |
| Measurement Method | Oscillometric method | |
| Measurement Range | Pressure: 0 mmHg to 299 mmHg Pulse: 40 to 180/min. | |
| Memory | Last measurement | |
| Accuracy | Pressure: ± 3 mmHg Pulse: ± 5% of display reading | |
| Inflation | Automatic by electric pump | |
| Deflation | Automatic pressure release valve | |
| Power Source | 4 "AAA" batteries 1.5V or AC/ DC adapter (optional, 6V  4W) 4W) | |
| Battery Life | Capacity of new alkaline batteries is approx. 300 measurements | |
| Operating Temperature/ Humidity | 10°C to 40°C/ 30 to 85% RH | |
| Storage Temperature/Humidity/ Air Pressure | -20°C to 60°C/ 10 to 95% RH/ 700-1060 hPa | |
| Console Weight | Approximately 245g without batteries | |
| Cuff Weight | Approximately 120g | |
| Outer Dimensions | Approximately 104 (w) mm × 64 (h) mm × 129 (l) mm | |
| Cuff Dimensions | Approximately 146 mm × 446 mm (Medium cuff: arm circumference 22 to 32 cm) | |
| Cuff material | Nylon and polyester | |
| Package Content | Main unit, cuff, instruction manual, battery set, guarantee card, blood pressure pass | |
Note:
Subject to technical modification without prior notice


This device fulfils the provisions of EC directive 93/42/EEC (Medical Device Directive).
This blood pressure monitor is designed according to the European Standard EN1060, Non-invasive sphygmomanometers Part 1: General Requirements and Part 3: Supplementary requirements for electromechanical blood pressure measuring systems.
Please read the instruction manual carefully before using the device.
Regarding Electro Magnetic Compatibility (EMC)
With the increased number of electronic devices such as PC's and mobile (cellular) telephones, medical devices in use may be susceptible to electromagnetic interference from other devices. Electromagnetic interference may result in incorrect operation of the medical device and create a potentially unsafe situation.
Medical devices should also not interfere with other devices.
In order to regulate the requirements for EMC (Electro Magnetic Compatibility) with the aim to prevent unsafe product situations, the EN60601-1-2:2007 standard has been implemented. This standard defines the levels of immunity to electromagnetic interferences as well as maximum levels of electromagnetic emissions for medical devices.
This medical device manufactured by OMRON HEALTHCARE conforms to this EN60601-1-2:2007 standard for both immunity and emissions.
Nevertheless, special precautions need to be observed:
Further documentation in accordance with EN60601-1-2:2007 is available at OMRON HEALTHCARE EUROPE at the address mentioned in this instruction manual.
Documentation is also available at
www.omron-healthcare.com.

Correct Disposal of This Product (Waste Electrical & Electronic Equipment)
This marking shown on the product or its literature, indicates that it should not be disposed of, with other household wastes at the end of its working life. To prevent possible harm to the environment or human health from uncontrolled waste disposal, please separate this product from other types of wastes and recycle it responsibly to promote the sustainable reuse of material resources.
Household users should contact either the retailer where they purchased this product, or their local government office, for details of where and how they can return this item for environmentally safe recycling.
Business users should contact their supplier and check the terms and conditions of the purchase contract. This product should not be mixed with other commercial wastes for disposal.
Some Useful Information about Blood Pressure
What is Blood Pressure?
Blood pressure is a measure of the force of blood flowing against the walls of the arteries. Arterial blood pressure is constantly changing during the course of the heart's cycle.
The highest pressure in the cycle is called the Systolic Blood Pressure; the lowest is the Diastolic Blood Pressure.
Both pressure readings, the Systolic and Diastolic, are necessary to enable a doctor to evaluate the status of a patient's blood pressure.
Why is it a Good Thing to Measure Blood Pressure at Home?
Having your blood pressure measured by a doctor can cause anxiety which is itself a cause of high blood pressure. As a variety of conditions affect blood pressure, a single measurement may not be sufficient for an accurate diagnosis.
Many factors such as physical activity, anxiety, or the time of day, can influence your blood pressure. Thus it is best to try and measure your blood pressure at the same time each day, to get an accurate indication of any changes in blood pressure. Blood pressure is typically low in the morning and increases from afternoon to evening. It is lower in the summer and higher in the winter.
Blood pressure is measured in millimetres of mercury (mmHg) and measurements are written with the systolic pressure before the diastolic
e.g. A blood pressure written as 135/85, is referred to as 135 over 85 mmHg.
 Example: fluctuation within a day (male, 35 years old)
Classification of Blood Pressure by the World Health Organization
The World Health Organization (WHO) and the International Society of Hypertension (ISH) developed the Blood Pressure Classification shown in this figure.

This classification is based on the blood pressure values measured on people in a sitting position in outpatient departments of hospitals.
Note:
There is no universally accepted definition of hypotension. However, those having the systolic pressure below 100 mmHg are assumed as hypotensive.

Documents / Resources
References
Download manual
Here you can download full pdf version of manual, it may contain additional safety instructions, warranty information, FCC rules, etc.
Thank you! Your question has been received!


Need Assistance?
Do you have a question about the M2 Basic that isn't answered in the manual? Leave your question here.