Table of Contents
Quick Links
Table of Contents

Summary of Contents for AEQ XPEAK
- Page 1 V. 1.7 - 12/04/2023 Firmware Versions: Xpeak_R / Xpeak_D / Xpeak_BP: CPU 2.2.5 or higher Xpeak_IF: CPU 2.2.5 / AoIP CPU 4.2.5.1 or higher Xplorer: CPU 1.00.022 or higher Software Versions: Xpeak 1.0.5 or higher Xpeak Virtual 1.0.2 or higher...
-
Page 2: Table Of Contents
2.2. Physical description of the Xpeak_BP wired user beltpack..........15 2.2.1. Front panel description..................15 2.2.2. Rear panel description..................16 2.3. Physical description of the Xplorer for Xpeak wireless user beltpack......17 2.3.1. Front panel description..................17 2.3.2. Other elements...................... 18 2.3.3. - Page 3 3.4.1. "Connection" menu....................47 3.4.2. "Options" menu..................... 48 3.4.3. "Info" menu......................49 4. INSTALLATION AND USE OF "XPEAK VIRTUAL" APPLICATION........50 4.1. Running the application. License activation..............50 4.2. Software operation......................53 4.2.1. Cross-point activation buttons................56 4.2.2.
- Page 4 6. FIRMWARE UPGRADE......................98 7. A.E.Q. GUARANTEE......................102 8. ADDITIONAL INFORMATION....................103 XPEAK IP Intercom System...
-
Page 5: Introduction
In Xpeak, different hardware or software user panels are interconnected as if they were all part of the same physical production center. It doesn’t matter whether they are on the same LAN network, or if they are dispersed in different places with access to Internet or to a WAN - they will all connect. - Page 6 • IMPORTANT NOTE: It is not possible to use switches or devices with EEE (Energy Efficient Ethernet or Green Ethernet) enabled in networks with Xpeak equipment. Therefore, it is recommended that: 1. If you use managed switches, ensure that they allow EEE to be disabled. Make sure that EEE is disabled on all ports used for Xpeak system.
-
Page 7: Devices Comprising The System
Xpeak_R: Rackmount User Panel. • Xpeak_D: Desktop User Panel. • Xpeak_BP: Wired Beltpack. • Xplorer beltpack now offers a working mode specially designed to integrate with Xpeak. • Xpeak Virtual: App for PC. • Xpeak_IF: I/O Interface. • 1.1.4. Operating modes. -
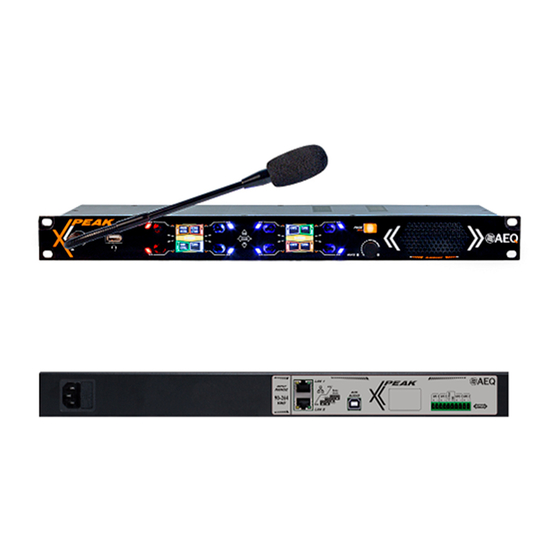
Page 8: Xpeak_R And Xpeak_D User Panels Description
It combines audio signals that arrive at the equipment from the different devices. Dimensions and weight: Xpeak_R: Front: 482.6 x 44.5 mm. Depth 103 mm. Weight: 1.87 Kg. • Xpeak_D: Front: 217 x 105 mm. Depth 101 mm. Weight: 1.46 Kg. • XPEAK IP Intercom System... -
Page 9: Xpeak_Bp Wired Beltpack Description
Front light signalling of incoming call. • The signalling of the key and communication status is carried out in the quadrant corresponding to each key in the idle screen of the display. XPEAK IP Intercom System... -
Page 10: Xplorer For Xpeak Wireless Beltpack Description
• Weight: 365 gr. • Functional: Xplorer terminals can be ordered on demand ready with capability to operate in XPeak systems, with the following functional characteristics: Internal programming of the Xpeak functionality. • On-screen display of Xpeak status and menus. - Page 11 Dimensions: 175 x 65 x 182 mm. Weight: 950 gr. Input voltage: 12 - 15VDC (external power adapter supplied with 100 - 240 VAC 50/60Hz input). Maximum consumption: 16W. Charge time, full cycle: approximately 7 h. XPEAK IP Intercom System...
-
Page 12: Xpeak_If I/O Interface Description
1.6. Xpeak Virtual application description. Virtual user panel. • PC software. • Windows operating system. • 16 virtual crossover keys. • Compatible with Xpeak in all work • modes. Adaptive screen configuration: • vertical, horizontal or square. XPEAK IP Intercom System... -
Page 13: Physical Description Of The Devices
3. 8 x 2-axis lever keys. Each one has an associated RGB LED. 4. 1,54” TFT Color screens. 5. Rotary encoder with push-button. During operation, the push-button activates the MUTE function, and the attached indicator is illuminated. 6. Page and configuration menu access key. 7. Integrated loudspeaker. XPEAK IP Intercom System... -
Page 14: Rear Panels Description
3. USB type-B connector for connection to a PC. Digital USB audio input / output on a B-type female connector. Inputs are in digital format and mono, as they are designed to incorporate or extract audio to/from the Intercom system. XPEAK IP Intercom System... -
Page 15: Physical Description Of The Xpeak_Bp Wired User Beltpack
Connecting a 4K7 ohm resistor in series with every circuit is recommended. In any case, max. supplied current is 50mA, so the equivalent resistance between +5V and GND must always be >100 ohm. 2.2. Physical description of the Xpeak_BP wired user beltpack. 2.2.1. Front panel description. XPEAK IP Intercom System... -
Page 16: Rear Panel Description
13. Muted microphone indicator. 2.2.2. Rear panel description. 1. General volume adjustment. 2. Pressed-key volume adjustment. It corresponds to the first key by default. 3. Ethernet + PoE port. 4. GPO connection. 5. USB headset connection. XPEAK IP Intercom System... -
Page 17: Physical Description Of The Xplorer For Xpeak Wireless User Beltpack
2.3. Physical description of the Xplorer for Xpeak wireless user beltpack. 2.3.1. Front panel description. 1. Programmable key. By default, access MENU to configuration options and keyboard LOCK. The function of the key at all times is related to the information indicated on the label located on the screen, just below the key. -
Page 18: Other Elements
Micro-headphone headsets are connected to a male "Tini-QG" connector located at the bottom of the unit. The input stage for the headset’s microphone is designed to be used with "electret" capsules homologated by AEQ, requiring 2.8V supply. XPEAK IP Intercom System... -
Page 19: Description Of The Charging Terminal
(if the device is on, the approximate current charge level is displayed on its screen: it's recommended to wait until the upper LED of the charging terminal turns on green to consider the device fully charged). XPEAK IP Intercom System... -
Page 20: Physical Description Of Xpeak_If I/O Interface
IMPORTANT NOTE: Shielded cable is required to make the connection between the USB port and PC. 3. Dual Ethernet port. Two Ethernet RJ45 10/100BaseT connectors can be found which are used to connect the interface to the network using IP protocols. Detail of ETHERNET connectors XPEAK IP Intercom System... - Page 21 5. Analog output connectors. Four XLR-3 Male connectors. Balanced output. Pin 1 Pin 2 Output + Pin 3 Output - 6. Analog input connectors. Four XLR-3 Female connectors. Balanced input. Pin 1 Pin 2 Input + Pin 3 Input - XPEAK IP Intercom System...
-
Page 22: Menus Description
"Producer", "Director", "Snd-ctrl" and "Cams" respectively. When programming a key from the "AEQ Xpeak" application, a label is automatically associated with it according to the destination and the type of command: if we use the default label it appears written in white on the display, while if the text is changed appears in cyan. - Page 23 By turning the encoder, we can select any of them. Press the encoder button to enter the selected option. Pressing "PAGE (MENU)" takes you back in the menu and repeating the key press takes you back to the operation screen. XPEAK IP Intercom System...
-
Page 24: Xpeak" Menu
"Save" legend (the changes can be discarded by means of the "Cancel" option). By pressing the "PAGE (MENU)" key once, we’ll go back to the main screen of the "Xpeak" menu, and two more pressings of "PAGE (MENU)" take us to the operation screen. -
Page 25: Key Auto" Option
3.1.1.3. "Key Auto" option. Allows us to enable the auto-discovery mode. When a Xpeak device "discovers" another device on the network and has no keys programmed to communicate with it, a key is automatically programmed to establish that communication if this mode is enabled. -
Page 26: Erase Config" Option
Xpeak mode: Up to 28-terminals matrix-less, Xplorer-compatible system, local and • global Plug & Play. 7 kHz HD audio. Native mode including all the features. Conexia mode: Xpeak panels turn into 8-key user panels compatible with Conexia • intercom Matrix. Audio quality is 7 kHz HD. -
Page 27: Options" Menu
• configured just in the same way as the panel’s IP address. 3.1.4. "Options" menu. Gives access to a test option where the encoder, the keys and the LEDs of the unit's front can be checked. XPEAK IP Intercom System... -
Page 28: Info" Menu
DNS. In section 3.1.3 the way to configure all these parameters is detailed. In addition, the Inet (indicates if there is an Internet connection) and VPN (indicates if the unit is connected to the AEQ VPN service) fields appear. About: Allows us to check the operative system version, the firmware •... -
Page 29: Easynet And Easynet G722 Modes
"Mute Key": The functionality is the same as defined in section 3.1.1.1. • 3.1.6.3. EasyNET and EasyNET G722 modes. They are 4-channel Party-Line modes, so in operating mode there are only 4 active keys, the ones associated to the left screen. XPEAK IP Intercom System... -
Page 30: Xpeak_Bp Menus
"Producer", "Director", "Snd-ctrl" and "Cams" respectively. When programming a key from the "AEQ Xpeak" application, a label is automatically associated with it according to the destination and the type of command: if we use the default label it appears written in white on the display, while if the text is changed appears in cyan. -
Page 31: Xpeak" Menu
This is the most used menu during operation as it shows very important functions for online operation. Press the "PAGE (MUTE)" key when the “Xpeak” option is visible on screen to enter this first menu. The different options in this menu are highlighted by turning the right encoder knob, and pressing the "PAGE (MUTE)"... -
Page 32: Dev. Name" Option
4, labeled with the "Save" legend (the changes can be discarded by means of the "Cancel" option, associated to key 3). By pressing the "(LOCK) MENU" key once, we’ll go back to the main screen of the "Xpeak" menu, and two more pressings take us to the operation screen. -
Page 33: Key Delete" Option
Next step is to confirm that the configuration of the selected key is deleted by means of the "Apply" option. 3.2.1.6. "Erase Config" option. Allows us to erase the beltpack's configuration. Confirmation is required. 3.2.2. "Mode" menu. Allows us to select between the different beltpack operating modes. There are five options: XPEAK IP Intercom System... -
Page 34: Connection" Menu
Xpeak mode: Up to 28-terminals matrix-less, Xplorer-compatible system, local and global • Plug & Play. 7 kHz HD audio. Native mode including all the features. Conexia mode: Xpeak beltpacks turn into 4-key user panels compatible with Conexia • intercom Matrix. Audio quality is 7 kHz HD. -
Page 35: Options" Menu
DNS. In section 3.2.3 the way to configure all these parameters is detailed. In addition, the Inet (indicates if there is an Internet connection) and VPN (indicates if the unit is connected to the AEQ VPN service) fields appear. About: Allows us to check the operative system version, the firmware •... -
Page 36: Menu Differences In Other Operating Modes
3.2.6. Menu differences in other operating modes. 3.2.6.1. All modes except Xpeak. Xpeak mode is the only one that supports families characterized by a defined color of the LED associated to each cross-point key. Thus, these LEDs don’t illuminate in the rest of operating modes. -
Page 37: Xplorer For Xpeak Menus
3.3. Xplorer for Xpeak menus. On the operation screen of the unit, the display shows the following information: Displayed page Configured key Input level Not configured key Family indicator WiFi level Device's name Muted microphone Battery level In the example above, there are 3 keys configured on page 1 and the destinations associated with each key are a Xpeak_R unit, a Xpeak_D and a Xpeak_BP. -
Page 38: Xpeak" Menu
This is the most used menu during operation as it shows very important functions for online operation. When the "XPEAK" option is highlighted in green, by pressing the key labeled as "SELECT" this first menu is accessed; this menu shows a different name depending on the selected operating mode. -
Page 39: Connection" Menu
This option allows the user to choose which kind of system the beltpack will connect: Conexia, CrossNET, EasyNET (Party-Line), EasyNET G722 (Party-Line) or Xpeak. Using any of the two encoders, the different options can be selected, and they are validated by pressing the "SELECT"... - Page 40 Hidden SSID: This options should be checked if the WiFi network the terminal will connect • to is hidden (it doesn't publish its SSID). Config IP: Allows us to configure the IP parameters of the terminal. • The following options appear: XPEAK IP Intercom System...
-
Page 41: Settings" Menu
DNS: IP address of the Domain Name Server to be used. It is configured just in the same way as the beltpack’s IP address. 3.3.4. "SETTINGS" menu. This is a configuration menu that allows us to define the operation of the display and the left and right function keys. XPEAK IP Intercom System... - Page 42 1 (low) to 7 (high), in order to suit the operating environment ambient light. Press the "OK" key when the adjusted brightness level is adequate. XPEAK IP Intercom System...
- Page 43 Press the "SELECT" key when a key and option (short or long pressing) is highlighted in order to go to next screen, where one among 8 different functions can be assigned to that key and pressing mode. XPEAK IP Intercom System...
-
Page 44: Status" Menu
Any of the two encoders can be used to navigate through the 3 options of the menu and the "SELECT" key allows to enter the selected one. The available options are: Battery: Provides detailed information about the battery status. • Network: Allows us to check the network configuration of the beltpack. • XPEAK IP Intercom System... -
Page 45: Menu Differences In Other Operating Modes
3.3.6. Menu differences in other operating modes. 3.3.6.1. All modes except Xpeak. Xpeak mode is the only one that supports families characterized by a color, so that in the rest of operating modes the family indicators don't appear on the display. -
Page 46: Easynet And Easynet G722 Modes
REPLAY: Reproduces the last received message in case it couldn’t be heard properly first • time or maybe the user didn’t pay attention to it. 3.3.6.3. EasyNET and EasyNET G722 modes. They are 4-channel Party-Line modes, so in operating mode there are only 4 active keys. XPEAK IP Intercom System... -
Page 47: Xpeak_If Menus
"AEQ Xpeak" application. In the example above, the presence of input audio to the second stream and output audio from the third stream is indicated. -
Page 48: Options" Menu
DNS: IP address of the Domain Name Server to be used. It is • configured just in the same way as the interface’s IP address. 3.4.2. "Options" menu. Gives access to a test option where the encoder and the LED of the "MENU (BACK)" key can be checked. XPEAK IP Intercom System... -
Page 49: Info" Menu
DNS. In section 3.4.1 the way to configure all these parameters is detailed. In addition, the Inet (indicates if there is an Internet connection) and VPN (indicates if the unit is connected to the AEQ VPN service) fields appear. About: Allows us to check the operative system version, the firmware •... -
Page 50: Installation And Use Of "Xpeak Virtual" Application
4. INSTALLATION AND USE OF "XPEAK VIRTUAL" APPLICATION. The "AEQ Xpeak Virtual" application is the software that allows you to convert a PC into a 16 keys virtual user panel for the Xpeak system. The application works on Windows 7 or higher operating system. - Page 51 Next, the initial screen of the application appears: XPEAK IP Intercom System...
- Page 52 When you press the "Enter License" button, a window will appear allowing you to introduce the key. You must copy the content of the "Code" field and send it to AEQ in order to generate the associated license and send it back to you (you must paste it in the "License" field).
-
Page 53: Software Operation
In case its license is already activated and their buttons have been configured from the "Xpeak" application, it will look something like this: The default position of the window is in the center of the main monitor screen (if there are several), or near the upper left corner if the resolution is very low. - Page 54 In order to do this, just place the mouse in a corner of the window, click and drag. In any of the available formats, the elements that appear reflected in the application are the following: XPEAK IP Intercom System...
- Page 55 The name of the virtual panel that appears at the bottom left is the name that will identify the "Xpeak Virtual" application in the system. It's possible to edit it from the application settings window (see section 4.2.2) or from the "Xpeak" application (see section 5.2.4.6).
-
Page 56: Cross-Point Activation Buttons
"Xpeak Virtual" application and a Xpeak_R panel. In addition, since this color is fixed, it indicates that this Xpeak_R panel is the one that has established the communication (the associated button has been pressed on it). -
Page 57: Software Configuration
The application version is shown at the top of the "Settings" window. Below is the internal identifier of the application in the system. Next, the "Change Name" button allows you to change the name that identifies the "Xpeak Virtual" application in the system. Pressing on it enables the edit box on the right (and disables... - Page 58 "Xpeak" application and on the buttons of other devices where communication commands with the "Xpeak Virtual" application are configured. It's also possible to change the name from the "Xpeak" application (see section 5.2.4.6 of this manual). The "Network Settings" button opens the window that allows you to configure the network parameters of the application.
-
Page 59: Use Of The Application Without Mouse
Finally, the "Autoconfiguration" box allows us to enable the auto-discovery mode. When the application "discovers" a Xpeak device on the network and has no buttons programmed to communicate with it, a button is automatically programmed to establish that communication if this mode is enabled. -
Page 60: Installation And Use Of Configuration And Control Applications
5. INSTALLATION AND USE OF CONFIGURATION AND CONTROL APPLICATIONS. 5.1. Configuration and control applications for PC. In order to configure the Xpeak system to work in Virtual Matrix mode, "AEQ Xpeak" application must be used. If the Xpeak devices are used in Conexia or CrossNET matrix-based systems, they must be configured by means of "CrossMapper"... -
Page 61: Screen Organization And Preliminary Definitions
5.2.2. Screen organization and preliminary definitions. The elements that appear reflected in the "AEQ Xpeak" application are the following: Device: Any user terminal, rack or desktop panel, wired or wireless beltpack or software • application allowing for interaction. Group: A set of user terminals that objectively have the same functionality. For example, •... -
Page 62: Menus
When selecting any of them, the IP and MAC addresses corresponding to that interface will appear in the lower box. Load configuration: This option opens the window that allows you to select and load a • configuration file previously created. XPEAK IP Intercom System... - Page 63 (internal identifier in the case of "Xpeak Virtual"), firmware version (software in the case of "Xpeak Virtual"), IP address, and whether it's connected by VPN (indicated by a green marked button). The list of devices is updated as the list on the left is refreshed.
- Page 64 "Alt" key and then the letter that appears at the right of the desired option. Open scheme: This option opens the window that allows you to select the background • image or plan for the upper right quadrant. XPEAK IP Intercom System...
- Page 65 The "Help" drop-down menu allows us to access to the window that shows the application version by selecting the "About Xpeak" option. It is also possible to access that window by pressing the "Alt" key and then the letter that appears at the right ("A").
-
Page 66: Upper Left Menu. Lower Line With Icons
The new group’s default name starts with a capital F followed by seven digits. This name can be replaced by any other alphanumeric name, of course. Each family is associated to a different color. XPEAK IP Intercom System... - Page 67 The buttons or cross-point activation or communication assignation elements in the panels or beltpacks designated in the software as "button" can be of two kinds: XPEAK IP Intercom System...
- Page 68 Key: Xpeak beltpacks (Xpeak_BP and Xplorer) have 4 keys that are activated by pressing • them. Each key can be programmed to perform a single cross point function. Lever: Xpeak panels (Xpeak_R and Xpeak_D) have 8 two-axis levers that can be moved •...
- Page 69 Delete group: After a group is selected (the icon changes from grey to orange), when clicking on this icon the group is deleted, also removing the buttons of the devices configured to communicate with it. That's why double confirmation is required. XPEAK IP Intercom System...
- Page 70 Double confirmation is required. It is possible to select several families by keeping pressed the "Ctrl" when making selection. XPEAK IP Intercom System...
- Page 71 "listen" command is active) and the audio from the PC (audio played or from the microphone, depending on how the PC is configured) will replace the audio from the physical device (reaching all devices with which a "talk" command is active). Please consult section 5.2.4.11 of this manual for more information. XPEAK IP Intercom System...
-
Page 72: Upper Right Window Menu
XPEAK IP Intercom System... - Page 73 Confirmation is required. XPEAK IP Intercom System...
-
Page 74: Software Operation
It's also possible to access that option from its icon in the menu bar located at the right side of the operation screen: XPEAK IP Intercom System... - Page 75 When an image has been selected, it won’t be necessary to select the same one each time the application is started. XPEAK IP Intercom System...
-
Page 76: New Devices, Groups And Families
A family is automatically added when a device associated with it is discovered, or manually using the "New family" option of the "Edit" drop-down menu (keyboard shortcut "F"): in this case, no devices will be initially associated to it. XPEAK IP Intercom System... - Page 77 Each type of device is represented differently both in the list and in the scheme: XPEAK IP Intercom System...
- Page 78 When the configuration of a key or lever includes a device or group which doesn’t correspond with any already configured, it is created in the list as an unknown device or group, and its name will be its serial number or identifier. The following image shows this situation: XPEAK IP Intercom System...
-
Page 79: Working On The Scheme
A device is selected when clicking on it in the scheme, so focus will also move to that device and it will get highlighted in an orange background. XPEAK IP Intercom System... -
Page 80: Devices Or Groups Detail Display
It is also possible to display in the lower right quadrant a device that appears in the scheme of the upper right quadrant by double clicking on that device. XPEAK IP Intercom System... -
Page 81: Editing The Name Of A Device, Group Or Family
The device or group selected in the list or in the scheme to modify its configuration appears in the lower right quadrant of the application. In the case of devices, depending on the type of equipment, several tabs may appear corresponding to the buttons pages and GPIs. XPEAK IP Intercom System... - Page 82 Xpeak_R / Xpeak_D Xpeak_BP Xplorer Xpeak_IF Xpeak Virtual XPEAK IP Intercom System...
- Page 83 F2 key, using the "Edit name" option of the "Edit" drop-down menu (keyboard shortcut "T") or the equivalent button in the lower line XPEAK IP Intercom System...
-
Page 84: Editing The Buttons Of A Device
When a button is selected (hence highlighted in orange), by double-clicking on it, selecting the "Edit button" option of the "Edit" drop-down menu (keyboard shortcut "E") or pressing the equivalent button in the lower line , the button properties window appears, allowing you to assign commands or functions to it: XPEAK IP Intercom System... - Page 85 In the case of the "Remote One Way" and "Remote Both Ways" commands, the "Source" drop-down menu also appears, allowing you to select the system device or group that will interact with the destination selected in "Target". XPEAK IP Intercom System...
- Page 86 "Normal" mode is a combination of the previous ones: a short press on the button works in "Latch" mode (the command is executed when the button is pressed and is maintained when the button is released), while a long press works in "PTT" mode (releasing the button deactivates the command). XPEAK IP Intercom System...
- Page 87 Xpeak_BP beltpacks every button has an associated LED which takes the color from the destination family. In Xplorer beltpacks and in "Xpeak Virtual" application, a line with the family color will be displayed above and below the button’s corresponding text.
-
Page 88: Editing The Gpis Of A Device
Select the command to be executed when the corresponding GPI is activated on the device in the "Command" drop-down menu. The available commands are the same as those detailed for the buttons and, in the same way, depending on the selected command, different configuration parameters may appear : XPEAK IP Intercom System... -
Page 89: Editing The Members And Color Of A Family
At that moment, a window will appears in order to edit the family: XPEAK IP Intercom System... -
Page 90: Communication Flows Scheme
(highlighted in blue) and where a command is configured. Have in mind that, in both cases, the "GP Out" type commands will have no associated lines. The following image shows an example of communication flows between devices: XPEAK IP Intercom System... -
Page 91: Deleting Devices, Buttons, Groups And Families
In this situation, the only action that can be executed is to activate or deactivate the buttons of the device displayed in the lower right quadrant (it's not possible to change the configuration of those buttons). Additionally, the indication "SNOOPING" appears on that quadrant. XPEAK IP Intercom System... -
Page 92: Audio Test
For example, if we are in the list of devices and groups, we can move through it with the up and down arrows, or, if we are placed in the buttons of the device that appear in the lower right quadrant, we can move through them with the keyboard arrows. XPEAK IP Intercom System... -
Page 93: Xpeak Network Virtualization Tools
15 incoming audios, more than enough for normal use. A typical system might consist of several Xpeak devices operating at a single site, and one or several remote devices at residential or remote locations. The devices at the site, in order to access the remote ones, must have an outgoing Internet connection, in order to reach the virtual network server in the cloud that will route the audio bidirectionally to the remote panels. -
Page 94: Configuration
The remote network should be configured. Take note that the configuration PC has at least two IP addresses, the local one and the remote one. In the "AEQ Xpeak" software, you must specify in "File" → "Network settings", in the "Remote network" section, the name of the virtual network or tunnel, in this example 030827CADC61, and the terminal number, in this example 32. -
Page 95: Local Panels Configuration
To start the service, you have to load a "tunnel" file provided by AEQ for that specific network, with the "Add Tunnel" option that appears at the bottom left. Then it must be activated. -
Page 96: Remote Panel Connection
Most residential routers have DHCP enabled, so manual configuration will not be necessary. In this case, if the Xpeak device is configured in DHCP, it will obtain the connection data from the router and automatically connect to the Internet, showing the icon of the globe in the central left... -
Page 97: Configuration Of Communication Keys Between Panels
"cloud" accessible from the Internet. Once connected, it will show the icon of the key: At that point, the Xpeak panel will carry out the process of detecting the rest of the units in the system, being able to operate with them as if it were locally connected to the site network. - Page 98 Because the upgrading process must be handled with caution, we recommend having it done by an authorized distributor, or under the instructions of the AEQ Technical Service. If you have any doubt, please consult AEQ Technical Service ([email protected]).
- Page 99 4. Then the upgrading process starts: 5. Once the upgrade bar reaches 100% the module restarting process begins: XPEAK IP Intercom System...
- Page 100 As indicated in point 2 of this section, in order to access the upgrading screen the proxy in the web browser must be disabled. In order to do that you have to access to "Settings" of the browser and go to "Advanced" -> "System" -> "Open your computer's proxy settings": XPEAK IP Intercom System...
- Page 101 Warning: You should not act on the system during the upgrading process, and you must never turn off the equipment, since this action may deprogram the module that you are trying to upgrade, which would entail sending that unit in order to be repaired. XPEAK IP Intercom System...
- Page 102 AEQ shall not be liable for loss of information in the disks or data support that have been altered or found to be inexact, neither for any accidental damage caused by the user or other persons manipulating the product.
- Page 103 Dante™ is a trademark of Audinate Pty Ltd. Product includes license from Audinate Pty Ltd under US patent number(s) 7747725, 8005939, 7978696, 8171152 and others.Visit Audinate website for more details on Dante: http://www.audinate.com/ XPEAK IP Intercom System...