SONY VGP-PRZ20 Series - Docking Station Manual
- Operating instructions (2 pages) ,
- Operating instructions (2 pages)
Before use
Before using the docking station, please read this manual thoroughly and retain it for future reference. See also the manuals provided with your computer for more information about connecting the docking station.
The Sony VGP-PRZ20 series is the docking station designed for Sony personal computers. However, it may not be used with some models.
Laser Caution
The equipment is classified as a CLASS 1 LASER PRODUCT and complies with the Laser Products Safety Standard IEC/EN60825-1(2007).

Repair and maintenance of this equipment should be made only by Sony authorised technicians. Improper repairs and use can create safety hazards.
Use of controls or adjustments or performance of procedures other than those specified herein may result in hazardous radiation exposure. You can find the following sticker on the bottom of the equipment.

The optical disc drive of this equipment is classified as a CLASS 1 LASER PRODUCT and complies with the Laser Products Safety Standard IEC/EN 60825-1.
Repair and maintenance of this equipment should be made only by Sony authorised technicians. Improper use and repairs can create a safety hazard.
Use of controls or adjustments or performance of procedures other than those specified herein may result in hazardous radiation exposure.
For incorporated optical disc drive
Class 3B visible and invisible laser radiation when open. Avoid direct exposure to the beam.
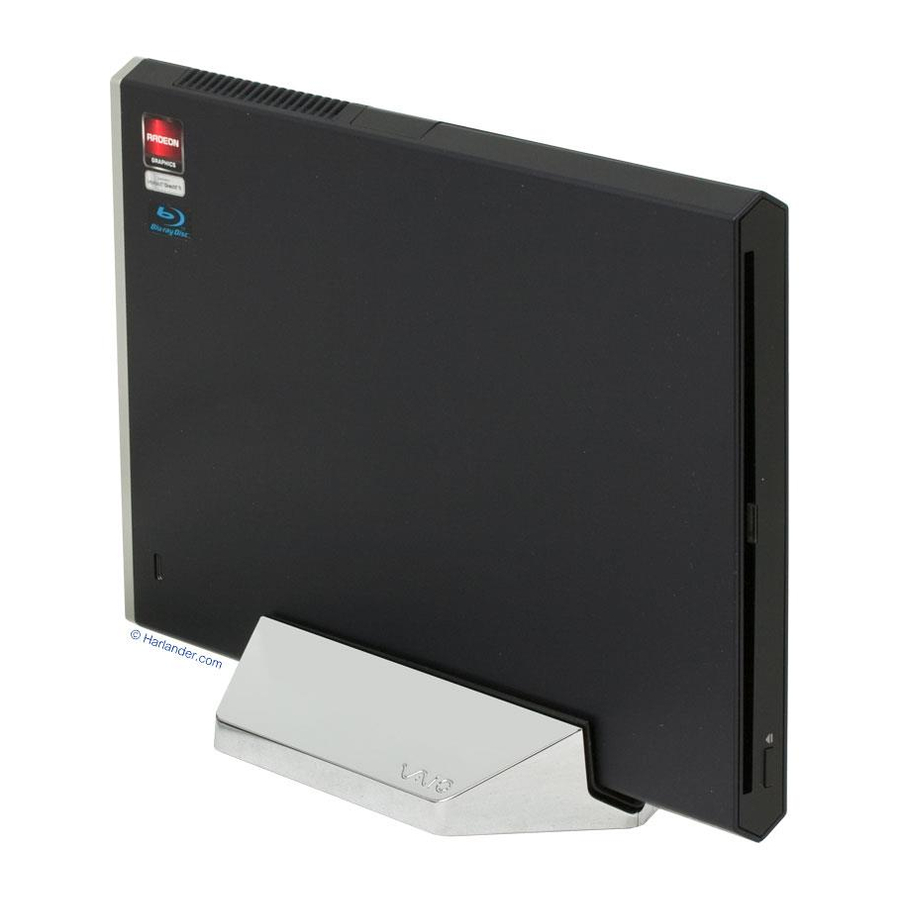
Locating controls and ports (A)

Back
- USB port*1
- USB port*2
- LAN port
- HDMI output port
- Monitor port
- Connector cable
![]() Hint
Hint
Use the supplied cable band to wrap the connector cable for storing. - Security slot
- DC IN port
- Docking station connector
- UNDOCK button
Before disconnecting the docking station from your computer, press the UNDOCK button. Follow the steps in "To disconnect the docking station from your computer." - IN USE indicator
Illuminates while the communication between the docking station and the computer is active.
 Hint
HintFront
- USB port*1
- Air vents
- Optical disc drive
- Power indicator
Illuminates in green when your computer is turned on, blinks in orange while your computer is in Sleep mode, and blinks in yellow while data access to the optical disc drive is in progress. - Disc eject button
*1 Compliant with the USB 2.0 standard.
*2 Compliant with the USB 2.0/3.0 standards. USB ports that are compliant with the USB
3.0 standard are identifiable by their blue color.
Connecting a Docking Station
To use the supplied vertical stand
When using the supplied vertical stand, attach the docking station with the air vents up ( ).
).


Note: Attach the docking station in the correct direction; otherwise, loss of unsaved data or failure of the docking station may result.
To connect the docking station to your Computer
- If your computer is connected to a power source, unplug the AC adapter from the computer and the power cord from the AC outlet.
- Plug one end of the supplied power cord into the supplied AC adapter and the other end into an AC outlet (
![]() ). Then plug the AC adapter cable into the DC IN port on the docking station (
). Then plug the AC adapter cable into the DC IN port on the docking station (![]() -
- ![]() ).
).

The power indicator of the docking station illuminates in green for approximately 10 seconds.
![warning]()
Note: Be sure to use the AC adapter and the power cord supplied with the docking station.
- Plug the docking station connector into your computer (
![]() ).
).

 ). Then plug the AC adapter cable into the DC IN port on the docking station (
 -
-  ).
).
 ).
).
To disconnect the docking station from your computer
Notes:
- Before disconnecting the docking station from your computer, press the UNDOCK button (
![]() ) and confirm that the IN USE indicator (
) and confirm that the IN USE indicator (![]() ) is off.
) is off.

- Do not disconnect the docking station from your computer while the IN USE indicator (
![]() ) on the docking station connector is lit. Disconnecting the docking station while the IN USE indicator (
) on the docking station connector is lit. Disconnecting the docking station while the IN USE indicator (![]() ) is lit may result in loss of unsaved data or a failure of the computer. If any problems occur, refer to "Docking station problems" in "Notes on use" and restart the computer.
) is lit may result in loss of unsaved data or a failure of the computer. If any problems occur, refer to "Docking station problems" in "Notes on use" and restart the computer. - When you press the UNDOCK button (
![]() ) while the computer is in Sleep mode, the computer returns to the Normal mode. In this case, before disconnecting the docking station from your computer, confirm that the IN USE indicator (
) while the computer is in Sleep mode, the computer returns to the Normal mode. In this case, before disconnecting the docking station from your computer, confirm that the IN USE indicator (![]() ) is off.
) is off.
 ) and confirm that the IN USE indicator (
 ) is off.
- Press the UNDOCK button (
![]() ).
). - After confirming the IN USE indicator (
![]() ) is off, unplug the connector cable by holding the docking station connector (
) is off, unplug the connector cable by holding the docking station connector (![]() ).
).

For details on disconnecting the docking station, see the manuals provided with your personal computer.
 ).
).
Inserting/Ejecting the CD/ DVD/ Blu-ray Disc™
The docking station must be turned on to insert or eject a disc.
Notes:
To insert a disc (G)

Insert a disc into the optical disc drive slot with the label side  as shown.
To eject a disc
Press the disc eject button.
About the location of the disc eject button, see "Locating controls and ports."
Note on use
- Do not place the unit in locations that are:
- Do not plug a telephone cable into the LAN port. If the LAN port is connected to one of the telephone lines mentioned below, high electric current to the port may cause damage, overheating, or fire.
About HDCP compliant of display output
This unit is compliant with the High-bandwidth Digital Content Protection (HDCP) standard and capable of encrypting the transmission channel of digital video signals for the purpose of copyright protection, which enables you to play and view a wide variety of copyright protected and high-quality content. To view the copyright protected content, connect an HDCP-compliant monitor to the HDMI output port on this unit. If your computer has a non-compliant monitor connected, you will not be able to play or view any copyright protected content.
On viewing 3D images
Some people may experience discomfort (such as eye strain, fatigue, or nausea) while watching 3D video images or playing stereoscopic 3D games.
Sony recommends that all viewers take regular breaks while watching 3D video images or playing stereoscopic 3D games.
The length and frequency of necessary breaks will vary from person to person.
You must decide what works best.
If you experience any discomfort, you should stop watching the 3D video images or playing stereoscopic 3D games until the discomfort ends; consult a doctor if you believe necessary.
You should also see the instruction manual of any other device or software used with this unit.
The vision of young children (especially those under six years old) is still under development.
Consult your doctor (such as a pediatrician or eye doctor) before allowing young children to watch 3D video images or playing stereoscopic 3D games.
Adults should supervise young children to ensure they follow the recommendations listed above.
Docking station problems
The following may cause problems with the docking station or your computer.
- The power-supply voltage is decreased due to the power source, etc.
If any problems occur, restart your computer as follows:
Press the Ctrl+Alt+Delete keys and click the arrow![]() next to the Shut down
next to the Shut down ![]() button and Restart.
button and Restart.
 next to the Shut down
  button and Restart.
If this procedure does not work, press and hold the power button for more than four seconds to shut down your computer.
Note: Turning off your computer with the Ctrl+Alt+Delete keys or the power button may cause loss of unsaved data.
Specifications
Mounted drive*1
| VGP-PRZ20A: | Blu-ray Disc™ Drive with DVD SuperMulti |
| VGP-PRZ20B: | Blu-ray Disc™ ROM Drive with DVD SuperMulti |
| VGP-PRZ20C: | DVD SuperMulti Drive |
| Other | |
| Ports | USB Hi-Speed USB (USB 2.0): Type-A port (2)*2 External display output: MONITOR ( Network (LAN): 10BASE-T/100BASE-TX/ 1000BASE-T (1) |
| Graphic accelerator | AMD Radeon™ HD 7670M* 4 (when SVZ131XX is connected) AMD Radeon™ HD 6650M* 4 (when VPCZ2XX is connected) |
| Power requirement (AC adapter *5) | Input: AC 100-240 V, 50/60 Hz, 1.6 A - 0.7 A Output: 19.5 V DC, 6.2 A |
| Operating temperature | 5°C to 35°C (temperature gradient less than 10°C/hour) |
| Operating humidity | 20% to 80% (not condensed), provided that humidity is less than 65% at 35°C (hygrometer reading of less than 29°C) |
| Storage temperature | –20°C to +60°C (temperature gradient less than 10°C/hour) |
| Storage humidity | 10% to 90% (not condensed), provided that humidity is less than 20% at 60°C (hygrometer reading of less than 35°C) |
| Dimensions | Approx. 148.0 × 16.65 × 220.0 mm (w/h/d) |
| Mass | Approx. 685 g |
| Supplied accessories | AC adapter Power cord Cable band Vertical stand Operating instructions Safety Regulations |
 ): Analog RGB
*1 The mounted drives sold vary depending on the country or region. For details and specifications on optical disc drives, visit the VAIO Support web site at http://support.vaio.sony.eu/.
*2 Compliant with the USB 2.0 standard.
*3 Compliant with the USB 2.0/3.0 standards.
*4 The graphic accelerator is displayed in a different name, depending on the graphic driver of the computer connected to the docking station.
*5 Use only the AC adapter (VGP-AC19V46) and power cord supplied with this product.
Trademarks

Documents / Resources
References

Download manual
Here you can download full pdf version of manual, it may contain additional safety instructions, warranty information, FCC rules, etc.
Thank you! Your question has been received!


Need Assistance?
Do you have a question about the VGP-PRZ20 Series that isn't answered in the manual? Leave your question here.