
Related Manuals for Saeco Xelsis SUPREMA


Summary of Contents for Saeco Xelsis SUPREMA
-
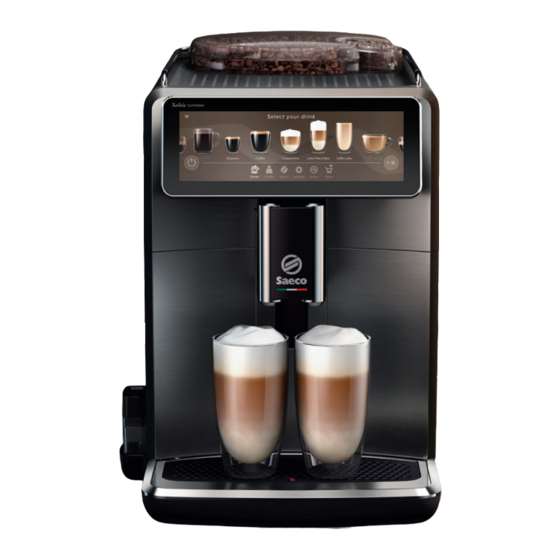
Page 5: Machine Overview (Fig. A)
Introduction Congratulations on your purchase of a Saeco full-automatic coffee machine! To fully benefit from the online support that Saeco offers, you can use the control panel to register your machine via the built-in Wi-Fi connection, or go to www.saeco.com/MyCoffeeMachine and register your product there. - Page 6 We guarantee, however, that the machine is absolutely new. Switching on the machine when you have a Xelsis SUPREMA (SM8885, SM8889 only) Switch on the machine by pressing the main switch on the back of the machine.
-
Page 7: Special Function
7 Make sure that the coffee machine and the Wi-Fi router are within range of each other. Follow the steps below to connect your coffee machine to your Wi-Fi network. 1 Tap the Settings icon and swipe from left to right to find the Wi-Fi icon. 2 Tap the Wi-Fi icon. -
Page 8: Brewing Drinks
8 Special function Purpose The Maintenance Dashboard gives you a helpful overview and notifies you with status information on things like your water level or tell you that the AquaClean is running low. Brewing drinks General steps To brew a drink, you need to follow a few simple steps. 1 Fill the water tank with tap water and fill the bean hopper with beans. -
Page 9: Brewing Milk-Based Drinks
9 Brewing milk-based drinks To brew milk-based drinks, you need to follow a few simple steps. 1 Fill the water tank with tap water and fill the bean hopper with beans. Tip: When the flexible milk tube is connected to the cappuccinatore, slide the dispensing spout to the uppermost position for easy access to the water tank. -
Page 10: Brewing Coffee With Pre-Ground Coffee
10 Brewing coffee with pre-ground coffee To brew coffee with pre-ground coffee, you need to follow a few simple steps. 1 Open the lid of the pre-ground coffee compartment and pour one measuring spoon of pre-ground coffee into it. Then close the lid. 2 Tap the Drinks icon, scroll from left to right and select your drink. - Page 11 11 4 Slide the adjustable bars up and down to adjust the hot water quantity or temperature to your preference. 5 Press the start/stop icon. 6 To stop dispensing hot water before the machine is finished, press the start/ stop icon again (SM8780, SM8782, SM8785 only) or press the stop icon again (SM8885, SM8889 only).
- Page 12 12 1 Tap the drink icon of your choice. 2 Tap the CoffeeMaestro icon repeatedly. The main settings of the drink are now adjusted accordingly. 3 Press the start/stop icon to start brewing the drink. Personalize your drink with the CoffeeEqualizer Touch+ function After selecting a drink, the CoffeeEqualizer Touch function is activated...
-
Page 13: Adjusting Machine Settings
Adjusting machine settings You can adjust most machine settings by tapping the Settings icon and follow the steps on the screen. For online support (frequently asked questions, movies etc.), scan the QR code on the cover of this booklet or visit www.saeco.com/care... -
Page 14: Setting The Water Hardness
14 Setting the water hardness We advise you to adjust the water hardness setting to the water hardness level in your region for optimal performance and a longer lifetime of the machine. This also prevents you from having to descale the machine too often. The default water hardness setting is 4: hard water. -
Page 15: Restoring Factory Settings
, front illumination, profiles, tank standby time, display brightness, sound light, measure/units, home screen settings, BeanMaestro preferences, Wi-Fi credentials, software update preferences, Saeco credentials, Amazon credentials. AquaClean water filter Your machine is AquaClean enabled. You can place the AquaClean water filter in the water tank to preserve the taste of your coffee. -
Page 16: Removing The Brew Group From The Machine
Removing and inserting the brew group Go to the 'Status' menu on the screen and select 'Brew group clean' or visit www.saeco.com/care for detailed video instructions on how to remove, insert and clean the brew group. -
Page 17: Reinserting The Brew Group
17 3 Press the PUSH button and pull at the grip of the brew group to remove it from the machine. Reinserting the brew group Before you slide the brew group back into the machine, make sure it is in the correct position. -
Page 18: Cleaning And Maintenance
Consult the table below for a detailed description of when and how to clean all detachable parts of the machine. You can find more detailed information and video instructions on www.saeco.com/care. See figure C for an overview of which parts can be cleaned in the dishwasher. - Page 19 19 Item When to clean How to find in the control panel/ What to do The machine does not automatically detect that a filter has been placed in the water tank. Therefore you need to activate each new AquaClean filter that you install in the 'Status' menu. Your machine has to be completely limescale-free before you start using the AquaClean filter.
- Page 20 Open the lid of the pre-ground coffee compartment and insert the spoon handle into it. Move the handle up and down until the clogged ground coffee falls down. Go www.saeco.com/care for detailed video instructions.
-
Page 21: Cleaning The Brew Group Under The Tap
Lubrication of the Every 2 months Lubricate the brew group with the by-packed brew group grease (see Lubricating the brew group). Go to www.saeco.com/care for detailed video instructions. Water tank Weekly Rinse the water tank under the tap. Machine front Weekly Clean with a non-abrasive cloth. -
Page 22: Lubricating The Brew Group
22 Lubricating the brew group To improve your machine's performance, we suggest that you lubricate the brew group every 2 months, to ensure that the moving parts continue to move smoothly. 1 Apply a thin layer of grease on the piston (grey part) of the brew group. 2 Apply a thin layer of grease around the shaft (grey part) in the bottom of the brew group. -
Page 23: Cleaning The Internal Cappuccinatore Under The Tap
23 'HygieSteam': the machine thoroughly cleans the internal milk system with steam. Make sure that the HygieSteam container is correctly assembled and attached to the machine. Place the milk tube in the milk tube holder and follow the instructions on the screen. 'Deep Milk Clean': Perform the 'Deep Milk Clean' procedure with the Philips milk circuit cleaner for a thorough cleaning of the internal milk system. -
Page 24: Descaling Procedure
Then move the internal cappuccinatore upwards until it locks into place. 7 Close the door. Visit www.saeco.com/care for detailed video instructions. Descaling procedure Please use Philips descaler only. Under no circumstances should you use a... -
Page 25: What To Do If The Descaling Procedure Is Interrupted
Error codes Below you find a list of the error codes showing problems that you can solve yourself. Video instructions are available on www.saeco.com/care . If another error code appears, please contact the Consumer Care Center in your country. For contact details, see the warranty leaflet. -
Page 26: Ordering Accessories
Move the handle up and down until the clogged ground coffee falls down. Visit www.saeco.com/care detailed video instructions. The brew group is dirty or Switch off the machine. Rinse the brew group with fresh water, not well-greased. -
Page 27: Software Updates
To be able to use Amazon Smart Reorders, you first need to activate this service on Amazon. Then follow the steps on the screen of your machine to connect your Amazon account to your Saeco account. After you have completed these steps, you can use the Amazon Smart Reorder service. - Page 28 28 Problem Cause Solution There are some coffee This machine has been tested with Although it has been carefully cleaned, residues inside my new coffee. there may be some coffee residues left. coffee machine. However, the machine is absolutely new. The machine is in DEMO You pressed the standby icon for Switch the machine off and then on again...
- Page 29 29 Problem Cause Solution I cannot insert the brew The brew group is not in the Reset the machine in the following way: group. correct position. close the service door. Leave the brew group out. Switch off the machine and unplug it.
- Page 30 30 Problem Cause Solution Coffee does not come The AquaClean water filter Remove the AquaClean filter and dispense out or coffee comes out was not prepared properly for some hot water. If this works, the slowly. installation. AquaClean filter was not installed properly. Reinstall and activate the AquaClean filter and follow all steps in chapter 'AquaClean water filter'.
- Page 31 31 Problem Cause Solution The milk is splashing. The milk you use is not cold Make sure you use cold milk coming enough. directly from the fridge. The flexible milk tube is not Open the door of connected properly. the coffee dispensing spout and check if the flexible milk tube...
- Page 32 32 Problem Cause Solution The machine seems to be The machine uses water to rinse Empty the drip leaking. the internal circuit and brew tray every day group. This water flows through or as soon as the internal system directly into the 'drip tray full' the drip tray.
- Page 33 I cannot use Alexa and You have not yet connected Please follow the instructions on the Amazon Smart Reorders to your Amazon to your Saeco control panel of the machine to connect yet. account. your Amazon account to your Saeco account to be able to use Alexa voice control and Amazon Smart Reorders.
-
Page 34: Technical Specifications
34 Problem Cause Solution The Wi-Fi connectivity of Your Wi-Fi name and/or password Follow the instructions of section the machine used to has changed. 'Connecting to Wi-Fi' and choose the work but is not working network with the new Wi-Fi name to anymore. - Page 35 35 The full text of the EU declaration of conformity is available at the following internet address: https://www.saeco.com. The fully automatic espresso machines SM8780, SM8782, SM8785, SM8885 and SM8889 are equipped with a Wi-Fi module, 2.4 GHz 802.11 b/g/n (channels 1..13). Maximum transmitting power <100 mW(20 dBm).
- Page 37 © 2021 Koninklijke Philips N.V. All rights reserved 4219.450.3076.2 (12/14/2022) >75 % recycled paper >75 % papier recyclé...