Quick Links
INSTALLATION MANUAL FOR MULTI-KITS
Models:
E-102SN, E-162SN, E-242SN and E-302SN
!
NOTE:
Hand over this installation manual to the next installation work
personnel.
1 APPLICABLE OUTDOOR UNITS
These multiple pipe connecting kits can be applied to the R410A
SET-FREE series:
2 TRANSPORTATION
Transport the product as close to the installation location as practical
before unpacking.
"
CAUTION:
Do not put any material on the product.
3 BEFORE INSTALLATION
I Confirm the number of the following parts by referring to the model
printed on the package before unpacking.
I
Do not put foreign materials into the parts. Check to confirm that
no foreign materials are inside the parts before the fixing work is
initiated.
Name of parts
Branch Pipe for Gas Line
Branch Pipe for Liquid Line
Insulation for Gas Line
Insulation for Liquid Line
Reducer for Gas Line
Acces
Expander for liquid Line
sories
Tape
!
NOTE:
In any of these parts is not contained, please contact your
distributor
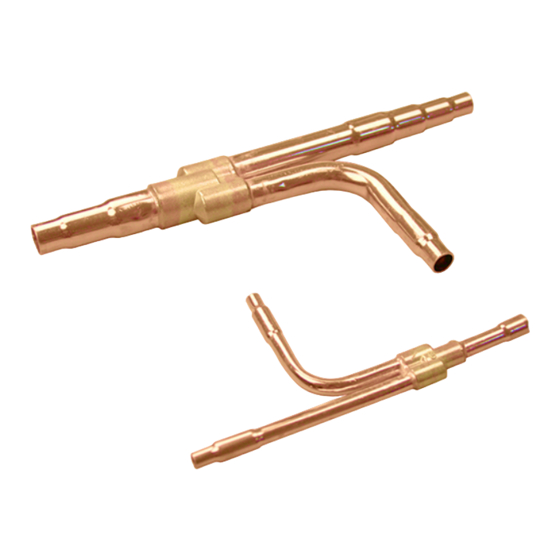
4 INSTALLATION WORK
4.1. Piping Connection Size
I The end of the multi-Kits is finished as shown in the following
figures. Cut the end of the pipe to meet with the pipe size.
Figure
1
1
1
1
–
1
1
4
2
1
1
1
2
2
2
2
E-102SN
E-162SN
E-242SN
E-302SN

Related Manuals for Hitachi E-102SN


Summary of Contents for Hitachi E-102SN
- Page 1 E-102SN INSTALLATION MANUAL FOR MULTI-KITS Models: E-102SN, E-162SN, E-242SN and E-302SN NOTE: Hand over this installation manual to the next installation work personnel. 1 APPLICABLE OUTDOOR UNITS These multiple pipe connecting kits can be applied to the R410A E-162SN SET-FREE series:...
- Page 2 4.2. Installation Position A: Outer B: Minimum Horizontal Installation Diameter Depth 5 O.D. <8 Locate the branch pipes on the same horizontal plane. (Inclination Max. 30°) Make the straight length a minimum of 0.5 m after the 8 O.D. <12 vertical bend.