GE WPDH8800 Owner's Manual & Installation Instructions
Profile washers
Hide thumbs
Also See for WPDH8800:
- Owner's manual & installation instructions (80 pages) ,
- Owner's manual (84 pages) ,
- Installation instructions manual (12 pages)
Table of Contents
Quick Links
. . . . . . . . . . . . . 2, 3
Operating Instructions
Available Accessories . . . . . . . . . . . . . . . . .14
Control Panel . . . . . . . . . . . . . . . . . . . . . . . . . 4
Control Settings . . . . . . . . . . . . . . . . . . . . 5-9
Features . . . . . . . . . . . . . . . . . . . . . . . . . . . . .10
Loading and Using the Washer . . . .11-14
Drain Requirements . . . . . . . . . . . . . . . . . .18
Electrical Requirements . . . . . . . . . . . . . . .18
Grounding Requirements . . . . . . . . . . . . .18
Installing the Washer . . . . . . . . . . . . .19, 20
Location of Your Washer . . . . . . . . . . . . .16
Preparing to Install Your Washer . . . . . .15
Replacement Parts . . . . . . . . . . . . . . . . . . .20
Rough-In Dimensions . . . . . . . . . . . . . . . . .16
Unpacking Your Washer . . . . . . . . . . . . . .17
Water Supply Requirements . . . . . . . . . .18
Troubleshooting Tips
Consumer Support
Consumer Support . . . . . . . . . . Back Cover
Warranty (Canada) . . . . . . . . . . . . . . . . . . 25
Warranty (U.S.) . . . . . . . . . . . . . . . . . . . . . . 24
As an E
S
®
partner,
NERGY
TAR
GE has determined that this
product meets the E
S
NERGY
TAR
guidelines for energy efficiency.
Write the model and serial
numbers here:
Model # __________________
Serial # __________________
You can find them on a label on the
side of the washer.
ge.com
. . . . .15-20
La section française commence à la page 27
. . . . . . . . .21-23
La sección en español empieza en la página 53
®
175D1807P608 49-90340 12-07 JR
Owner's Manual &
Installation Instructions
WPDH8800
GPDH8800
Laveuses
Profile
Manuel d'utilisation
et d'installation
Lavadoras
Profile
Manual del propietario
e instalación
Table of Contents

Related Manuals for GE WPDH8800


Summary of Contents for GE WPDH8800
-
Page 1: Table Of Contents
Warranty (U.S.) ..... . 24 As an E ® partner, NERGY GE has determined that this product meets the E ® NERGY guidelines for energy efficiency. - Page 2 IMPORTANT SAFETY INFORMATION. READ ALL INSTRUCTIONS BEFORE USING. WARNING! For your safety, the information in this manual must be followed to minimize the risk of fire or explosion, electric shock, or to prevent property damage, personal injury or loss of life. The instructions in this manual and all other literature included with this washer are not meant to cover every possible condition and situation that may occur.
- Page 3 WHEN USING THE WASHER Never reach into washer while it is moving. Never attempt to operate this appliance Wait until the machine has completely stopped if it is damaged, malfunctioning, partially before opening the door. disassembled, or has missing or broken parts, including a damaged cord or plug.
-
Page 4: Safety Instructions
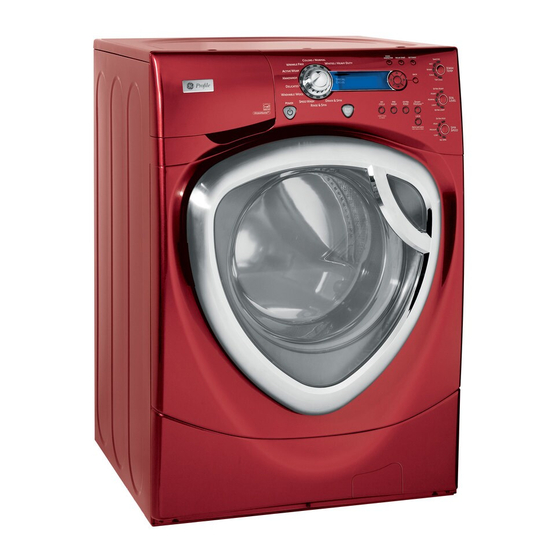
About the washer control panel. You can locate your model number on a label on the side of the washer. WARNING! To reduce the risk of fire, electric shock, or injury to persons, read the IMPORTANT SAFETY INSTRUCTIONS before operating this appliance. Quick Start If the screen is dark, press the POWER button to “wake up”... -
Page 5: Control Settings
Control settings. ge.com Wash Cycles The wash cycles are optimized for specific types of wash loads. The chart below will help you match the wash setting with the loads. The GentleClean ™ lifters lightly tumble the clothes into the water and detergent solution to clean the load. - Page 6 Control settings. Soil Level Changing the SOIL LEVEL increases or decreases the wash time to remove different amounts of soil. To change the SOIL LEVEL, press the SOIL LEVEL button until you have reached the desired setting. You can choose between Extra Light, Light, Normal, Heavy or Extra Heavy soil.
- Page 7 Prewash Prewash is an extra wash before The prewash feature will fill the washer the main wash. Use it for heavily soiled (adding the prewash detergent), tumble clothes or for clothes with a care label the clothes, drain and spin. Then the...
- Page 8 Control settings. 6. Press the ENTER button to select the stain Stain Inspector category. The STAIN INSPECTOR feature allows you 7. Use the L and M arrows to select the desired to indicate what stains are on the garments in your stain.
- Page 9 You should then put detergent and other selected additive in the flow-through dispenser drawer located at the top left of the unit. To purchase the PROFILE SMART DISPENSE System, go online to ge.com or contact your local retailer.
-
Page 10: Features
About the washer features. The Dispenser Drawer Slowly open the dispenser drawer by pulling You may see water in the bleach and fabric it out until it stops. softener compartments at the end of the cycle. This is a result of the flushing/siphoning action and is part of the normal After adding laundry products, slowly close operation of the washer. -
Page 11: Loading And Using The Washer
Loading and using the washer. Always follow fabric manufacturer’s care label when laundering. ge.com Sorting Wash Loads Colors Soil Fabric Lint Whites Heavy Delicates Lint Producers Lights Normal Easy Care Lint Collectors Darks Light Sturdy Cottons Combine large and small items in a load. Load large items first. Large items should not be more than half the total wash load. - Page 12 See Installation Instructions in this manual. If these parts are not available, they can be ordered by visiting our Website at ge.com or by calling 800.GE.CARES. Long Vacations: Be sure water supply is shut off at faucets. Drain all water from hoses if weather will be below freezing.
- Page 13 Always follow fabric manufacturer’s care label when laundering. ge.com Dispenser Drawer Area: Detergent and fabric softener may build up in the dispenser drawer. Residue should be removed once or twice a month. I Remove the drawer by first pulling it out until it stops. Then reach back into the right rear corner of the drawer cavity and press down firmly on the lock tab, pulling out the drawer.
-
Page 14: Available Accessories
Loading and using the washer. Fabric Care Labels Below are fabric care label “symbols” that affect the clothing you will be laundering. WASH LABELS Machine wash cycle Normal Permanent Press/ Gentle/ Do not wash Do not wring Hand wash wrinkle resistant delicate Water temperature... -
Page 15: Preparing To Install Your Washer
Installation Washer Instructions Models WPDH8800, GPDH8800 If you have any questions, call 800.GE.CARES (800.432.2737) ge.com or visit our Website at: In Canada, call 1.800.561.3344 geappliances.ca or visit TOOLS REQUIRED FOR BEFORE YOU BEGIN WASHER INSTALLATION Read these instructions completely and carefully. -
Page 16: Installation Instructions
Installation Instructions LOCATION OF YOUR WASHER ROUGH-IN DIMENSIONS Do Not Install the Washer: FRONT 1. In an area exposed to dripping water or outside 27.0” weather conditions. The ambient temperature (68.6 cm) should never be below 60°F (15.6°C) for proper washer operation. -
Page 17: Unpacking Your Washer
Installation Instructions UNPACKING THE WASHER WARNING: Recycle or destroy the carton and plastic bags after the washer is unpacked. Make materials inaccessible to children. Children might use them for play. Cartons covered with rugs, bedspreads or plastic sheets can become airtight chambers causing suffocation. -
Page 18: Drain Requirements
Installation Instructions WATER SUPPLY REQUIREMENTS ELECTRICAL REQUIREMENTS Hot and cold water faucets MUST be installed within Read these instructions completely 42 inches (107 cm) of your washer’s water inlet. The faucets and carefully. MUST be 3/4″ (1.9 cm) garden hose-type so inlet hoses can be connected. -
Page 19: Installing The Washer
Installation Instructions INSTALLING THE WASHER 5. Carefully move the washer to its final location. Gently rock the washer into position. It is important not to damage 1. Run some water from the hot and cold faucets to flush the rubber leveling legs when moving your washer the water lines and remove particles that might clog to its final location. -
Page 20: Replacement Parts
REPLACEMENT PARTS If replacement parts are needed for your washer, they can be ordered in the United States by visiting our Website at ge.com or by calling 800.GE.CARES. In Canada, visit Cable Tie geappliances.ca or call 1.800.561.3344. 8. Plug the power cord into a grounded outlet.