
Summary of Contents for FenceMaster Laurelview HBK11-13659
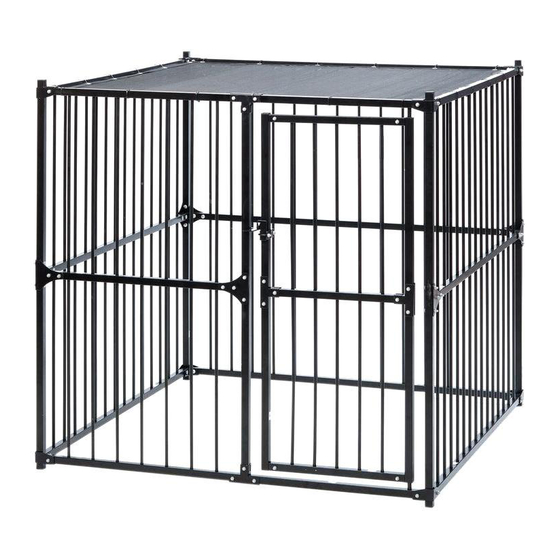
- Page 1 Laurelview Dog Kennel Assembly Instructions FAILURE TO FOLLOW INSTRUCTIONS STEP BY STEP COULD RESULT IN LONGER INSTALLATION TIME HBK11-13659 5'(W) x 5'(L) x 5'(H)
- Page 2 • If your area is subject to heavy snow, it is recommended that you remove the Kennel Top during the winter months. Heavy snow can collapse the kennel resulting in damage and injury. • Kennel anchors are strongly recommended. FENCEMASTER Kennel System Anchor Kit sold separately.
-
Page 3: Table Of Contents
Thank you for choosing FENCEMASTER Kennel System. Our mission is to be the most trusted brand in the pet ownership experience. We want to ensure your pet’s safety by providing you with the tools and techniques to successfully train your pet. If you have questions, please contact the Customer Care Center at 800-451-2612. -
Page 4: Components
Components Gate Components Tube A (3 pcs.) Tube B (3 pcs.) Tube I (1 pc.) Tube H (3 pcs.) Tube J (2 pcs.) Corner Brace (3 pcs.) Tube C (3 pcs.) Tube K (1 pc.) Tube D (1 pc.) Tube L (1 pc.) Tube M (1 pc.) -
Page 5: Build Up Gate
Step Build up gate Important: Assemble on a level surface. Gather (Quantity): • (1) Tube I Gate Fence Tube • (2) Tube J • (1) Tube K • (1) Tube L • (5) Gate Fence Tubes • (4) Gate Clamp (10) 5 / 16 "... -
Page 6: Build Up Kennel
Build up the Kennel Step Gather (Quantity): • (2) Tube A • (1) Tube C • (1) Corner Clamp • ” bolt and nut Make tube C stand up, and mount tube A to the bracket on tube C. Then mount the Corner Clamp. - Page 7 Gather (Quantity): • (1) Tube A • (1) Tube B Mount tube A and tube B to the brackets Corner Brace on tube C. Do not mount clamps and bolts in this step. Gather (Quantity): • (1) Corner Brace • (1) Corner Clamp •...
- Page 8 Gather (Quantity): • (1) Tube E • (1) Tube F • (1) Tube G Mount tube E to the brackets on tube C and tube D. Then mount tube F to the bracket on tube C, then insert tube G to the bracket on tube E.
- Page 9 Gather (Quantity): • (49) Fence Tube Insert all 49 Fence Tubes. Gather (Quantity): • (1) Gate, assembled in Step 1. Insert the gate. Nuts should face outside the kennel.
- Page 10 Gather (Quantity): • (1) Tube M • (3) Tube H Mount tube M. Make sure each fence tube gets into the right hole. Then mount tube H. Gather (Quantity): • (4) Corner Clamp • (2) Gate Clamp (11) ” bolt and nut •...
-
Page 11: Install The Sunblock Top
Gather (Quantity): • (5) Tube Plug • (1) Gate Latch Knock in the 5 tube plugs. One is on the gate, the remaining four are on the kennel. Then assemble the gate latch on the gate. The latch should be mounted approximately 41 inches to the ground. -
Page 12: Getting Your Dog Comfortable In His Kennel
Do not kennel a dog outside in hot or cold weather without other shelter. Caution While this product is a solid barrier, FENCEMASTER Kennel System CANNOT guarantee that the kennel will, in all cases, keep a pet within the established boundary. Not all pets can be trained for containment. -
Page 13: Terms Of Use And Limitation Of Liability
Terms of Use and Limitation of Liability 1. Terms of Use This Product is offered to you conditioned upon your acceptance without modification of the terms, conditions and notices contained herein. Usage of this Product implies acceptance of all such terms, conditions, and notices. - Page 14 2015 Stephens Pipe & Steel, LLC FENCEMASTER Kennel System 2151 N Main St. Jamestown, KY 42629 Phone: 800.451.2612 L400-1654/1...