Table of Contents
Quick Links
Table of Contents

Summary of Contents for U-Reach ITS-SAS Series
- Page 1 ITS-SAS Series SATA/SAS Duplicator and Sanitizer User Manual v A.03...
-
Page 2: Table Of Contents
Index VA.03 Product Disclaimer ....................2 Warranty ........................ 2 Piracy Statement ....................2 Before You Start ..................... 3 Notice Symbols ...................... 4 Product Overview ....................5 Functions Table ...................... 7 Functions ......................10 1. Copy ......................... 10 2. Compare ......................10 3. -
Page 3: Product Disclaimer
U-Reach is not accountable for any incidental or consequential damages, including, but not limited to property harm, loss of time or data from use of any U-Reach products or any other damages attributable to product malfunction or failure of including without limitation, those... -
Page 4: Before You Start
Before You Start Important Notice ⚫ Carefully read the entire manual before operating. ⚫ Never turn off the power while the firmware is updating. ⚫ Devices will operate at high temperature during high-speed tasks. Please wear protective gloves to prevent burns when handling devices. ⚫... -
Page 5: Notice Symbols
Notice Symbols Special items, procedures, or notes to be observed prior to use: Refers to related duplicator operations, special details, tips, or Note suggestions for operational effectiveness. Caution Refers to procedures that need to be adhered to or precautions. -
Page 6: Product Overview
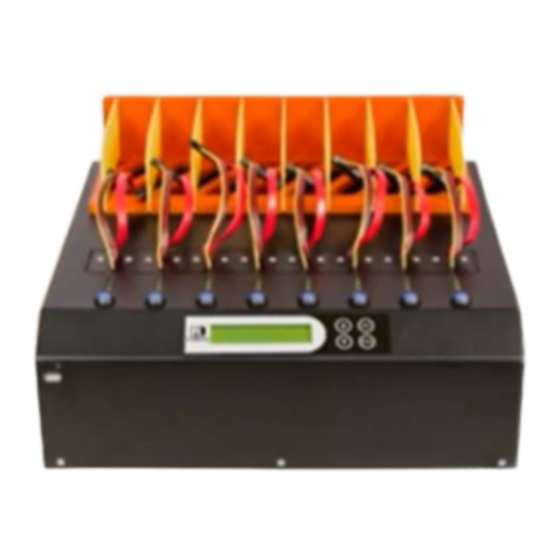
Product Overview Front View Control Buttons USB port for 1. Output log report 2. Update FW LCD Display Back View USB Port for PC-LINK Fan switch Power switch Power supply... - Page 7 LED Indicator Yellow : Powering Green: Pass Red: Fail LCD Configuration...
-
Page 8: Functions Table
Functions Table Function Description Copies data from source device to targets. (There are four copy modes in 1. Copy function "6.2.1 Copy Area") 2. Compare Compares the source and targets to ensure copy accuracy. 3. Copy + Automatically launches compare function after copy is completed. Compare 4.1 Quick Erase Erases device(s)’... - Page 9 System and Files Copies data and skips empty space. Only supports standard formats. ALL Partitions Copies all partitions and data, unallocated 6.2 Copy Area partitions not included. Setup copy mode. Whole HDD Copies all source data, bit-by-bit. Percentage (%) Sets percentage of source capacity to copy. Keep Target HPA Does not copy HPA data but keeps target device’s...
- Page 10 Keep HPA Setting Keeps original HPA setting during erase. 6.9 Mark After Erase Creates watermark on the device(s) after erase job is completed. 6.10 Language Sets preferred language: English, Japanese, Spanish. 6.11 Restore Default Reinstates manufacturer settings. 7.1 Out Today Report Outputs today’s log data.
-
Page 11: Functions
Functions 1. Copy Step 1: Prepare source and target devices. Recommendation: Target device(s)’ capacity must be equal to or larger than Note the source device capacity. Step 2: Connect source and target devices. Step 3: Proceed to copy. Scroll to select "Copy", then press "OK" to start the duplication process. ⚫... -
Page 12: Erase
Sequentially automates from Function 1, Copy to Function 2, then Compare. Scroll to select "Copy+Compare", then press "OK" to start the automated duplication and verification process. 4. Erase Step 1: Connect device(s) for sanitizing. Source Port is disabled for erasing. Go to “Erase Master” to enable source port Note erasing. -
Page 13: Utility
This function will erase all data per DoD 5220.22-M Standards, then verifies erasure of the connected device(s). Scroll to select "DoD EraseComp", then press "OK" to start the erasing and verification process. 4.5 7-Pass Erase This function will erase device(s) 7 times complying with DoD 5220.22-M(ECE) Standards. Scroll to select "7-Pass Erase", then press "OK"... -
Page 14: Setup
Step 2: Proceed to update firmware. Connect USB drive to the USB port in front of the duplicator. Scroll to select "Update System”, then press "OK" to start the firmware update process. The firmware update process may take longer than 5 minutes. Please do not Caution disrupt power or process during BIOS update. - Page 15 System and files All Partitions Whole Device 30GB Data 30GB Data 30GB Data 100GB 100GB 100GB 70GB 70GB 60GB Data 60GB Data 60GB Data 250GB 250GB 250GB 190GB 190GB 500GB 500GB 500GB 150GB 150GB 150GB Unallocated Unallocated Unallocated Partition Partition Partition This function will analyze This function will copy the...
- Page 16 2. All Partitions Copy or skip HPA, DCO, unknown partitions, modified formats, etc. defined by settings. Scroll to select "All Partitions”, then press "OK" to save the copy method. The target device’s capacity must be equal to or larger than the source device’s capacity. 3.
- Page 17 Copies the selected percentage range of the source’s total capacity, starting from the initial sector. 6.3 Copy HPA Mode This menu contains submenus related to HPA Copy Modes Scroll to select "Copy HPA Mode”, then press "OK" to view the submenus. 1.
- Page 18 6.4 Skip Bad Sectors Scroll to select "Skip Bad Sectors”, then press "OK" to scroll through the available values for skipping bad sectors. If the device data is critical and needs to be a full clone, it is recommended to set “Skip Bad Sectors” at "0.” Bad sectors can be set as unlimited or at a value from 0 to 65,535.
- Page 19 2. Big Random Data Random character written in a set of area. Scroll to select "Erase Pattern >> Big Random Data”, then press "OK" to save this setting 6.8 Clear HPA at Erase Sets to clear HPA setting during erase. Scroll to select "Clear HPA at Erase”, then press "OK"...
-
Page 20: Log Manager
7. Log Manager This menu allows user to access several submenus. Scroll to select "7. Log Manager”, then press "OK" access submenus. Log Report Diagram II. How to Export Log Reports The Log Report Management Tool assists users with monitoring, recording and managing the entire duplication process. -
Page 21
III. Output Log Reports through LV07H Program. After finishing all tasks, press
key, the LV07H status will return to STANDBY. Step 1: Click in the field of LV07H screen . Step 2: Select Date Range After entering , select the date range for log report. -
Page 22
Step 4: Save Log as Text File At the top-left of Log Data screen, select
then . There are 4 files types to choose from when saving a Log Report: Note .txt, .csv, .xml, or .pdf. Step 5: Save Log to the Specific Location Specify a name and location to save the log. -
Page 23: Real Time Pc-Monitoring
2. There are configuration files when launching LV07B. Make sure you are Caution launching the .exe file on the PC, and not with the provided U-Reach mini-CD software. Step 5: When the following screen below is shown, the duplicator has linked to the computer successfully and is ready to use real-time monitoring function. -
Page 24: Using The Pc-Monitoring Feature
Using the PC-Monitoring Feature Please select only one computer to do all PC-Monitoring. This will prevent PC Note from operating other tasks simultaneously as PC-Monitoring information can rapidly synchronize. Step 1: When duplicator status indicates it’s online, open the monitoring screen. The program is ready to work when the status displays “STANDBY”. - Page 25 7.1 Out Today Report Outputs current day log report Scroll to select "Out Today Report”, then press "OK" to output log report to a USB drive. 7.2 Out Recent Report Outputs recent log report Scroll to select "Out Recent Report”, then press "OK" to output log report to a USB drive. 7.3 Out Period Report Outputs recent log report Scroll to select "Out Period Report”, then press "OK"...
- Page 26 7.4.4 Add Watermark at text File Creates watermark on the log report. The log report can be checked by software (iSecuLog.exe) to prevent modifying. Note Contact with supplier’s technical team for related software and operation details. Specifications are subject to change without notice.