Table of Contents

Related Manuals for Electrolux EW23BC87SS4


Summary of Contents for Electrolux EW23BC87SS4
- Page 1 EN FRENCH DOOR BOTTOM USE AND CARE GUIDE FREEZER/REFRIGERATOR FR RÉFRIGÉRATEUR À PORTES GUIDE D’UTILISATION ET D’ENTRETIEN FRANÇAISES/CONGÉLATEUR EN BAS ES REFRIGERADOR CON CONGELA- GUIA DE USO Y CUIDADO DOR INFERIOR DE PUERTA DOBLE A05947702 July 2017...
-
Page 2: Table Of Contents
Finding Information Please read and save this Table of contents guide Thank you for choosing Electrolux, our Finding Information ......... 2 new premium brand in home appliances. Safety ............. 3 This Use & Care Guide is part of our commitment to customer satisfaction and Feature Overview ........ -
Page 3: Safety
Safety Important safety instructions Safety Precautions • Do not operate the refrigerator in the presence of explosive fumes. Do not attempt to install or operate your unit • Avoid contact with any moving parts until you have read the safety precautions of the automatic ice maker. - Page 4 Safety Electrical information Grounding type wall receptacle Do not, under any WARNING circumstances, cut, remove, or You must follow these guidelines to bypass the ensure that your refrigerator’s safety grounding prong. mechanisms are operating correctly. • The refrigerator must be plugged into its own dedicated 115 Volt, 60 Hz, AC-only non-GFCI electric outlet.
-
Page 5: Feature Overview
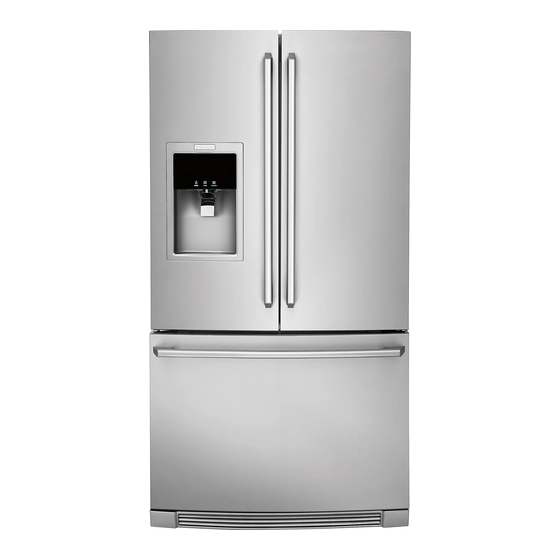
Feature Overview Understanding features and terms Your Electrolux refrigerator is designed for optimal convenience and storage flexibility. The illustration below is provided to assist you with familiarizing yourself with product features and terminology. NOTE *Features may vary according to model. Dispenser model shown. Model is shown without freezer drawer cover. -
Page 6: Installation
Installation Required Tools You will need the following tools: Tools Necessary: (OR) Phillips Head ⅜" and ¼" Quadrex Head Socket ⅜" Fixed Adjustable Screwdriver Allen Wrench Wrench Wrench Wrench Components Provided: CAUTION Top Hinge Top Hinge DO NOT install the refrigerator where Cover Front Cover Rear the temperature will drop below 55° F... - Page 7 Installation 4 After unit is leveled, lower anti-tip leg CAUTION using a 3/8 inch socket wrench until it firmly contacts the floor. Do Not loosen or remove these 3 hex screws. DO NOT Loosen Door Door Remove These 3 Screws Raise Anti-tip Lower...
- Page 8 Installation Installing Shelves (select models) To adjust the flipper mullion: 1 Loosen the screw located on the Your refrigerator was shipped with the flipper mullion hinge. shelf hanger and glass shelves in a shipping pack. Below are the instructions to install and remove the shelves in your desired locations.
- Page 9 Installation Reposition the Air Seal 4 Gently set the shelf onto the hanger once the back is secured by the hanger. (select models) 1 Remove air seal by pushing seal straight back. 2 Position the air seal towards the outside edge of the shelf to avoid the air tower when shelf is pushed back into place.
- Page 10 10 Installation Shelf features (select models) Reposition the Air Seal (select models) For slide-out shelves: CAUTION 1 Remove air seal by pushing down on the flap with a downward rotation. To avoid injury from breakage, handle 2 Position the air seal towards the outside tempered glass shelves carefully.
-
Page 11: Removing The Doors
Removing the Doors Getting through narrow To remove the refrigerator doors spaces 1 Trace lightly around the door’s top hinges with a pencil. This makes If your refrigerator will not fit through an reinstallation easier. entrance area, you can remove the doors. Check first by measuring the entrance. - Page 12 12 Removing the Doors To reinstall the refrigerator doors: Reverse the above steps. Press NOTE Press Upon replacement, the tube needs to be Water fully inserted up to the marking line. Line Approximately Insert tube 5 feet up to the marking Press line...
- Page 13 Removing the Doors Removing Freezer Drawer CAUTION Drawer is heavy. Use caution when lifting. 1 Remove 4 hex head drawer screws. 2 Lift up drawer to remove. DO NOT Remove Other Screws Remove Hex Head Drawer Screw Replacing Freezer Drawer 1 Lower drawer back into place.
-
Page 14: Installing Door Handles
14 Installing Door Handles Door Handle Mounting Instructions CAUTION Wear gloves and safety goggles. Use extreme CAUTION when installing these handles. 1. Remove handles from protective packaging. 2. Position fresh food handle end caps (A) over upper and lower pre-installed shoulder bolts (B) that are fastened into door, ensuring the holes for the set screws are facing towards the opposite door. -
Page 15: Connecting The Water Supply
5305513409 with a 6 ft. (1.8 meters) Stainless Steel Water Line and for homes without an existing valve, Electrolux recommends its Smart Choice® water line kit 5305510264 with a 20 ft. (6 meters) Copper Water Line with self-tapping saddle valve). Please refer to www.electroluxappliances.com... - Page 16 Connecting the Water Supply To connect water supply line to ice Plastic Water Tubing Steel maker inlet valve: to Ice Maker Clamp Fill Tube Brass 1. Disconnect refrigerator from electric Compression power source. 2. Place end of water supply line into Ferrule sink or bucket.
-
Page 17: Controls
Controls - Dispenser Models Wave-Touch IQ-Touch... - Page 18 18 Controls - Dispenser Models Wave-Touch (select dispenser light On / Off models) control lock Press and hold for three seconds to activate and deactivate. This restricts undesired changes to the Your refrigerator is equipped with a Wave- refrigerator’s settings and prevents Touch control panel display.
- Page 19 Controls - Dispenser Models Alarms IMPORTANT Pressing the system on/off icon does not turn off power to your refrigerator. You must unplug the power cord from the wall outlet. Setting cooling temperatures 1 Touch the glass panel to illuminate the 2nd level of Door Ajar If the door has been left open for...
- Page 20 Controls - Dispenser Models Wave-Touch / IQ- NOTE Touch Sabbath Mode During Sabbath Mode, the freezer ice The Sabbath Mode is a feature that disables maker will continue to work and must be portions of the refrigerator and its controls manually turned off to be compliant with for both Wave-Touch and IQ-Touch...
- Page 21 Controls - Dispenser Models An indicator light will be illuminated above IMPORTANT the active feature. Touch the icon to activate the options below. Pressing the system on/off icon does not turn off power to your refrigerator. You must ice off Press and hold for three seconds unplug the power cord from the wall outlet.
- Page 22 22 Controls - Non-Dispenser Models IQ-Touch press & hold IMPORTANT default settings Pressing the system on/off icon does not turn off power to your refrigerator. You must unplug the power cord from the wall outlet. refrigerator temp A red indicator light will be illuminated above most active features. Touch the icon to activate the options below.
- Page 23 Controls - Non-Dispenser Models Alarms example, if the door is left ajar the High Temp alarm is activated. The refrigerator Door If the door has been left open for will function normally once the door Ajar an extended period of time, an is closed, without any violation of the alarm will sound and the door ajar Sabbath/Holidays.
-
Page 24: Dispenser Model Automatic Ice Maker/Water Dispenser
Dispenser Model Automatic Ice Maker/Water Dispenser Priming the water supply IMPORTANT system Your ice maker is turned on at the factory so it can work as soon as you CAUTION install your refrigerator. If you cannot connect a water supply, set the ice For proper dispenser operation, maker’s On/Off icon to Off and turn off recommended water supply pressure... - Page 25 Dispenser Model Automatic Ice Maker/Water Dispenser Cleaning the ice maker IMPORTANT Clean the ice maker and ice bin at regular intervals, especially prior to vacation or On occasion, unusually small ice cubes moving. may be noticed in the bucket or in dispensed ice.
- Page 26 Dispenser Model Automatic Ice Maker/Water Dispenser IMPORTANT When removing or replacing the ice bin, DO NOT rotate the auger in the ice bin. If the auger is accidentally rotated, you must realign the auger by turning it in 45 degree turns (see below) until the ice bin fits into place with the drive mechanism.
-
Page 27: Automatic Ice Maker - Freezer
Automatic Ice Maker - Freezer Ice maker operation & Turning the ice maker on and off care (select models) Ice production is controlled by lifting/ lowering the ice maker’s wire signal arm. After the refrigerator is installed properly, To gain access to the ice maker, pull the the ice maker can produce ice within 24 freezer drawer out. - Page 28 Automatic Ice Maker - Freezer Cleaning the ice maker Clean the ice maker and ice bin at regular intervals, especially prior to vacation or moving. 1 Turn off the ice maker. 2 Remove the ice bin. 3 Empty and carefully clean the ice bin with mild detergent.
-
Page 29: Storage Features
Storage Features Drawers To remove the Crisper Drawer for cleaning: Your refrigerator includes a variety of 1 Pull the drawer out until it stops. storage drawers. 2 Lift the front slightly and remove the Crispers drawer. Crisper drawers are designed for storing fruits, vegetables, and other fresh produce. - Page 30 30 Storage Features Perfect Temp Drawer (select models) The Perfect Temp Drawer is designed to keep food items at a precise temperature whether cooler, warmer, or the same as the fresh food section of the refrigerator. This drawer features a smooth-glide, ball-bearing system and soft-close functionality so as not to bruise your fruits and vegetables.
- Page 31 Storage Features Doors Freezer Features (varies by model) Storage bins The doors to your fresh food compartment use a system of modular storage bins. All of these bins are removable for easy Clip cleaning. Some of them have fixed positions, while others can be adjusted to your needs.
- Page 32 32 Storage Features Removing Freezer Basket Dividers Removal Instructions Lift up on the front of the upper divider and pull out. 1 Locate the basket clips in the rear corners of the basket and pull them out to remove. Upper Basket 2 Open fresh food doors completely.
-
Page 33: Storing Food And Saving Energy
Storing Food and Saving Energy Ideas for storing foods food designated for the freezer will be preserved as quickly as possible. Fresh food storage • Activating fast freeze also will help your freezer more efficiently maintain • Keep the fresh food compartment the selected temperature after placing between 37° F and 40° F with an new purchases with pre-existing... -
Page 34: Normal Operating Sounds
34 Normal Operating Sounds Understanding the L Ice dispensing paddle When dispensing ice, you will hear a sounds you may hear snapping, clicking, or popping sound. M Motorized damper May produce a Your new, high-efficiency refrigerator light humming during operation. may introduce unfamiliar sounds. -
Page 35: Changing The Water And Air Filters
Changing The Water and Air Filters Locating the Filters Test & certification results: • Rated Capacity - 125 gallons/473 Your refrigerator is equipped with water liters for PureAdvantage Ultra filtering system. The water filter system and water filter filters all dispensed drinking water, as well •... - Page 36 800-599-7569, or by visiting the dealer where you purchased your To ensure optimal filtering of refrigerator refrigerator. Electrolux recommends that odors, you should change the air filter you order extra filters when you first install every six months (the filter status light on...
-
Page 37: Care And Cleaning
Care and Cleaning Protecting your investment Keeping your refrigerator clean maintains its appearance and prevents odor build-up. Wipe up any spills immediately and clean the freezer and fresh food compartments at least twice a year. NOTE Do not use abrasive cleaners such as window sprays, scouring cleansers, flammable fluids, cleaning waxes, concentrated detergents, bleaches, or cleansers containing petroleum products on plastic parts, interior doors, gaskets, or cabinet liners. - Page 38 38 Care and Cleaning Care and cleaning tips Part Cleaning Agents Tips and Precautions Interior & Door • Soap and water • Use two tablespoons of baking soda in Liners one quart of warm water. • Baking soda and water •...
-
Page 39: Solutions To Common Problems
Solutions to Common Problems Before you call... If you experience a problem with your refrigerator or notice a product behavior or condition that you do not understand, you can usually avoid a call to your service representative by referring to this section for an answer. Beginning with the following table, this information includes common concerns, causes, and suggested solutions. - Page 40 40 Solutions to Common Problems Concern Potential Cause Common Solution Automatic Ice Maker (Cont’d) Ice maker is • Ice maker is producing • The ice maker will produce not making less ice than you expect. approximately 2.0 to 2.5 pounds of enough ice.
- Page 41 Solutions to Common Problems Concern Potential Cause Common Solution Dispenser (Ice & Water) Dispenser • There is no ice in the bin to • See the “Ice maker is not making any will not be dispensed. ice” section above. dispense •...
- Page 42 Digital Temperature Setting Display Digital • Electronic control • Call your Electrolux service temperature system has detected a representative, who can interpret any displays an performance problem. messages or number codes flashing error.
- Page 43 Solutions to Common Problems Concern Potential Cause Common Solution Water/Moisture/Frost Inside Refrigerator Moisture • Weather is hot and humid. • The rate of frost buildup and internal collects on sweating increases. inside of • Flipper mullion • Adjust flipper mullion. (See “To adjust refrigerator the flipper mullion”...
-
Page 44: Warranty
During the 2nd through 5th years from your original date of purchase, Electrolux will repair or replace any parts in the cabinet liner and sealed refrigeration system which prove to be defective in materials or workmanship when such appliance is installed, used, and maintained in accordance with the provided instructions.