
Related Manuals for Acer Aspire E700


Summary of Contents for Acer Aspire E700
- Page 1 Acer Aspire E700 Service Guide Service guide files and updates are available on the ACER/CSD web. For more information, please refer to http:/ /csd.acer.com.tw PRINTED IN TAIWAN...
-
Page 2: Revision History
Revision History Please refer to the table below for the updates of Desktop Aspire E700 service guide. Date Chapter Updates September 8, 2006 first release... - Page 3 © Copyright 2006 by Acer Incorporated. All rights reserved. No part of this publication may be reproduced, transmitted, transcribed, stored in a retrieval system, or translated into any language or computer language, in any form or by any means, electronic, mechanical, magnetic, optical, chemical, manual or otherwise, without the prior written permission of Acer Incorporated.
- Page 4 “as is”. Should the programs prove defective following their purchase, the buyer (and not Acer Incorporated, its distributor, or its dealer) assumes the entire cost of all necessary servicing, repair, and any incidental or consequential damages resulting from any defect in the software.
- Page 5 Conventions The following conventions are used in this manual: SCREEN MESSAGES Denotes actual messages that appear on screen. NOTE Gives bits and pieces of additional information related to the current topic. WARNING Alerts you to any damage that might result from doing or not doing specific actions.
- Page 6 DIFFERENT part number code to those given in the FRU list of this printed Service Guide. You MUST use the list provided by your regional Acer office to order FRU parts for repair and service of customer machines.
-
Page 7: Table Of Contents
Acer ePerformance Management ..15 Acer eRecovery ..... . 16 Create Backup ......16 Restore from Backup . - Page 8 General Information ....46 Before You Begin ..... 46 Aspire E700 Disassembly Procedure ..47 Chapter 4 Troubleshooting 53 Chapter 5 Jumper and Connector Location 54 Main Board Placement .
-
Page 9: Chapter 1 System Specification
System Specification Overview Main Board Description Size Max. 244 mm x 244 mm, MicroATX Processor • Socket type: Intel socket T LGA775 pin • Socket quantity: one • Intel Prescott 775 / Smithfield / Cedar Mill / Presler / Conroe, core speed 533/800/1066MHz System Chipset •... - Page 10 Audio • Chip: HD audio codec ALC888 HD codec 7.1 with S/PDIF out • Connectors support (at least): • Rear six jacks that follow HD audio definition • Front microphone in • Front headphone out • S/PDIF out header (1*4) •...
-
Page 11: Special Design Specification
CIR & IR blaster • Follow ITE’s pin define to support CIR & IR blaster function for Vista home premium SKU • Two IR blasters support • BIOS needs to have the item to enable/disable this function. The factory default is disabled (for XP MCE). All Onboard •... -
Page 12: Wake-Up Event Specification
Wake-Up Event Specification (Default Setting in BIOS) Power Button PS2 Keyboard/mouse USB Keyboard/mouse Modem (Ring) Enabled Enabled Disabled Disabled Enabled Enabled Enabled Enabled Disabled Disabled Disabled Disabled Enabled Enabled Disabled Enabled Enabled Disabled Disabled Disabled Disabled Chapter 1... -
Page 13: Block Diagram
Block Diagram Chapter 1... -
Page 14: Main Board Placement
Main Board Placement Chapter 1... - Page 15 F_1394 PCI1, PCI2 DIMM1, DIMM2, DIMM3, DIMM4 Chapter 1 Description CPU fan header COM header 2 Acer special requirement Acer special requirement 24-pin power connector Floppy connector 1 System fan header 1_1 (three-pin) Clear CMOS One button recovery Chassis intruder...
- Page 16 FLOPPY1 BUZ1 Infrared function header Floppy connector Buzzer Chapter 1...
-
Page 17: Front Panel
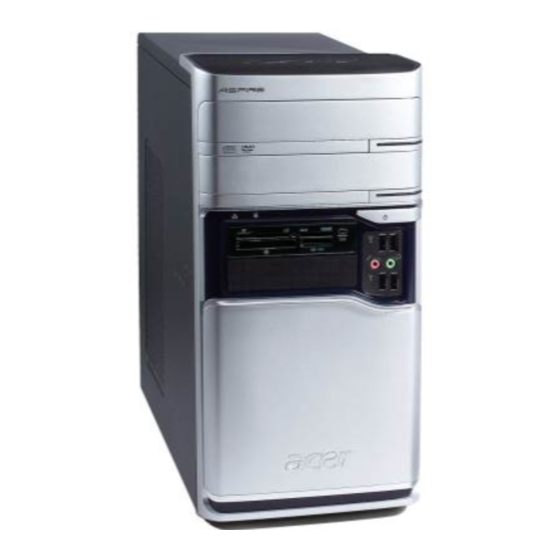
Front Panel Chapter 1 Description USB ports Microphone-in jack Speaker-out/Line-out port Power button CD reject button Optical drive door 3.5” floppy disk drive Card reader... -
Page 18: Rear Panel
Rear Panel Description Six audio jacks (7.1 HD audio jack) USB ports CRT/LCD port Serial port PS/2 mouse SPDIF bracket Recovery switch holder Description RJ-45 port 1394 port Parallel port PS/2 keyboard Power cord port SPDIF port Lock handle Chapter 1... -
Page 19: Acer Empowering Technology
Acer Empowering Technology Acer’s innovative Empowering Technology makes it easy for you to access frequently used functions and manage your new Acer notebook. It features the following handy utilities: Acer eRecovery Management backs up and recovers data flexibly, reliably and completely. -
Page 20: Acer Erecovery Management
• For more information, please refer to Acer eRecovery Management. If your computer does not come with a Recovery CD or System CD, please use Acer eRecovery Note: Management’s System backup to optical disk feature to burn a backup image to CD or DVD. To... -
Page 21: Acer Edatasecurity Management
(except the external Acer ODD, if your computer has one), including your Acer ezDock. Acer eDataSecurity Management Acer eDataSecurity Management is a handy file encryption utility that protects your files from being accessed by unauthorized persons. It is conveniently integrated with Windows explorer as a shell extension for quick and easy data encryption/decryption and also supports on-the-fly file encryption for MSN Messenger and Microsoft Outlook. - Page 22 Chapter 1...
-
Page 23: Acer Eperformance Management
• For more information, please refer to Acer eRecovery Management. If your computer does not come with a Recovery CD or System CD, please use Acer eRecovery Note: Management’s System backup to optical disk feature to burn a backup image to CD or DVD. To... -
Page 24: Acer Erecovery
Acer eRecovery Acer eRecovery is a tool to quickly backup and restore the system. Users can create and save a backup of the current system configuration to hard drive, CD, or DVD. Acer eRecovery consists of the following functions: Create backup... -
Page 25: Re-Install Bundled Software Without Cd
In the Recovery settings window, select Re-install applications / drivers and click Next. Select the desired driver / application and follow the instructions on screen to re-install. After the first launch, Acer eRecovery prepared all the needed software and may take few seconds to bring up the software content window. -
Page 26: Acer Disc-To-Disc Recovery
Restart the system. While the Acer logo comes out, press+ to enter the recovery process. The message The system has password protection. Please enter 000000: will be displayed. Enter six zeros and continue. -
Page 27: Hardware Specification And Configuration
Hardware Specification and Configuration Processor Item Type Intel Prescott 775 / Smithfield / Cedar Mill / Presler / Conroe Feature • FSB: 533/800/1066MHz • Socket type: Intel socket T LGA 775-pin • HyperThreading Technology and FSB Dynamic Bus Inversion (DBI) support •... - Page 28 South Bridge Item General The Intel ICH8 is the other main component of the Intel Broadwater Information chipset that integrates many I/O functions and provides the I/O subsystem with access to the rest of the platform. Feature • 609-pin BGA package •...
- Page 29 System Memory Item Feature • The GMCH system memory controller directly supports one or two channels of memory (each channel consisting of 64 data lines). • DDRII memory 533/667/800MHz support • I/O voltage of 1.8V for DDRII • Only unbuffered DIMMs support •...
- Page 30 Audio Interface Item Chip Realtek ALC888 (high definition audio) Feature • 48-pin LQFP green package • High performance DACs with 95dB SNR (A-Weighting), ADCs with 85dB SNR (A-Weighting) • Meets performance requirements for audio on PC2001 systems and Microsoft WLP 2.x •...
- Page 31 LAN Interface Item Chip Intel 82566 Feature • 81-pin, 1.0 mm pitch, 10 mm x 10 mm FCMMAP (BGA) package • IEEE 802.3ab compliant • Robust end to end connections over various cable length • Full duplex at 10/100/1000Mbps and half duplex at 10 or 100Mbps •...
- Page 32 BIOS ROM Item Type SST 39VF080 Package 40-pin TSOP Block Size 64KB per block Supply current Active current: 15mA (typical) Standby current: 4uA (typical) Remark The 32-pin PLCC package 1MB Flash ROM SST 39VF080 is used for BIOS, keyboard encoder and power controller codes. It occupies system memory area E0000-FFFFF.
-
Page 33: Power Management Function
Power Management Function (ACPI Support Function) Device Standby Mode Independent power management timer for hard disk drive devices (zero to 15 minutes, time step = • one minute). Hard disk drive goes into Standby mode (for ATA standard interface). • Disable V-sync to control the VESA DPMS monitor. -
Page 34: Chapter 2 Setup Utility
Setup Utility About the Setup Utility The computer uses the Phoenix Award BIOS (Basic Input and Output System) with support for Windows Plug and Play. The CMOS chip on the main board contains the ROM setup instructions for configuring the main board BIOS. The BIOS Setup Utility displays the system’s configuration status and provides you with options to set system parameters. -
Page 35: Entering The Setup Utility
Entering the Setup Utility Power on the computer and the system will start POST (Power On Self Test). When the message Press DEL to enter SETUP appear on the screen, press the key DEL to enter the setup menu. Once you enter the Phoenix Award BIOS CMOS Setup Utility, the main menu will appear on the screen. -
Page 36: Product Information
Product Information This page displays product information about your system. You can press ESC to return to the main menu setting page. Chapter 2... -
Page 37: Standard Cmos Features
Standard CMOS Features Date and Time The Date and Time items show the current date and time set on the computer. If you are running a Windows OS, these items are automatically updated whenever you make changes to the Windows Date and Time Properties utility. SATA Devices This main board features four SATA connectors supporting four SATA drives. -
Page 38: Advanced Bios Features
Advanced BIOS Features Chapter 2... - Page 39 CPU Features Scroll to this item and press ENTER to enter the sub-menu. Chapter 2...
- Page 40 Hard Disk Boot Priority Scroll to this item and press ENTER to enter the sub-menu on next page. Virus Warning This item enables or disables the boot sector virus protection. Quick Power On Self Test You can enable this item to shorten the POST and have your system startup faster. You might like to enable this item after you are confident that your system hardware is operating smoothly.
- Page 41 Gate A20 Option This item defines how the system handles legacy software that was written for an earlier generation of processors. Set this item for the default value. Security Option If you have installed password protection, this item defines if the password is required at system start up, or if it is only required when a user tries to enter the Setup Utility.
-
Page 42: Advanced Chipset Features
Advanced Chipset Features These items define critical timing parameters of the main board. You should set these items for their default values unless you are very familiar with the technical specification of your system hardware. If you change the values incorrectly, you may introduce fatal errors or recurring instability into your system. -
Page 43: Integrated Peripherals
Integrated Peripherals Chapter 2... - Page 44 OnChip IDE Device Scroll to this item and press ENTER to enter the sub-menu shown as below. IDE HDD Block Mode Block mode is also called block transfer, multiple commands, or multiple sector read/write. If your IDE hard drive supports block mode, select Enabled for automatic detection of the optimal number of block read/write per sector the drive can support.
- Page 45 may have to install the UltraDMA driver supplied with this main board in order to use an UltraDMA device. Onboard Device Scroll to this item and press Enter to enter the sub-menu shown as below. USB Controller You can enable or disable the onboard USB controller. We recommend users to keep the default value.
- Page 46 Onboard LAN Controller This item allows users to enable or disable the onboard LAN Controller function. Onboard LAN Boot ROM This item allows you to enable or disable the onboard LAN Boot ROM function. Super I/O Device Scroll to this item and press ENTER to enter the sub-menu shown as below. Onboard FDC Controller If your system has a floppy disk controller (FDC) installed on the system board and you want to use it, you can select Enabled.
- Page 47 Onboard Parallel Port This option is used to assign the I/O address and interrupt request (IRQ) for the onboard parallel port. Parallel Port Mode This item enables you to set the data transfer protocol for your parallel port. There are four options: SPP (Standard Parallel Port), EPP (Enhanced Parallel Port), ECP (Extended Capabilities Port), and ECP + EPP.
-
Page 48: Power Management Setup
Power Management Setup The system has various power-saving modes including powering down the hard disk, turning off the video, suspending to RAM, and software power down that allows the system to be automatically resumed by certain events. The power-saving modes can be controlled by time-outs. If the system is inactive for a while, the time-outs begin counting. - Page 49 Soft-Off by PWR-BTTN Under ACPI (Advanced Configuration and Power Management Interface) you can create a software power down. In a software power down, the system can be resumed by Wake Up Alarms. This item lets you install a software power down that is controlled by the power button on your system.
-
Page 50: Pnp/Pci Configurations
PnP/PCI Configurations It configures how PnP (Plug and Play) and PCI expansion cards operate in your system. Both the ISA and PCI buses on the main board use system IRQs (interrupt requests) and DMAs (direct memory access). You must set up the IRQ and DMA assignments correctly through the PnP/PCI Configurations Setup Utility for the main board to work properly. -
Page 51: Pc Health Status
PC Health Status On the main board that supports hardware monitoring, you can monitor the parameters of critical voltage, temperature and fan speed. Advanced Fan Control This item incorporates linear control metrics to provide optimal cooling. Under normal condition, Advanced Fan Control keeps the fan speed low, minimizing acoustic noise. When the load increases, Advanced Fan Control increases the fan speed to provide optimal cooling. -
Page 52: Frequency Control
Frequency Control It enables you to set the clock speed and system bus for your system. The clock speed and system bus are determined by the processor you have installed in your system. CPU Clock Ratio This item allow you to adjust the CPU clock to 200MHz. You can key in the number within the range to make a precise and ideal adjustment. -
Page 53: Load Default Settings
Load Default Settings This option opens a dialog box that lets you install optimized defaults for all appropriate items in the Setup Utility. Press OK and then ENTER to install the defaults. Press CANCEL and then ENTER to not install the defaults. If you only want to install setup defaults for a specific option, select and display that option, and then press F9. -
Page 54: Chapter 3 Machine Disassembly And Replacement
Machine Disassembly and Replacement General Information This chapter contains step-by-step procedures on how to disassemble the Aspire E700 for maintenance and troubleshooting. To disassemble the notebook, you need the tools below: Wrist ground strap and conductive mat for preventing electrostatic discharge •... -
Page 55: Aspire E700 Disassembly Procedure
Aspire E700 Disassembly Procedure Place the system unit on a flat, steady and nonskid surface. Release the lock handle then slide the left cover out. Detach the VGA card. Detach the modem card. Disconnect the IR cable. Disconnect the front bezel LED cable. - Page 56 Disconnect the SPDIF cable. Disconnect the audio cable. Disconnect the USB cables. Disconnect the PA and the PD cables linked to the main board. Chapter 3...
- Page 57 Disconnect the P1 power supply cable and FDD data cable. Disconnect the ODD power cable and the ODD data cable. Disconnect the HDD power cable and the HDD data cable. Chapter 3...
- Page 58 Slide the HDD holder as shown below then take the HDD out from the chassis. Release the three latches holding the front panel then remove the front panel. Slide the ODD holder as shown below then take the ODD out from the chassis. Chapter 3...
- Page 59 Detach the card reader. Detach the CPU cooler from the main board. Pull the two latches at the same time to release the memory. Repeat this step to remove another memory. Release the four screws fastening the system fan then remove the system fan. Push and release the CPU latch then detach the CPU.
- Page 60 Release the screws marked below then remove the main board. Release the four screws marked below then remove the system power supply. Chapter 3...
-
Page 61: Chapter 4 Troubleshooting
Troubleshooting Please refer to generic troubleshooting guide in the service guide database for information with respect to following items: Power-On Self-Test (POST) • POST Check Points • POST Error Messages List • Error Symptoms List • Chapter 4 Chapter 4... -
Page 62: Chapter 5 Jumper And Connector Location
Chapter 5 Jumper and Connector Location Main Board Placement Chapter 5... - Page 63 Item Description CPU_FAN1 CPU fan header COM2 COM header 2 Acer special requirement Acer special requirement PWR1 24-pin power connector FLOPPY1 Floppy connector 1 SYS_FAN1_1 System fan header 1_1 (three-pin) CLR_CMOS Clear CMOS One button recovery INTR1 Chassis intruder Front panel switch/LED...
-
Page 64: Introduction Of Connectors And Headers
Introduction of Connectors and Headers System Board Jumper Setting Features Intruder pin (1*2) & default setting BIOS_SEL1 (1*2) & default setting Clear CMOS (1*3) & default setting OBR (1*2) & default setting System Board Header Setting Front Panel Orange1 Green2 Orange3 Green4 Blue5... - Page 65 Front USB Front Audio (AC’97) Pin Definition Description VREG_FP_USBPWR0 Front panel USB power (ports 0 & 1) VREG_FP_USBPWR0 Front panel USB power (ports 0 & 1) USB_FP_P0- Front panel USB port 0 negative signal USB_FP_P1- Front panel USB port 1 negative signal USB_FP_P0+ Front panel USB port 0 positive signal USB_FP_P1+...
- Page 66 Front 1394 AUX_IN System Fan CPU Fan Chapter 5 Signal Name TPA+ TPA- Ground Ground TPB+ TPB- +12V (fused) +12V (fused) Ground Description CD left channel Ground Ground CD right channel Description Ground FANOUT SIO FANSPD Description Ground FAN POWER 12V SIO FANSPD FANOUT...
- Page 67 Clear CMOS Intruder One Button Recovery (OBR) Description Ground RTCRSTJ (Connect to ICH) Connect to VCC_RTC Pin 2-3: normal Pin 1-2: clear CMOS Description INTRUDERJ Ground Description AGPIO1 Ground Description AGPIO2 Ground Description ICH_GPIO8_PU Ground Chapter 5...
- Page 68 CMO HEADER Chapter 5 Description LCLK LFRAME# LREST NC_3 LAD3 LAD2 LAD1 LAD0 NC_1 NC_4 NC_2 SERIRQ CLKRUN LPCPD NC_6 Description COM_SER2_RLSD COM_SER2_SIN COM_SER2_SOUT COM_SER2_DTR Ground COM_SER2_DSR COM_SER2_RTS COM_SER2_CTS COM_SER2_RI...
- Page 69 Description IR_26 SIO_RSMRSTJ RESETCONJ IR_20 IR_27 IR_RE IR_21 IR_RE Chapter 5...
-
Page 70: Chapter 6 Fru (Field Replaceable Unit) List
NOT be noted on the printed service guide. For Acer authorized service providers, your Acer office may have a different part number code from those given in the FRU list of this printed service guide. You MUST use the local FRU list provided by your regional Acer office to order FRU parts for service. -
Page 71: Exploded Diagram
Exploded Diagram Chapter 6... - Page 72 Item Description 5.25” ROTATE COVER A451 BEZEL CD-ROM FDD WITH PANEL HDD-DISK MOTHER BOARD HDD-LOCK-SLIDE FDD-LOCK-SLIDE CDROM-LOCK-SLIDE USB BOARD USB BKT RIGHT-SIDE CHASSIS POWER-SUPPLY PCC-BKT LEFT-SIDE Chapter 6...
-
Page 73: Parts
"FRONT BEZEL W/ POWER BUTTON, 5.25"" 3.5"" EMPTY COVER" POWER BUTTON ODD COVER 1 W/ HOLDER ODD COVER 2 W/ HOLDER TOP COVER ASSY FRONT COVER WITH ACER LOGO "FILLER COVER FOR 3 1/2"" DEVICE" DESCRIPTION USB BOARD FG965M FG965M... - Page 74 HDD HOLDER ASSY PCI-BKT COVER SLOT I/O SHIELDING HPI56M3F D-1156I#/A7A WP61R WINTV-HVR-1100 WINTV-HVR-1110 WINTV-PVR150MCE LR306N 88-AC94-0A-AC 88-AC94-0A-AC 88-AC94-0A-AC 88-AC94-0A-AC 88-8C87-11-AC 88-8C87-11-AC ACER PART NO. 60.S46VF.004 60.S46VF.005 60.S46VF.006 42.S46VF.004 42.S46VF.005 42.S46VF.006 42.S46VF.007 42.S46VF.008 33.S45VF.001 PZ.S5908.001 FX.56M03.003 FX.15602.001 NI.61R08.002 TV.HAUDV.BT3 TV.HAUOX.BT2 TV.AMITY.HR1 TU.30605.005...
- Page 75 GSA-H31N SHW-160S6S HH80557PH0564M HH80557PH0362M HH80553PG0884MH HH80553PG0804MH HH80553PG0724MN "PKP249GB1U12 + PMD1208PKV1- A P/N:B1411.F(8020+4P), 80*80*20 (REV5)" PKP367G01U12 + SUNON 9225 4200RPM FAN P300L KDE1209PTV3 ST3160812AS ACER PART NO. 54.X16SE.011 54.X16SE.012 54.X1650.S01 54.X1650.S02 KV.01604.009 KO.0520A.005 KU.0160D.013 KU.01604.009 KC.66001.DE0 KC.63001.DE0 KC.DC001.945 KC.DC001.940 KC.DC001.930 KC.D0001.915 KC.DC001.945...
- Page 76 WD2500JS-22NCB1 HDT725032VLA380 HDT725040VLA380 SK-9610 SK-9610 SK-9610 SK-9610 SK-9610 SK-9610 SK-9610 SK-9610 SK-9610 SK-9610 SK-9610 SK-9610 SK-9610 SK-9610 SK-9610 SK-9610 ACER PART NO. KH.20001.007 KH.25001.005 KH.30001.008 KH.40001.005 KH.20008.019 KH.25008.015 KH.32007.001 KH.40007.006 KB.9610B.045 KB.9610B.046 KB.9610B.047 KB.9610B.048 KB.9610B.049 KB.9610B.050 KB.9610B.051 KB.9610B.052 KB.9610B.053 KB.9610B.054 KB.9610B.055...
- Page 77 SK-9610 SK-9610 SK-9610 SK-9610 SK-9610 SK-9610 SK-9610 SK-9610 SK-9610 SK-9610 SK-9610 SK-9610 SK-9610 SK-9610 SK-9610 SK-9610 SK-9610 KU-0355 KU-0355 ACER PART NO. KB.9610B.061 KB.9610B.062 KB.9610B.063 KB.9610B.064 KB.9610B.065 KB.9610B.066 KB.9610B.067 KB.9610B.068 KB.9610B.069 KB.9610B.070 KB.9610B.071 KB.9610B.072 KB.9610B.073 KB.9610B.074 KB.9610B.075 KB.9610B.076 KB.9610B.077 KB.9610B.078 KB.9610B.079...
- Page 78 KU-0355 KU-0355 KU-0355 KU-0355 KU-0355 KU-0355 KU-0355 KU-0355 KU-0355 KU-0355 KU-0355 KU-0355 KU-0355 KU-0355 KU-0355 KU-0355 KU-0355 KU-0355 KU-0355 ACER PART NO. KB.KUS03.224 KB.KUS03.225 KB.KUS03.226 KB.KUS03.227 KB.KUS03.228 KB.KUS03.230 KB.KUS03.231 KB.KUS03.232 KB.KUS03.262 KB.KUS03.264 KB.KUS03.233 KB.KUS03.234 KB.KUS03.235 KB.KUS03.236 KB.KUS03.237 KB.KUS03.238 KB.KUS03.239 KB.KUS03.240 KB.KUS03.241...
- Page 79 DESCRIPTION KU-0355 KU-0355 KU-0355 KU-0355 KU-0355 KU-0355 KU-0355 KU-0355 KU-0355 KU-0355 KU-0355 KU-0355 KU-0355 KU-0355 KU-0355 KU-0355 KU-0355 ACER PART NO. KB.KUS03.243 KB.KUS03.244 KB.KUS03.245 KB.KUS03.247 KB.KUS03.248 KB.KUS03.249 KB.KUS03.250 KB.KUS03.251 KB.KUS03.252 KB.KUS03.253 KB.KUS03.254 KB.KUS03.255 KB.KUS03.256 KB.KUS03.257 KB.KUS03.258 KB.KUS03.259 KB.KUS03.260 Chapter 6...
- Page 80 KU-0355 KU-0355 KU-0355 KU-0355 KU-0355 KU-0355 KU-0355 KU-0355 KU-0355 KU-0355 KU-0355 KU-0355 KU-0355 KU-0355 KU-0355 KU-0355 KU-0355 KU-0355 KU-0355 ACER PART NO. KB.KUS03.261 KB.KUS03.263 KB.KUS03.177 KB.KUS03.178 KB.KUS03.179 KB.KUS03.180 KB.KUS03.181 KB.KUS03.182 KB.KUS03.183 KB.KUS03.184 KB.KUS03.185 KB.KUS03.186 KB.KUS03.187 KB.KUS03.188 KB.KUS03.189 KB.KUS03.190 KB.KUS03.191 KB.KUS03.192 KB.KUS03.193...
- Page 81 DESCRIPTION KU-0355 KU-0355 KU-0355 KU-0355 KU-0355 KU-0355 KU-0355 KU-0355 KU-0355 KU-0355 KU-0355 KU-0355 KU-0355 KU-0355 KU-0355 KU-0355 KU-0355 ACER PART NO. KB.KUS03.195 KB.KUS03.196 KB.KUS03.197 KB.KUS03.198 KB.KUS03.199 KB.KUS03.200 KB.KUS03.201 KB.KUS03.202 KB.KUS03.203 KB.KUS03.204 KB.KUS03.205 KB.KUS03.206 KB.KUS03.207 KB.KUS03.208 KB.KUS03.209 KB.KUS03.210 KB.KUS03.211 Chapter 6...
- Page 82 KU-0355 KU-0355 KU-0355 KU-0355 KU-0355 Y-RAJ56A Y-RAJ56A Y-RAJ56A Y-RAJ56A Y-RAJ56A Y-RAJ56A Y-RAJ56A Y-RAJ56A Y-RAJ56A Y-RAJ56A Y-RAJ56A Y-RAJ56A Y-RAJ56A Y-RAJ56A ACER PART NO. KB.KUS03.212 KB.KUS03.213 KB.KUS03.214 KB.KUS03.215 KB.KUS03.216 KB.KUS03.217 KB.KUS03.218 KB.CCN04.030 KB.CCN04.029 KB.CCN04.030 KB.CCN04.031 KB.CCN04.032 KB.CCN04.033 KB.CCN04.034 KB.CCN04.035 KB.CCN04.036 KB.CCN04.037 KB.CCN04.038 KB.CCN04.039...
- Page 83 Y-RAJ56A Y-RAJ56A Y-RAJ56A Y-RAJ56A Y-RAJ56A Y-RAJ56A Y-RAJ56A Y-RAJ56A Y-RAJ56A Y-RAJ56A Y-RAJ56A Y-RAJ56A Y-RAJ56A Y-RAJ56A Y-RAJ56A Y-RAJ56A Y-RAJ56A Y-RAJ56A Y-RAJ56A ACER PART NO. KB.CCN04.042 KB.CCN04.043 KB.CCN04.044 KB.CCN04.045 KB.CCN04.046 KB.CCN04.047 KB.CCN04.048 KB.CCN04.049 KB.CCN04.050 KB.CCN04.051 KB.CCN04.052 KB.CCN04.053 KB.CCN04.054 KB.CCN04.055 KB.CCN04.056 KB.CCN04.057 KB.CCN04.087 KB.CCN04.088 KB.CCN04.089...
- Page 84 Y-RAJ56A Y-RAJ56A Y-RAJ56A Y-RAJ56A Y-RAJ56A Y-RAJ56A Y-RAJ56A Y-RAJ56A Y-RAJ56A Y-RAJ56A Y-RAJ56A Y-RAJ56A Y-RAJ56A Y-RAJ56A Y-RAJ56A Y-RAJ56A Y-RAJ56A HYS64T32000HU-3.7-B NT512T64U88A0BY-37B ACER PART NO. KB.CCN04.095 KB.CCN04.096 KB.CCN04.097 KB.CCN04.098 KB.CCN04.099 KB.CCN04.100 KB.CCN04.101 KB.CCN04.102 KB.CCN04.103 KB.CCN04.104 KB.CCN04.105 KB.CCN04.106 KB.CCN04.107 KB.CCN04.108 KB.CCN04.109 KB.CCN04.110 KB.CCN04.111 KB.CCN04.112 KB.CCN04.113...
- Page 85 STK LABEL, ROHS" "LOGITECH WIRELESS MOUSE, M- RAU95, ROHS" POWER SUPPLY POWER SUPPLY FSP ATX-250PA(1) (NON-PFC) (250W) POWER SUPPLY FSP ATX-250PA(1PF) (PFC) (250W) SPEAKER "JS 2.0 SPEAKER, USB, M-1118B, ACER LOGO,ROHS" DESCRIPTION NT1GT64U8HA0BY-37B HYMP532U64BP6-C4 HYMP564U64BP8-C4 N12ROU M-UV ACR1 M-RAU95 ATX-250PA(1) ATX-250PA(1PF) "M-1118B,LF"...