Table of Contents
Available languages
Available languages
Quick Links
USING THE AIR CONDITIONER
Controls . . . . . . . . . . . . . . . . . . . . . . . . . . . . . .5
Air Filter . . . . . . . . . . . . . . . . . . . . . . . . . . . . . .6
Outdoor Coils . . . . . . . . . . . . . . . . . . . . . . . . .6
TROUBLESHOOTING TIPS
Normal Operating Sounds . . . . . . . . . . . . . 13
Write the model and serial
numbers here:
Model # _________________
Serial # _________________
Find these numbers on a label on
the side of the air conditioner.
GE is a trademark of the General Electric Company. Manufactured under trademark license.
. . . . . . . . .3
. . . . . . . . . . . . . . . . . . .7
. . . . . . 12
. . . . . . . . . . . 15
. . . . . . . . . . 16
OWNER'S MANUAL
AND INSTALLATION
INSTRUCTIONS
AET05
49-5000086 09-18 GEA
Chapters
Table of Contents

Related Manuals for GE AET05LY


Summary of Contents for GE AET05LY
-
Page 1: Table Of Contents
Write the model and serial numbers here: Model # _________________ Serial # _________________ Find these numbers on a label on the side of the air conditioner. GE is a trademark of the General Electric Company. Manufactured under trademark license. 49-5000086 09-18 GEA... - Page 2 THANK YOU FOR MAKING GE APPLIANCES A PART OF YOUR HOME. Whether you grew up with GE Appliances, or this is your first, we’re happy to have you in the family. We take pride in the craftsmanship, innovation and design that goes into every GE Appliances product, and we think you will too.
-
Page 3: Safety Information
The appliance shall be stored in a room without in the use of flammable refrigerants. continuously operating ignition sources (for example: GE Appliances does not support any servicing of the open flames, an operating gas appliance or an air conditioner. - Page 4 IMPORTANT SAFETY INFORMATION READ ALL INSTRUCTIONS BEFORE USING THE APPLIANCE WARNING USE OF EXTENSION CORDS RISK OF FIRE. Could cause serious injury or death. with this Window Air Conditioner. Conditioner. HOW TO CONNECT ELECTRICITY Do not, under any circumstances, cut or remove the third Have the wall outlet and circuit checked by a qualified (ground) prong from the power cord.
-
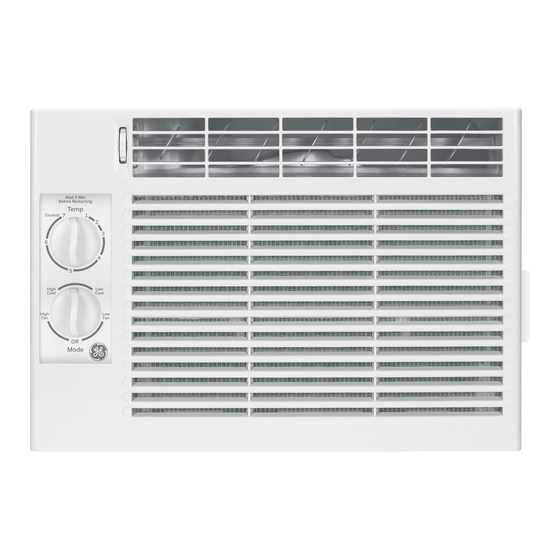
Page 5: Controls
Controls Features and appearance will vary. TEMPERATURE CONTROL Mode Control High Cool and Low Cool provide cooling with different fan speeds. Fan settings provide air circulation and filtering without cooling. NOTE: If you move the mode control from a cool setting to OFF or to a fan setting, wait at least 3 minutes before switching back to a cool setting. -
Page 6: Care And Cleaning
Care and Cleaning Grille and Case Turn the air conditioner off and remove the plug from the To clean, use water and a mild detergent. Do not use wall outlet before cleaning. bleach or abrasives. Air Filter The air filter behind the front grille should be checked and cleaned at least every 30 days or more often if necessary. -
Page 7: Installation Instructions
Installation Instructions Questions? Call GE Appliances at 800.GE.CARES (800.432.2737) or visit our Website at: GEAppliances.com In Canada, call 1.800.561.3344 or visit our Website at: www.GEAppliances.ca BEFORE YOU BEGIN CAUTION Read these instructions completely and carefully. Do not, under any circumstances, cut or remove the IMPORTANT •... - Page 8 Installation Instructions PARTS INCLUDED Accordion panel seal (2) (Appearance may vary) Window sill and sash seal (2) Foam top window gasket Top mounting rail Right accordion Left panel accordion panel Top mounting rail seal strip conditioner Window locking Type B (6) Type A (4) bracket (1) 49-5000086...
- Page 9 Installation Instructions 1. WINDOW REQUIREMENTS 3. ATTACH THE TOP MOUNTING RAIL SEAL STRIP • These instructions are for a standard double-hung window. You will need to modify (Some models may have the seal strip already them for other types of windows. attached to the top mounting rail.
- Page 10 Installation Instructions 4. PREPARE THE AIR 5 PREPARE THE WINDOW CONDITIONER (cont.) Cut the window seal (2 long strips) to the proper length. Peel off the backing and attach the seal Remove the backing from the accordion seal to the underside of the window sash. (two short strips).
- Page 11 Installation Instructions 7. INSTALL SUPPORT BRACKET AND FOAM TOP WINDOW GASKET CAUTION Vinyl To prevent broken glass or damage to windows, on vinyl or other similarly constructed windows, attach the window locking bracket to the window Wood screw. Cut the foam top window gasket to the window width.
- Page 12 Troubleshooting Problem Possible Causes What To Do Air conditioner does The air conditioner is Make sure the air conditioner plug is pushed not start unplugged. completely into the outlet. The fuse is blown/circuit Check the house fuse/circuit breaker box and replace breaker is tripped.
-
Page 13: Normal Operating Sounds
Troubleshooting Normal Operating Sounds picked up and thrown against the condenser on rainy days or when the humidity is high. This design feature coils can make a pinging noise. This helps cool the helps remove moisture and improve efficiency. condenser. You can reduce this noise by removing the side-base water hole seal by removing 2 screws, then compressor cycles on and off. - Page 14 Notes 49-5000086...
-
Page 15: Limited Warranty
Appliances Authorized Servicer is not available, you may be responsible for a trip charge or you may be required to bring the product to an Authorized GE Appliances Service location for service. In Alaska, the limited warranty excludes the cost of shipping or service calls to your home. -
Page 16: Consumer Support
Have a question or need assistance with your appliance? Try the GE Appliances Website 24 hours a day, any day of the year! You can also shop for more great GE Appliances products and take advantage of all our on-line support GEAppliances.com... - Page 17 # de Modelo _____________ # de Serie _______________ Puede encontrar estos números en una etiqueta en el costado del acondicionador de aire. GE es una marca registrada de General Electric Company. Fabricado bajo licencia de marca. 49-5000086 09-18 GEA...
- Page 18 GRACIAS POR HACER QUE GE APPLIANCES SEA PARTE DE SU HOGAR. Ya sea que haya crecido usando GE Appliances, o que ésta es su primera vez, nos complace tenerlo en la familia. Sentimos orgullo por el nivel de arte, innovación y diseño de cada uno de los electrodomésticos de GE Appliances, y creemos que usted también.
-
Page 19: Seguridad
INFORMACIÓN IMPORTANTE DE SEGURIDAD LEA TODAS LAS INSTRUCCIONES ANTES DE USAR Para su seguridad, siga las instrucciones de este manual a fin de minimizar riesgos de ADVERTENCIA incendio, descargas eléctricas o heridas personales. como se describe en el Manual del Propietario. acondicionador de aire antes de usar el mismo. - Page 20 INFORMACIÓN IMPORTANTE DE SEGURIDAD LEA TODAS LAS INSTRUCCIONES ANTES DE USAR USO DE PROLONGADORES ADVERTENCIA RIESGO DE INCENDIO. Podría para múltiples tomacorrientes con este Acondicionador de ocasionar lesiones graves o la muerte. Aire de Ventana. Ventana. CÓMO CONECTAR LA ELECTRICIDAD Contrate a un electricista calificado para que controle el tomacorriente y el circuito eléctrico para asegurar que el personal, este electrodoméstico debe estar adecuadamente...
-
Page 21: Controle
Controles Las funciones y la apariencia podrán variar. Controles CONTROL DE TEMPERATURA Control de Modo High Cool (Frío Alto) y Low Cool (Frío Bajo) brindan refrigeración con diferentes velocidades del ventilador. Los ajustes del ventilador brindan circulación de aire y filtrado sin refrigeración. Temp NOTA: Si mueve el control de modo de un ajuste de refrigeración a OFF un ajuste del ventilador, espere por los menos 3 minutos antes de volver a activar un... -
Page 22: Cuidado Y Limpieza
Cuidado y Limpieza Rejilla y caja Apague el acondicionador de aire y retire el enchufe del tomacorriente de la pared antes de limpiar. materiales abrasivos. Filtro de aire El filtro de aire detrás de la rejilla frontal debe inspeccionarse y limpiarse por lo menos cada 30 días o más a menudo si fuese necesario. -
Page 23: Instrucciones De Instalación
Instrucciones de instalación ¿Preguntas? Llame 800.GE.CARES (800.432.2737) o visite nuestra página en la red en: GEAppliances.com ANTES DE INICIAR PRECAUCIÓN Lea estas instrucciones completa y cuidadosamente. IMPORTANTE • — Guarde estas instrucciones para uso del inspector local. acondicionador de aire. - Page 24 Instrucciones de instalación Sello del panel PARTES INCLUIDAS Sello de la banda (Apariencia puede variar) Junta de espuma superior de la ventana Riel de montaje superior Panel de acordeón Panel de derecho acordeón izquierdo Acondicionador de aire del riel de montaje superior Soporte de cierre de la 49-5000086...
- Page 25 Instrucciones de instalación 3. PEGUE LA BANDA DE SELLADO 1. REQUISITOS PARA LA VENTAN DEL RIEL DE MONTAJE SUPERIOR Estas instrucciones son para una ventana estándar proceso para otros tipos de ventanas. sellado ya se encuentre sobre el riel de montaje. Si paneles de acordeón para ajustarse a una ventana más estrecha.
- Page 26 Instrucciones de instalación 4. PREPARE EL ACONDICIONADOR 5. PREPARE LA VENTANA (cont.) DE AIRE Corte el sello de la banda de la ventana a Retire la parte trasera del sellado con forma de y pegue el sello a la parte inferior de la banda de la sellado respectivamente del lado izquierdo y del ventana.
- Page 27 Instrucciones de instalación 7. INSTALE UN SOPORTE DE CIERRE Y LA JUNTA DE ESPUMA SUPERIOR DE LA VENTANA Vinilo PRECAUCIÓN ventanas construidas de vinil o de similar construcción, conecte el soporte de cierre de la ventana a el marco de la Madera para prevenir daño a la ventana y vidro quebrado.
-
Page 28: Solucionar Problemas
Solucionar problemas Problema Causas posibles Qué hacer El acondicionador de aire El acondicionador de aire está Cerciórese de que el acondicionador de aire está enchufado no enciende desconectado. totalmente en el tomacorriente. El fusible se disparó / el cortacircuitos se Inspeccione los fusibles / caja de interruptores de la casa y disparó. - Page 29 Solucionar problemas Sonidos de Funcionamiento Normal por el agua recogida y arrojada contra el condensador en cuando el compresor no esté en funcionamiento. días lluviosos o cuando el nivel de humedad sea alto. Esta función ayuda a eliminar la humedad y mejorar el nivel de bobinas externas produzcan un ruido metálico.
- Page 30 Notas 49-5000086...
- Page 31 Para Clientes de EE.UU: Esta garantía limitada se extiende al comprador original y a cualquier dueño subsiguiente de un Proveedor Autorizado del Servicio Técnico de GE Appliances, usted será responsable por el costo de un viaje o se podrá requerir que traiga el producto a una ubicación del Servicio Técnico de GE Appliances Autorizado para recibir el servicio. En Alaska, la garantía limitada excluye el costo de envío o llamadas del servicio técnico a su hogar.
- Page 32 También puede enviar una carta en la tarjeta de inscripción preimpresa que se incluye con el material embalado. GEAppliances.com/register Servicio Programado El servicio de reparación de expertos de GE Appliances está a sólo un paso de su puerta. Conéctese a través de Internet y programe GEAppliances.com/service o comuníquese al 800.432.2737 durante el horario de atención comercial.