
Related Manuals for Haier HAIDSJ63MC


Summary of Contents for Haier HAIDSJ63MC
- Page 1 1、印刷颜色:胶装,单黑; PN:16161000A15427 HAIER-MC-IT7117B1C-A 多头电磁灶 (IT7142B1C-AW) HAIDSJ63MC 80G双胶纸 20201223...
- Page 2 Manuale di istruzioni per piano di cottura ad induzione POLSKI Instrukcja obsługi płyty indukcyjnej FRANÇAIS Manuel d’utilisation de la table de cuisson à induction ESPAÑOL Manual de instrucciones de la encimera de inducción DEUTSCH Bedienungsanleitung für Induktionskochfeld БЪЛГАРСКИ Ръководство за употреба на индукционен плот HAIDSJ63MC HAIER...
- Page 3 By placing CE mark on this product, we are confirming compli- ance to all relevant European safety, health and environmental requirements which are applicable in legisla�on for this product. As applicable EN-2...
- Page 4 EN-3...
- Page 5 Haier Haier EN-4...
- Page 6 Haier EN-5...
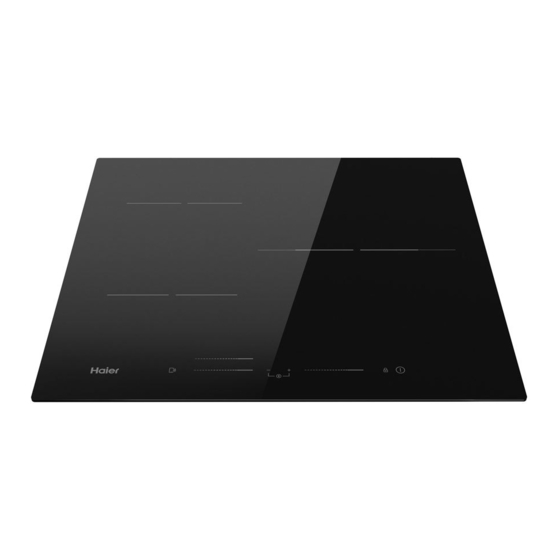
- Page 7 1. Max. 1500/2000 W zone 2. Max. 1500/2000 W zone 3. Max. 3000/3600 W zone 4. Glass plate 5. Control panel 1. Heating zone power controls 2. “Cook with me function” control 3. Timer control Keylock 5. ON/OFF control EN-6...
-
Page 8: Touch Controls
Touch Controls • The controls respond to touch, so you don’t need to apply any pressure. • Use the ball of your finger, not its tip. • You will hear a beep each time a touch is registered. • Make sure the controls are always clean, dry, and that there is no object (e.g. a utensil or a cloth) covering them. Even a thin film of water may make the controls difficult to operate. -
Page 9: How To Use
How to use Start cooking Touch the ON/OFF control for three seconds. After power on, the buzzer beeps once, all displays show “–” or “– –”, indicating that the induction hob has entered the state of standby mode. Place a suitable pan on the cooking zone that you wish to use. •... -
Page 10: Finish Cooking
Finish cooking Touching the heating zone selection control that you wish to switch off. Turn the cooking zone off by touching the slider to “ 0 ”. Make sure the display shows “0”. Turn the whole cooktop off by touching the ON/OFF control. Beware of hot surfaces H will show which cooking zone is hot to touch. - Page 11 • The function can work in any cooking zone. • The cooking zone returns to its original setting after 5 minutes. • If the original heat setting equals 0, it will return to 9 after 5 minutes. Locking the Controls •...
-
Page 12: Timer Control
To enter Power Management Function Turn on the hob, then Press at the same time keylock The timer indicator will show “ P5“ which means power level 5 The default mode is on max power of he hob. control and Timer ” ”. -
Page 13: Using The Timer As A Minute Minder
a) Using the Timer as a Minute Minder If you are not selecting any cooking zone Make sure the cooktop is turned on. Note: you can use the minute minder even if you’re not selecting any cooking zone. Touch “+” the controls of the timer. The minder indicator will start flashing and “10”... -
Page 14: Cancel The Timer
When cooking timer expires, the corresponding cooking zone will be switched off automatically. Other cooking zone will keep operating if they are turned on previously. set more zones: The steps for setting more zones are similar to the steps of setting one zone; When you set the time for several cooking zones simultaneously, decimal dots of the relevant cooking zones are on. -
Page 15: Wireless Parameters
“Cook with me function” First of all, you should download hOn App and install to your portable device. Then enroll your induction hob following the instructions directly from the App. To make the pairing between Hob and APP use the following process: Press 4 seconds the "Cook with me"... - Page 16 Selection of cooking vessels Iron oil frying Iron pan Stainless steel Iron kettle Enamel Enamel cooking stainless steel utesil kettle Iron plate You may have a number of different cooking vessels 1. This induction hob can identify a variety of cooking vessels, which you can test by one of the following methods: Place the vessel on the cooking zone.
-
Page 17: Cooking Zone
5. If the ferromagnetic part covers only partially the base of the pan, only the ferromagnetic area will heat up, the rest of the base may not heat up a sufficient temperature for cooking. 6. If the ferromagnetic area is not homogeneous, but presents others material such as aluminum this may affect the heating up and the pan detection. -
Page 18: Troubleshooting
The induction hob is equipped with a self diagnostic function. With this test the technician is able to check the function of several components without disassembling or dismounting the hob from the working surface. Troubleshooting Failure code occur during customer using & Solution; Failure code Problem Solution... - Page 19 Specific Failure & Solution Failure Problem Solution A Solution B The LED does not No power supplied. Check to see if plug is come on when unit is plugged secured tightly in outlet and that outlet is working. The accessorial power Check the connection.
- Page 20 This appliance is labelled in accordance with European Directive 2012/19/EU regarding electric and electronic appliances (WEEE). The WEEE contain both polluting substances (that can have a negative effect on the environment) and base elements (that can be reused). It is important that the WEEE undergo specific treatements to correctly remove and dispose of the pollutants and recover all the materials.
- Page 21 Product Informa�on for Domes�c Electric Hobs Compliant to Commission Regula�on (EU) No 66/2014 Posi�on Symbol Value Unit Model iden�fica�on HAIDSJ63MC Type of hob: Electric Hob Number of cooking zones and/or zones areas areas Induc�on cooking zones Hea�ng technology (induc�on cooking zones and cooking areas, Induc�on cooking cooking areas...
- Page 22 Inserendo il marchio CE su questo prodotto, confermiamo la conformità a tutti i requisiti europei in materia di sicurezza, salute e ambiente che sono applicabili nella legislazione per questo elettrodomestico. A seconda dei casi, le parti di questo elettrodomestico sono conformi a: REGOLAMENTO (CE) Nº...
- Page 23 • Oggetti metallici come coltelli, forchette, cucchiai o coperchi non devono essere posti sulla superficie del piano di cottura perché possono surriscaldarsi. • Qualsiasi fuoriuscita deve essere rimossa dal coperchio prima dell'apertura. • Prima di chiudere il coperchio lasciare raffreddare la superficie del piano di cottura.
-
Page 24: Introduzione Al Prodotto
Un processo di cottura breve deve essere supervisionato di continuo Gentile cliente, Grazie per aver acquistato il piano cottura a induzione Haier. Ci auguriamo che possa funzionare correttamente per molti anni. Legga attentamente questo manuale di istruzioni prima dell’uso e lo conservi con cura in un luogo sicuro per poterlo consultare in futuro in caso di necessità. -
Page 25: Installazione
Nella sua costante ricerca di miglioramento dei propri prodotti, Haier si riserva il diritto di Installazione modificare in qualsiasi momento qualsiasi aspetto tecnico, del programma o estetico 1. - Page 26 N.B.: Tra il piano di cottura e l'eventuale Se l'elettrodomestico viene collegato elemento superiore deve essere prevista una direttamente alla rete elettrica, è necessario distanza di sicurezza pari ad almeno 760 mm. installare un interruttore automatico omnipolare 3. Fissare il piano cottura al piano di lavoro con una distanza minima di 3 mm tra i contatti.
-
Page 27: Funzionamento Del Prodotto
Funzionamento del prodotto Tasti a sfioro I comandi rispondono allo sfioramento, quindi non è necessario premerli. • Utilizzare il polpastrello del dito e non la punta. • Ogni volta che viene registrato il contatto, viene emesso un bip. • • Accertarsi che i comandi siano sempre puliti, asciutti e privi di oggetti (ad esempio utensili o asciugapiatti) appoggiati su di essi. - Page 28 Togliere sempre le pentole dal piano di cottura ad induzione sollevandole - non farle strisciare, in quanto si rischia di graffiare il vetro Modo d’uso Per iniziare la cottura Toccare il tasto ON/OFF per tre secondi. Dopo l'accensione, l'avvisatore acustico si attiva una volta, tutti i display visualizzano "-"...
- Page 29 Per terminare la cottura Toccare il comando di selezione della zona di riscaldamento che si intende spegnere. Spegnere la zona di cottura toccando il cursore verso "0". Accertarsi che il display visualizzi “0”. Spegnere l'intero piano di cottura toccando il tasto ON/OFF.
- Page 30 Blocco dei comandi • I comandi si possono bloccare per evitare un uso involontario (ad esempio accensione involontaria delle zone di cottura da parte di bambini). • Quando i comandi sono bloccati, sono tutti disabilitati tranne il tasto ON/OFF. Per bloccare i comandi L'indicatore del timer mostra "Lo"...
- Page 31 Per passare ad un altro livello premere +/- del timer Ci sono 5 livelli di potenza, da "P1" a "P5". L'indicatore del timer visualizza uno di questi. "P1": la potenza massima è pari a 2,5 kW. "P2": la potenza massima è pari a 3,5 kW. oppure "P3": la potenza massima è...
- Page 32 L'avvisatore acustico si attiva per 30 secondi e l'indicatore del timer visualizza "- -" al termine del tempo impostato. b) Impostazione del timer per spegnere una o più zone di cottura Impostare una zona Toccare il comando del cursore della zona da scaldare Impostare il tempo toccando i tasti "-”...
- Page 33 c) Annullare il timer Toccare il comando del cursore della zona di riscaldamento per cui si vuole annullare il timer Tenere premuto il tasto "-" del timer, il timer scende a "00" e viene annullato. Tempi di funzionamento di default L'autospegnimento è...
- Page 34 a. PARAMETRI WIRELESS Tecnologia Wi-Fi Norma IEEE 802.11b/n/g Bluetooth v4.2, BR/EDR, BLE Banda(e) di frequenza 2402-2480 2402-2480 [MHz] Potenza massima [mW] 1500 1500 Selezione dei recipienti di cottura Ferro per friggere Acciaio inox Padella in ferro Bollitore in ferro Bollitore in acciaio Utensili da cucina con olio inox smaltato...
-
Page 35: Pulizia E Manutenzione
A seconda delle dimensioni della zona, si possono utilizzare pentole con diametri diversi, come indicato nella figura sottostante: 5. Se la parte ferromagnetica copre solo parzialmente la base della pentola, si riscalderà solo l'area ferromagnetica, il resto della base potrebbe non riscaldarsi ad una temperatura sufficiente per la cottura. - Page 36 Display di anomalie e controllo Il piano di cottura ad induzione è dotato di una funzione di autodiagnosi. Con questo test il tecnico è in grado di controllare il funzionamento di diversi componenti senza disassemblare o smontare il piano di lavoro. Qualcosa non funziona? 1) Il codice di guasto si verifica durante l'utilizzo del cliente, con relativa soluzione;...
- Page 37 2) Guasto specifico e soluzione Guasto Problema Soluzione A Soluzione B Verificare che la spina Mancanza di sia ben fissata alla alimentazione. presa e che questa sia funzionante. La scheda di alimentazione accessoria e la scheda Controllare il Il LED non si accende del display hanno un collegamento.
-
Page 38: Servizio Clienti
Guasto Problema Soluzione A Soluzione B La scheda di alimentazione e la Controllare il scheda del display collegamento. Le zone di hanno un guasto nel riscaldamento dello collegamento; stesso lato (come la La scheda del display prima e la seconda della parte di Sostituire la scheda del zona) mostrerebbero... - Page 39 Informazione prodotto per piani di cottura elettrici domestici conformi al Regolamento della Commissione (UE) nº 66/2014 Unità di Posizione Simbolo Valore misura Identificativo del modello HAIDSJ63MC Tipologia di piano cottura: Piano cottura elettrico zone Numero di zone e/o aree di cottura aree...
- Page 40 Poprzez umieszczenie oznaczenia CE na tym produkcie potwierdzamy zgodność ze wszystkimi odpowiednimi europejskimi wymogami bezpieczeństwa, zdrowia i ochrony środowiska, które mają zastosowanie w ustawodawstwie dotyczącym tego produktu. W stosownych przypadkach elementy tego urządzenia są zgodne z: ROZPORZĄDZENIE (WE) nr 1935/2004 dotyczące materiałów i wyrobów przeznaczonych do kontaktu z żywnością.
- Page 41 • Zabrania się umieszczania na powierzchni płyty metalowych przedmiotów, takich jak noże, widelce, łyżki i pokrywki rondli, ponieważ mogą one się nagrzewać. • Przed otwarciem pokrywy należy usunąć z niej wszelkie wycieki. • Przed zamknięciem pokrywy należy odczekać, aż płyta ostygnie. •...
-
Page 42: Opis Produktu
• PRZESTROGA: proces gotowania powinien być nadzorowany. Krótki proces gotowania powinien być stale nadzorowany Szanowny Kliencie: Dziękujemy za zakup płyty indukcyjnej HAIER. Mamy nadzieję, że będzie dobrze służyła przez wiele lat. Przed użyciem płyty indukcyjnej należy dokładnie zapoznać się z niniejszą instrukcją obsługi i przechowywać... - Page 43 1. Wyciąć w blacie roboczym otwór o W ramach ciągłych badań mających na celu wymiarach pokazanych na poniższym doskonalenie swoich produktów firma Haier schemacie. Wokół otworu należy pozostawić zastrzega sobie prawo do modyfikacji co najmniej 50 mm przestrzeni. Blat roboczy wszelkich aspektów technicznych,...
- Page 44 3. Przymocować płytę grzewczą do blatu Jeśli urządzenie jest podłączone bezpośrednio roboczego za pomocą czterech uchwytów do sieci zasilającej, należy zainstalować na podstawie płyty grzewczej. Położenie wyłącznik wielobiegunowy z minimalną wsporników można regulować w zależności szczeliną pomiędzy stykami wynoszącą 3 mm. od grubości blatu.
- Page 45 Działanie produktu Przyciski dotykowe Przyciski reagują na dotyk, więc nie trzeba ich naciskać. • Należy użyć opuszki palca, a nie jego czubka. • Przy każdym odnotowaniu dotknięcia przez urządzenie generowany jest sygnał dźwiękowy. • • Należy sprawdzić, czy przyciski są czyste, suche i czy nie ma na nich żadnego przedmiotu (np. naczynia lub szmatki).
- Page 46 Za każdym razem należy podnieść patelnię z płyty indukcyjnej, a nie przesuwać jej, ponieważ może porysować szkło. Jak używać Jak rozpocząć gotowanie Dotknąć przycisku ON/OFF na trzy sekundy. Po włączeniu zasilania emitowany jest jeden sygnał akustyczny, na wszystkich wyświetlaczach widnieją wskazania „–” lub „– –” informujące, że płyta indukcyjna jest w trybie gotowości.
- Page 47 Jak zakończyć gotowanie Dotknąć przycisku wyboru danej strefy grzewczej, którą zamierza się wyłączyć. Wyłączyć strefę gotowania, dotykając suwaka w pozycji „0". Upewnić się, że na wyświetlaczu widnieje wartość „0”. Wyłączyć całą płytę kuchenną, dotykając przycisku ON/OFF. Uważać na gorące powierzchnie. Na wyświetlaczu wciąż...
- Page 48 Blokowanie elementów sterowania • Elementy sterowania można zablokować, aby zapobiec użyciu ich przez osoby niepowołane (np. przez dzieci, które przypadkowo włączą strefy grzewcze). • Po zablokowaniu elementów sterowania wszystkie elementy sterowania z wyjątkiem przycisku ON/OFF są nieaktywne. Jak zablokować elementy sterowania Dotknąć...
- Page 49 Przełączanie na inny poziom Nacisnąć +/- na regulatorze czasowym Przewidziano 5 poziomów mocy: od „P1” do „P5”. Na regulatorze czasowym będzie wyświetlany jeden z nich. „P1”: maksymalna moc wynosi 2,5 kW. „P2”: maksymalna moc wynosi 3,5 kW. „P3”: maksymalna moc wynosi 4,5 kW. „P4”: maksymalna moc wynosi 5,5 kW.
- Page 50 Potwierdzanie i wychodzenie z funkcji sterowania mocą W tym samym czasie nacisnąć blokadę Wtedy płyta kuchenna zostanie wyłączona. klawiszy i „ ” na regulatorze czasowym, aby potwierdzić. Przycisk regulatora czasowego Z regulatora czasowego można korzystać na dwa różne sposoby: • Można używać go jako minutnika. W takiej sytuacji regulator czasowy nie wyłączy żadnej strefy grzewczej przed upływem ustawionego czasu.
- Page 51 b) Ustawienie regulatora czasowego w celu wyłączenia jednej lub kilku stref gotowania Ustawienie jednej strefy Dotknąć suwaka do obsługi danej strefy grzewczej. Ustawić czas, dotykając przycisku „-” lub „+” regulatora czasowego. Wskazanie: Dotknąć przycisku „-” lub „+” na regulatorze czasowym, aby skrócić...
- Page 52 c) Anulowanie działania regulatora czasowego Dotknąć przycisku suwaka strefy grzewczej, dla której zamierzamy anulować działanie regulatora czasowego. Dotknąć i przytrzymać przycisk „-” regulatora czasowego, a wyświetli się „00” i działanie regulatora zostanie anulowane. Domyślne czasy działania Automatyczne wyłączanie się to funkcja zabezpieczająca płytę indukcyjną. Płyta wyłącza się automatycznie, jeśli użytkownik zapomni ją...
- Page 53 a. PARAMETRY BEZPRZEWODOWE Technologia Wi-Fi Standard IEEE 802.11b/n/g Bluetooth v4.2, BR/EDR, BLE Pasmo(a) częstotliwości 2402 - 2480 2402 - 2480 [MHz] Moc maksymalna [mW] 1500 1500 Wybór naczyń do gotowania Smażenie na Stal nierdzewna Żeliwna patelnia Żeliwny czajnik Czajnik z Emaliowane oleju w naczyniu emaliowanej stali...
- Page 54 Zgodnie z wymiarami strefy, na której używane są garnki, można korzystać z naczyń o rożnej średnicy, jak pokazano poniżej: 5. Jeśli część ferromagnetyczna zakrywa tylko częściowo dno naczynia, tylko część ferromagnetyczna nagrzeje się, a reszta może nie nagrzać się do temperatury wystarczającej do gotowania.
- Page 55 Wyświetlanie usterek i ich kontrola Płyta indukcyjna jest wyposażona w funkcję autodiagnostyki. Dzięki niej technik może sprawdzić działanie różnych komponentów bez wymontowywania ich lub wyjmowania płyty kuchennej z blatu. Rozwiązywanie problemów 1) Kod usterki i możliwe rozwiązania ze strony użytkownika; Kod usterki Problem Rozwiązanie...
- Page 56 2) Konkretne usterki i rozwiązania Usterka Problem Rozwiązanie A Rozwiązanie B Sprawdzić, czy wtyczka jest dobrze włożona do Brak zasilania. gniazdka i czy to gniazdko działa. Nieprawidłowe podłączenie Dioda nie zaświeca się akcesoryjnego Sprawdzić podłączenie. po podłączeniu panelu zasilania i urządzenia.
-
Page 57: Obsługa Klienta
Usterka Problem Rozwiązanie A Rozwiązanie B Główny panel zasilania jest Wymienić panel zasilania. uszkodzony. Dźwięk silnika Panel zasilania jest wentylatora brzmi Wymienić wentylator. uszkodzony. nietypowo. Powyższe wskazania są jedynie przypuszczeniem, czynności takie wykonuje się przy powszechnych usterkach. Proszę nie demontować urządzenia samodzielnie, aby uniknąć zagrożeń i uszkodzeń płyty indukcyjnej. - Page 58 Informacje o produkcie – domowe płyty grzejne zgodne z rozporządzeniem (UE) nr 66/2014 Pozycja Oznaczenie Wartość Jednostka Identyfikacja modelu HAIDSJ63MC Typ płyty grzejnej: płyta grzejna elektryczna pola Liczba pól i/lub obszarów grzejnych obszary Indukcyjne pola grzejne Technologia grzewcza (strefy indukcyjne i strefy gotowania, Indukcyjne obszary grzejne promiennikowe płyty grzejne,...
- Page 59 En apposant la marque CE sur ce produit, nous confirmons la conformité à toutes les exigences européennes concernant la protection de l'environnement et de la santé et de la sécurité, applicables selon la loi à ce produit. Selon le cas, les pièces de cet appareil sont conformes à : RÈGLEMENT (CE) N° 1935/2004 pour tous les matériaux destinés à...
- Page 60 • Les objets métalliques tels que couteaux, fourchettes, cuillères et couvercles de saucière ne doivent pas être posés sur la surface de la table de cuisson, car ils peuvent devenir chauds. • Le couvercle doit être nettoyé de tout déversement avant ouverture.
-
Page 61: Présentation Du Produit
être surveillées en permanence Cher client, Merci d'avoir acheté la table de cuisson à induction HAIER. Nous espérons qu'il offrira de nombreuses années de bon service. Veuillez lire attentivement ce manuel d'utilisation avant d'utiliser la table de cuisson et conservez-le dans un endroit sûr pour référence ultérieure. -
Page 62: Installation
à induction. Dans sa recherche constante d'amélioration de Installation ses produits, Haier se réserve le droit de modifier à tout moment tout aspect technique, 1. Faites un trou dans le plan de travail de la esthétique ou les programmes de l'appareil. - Page 63 N.B. : Pour des raisons de sécurité, l'espace Si l'appareil est branché directement sur le entre la table de cuisson et toute armoire secteur, un disjoncteur omnipolaire doit être située au-dessus doit être d'au moins 760 mm. installé avec un espace minimum de 3 mm 3.
-
Page 64: Utilisation Du Produit
Utilisation du produit Touches de commande Les commandes répondent au toucher, vous n’avez donc pas besoin d’appuyer fort. • • Utilisez la boule de votre doigt, pas son bout. Vous entendrez un buzzer chaque fois qu’une touche est enregistrée. • Assurez-vous que les commandes sont toujours propres et sèches et qu’aucun objet (p. -
Page 65: Comment L'utiliser
Soulevez toujours les casseroles de la table de cuisson à induction - ne les faites pas glisser, sinon elles risquent d’érafler le verre Comment l’utiliser Démarrage de la cuisson Appuyez sur la touche Marche/Arrêt pendant trois secondes. Après la mise en marche, l’avertisseur sonore retentit une fois et toutes les touches affichent «... - Page 66 Arrêt de la cuisson Appuyez sur la touche de sélection de la zone de cuisson que vous souhaitez éteindre. Désactivez la zone de cuisson en touchant le curseur sur « 0 ». Vérifiez que « 0 » s’affiche. Éteignez la table de cuisson en appuyant sur la touche Marche/Arrêt.
- Page 67 Verrouillage des touches de commande L’indicateur de temporisation affiche « Lo » Touchez et maintenez la touche verrouillage pendant un moment. Déverrouillage des touches de commande Touchez et maintenez la touche de verrouillage pendant un moment. Quand la table de cuisson est en mode verrouillage, toutes les touches de commande sont désactivées sauf la touche Marche/Arrêt et vous gardez la possibilité...
- Page 68 Réglage à un niveau différent appuyez sur +/- du temporisateur Il y a 5 niveaux différents de cuisson, allant de « P1 » à « P5 ». Le témoin du temporisateur indique l’un de ces niveaux. « P1 » : le niveau de chauffe maximum est égal à...
- Page 69 Une fois le temps réglé, le décompte commence immédiatement. La touche de temporisation affiche le temps restant et l’affichage du temporisateur clignote pendant 5 secondes. Le buzzer retentit pendant 30 secondes et l’indicateur du temps indique « - - » quand la temps réglé est terminé. b) Réglage de la minuterie pour désactiver une ou plusieurs zones de cuisson Réglage d’une seule zone En appuyant sur le curseur de la zone de cuisson...
- Page 70 Quand le décompte est terminé, la zone de cuisson correspondante s’éteint. Ensuite, c’est la nouvelle durée de cuisson la plus courte qui s’affiche et le point sur la zone de cuisson correspondante commence à clignoter. (réglage à 30 minutes) Comme indiqué sur la droite : Touchez la commande de sélection de la zone de chauffage, la minuterie correspondante sera affichée dans l'indicateur de minuterie.
-
Page 71: Paramètres Sans Fil
Lorsque la table de cuisson reçoit la commande de l'App, elle émet deux tons et clignote pendant une seconde pour indiquer que les instructions ont été reçues. Si vous voulez sortir de la fonction « Cook with me », modifiez le niveau de puissance de la zone. - Page 72 4. Utiliser des casseroles dont le diamètre de la zone ferromagnétique (fond de la casserole) correspond aux dimensions indiquées dans le tableau ci-dessous. (Tableau 1) - Si vous utilisez des casseroles plus petites, les performances pourraient être affectées - Si vous utilisez des casseroles avec des diamètres plus petits que ceux indiqués dans le Tableau 1, elles pourraient ne pas être détectées En fonction de la taille de la zone, vous pouvez utiliser des casseroles de différents diamètres tel qu’illustré...
-
Page 73: Nettoyage Et Entretien
Nettoyage et entretien La surface de la table de cuisson à induction peut être facilement nettoyée de la manière suivante : Type de Procédé de nettoyage Matériaux de nettoyage contamination Immerger dans l'eau chaude et Faible Éponge de nettoyage essuyer Appliquez du vinaigre blanc sur la Anneaux et tartre de zone, essuyez avec un chiffon doux ou... - Page 74 Code de Problème Solution défaillance Pas de rétablissement automatique Défaillance du capteur de température F3/F6 de la plaque céramique - court-circuit. (F3 pour 1#, F6 pour 2#) Défaillance du capteur de température Vérifiez le raccordement ou remplacez le F4/F7 de la plaque en céramique -- circuit capteur de température de la table en ouvert.
- Page 75 Défaillance Problème Solution A Solution B La typologie de casserole est n’est pas Utilisez la bonne casserole adaptée. (consulter la notice d’utilisation.) Le diamètre de la Le circuit de Le chauffage s'arrête casserole est trop petit. détection de la soudainement pendant casserole est L’appareil a surchauffé.
-
Page 76: Service Après-Vente
Service après-vente En cas de défaillance, avant d'appeler le service après-vente, veuillez procéder comme suit : - Vérifiez que l'appareil est correctement branché - Lire le tableau des défaillances et de l'affichage ci-dessus Si vous n'arrivez toujours pas à résoudre le problème, éteignez l'appareil, n'essayez pas de le démonter et appelez notre Service après-vente. - Page 77 Informations sur la table de cuisson électrique à usage domestique conforme aux normes de la Commission (UE) n° 66/2014 Position Symbole Valeur Unité Identification du modèle HAIDSJ63MC Type de table de cuisson : Table de cuisson électrique foyers Nombre de foyers et/ou de zones de cuisson...
- Page 78 Al colocar la marca CE en este producto, confirmamos el cumplimiento de todos los requisitos europeos pertinentes de seguridad, salud y medio ambiente que son aplicables en la legislación para este producto. Como corresponde, las piezas de este aparato cumplen las normas siguientes: REGLAMENTO (EC) 1935/2004 sobre materiales y artículos diseñados para entrar en contacto con alimentos.
- Page 79 • Cualquier derrame debe eliminarse de la tapa antes de abrir. • Es preciso dejar que la superficie de la encimera se enfríe antes de cerrar la tapa. • Después de utilizarla, apague la encimera para su control. No confíe en el detector de utensilios de cocción. •...
-
Page 80: Apreciado Cliente
Apreciado cliente: Gracias por comprar la encimera de inducción de HAIER. Esperamos que le de muchos años de buen servicio. Lea atentamente este manual de instrucciones antes de utilizar la encimera y guárdelo en un lugar seguro para consultarlo en el futuro. -
Page 81: Instalación
Se En su constante búsqueda por mejorar sus deberá dejar un espacio mínimo de 50 mm productos, Haier se reserva el derecho de alrededor del agujero. La superficie de modificar cualquier aspecto técnico, de trabajo deberá de tener un grosor mínimo programa o estético del aparato en cualquier... - Page 82 3. Fije la encimera a la superficie de trabajo 3 mm entre los contactos. con los cuatro soportes en la base de la El instalador debe asegurarse de que la encimera. La posición de los soportes se conexión a la red eléctrica se haya realizado puede ajustar en función del grosor de la correctamente y cumpliendo las normativas de superficie.
-
Page 83: Funcionamiento Del Producto
Funcionamiento del producto Mandos táctiles Los mandos responden al tacto, por lo que no es necesario presionarlos. • Utilice la yema de los dedos en lugar de la punta. • Oirá un pitido cada vez que se produzca el contacto. •... - Page 84 Para apartar las cacerolas de la encimera de cocción, levántelas siempre en lugar de deslizarlas, ya que el vidrio podría rayarse Cómo se usan Empezar a cocinar Toque el mando de encendido/apagado durante tres segundos. Después de encender la encimera se escucha un pitido y aparece "-"...
- Page 85 Terminar de cocinar Tocar el mando de selección de la zona de cocción que desee apagar. Apagar la zona de cocción tocando el deslizador hasta "0". Asegúrese de que aparece ”0” en el visor. Para apagar la placa de cocción completa, toque el mando de encendido/apagado.
- Page 86 Para bloquear los mandos Toque y mantenga el control de bloqueo En el indicador del temporizador aparecerá "Lo" por un rato. Para desbloquear los mandos Toque y mantenga el control de bloqueo por un rato. Cuando la encimera está bloqueada, todos los mandos están desactivados, excepto el mando de encendido/apagado .
- Page 87 "P5": la potencia máxima es la potencia máxima de la encimera de cocción. Confirmación y salida de la función de gestión de potencia Presiona al mismo tiempo el bloqueo y el La encimera se apaga. temporizador " " para confirmar. Mando del temporizador El temporizador se puede utilizar de dos formas distintas: •...
- Page 88 b) Configurar el temporizador para apagar una o más zonas de cocción Elija una zona Toque el mando deslizante de la zona de cocción. Toque el mando "-" o "+" del temporizador para programar el tiempo. Consejo: Toque el mando "-" o "+" del temporizador una vez disminuirá...
- Page 89 c) Cancelar el temporizador Toque el mando de selección de la zona de cocción cuyo temporizador quiera cancelar. Toque y mantenga el mando "-" del temporizador, este baja hasta "00" y se cancela. Tiempos de trabajo por defecto La autodesconexión es una función de seguridad de la encimera de inducción. La encimera se apagará...
- Page 90 a. PARÁMETROS INALÁMBRICOS Tecnología Wi-Fi Estándar IEEE 802.11b/n/g Bluetooth v4.2, BR/EDR, BLE Bandas de frecuencia [MHz] 2402-2480 2402-2480 Potencia máxima [mW] 1500 1500 Selección de utensilios de cocción Hierro para fritura Acero inoxidable Cacerola de Hervidor de hierro Hervidor de acero Utensilio de con aceite hierro...
-
Page 91: Limpieza Y Mantenimiento
En función de las medidas de la zona, puede utilizar ollas de diferentes diámetros, como se ilustra abajo: 5. Si la parte ferromagnética cubre sólo parcialmente la base de la olla, sólo se calentará el área ferromagnética, el resto de la base puede no calentarse lo suficiente para cocinar. 6. -
Page 92: Resolución De Problemas
Indicador de fallo e inspección La encimera de inducción está equipada con una función de autodiagnóstico. Con esta prueba, el técnico puede comprobar el funcionamiento de varios componentes sin necesidad de desmontar o desarmar la encimera de cocción de la superficie de trabajo. Resolución de problemas 1) El código de fallo ocurre durante el uso del cliente y se puede utilizar la solución;... - Page 93 2) Fallo específico y solución Fallo Problema Solución A Solución B El LED no se enciende No recibe alimentación. Comprobar que la toma cuando la unidad está está bien enchufada a la conectada. red y que esta funcione correctamente. La tarjeta de potencia Compruebe la conexión secundaria y la tarjeta eléctrica.
-
Page 94: Servicio De Atención Al Cliente
Servicio de atención al cliente Si se produce un fallo, antes de llamar al servicio de atención al cliente, por favor haga lo siguiente: - Compruebe que el aparato esté bien conectado - Lea la tabla de fallos y del visor anterior Si aún así... - Page 95 Información de producto de las placas de cocina eléctricas de uso doméstico según el Reglamento (UE) nº. 66/2014 de la Comisión Posición Símbolo Valor Unidad Identificación de modelo HAISJ64MC Tipo de placa: Placa eléctrica zonas Número de zonas y/o áreas de cocción áreas Zonas de inducción...
- Page 96 Das CE- Zeichen an diesem Produkt bestätigt die Einhaltung aller von der Europäischen Union erlassenen relevanten Sicherheits-, Gesundheits- und Umweltvorschriften, die in der Gesetzgebung für dieses Produkt gelten. Soweit zutreffend entsprechen die Komponenten dieses Geräts: EG-VERORDNUNG 1935/2004 über Materialien und Gegenstände, die dazu bestimmt sind, mit Lebensmitteln in Berührung zu kommen.
- Page 97 • Metallobjekte wie Messer, Gabeln, Löffel und Topfdeckel dürfen nicht auf der Kochfläche abgelegt werden, weil sie heiß werden können. • Verschüttungen müssen entfernt werden, bevor die Abdeckung geöffnet wird. • Das Kochfeld muss abkühlen, bevor die Abdeckung geschlossen wird. •...
- Page 98 Kochvorgang muss permanent überwacht werden. Sehr geehrter Kunde! Vielen Dank, dass Sie sich für das Induktionskochfeld von Haier entschieden haben. Wir hoffen, dass Ihnen das Gerät jahrelang zuverlässig Dienst leisten wird. Lesen Sie dieses Handbuch vor der Benutzung des Kochfelds aufmerksam durch und bewahren Sie es für zukünftige Zwecke sicher auf.
-
Page 99: Montage
Elektrohaushaltsgerät nur unter Haushalt entwickelt. Aufsicht ihres Arztes verwenden. Im Rahmen des ständigen Strebens nach Produktverbesserung behält sich Haier das Montage Recht vor, technische, programmatische oder ästhetische Aspekte des Geräts jederzeit zu 1. Einen Ausschnitt in der Arbeitsplatte gemäß... - Page 100 Hinweis: Der Sicherheitsabstand zwischen Bei einem direkten Anschluss des Geräts an dem Kochfeld und einem darüber befindlichen das Stromnetz muss ein allpoliger Küchenschrank muss mindestens 760 mm Schutzschalter mit einem Mindestabstand von betragen. 3 mm zwischen den Kontakten installiert 3. Setzen Sie das Kochfeld mithilfe der vier werden.
-
Page 101: Bedienung Des Geräts
Bedienung des Geräts Berührungsbedienelemente Die Elemente des Bedienfelds reagieren auf leichte Berührung, so dass kein Druck ausgeübt • werden muss. Benutzen Sie die gesamte Fingerkuppe, nicht nur die Fingerspitze. • Jede erfasste Berührung wird mit einem Piepton quittiert. • • Achten Sie darauf, dass die Berührungstasten stets sauber und trocken und keine Gegenstände (z. - Page 102 Heben Sie Kochtöpfe stets vom Kochfeld ab, anstatt sie davon herunterzuziehen, weil dies zu Kratzern in der Glaskeramikfläche führen kann. Verwendung Kochfeld einschalten Die ON/OFF-Taste drei Sekunden lang gedrückt halten. Nach dem Einschalten ist ein Piepton zu hören, und das Displays zeigt „–“...
- Page 103 Garvorgang beenden Drücken Sie auf die Leistungseinstellung der Kochzone, die Sie ausschalten wollen. Schalten Sie die Kochzone aus, indem Sie den Schieberegler bei „0“ berühren. Achten Sie darauf, dass auf dem Display „0“ angezeigt wird. Schalten Sie das gesamte Kochfeld aus, indem Sie auf EIN/AUS drücken.
- Page 105 Power-Management-Funktion • Es besteht die Möglichkeit, durch Auswahl unterschiedlicher Leistungsbereiche ein maximales Leistungsaufnahmeniveau für das Induktionskochfeld einzustellen. • Induktionskochfelder können sich selbst automatisch begrenzen, um auf einem geringeren Leistungsniveau zu arbeiten und dadurch eine Überlastung zu vermeiden. Aktivieren der Power-Management-Funktion Schalten Sie das Kochfeld ein und drücken Sie Die Zeitschaltuhranzeige zeigt „P5“...
- Page 106 a) Verwendung der Zeitschaltuhr als Erinnerungsfunktion Ohne Auswahl einer Kochzone Achten Sie darauf, dass das Kochfeld eingeschaltet ist. Hinweis: Sie können die Erinnerungsfunktion auch benutzen, ohne eine Kochzone auszuwählen. Berühren Sie "+" die Bedienelemente der Zeitschaltuhr. Die Erinnerungsanzeige beginnt zu blinken, und in der Zeitschaltuhranzeige erscheint „10“.
- Page 107 Mehrere Zonen einstellen Für die Auswahl von mehreren Kochzonen gelten die gleichen Schritte, wie für die Wahl von einer Kochzone. Wenn Sie die Zeitschaltuhr für mehrere Kochzonen gleichzeitig einstellen, leuchten die Dezimalstellenpunkte dieser Kochzonen. Das Minutendisplay zeigt die Minuten der Zeitschaltung an.
-
Page 108: Geeignetes Kochgeschirr
WLAN ist an: ein Punkt erscheint rechts von der LED WLAN ist aus: Es erscheint kein Punkt. Einstellen von „Cook with me“ Wählen Sie aus dem Rezept- oder dem Spezialprogramm-Menü der hOn App etwas aus. Arbeiten Sie die Anweisungen in der App schrittweise ab. - Page 109 2. Einen Magneten an das Kochgeschirr halten. Wird der Magnet vom Kochgeschirr angezogen, ist es zum Induktionsgaren geeignet. Hinweis: Der Boden des Kochgeschirrs muss magnetisches Material enthalten. Es muss einen flachen Boden mit einem Durchmesser gemäß Tabelle 1 unten haben. 3.
-
Page 110: Reinigung Und Wartung
Reinigung und Wartung Die Oberfläche des Induktionskochfeldes kann leicht auf folgende Weise gereinigt werden: Art der Reinigungsmethode Reinigungsmittel Verschmutzung Mit warmem Wasser einweichen Light Reinigungsschwamm und trocken wischen Weißweinessig auf die Ringe und Verkrustung geben und mit einem Spezielle Klebefolie für Verkrustungen weichen Tuch reinigen oder ein Glaskeramik... - Page 111 Fehlercode Problem Lösung Keramikplatten-Temperatursensor F5/F8 fehlerhaft – ungültig. (F5 für Nr. 1, F8 für Nr. 2) Temperatursensor-IGBT-Fehler. F9/FA (Kurzschluss/Stromkreisunterbrechung für Nr. 1 Netzplatine auswechseln. Temperatursensor-IGBT-Fehler. FC / FD (Kurzschluss/Stromkreisunterbrechung für Nr. 2) 2) Spezifische Störung & Lösung Störung Problem Lösung A Lösung B Kontrollieren Sie, ob der Stecker fest in der...
- Page 112 Störung Problem Lösung A Lösung B Das Gerät ist auswechseln. überhitzt. Warten Sie, bis die Temperatur wieder normal ist. Kocher ist überhitzt. Drücken Sie die EIN/AUS-Taste, um das Gerät neu zu starten. Netz- und Displayplatine Kontrollieren Sie die sind ausgefallen; Verbindung.
- Page 113 Produktinformationen für Haushalts-Elektrokochfelder gemäß der Verordnung (EU) Nr. 66/2014 der Kommission Position Symbol Wert Einheit HAIDSJ63MC Modellidentifikation Kochfeldtyp: Elektrokochfeld Zonen Anzahl der Kochzonen und/oder -bereiche Bereiche Induktionskochzonen Heiztechnologie (Induktionskochzonen und - Induktionskochen kochbereiche, Kochbereiche Strahlungskochzonen, Strahlungskochbereiche Kochplatten) feste Platten Hinten links Ø...
- Page 114 С поставянето на CE маркировка върху този продукт, ние потвърждаваме съответствието с всички съответни европейски изисквания за безопасност и опазване на здравето и околната среда, които са приложими в законодателството за този продукт. Доколкото е приложимо, частите на този уред съответстват на: РЕГЛАМЕНТ (ЕО) № 1935/2004 относно...
- Page 115 • Преди да затворите капака, трябва да оставите повърхността на плота да изстине. • След като приключите с ползването, изключете котлона от бутона му за управление. Не разчитайте на сензорите за засичане на съдове. • Този уред не е предназначен да се използва чрез външен таймер...
-
Page 116: Принцип На Работа
Уважаеми клиенти, Благодарим Ви, че закупихте индукционния плот Haier. Надяваме се той да Ви служи безпроблемно дълги години. Моля, преди да използвате плота, прочетете внимателно настоящото ръководство и го съхранявайте на сигурно място за бъдещи справки. Представяне на продукта Благодарение на електромагнитните си зони за готвене, микрокомпютърното си управление и... - Page 117 Този плот е специално предназначен за Изрежете дупка в работния плот с размерите, домашна употреба. показани на диаграмата по-долу. Около Ние от Haier непрекъснато се стремим да отвора трябва да оставите минимално подобряваме своите продукти и си запазваме разстояние от 50 mm. Работният плот трябва...
- Page 118 3. Закрепете плота върху кухненския плот с Ако уредът е свързан директно с помощта на четирите скоби в основата на електрическата мрежа, трябва да бъде плота. Положението на скобите може да монтиран многополюсен прекъсвач с бъде регулирано спрямо дебелината на минимално...
- Page 119 Експлоатация на продукта Сензорни бутони за управление Бутоните за управление реагират на докосване, така че не е нужно да прилагате натиск. Използвайте основата на пръста си, а не върха. Ще чувате звуков сигнал при всяко докосване. Уверете...
-
Page 120: Начин На Употреба
Начин на употреба Начало на готвенето Докоснете бутона за вкл./изкл. за три секунди. След включване на захранването, прозвучава звуков сигнал веднъж, всички дисплеи показват "-" или "-", което показва, че индукционният плот е влязъл в режим на готовност. Поставете подходящ тиган върху зоната за готвене, която искате... - Page 121 Завършване на готвенето Докоснете бутона за избор на нагряваща зона, която искате да изключите. Изключете зоната за готвене, като докоснете плъзгача до "0". Уверете се, че на дисплея се показва "0". Изключете целия готварски плот, като докоснете бутона за вкл./изкл. Пазете...
- Page 122 • Функцията може да работи във всяка зона за готвене. • Зоната за готвене се връща към първоначалната си настройка след 5 минути. • Ако първоначалната настройка на топлината е равна на 0, тя ще се върне на 9 след 5 минути. Заключване...
- Page 123 За да въведете функция за управление на мощността Включете плота, след което натиснете Индикаторът на таймера ще покаже "P5", което едновременно бутона за заключване и таймера означава ниво на мощност 5. Режимът по подразбиране е на максимална мощност на " ".
- Page 124 а) Използване на таймера като брояч на минути Ако не избирате зона за готвене Уверете се, че готварският плот е включен. Забележка: Можете да използвате брояча на минути, дори ако не избирате зона за готвене. Докоснете бутоните за управление "+" на таймера. Индикаторът...
- Page 125 Когато таймерът за готвене изтече, съответната зона за готвене ще бъде изключена автоматично. Другата зона за готвене ще продължи да работи, ако е била включена. задаване на повече зони: Стъпките за определяне на повече зони са подобни на стъпките за определяне на една зона; Когато...
- Page 126 Функция "Готви с мен" Първо трябва да изтеглите приложението hOn и да го инсталирате на Вашето преносимо устройство. След това регистрирайте своя индукционен плот, като следвате инструкциите директно от приложението. За да направите сдвояването между плота и приложението, използвайте следния процес: Натиснете...
- Page 127 Избор на готварски съдове Пържене с неръждаеми Плитки Метални Чайници от Емайлирани железен тиган стомани метални чайници емайлирана готварски тенджери неръждаема съдове стомана Метални плочи Можете да използвате различни готварски съдове Индукционният плот може да разпознава различни готварски съдове, които можете да изпробвате...
- Page 128 Ако феромагнитната част само частично обхваща основата на тигана, ще се загрее само феромагнитната зона, а останалата част от основата може да не достигне подходяща за готвене температура. Ако феромагнитната зона не е хомогенна, а съдържа и други материали, като например алуминий, това...
-
Page 129: Почистване И Поддръжка
Почистване и поддръжка Повърхността на индукционния плот може лесно да се почиства по следния начин: Вид замърсяване Начин на почистване Почистващи материали Леко Потопете в гореща вода и забършете Гъба за почистване Полейте мястото с бял оцет, Кръговете на Специални препарати за забършете... - Page 130 2) Специфични неизправности и решения Неуспешно Проблем Разтвор А Разтвор В Светодиодът не се Няма захранване. Проверете дали включва, когато уредът е щепселът е здраво включен. закрепен в контакта и дали този контакт работи. Неизправност в Проверете връзката. свързаното захранващо табло...
- Page 131 Екип по поддръжка на клиентите Ако възникне неизправност, преди да позвъните на екипа по следпродажбено обслужване, направете следното: – Проверете дали захранващият кабел е включен правилно – Проверете в таблицата по-горе за информация за неизправността Ако все още не можете да разрешите проблема, изключете уреда, не се опитвайте да го разглобите...
- Page 132 Информация за продукта за битови електрически плотове, съобразени с Регламент (ЕС) № 66/2014 на Комисията Позиция Символ Стойност Единица Идентификация на модел HAIDSJ63MC Тип на котлона: Електрически котлон зони Брой на зоните и/или площите за готвене площи Индукционни зони за готвене...