Available languages
Available languages
Quick Links
4-274-302-22(1)
Personal Audio Docking System
US
Reference Guide
Guide de référence (au dos)
FR
Printed in China
©2011 Sony Corporation
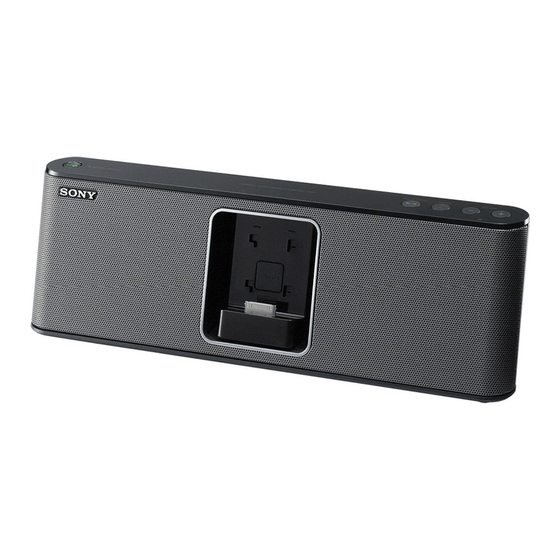
RDP-M15iP
— Reorient or relocate the receiving antenna.
— Increase the separation between the equipment
and receiver.
— Connect the equipment into an outlet on a circuit
different from that to which the receiver is
English
connected.
— Consult the dealer or an experienced radio/TV
technician for help.
WARNING
WARNING
Replace the battery for the remote commander
with a Sony CR2025 lithium battery only. Use
of another battery may present a risk of fire or
To reduce the risk of fire or electric
explosion.
shock, do not expose this apparatus to
Battery may explode if mistreated. Do not
rain or moisture.
recharge, disassemble or dispose of in fire.
Dispose of used battery promptly. Keep away
To reduce the risk of fire, do not cover the
from children.
ventilation of the apparatus with newspapers,
Important Safety Instructions
tablecloths, curtains, etc. And do not place lighted
1) Read these instructions.
candles on the apparatus.
2) Keep these instructions.
To reduce the risk of fire or electric shock, do not
3) Heed all warnings.
expose this apparatus to dripping or splashing,
4) Follow all instructions.
and do not place objects filled with liquids, such
5) Do not use this apparatus near water.
as vases, on the apparatus.
6) Clean only with dry cloth.
Do not install the appliance in a confined space,
7) Do not block any ventilation openings.
such as a bookcase or built-in cabinet.
Install in accordance with the manufacturer's
instructions.
Do not expose the batteries (battery pack or
8) Do not install near any heat sources such as
batteries installed) to excessive heat such as
radiators, heat registers, stoves, or other
sunshine, fire or the like for a long time.
apparatus (including amplifiers) that produce
As the main plug of AC adaptor is used to
heat.
disconnect the AC adaptor from the mains,
9) Do not defeat the safety purpose of the
connect it to an easily accessible AC outlet.
polarized or grounding-type plug. A polarized
Should you notice an abnormality in it,
plug has two blades with one wider than the
other. A grounding type plug has two blades
disconnect it from the AC outlet immediately.
and a third grounding prong. The wide blade
The unit is not disconnected from the AC power
or the third prong are provided for your safety.
source (mains) as long as it is connected to the
If the provided plug does not fit into your
wall outlet, even if the unit itself has been turned
outlet, consult an electrician for replacement
off.
of the obsolete outlet.
The nameplate and important information
10) Protect the power cord from being walked on
or pinched particularly at plugs, convenience
concerning safety are located on the bottom
receptacles, and the point where they exit
exterior of the main unit and on the surface of the
from the apparatus.
AC adaptor.
11) Only use attachments/accessories specified by
You are cautioned that any changes or
the manufacturer.
modifications not expressly approved in this
12) Use only with the cart, stand, tripod, bracket,
manual could void your authority to operate this
or table specified by the manufacturer, or sold
equipment.
with the apparatus. When a cart is used, use
caution when moving the cart/apparatus
CAUTION
combination to avoid injury from tip-over.
Danger of explosion if battery is incorrectly
replaced. Replace only with the same type.
NOTE
This equipment has been tested and found to
13) Unplug this apparatus during lightning storms
comply with the limits for a Class B digital device,
or when unused for long periods of time.
pursuant to Part 15 of the FCC Rules. These limits
14) Refer all servicing to qualified service
are designed to provide reasonable protection
personnel. Servicing is required when the
against harmful interference in a residential
apparatus has been damaged in any way, such
installation. This equipment generates, uses and
as power-supply cord or plug is damaged,
can radiate radio frequency energy and, if not
liquid has been spilled or objects have fallen
installed and used in accordance with the
into the apparatus, the apparatus has been
instructions, may cause harmful interference to
exposed to rain or moisture, does not operate
radio communications. However, there is no
normally, or has been dropped.
guarantee that interference will not occur in a
particular installation. If this equipment does
cause harmful interference to radio or television
reception, which can be determined by turning
the equipment off and on, the user is encouraged
to try to correct the interference by one or more
of the following measures:
SOUND
iPod & iPhone
− VOLUME +
BATTERY/CHARGE
/
Remote sensor
PUSH
Docking Tray
VOLUME + and buttons have a tactile dot.
RECYCLING NICKEL METAL HYDRIDE
Operations
BATTERIES
Nickel Metal Hydride batteries are
Power source
recyclable. You can help preserve
our environment by returning
your used rechargeable batteries to
Power management system
the collection and recycling
After playback of the iPod (or component
location nearest you.
connected to AUDIO IN jack) has finished, if no
operation is performed for about 20 minutes, the
For more information regarding recycling of
unit will automatically turn off.
rechargeable batteries, call toll free 1-800-822-8837 or
To prepare a power source
visit http://www.rbrc.org/
This unit contains a rechargeable battery pack.
Caution:
Do not handle damaged or leaking Nickel
Metal Hydride batteries.
Charge the battery before using this unit for the
first time, or when it is depleted. You can operate
the unit while charging.
Precautions
1
Connect the supplied AC adaptor to the
DC IN 14.5V jack on the back of this
To disconnect the AC adaptor, pull it out by the
unit firmly, and plug it into a wall outlet
plug, not the cord.
Since a strong magnet is used for the speaker,
to charge the battery.
keep credit cards using magnetic coding or
Note on the AC adaptor
spring-wound watches, CRT-based TVs, or
Use the supplied Sony AC adaptor only. The
projectors, etc., away from the unit to prevent
polarity of the plugs of other manufacturers
possible damage from the magnet.
may be different. Failure to use the supplied AC
Do not leave the unit in a location near a heat
adaptor may cause the unit to malfunction.
source such as a radiator or airduct, or in a
place subject to direct sunlight, excessive dust,
mechanical vibration, or shock.
Allow adequate air circulation to prevent
internal heat build-up. Do not place the unit on
2
a surface (a rug, a blanket, etc.) or near
Confirm that charging has started.
materials (a curtain) which might block the
The BATTERY/CHARGE indicator (red) lights
ventilation holes.
up while charging, and turns off when
Should any solid object or liquid fall into the
unit, unplug the unit and have it checked by
charging is complete.
qualified personnel before operating it any
Note
further.
It will take approximately 5 hours to charge the
Do not handle the unit with wet hands.
battery.
Do not place the unit anywhere near water.
To use the rechargeable
NOTES ON LITHIUM BATTERY
battery
Wipe the battery with a dry cloth to assure a
good contact.
You can operate the unit with the rechargeable
Be sure to observe the correct polarity when
battery instead of the AC adaptor.
installing the battery.
Do not hold the battery with metallic tweezers,
Battery Life
otherwise a short-circuit may occur.
(Approx. hours)
(JEITA*)
Note
When
Usage time
In this Reference Guide, "iPod" is used as a
Playback of iPod
6
general reference to functions on an iPod or
iPhone, unless otherwise specified by the text
* Measured by JEITA (Japan Electronics and
or illustrations.
Information Technology Industries
Association) standards. The usage time is
If you have any questions or problems concerning
measured with the SOUND function set to off,
your unit, please consult your nearest Sony dealer.
and actual battery life will vary depending on
the circumstances of the unit.
Notes on the rechargeable battery
The maximum output will be lower when the
AC adaptor is disconnected.
The BATTERY/CHARGE indicator (green)
becomes dim when the battery is weak, and
turns off when remaining battery power is
depleted.
When to replace the rechargeable
battery
Repeated recharging causes the capacity of the
battery power to decrease over time. Replace the
battery pack when its capacity becomes half the
usual time, even after charging it fully.
Note
The rechargeable battery pack is not a
commercially available product. To purchase
rechargeable battery pack (NH – M15 RDP),
consult with your nearest Sony dealer.
To replace the rechargeable
(Backward)
battery
Go back to the previous track. During
1
playback, this operation returns to the
Remove the screw of the battery
beginning of the current track. To go back to
compartment at the bottom of the unit,
the previous track, press twice.
and open the lid.
Press and hold while listening to the sound to
locate a desired point.
Press and hold in pause while observing the
display on iPod to locate a desired point.
(Up)/ (Down)
Select a menu item or track for playback.
MENU
Go back to the previous menu.
Press and hold to go back to the main menu.
ENTER
2
Disconnect the connector of the battery
Execute the selected menu item or begin
pack and pull the old one out.
playback.
SOUND
Press once or twice to obtain the desired sound
effect. (For details, see "To obtain the bass or
expansion sound effect. " )
VOL +/– (Volume plus/minus)
Adjust the volume.
* W hen using the rechargeable battery, press the
/ button on the unit. The / button of the
3
Insert a new battery pack and connect its
remote commander works only when the AC
adaptor is used.
connector to the jack.
Notes
4
Replace the battery compartment lid and
Some operations may differ or may not be
tighten the screw.
available between models of iPod.
Notes
Some operations may differ or may not be
Charge a new battery pack before use. See "To
available when using the iPod in a horizontal
prepare a power source" for details.
position.
Turn off the unit and disconnect the AC
When to replace the battery
adaptor before replacing the battery pack.
When replacing the battery pack, place a soft
With normal use, the battery (CR2025) should
cloth etc., under the unit.
last for about 6 months. When the remote
commander no longer operates the unit, replace
To charge your iPod (AC only)
the battery with a new one.
You can use the unit as a battery charger for your
iPod when the power is supplied by the AC
the side facing up
adaptor.
Charging begins when the iPod is connected to
the unit. The charging status appears in the
display on iPod. For details, see the user's guide of
your iPod.
To turn the unit on/off
Note
Press / (power).
If you are not going to use the remote
The / button indicator will light up when the
commander for a long time, remove the battery
unit is turned on.
to avoid any damage that may be caused by
leakage and corrosion.
Remote commander
Playing an iPod
Before using the supplied remote commander for
the first time, remove the insulation film.
Compatible iPod/iPhone
Aim the remote commander at the
(Remote
sensor) of the unit.
models
The / button indicator flashes when the remote
commander's command is received.
The compatible iPod/iPhone models are as
follows.
Update software of your iPod/iPhone to the latest
version before using it with this unit.
iPod touch (4th generation)
iPod touch (3rd generation)
iPod touch (2nd generation)
iPod touch (1st generation)
iPod nano (6th generation)*
iPod nano (5th generation)
iPod nano (4th generation)
iPod nano (3rd generation)
iPod nano (2nd generation)
iPod with video
iPod classic
iPhone 4S
iPhone 4
iPhone 3GS
VOL + and buttons have a tactile dot.
iPhone 3G
iPhone
/ (Power)*
Turns the unit on/off. The / button indicator
* The iPod nano (6th generation) cannot be
lights up when the unit is turned on.
controlled by the remote when the command of
"MENU, " ", " ", " and "ENTER" is pressed.
(Play/Pause)
On copyrights
Start playing iPod. Press again to pause/resume
iPhone, iPod, iPod classic, iPod nano, and iPod
playback.
touch are trademarks of Apple Inc., registered in
Press and hold to turn off the iPod.
the U.S. and other countries.
(Forward)
"Made for iPod, " and "Made for iPhone" mean
Go to the next track.
that an electronic accessory has been designed to
Press and hold while listening to the sound to
connect specifically to iPod or iPhone,
locate a desired point.
respectively, and has been certified by the
Press and hold in pause while observing the
developer to meet Apple performance standards.
display on iPod to locate a desired point.
Apple is not responsible for the operation of this
device or its compliance with safety and
regulatory standards. Please note that the use of
this accessory with iPod or iPhone may affect
wireless performance.
To adjust the volume
Note
This unit is not specified for use with an iPad,
Press VOLUME +/− (VOL +/− on the remote
and malfunction may result if used as such.
commander).
To set an iPod on the
Tip
The / button indicator flashes three times
Docking Tray
when the sound is set to either maximum or
1
Press PUSH on the front of the unit until
minimum volume.
the Docking Tray comes forward.
To obtain the bass or
2
Set your iPod on the Dock connector.
expansion sound effect
To set an iPod in sideways
Press SOUND.
The SOUND button indicator lights up umber.
You can use the supplied Dock Holder to set your
iPod. The Dock Holder code (A, B, etc.) and
High quality bass sound will be heard.
compatible iPod model(s) are indicated on the
Press the button again.
Dock Holder. Check for compatibility before use.
The indicator lights up green. Additional
expansion of the sound field will be heard.
Example
To return to normal sound, press the button again
and the indicator will turn off.
Connecting optional
components
Dock Holder
Compatible iPod models
You can enjoy the sound from an optional
code
component, such as a portable digital music
A
iPod touch (4th generation)
player, through the speakers of this unit. Be sure
to turn off the power of each component before
B
iPod touch (3rd generation)/
making any connections.
iPod touch (2nd generation)/
1
Firmly connect the line output jack of a
iPod touch (1st generation)
portable digital music player (or other
C
iPod nano (5th generation)
component) to the AUDIO IN jack on the
D
iPod nano (4th generation)
back of the unit, using a suitable audio
connecting cable (not supplied).
E
iPhone 4S/iPhone 4
2
Press to turn on the unit.
F
iPhone 3GS/iPhone 3G/
3
Turn the connected component on.
iPhone
4
Play the connected component.
1
Press PUSH on the front of the unit until
The sound from the connected component is
the Docking Tray comes forward.
output from the speakers of this unit.
2
Attach and slide the appropriate Dock
Notes
Holder down in the Docking Tray.
The audio connecting cable required depends
Hold the Docking Tray when attaching the
on the external equipment. Make sure the cable
is correct for the external equipment to be
Dock Holder.
connected.
3
Set your iPod on the Dock connector.
If the volume level is low, adjust the volume of
4
Twist the Docking Tray anti-clockwise to
the unit first. If the volume is still too low,
the horizontal position.
adjust the volume of the connected equipment.
When playing an external component
Conversely, the Docking Tray will not move
connected to the AUDIO IN jack, stop playback
when twisted clockwise.
of your iPod.
Notes
Disconnect the audio connecting cable when
To change the Dock Holder, slide it up and pull
audio-in is not in use.
out. Hold the Docking Tray when pulling the
Dock Holder out.
About App
Attach the Dock Holder for using the iPod in
the horizontal position. Otherwise, the iPod
may fall when the Docking Tray is twisted.
Dedicated Dock App for iPod/iPhone available at
Apple App Store.
To close the Docking Tray
Search for "D-Sappli" and download the free App
1
to find out more about the functions.
Twist the Docking Tray clockwise until it
Notes
is in vertical position.
If the App to link with this unit is not
2
Remove the iPod from the Dock
downloaded to your iPod/iPhone, a pop-up
connector.
message prompting you to download D-Sappli
3
Press PUSH on the front of the unit until
may appear repeatedly.
Deactivate the App's link function to stop the
the Docking Tray is locked.
pop-up message.
To play back
To deactivate the App's link function: Connect
the AC adaptor, and then press / to turn off
Press .
the unit. Remove your iPod/iPhone from the
When using the rechargeable battery with the
Dock connector, and then press and hold
remote commander, press / on the unit, and
VOLUME − and simultaneously for more
then press .
than 2 seconds. (The BATTERY/CHARGE
The iPod begins to play back.
indicator (red) flashes 3 times when
You can operate the connected iPod via this unit
deactivated.)
or the iPod itself.
Repeat the above steps to activate the function.
Notes
(The BATTERY/CHARGE indicator (green)
Remove the case or cover from your iPod
flashes 3 times when activated.)
before setting it in the Docking Tray to ensure a
stable connection.
When placing or removing the iPod, hold the
iPod at the same angle as that of the connector
on this unit, and do not twist or bend the iPod
as it may result in connector damage.
Remove the iPod and lock the Docking Tray of
the unit when transporting it, otherwise a
malfunction may result.
When placing or removing the iPod, hold the
Docking Tray securely.
If the battery of your iPod is extremely low,
charge it for a while before operation.
An iPod touch/iPhone will not work unless it is
turned on. Be sure to turn on the power of the
iPod touch/iPhone before operation.
Sony cannot accept responsibility in the event
that data recorded to an iPod is lost or damaged
when using an iPod connected to this unit.
For details of environmental conditions for
operating your iPod, check the website of Apple
Inc.
Others
Specifications
Section for iPod
Troubleshooting
DC out: 5 V
MAX: 1 A
General
General
Speaker
The power does not turn on when the AC
Approx. 5.0 cm (2 inches) dia. 8 Ω
adaptor is connected.
Input
Make sure the AC adaptor is connected to the wall outlet
AUDIO IN jack (ø 3.5 mm stereo minijack)
firmly.
The power does not turn on when the AC
Power output
10 W + 10 W (at 10% harmonic distortion)
adaptor is disconnected, or the / button
(with AC adaptor)
indicator flashes several times and then the
2 W + 2 W (at 10% harmonic distortion)
power of the unit turns off.
(with rechargeable battery)
The rechargeable battery may be depleted. In this case,
connect to the AC adaptor to charge the battery. (See
Power requirements
"To prepare a power source. " )
Rechargeable battery pack: NH - M15 RDP
The rechargeable battery is depleted.
Battery life
Connect to the AC adaptor to charge the battery.
See "Battery Life" of "Power source" for details.
There is no audio.
External power source
Adjust VOLUME +/− (VOL +/− on the remote
DC IN 14.5V
commander).
Noise is heard.
Dimensions
Ensure that the unit is not in the vicinity of in-use
Approx. 337.0 mm × 108.2 mm × 77.0 mm (w/h/d)
portable phones, etc.
(13
3
/
inches × 4
3
/
inches × 3
1
/
inches)
8
8
8
The two different music sources are mixed
(not including projecting parts and controls)
together during playback.
Mass
Stop playback of your iPod or external component.
Approx. 1.1 kg (2 lb 7 oz)
The BATTERY/CHARGE indicator (red)
Supplied accessories
flashes.
Remote commander (1)
The rechargeable battery is not connected properly, or
AC adaptor (1)
cannot be charged for some reason. Check that the
Dock Holder A/B/C/D/E/F (6)
battery connector is connected firmly; otherwise, replace
the battery.
Design and specifications are subject to change
iPod
without notice.
There is no audio.
Make sure the iPod is connected firmly.
Operation is not performed.
Make sure the iPod is connected firmly.
The iPod does not charge.
Make sure the iPod is connected firmly.
Make sure the AC adaptor is connected firmly.
Audio-in
There is no audio.
Make sure the audio connecting cable is connected
firmly.
The sound is low.
Confirm the volume of the connected external
component.
Remote commander
The remote commander does not function.
Replace the battery in the remote commander with a
new one if it is weak.
Make sure that you are pointing the remote commander
at the remote sensor on the unit.
Remove any obstacles in the path of the remote
commander and the unit.
Make sure the remote sensor is not exposed to strong
light such as direct sunlight or fluorescent lamp light.
Move closer to the unit when using the remote
commander.
If the problem persists, consult your nearest Sony dealer.

Related Manuals for Sony RDP-M15iP


Summary of Contents for Sony RDP-M15iP
- Page 1 Note on the AC adaptor iPod when the power is supplied by the AC the side facing up Use the supplied Sony AC adaptor only. The adaptor. polarity of the plugs of other manufacturers Charging begins when the iPod is connected to may be different.
- Page 2 à la prise AUDIO IN, arrêtez la lecture Tournez le plateau d’accueil vers la droite de votre iPod. Si le problème persiste, consultez votre détaillant Sony le plus proche. Déconnectez le câble de raccordement audio pour le placer en position verticale.