Table of Contents
M P A M U L T I - C H A N N E L P O W E R A M P L I F I E R
MPA 400us
3/2 Channel Mobile Audio Amplifier with 400 Watts Max. Power
Amplificateur audio mobile de 400 watts de puissance maximum à 3/2 canaux
Amplificador Móvil de Áudio de 31 Canales con Potencia Máx. de 400 vatios
Amplificador Móvel de Áudio de 3/2 Canais com Potência Máx. de 400 Watts
Table of Contents

Related Manuals for Blaupunkt MPA400


Summary of Contents for Blaupunkt MPA400
- Page 1 M P A M U L T I - C H A N N E L P O W E R A M P L I F I E R MPA 400us 3/2 Channel Mobile Audio Amplifier with 400 Watts Max. Power Amplificateur audio mobile de 400 watts de puissance maximum à...
-
Page 2: Specifications
Turn on delay time Thermal shutoff temperature (averaged heat-sink exterior temperature) NOTE: DUE TO ONGOING PRODUCT IMPROVEMENTS, DESIGN AND SPECIFICATIONS ARE SUBJECT TO CHANGE WITHOUT ADVANCED NOTICE TO THE CONSUMER OR RETAILER. MPA400 , 3/2 C HANNEL VALUE 3/2 active channels 8.69 x 2.19 x 11.82 inches (220 x 56 x 300mm) - Page 3 MOST important to us are the concerns with safety and the installation process. Since our Blaupunkt retail dealers have the tools and experience for an optimized and safe installation, we always recommend they do the final vehicle integration. But, should you choose to install these products yourself, please take the time to read this manual completely and abide by all precautions.
-
Page 4: Installation
AFETY ONCERNS We always recommend you have your Blaupunkt amplifiers professionally installed but the installation process is often so easy that the average consumer can achieve success with little trouble. Regardless of the person installing, you should be sure to review the following points... -
Page 5: System Planning
YSTEM LANNING Before wiring up an audio system that may not achieve the sound quality you want, be sure to choose a system concept that fits your listening requirements. Basic systems, a receiver with internal 4x20 watts and 4 coax speakers, are adequate for many listeners. - Page 6 EHICLE IRING VEHICLE FUSING For safety purposes, a high current fuse (or circuit breaker) MUST be installed in line with the amplifiers(s) immediately at the battery to prevent vehicle damage should the battery line in advertently shorted to the vehicle chassis. The chart at the right shows the recommended master fuse sizes for an average audio system with noted “rms”...
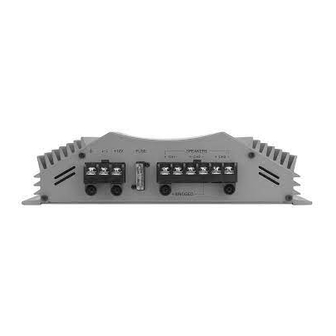
- Page 7 & C NPUTS ONTROLS The inputs and controls for this amplifier are explained in the summaries below and reference the numbered call-outs above. 1.) LOW-PASS CROSSOVER CONTROL (ch 1 & 2) - Once the “crossover frequency setting” is set to “LOW-PASS”, this control adjusts the frequency for which all signals BELOW this setting are passed on to the speakers.
- Page 8 OWER ONNECTIONS 1.) POWER CONNECTIONS - GROUND - This is the high current ground connection to the chassis of the car. It should be fastened to a clean ground connection in the car, capable of handling high current loads and within 3 feet (absolutely no longer than 3 feet).
- Page 9 YSTEM ONFIGURATION Full-Range Full-Range 3 Channel Multi-Mode (Active) This amplifier offers a very unique installation advantage by including 3 independent amplifier channels with 2 active crossover sections. The inputs require only 2 signal leads (left and right) and derive the bass signal from these two. The final installation is most commonly configured with the two stereo channels driving satellite speakers in the flat or high- pass mode for maximum sound pressure level.
- Page 10 YSTEM ONFIGURATION Full-Range Full-Range 2 Channel Dual Subwoofer Mode The largest improvement in sound quality always comes when adding some kind of subwoofer via a dedicated subwoofer amplifier and electronics crossover. The electronic crossover ensures minimal overlap of the bass response with the mid and high frequencies from the other speakers resulting in a more accurate performance compared to conventional coaxials with additional power.
-
Page 11: Shooting Guide
ROUBLE SHOOTING Below is a basic trouble-shooting guide to assist in seeking out and correcting a problem that may occur in the installation process. Although lengthy, this chart cannot address every single problem possible but mainly the ones most common. SYMPTOM No power (power light not on) Power but no sound (power light is on) -
Page 12: Warranty
We shall not be liable for any incidental, consequential, special or punitive damages arising from the sale or use of any Blaupunkt car audio products, whether such claim is in contract or tort. - Page 13 Robert Bosch Corporation Sales Group - Blaupunkt Division 2800 S. 25th Avenue, Broadview, Illinois 60153 U.S.A. http://www.blaupunkt.com Copyright 1998 by the Robert Bosch Corporation No portion of this work may be reproduced in any form without the written consent of the Robert Bosch Corporation...