
Related Manuals for Parkeon Strada PAL

Summary of Contents for Parkeon Strada PAL
- Page 1 Strada PAL Operation manual Brand name: STRADA Ref.504022254_1 Model name: StradaPAL...
-
Page 2: Table Of Contents
Table of Contents ......................... 4 BOUT THIS DOCUMENT ..........................5 ECURITY ..................... 8 RESENTATION OF THE EQUIPMENT 3.1 G ......................8 ENERAL PRESENTATION 3.2 T ....................9 ERMINAL DIMENSIONS AND WEIGHT 3.3 P ..................11 RESENTATION OF THE USER INTERFACE 3.4 P .............. - Page 3 7.14 E ....................56 MPTYING THE BANKNOTE STACKER ......................... 57 ERVICE OPERATIONS 8.1 R ....................57 EPLACING THE TICKET ROLL 8.2 B ........................ 59 ASIC FUNCTIONS 8.3 C ..................61 ORRECTING PAPER JAMS IN THE PRINTER 8.4 C ....................62 HECKING THE BATTERIES VOLTAGE 8.5 R ..................
-
Page 4: About This Document
Parkeon shall not be liable in the event of any changes or incorrect use of the machine other than as described in this document. Refer to the maintenance guide for information on troubleshooting or component replacement. -
Page 5: Security
2. Security Parkeon products are designed to limit the risks for customers and operators with regard to power sources, high temperatures, fires, mechanics, radiations, or chemicals. This product is compliant to the whole of the European Parliament of the CE marking (see below) and to the... - Page 6 Connect the device into an outlet on a circuit different from that to which the receiver is connected. Consult the dealer or an experienced radio/TV technician for help Any changes or modifications to this equipment not expressly approved by Parkeon may cause, harmful interference and void the FCC authorization to operate this equipment.
- Page 7 These elements must be disposed of in accordance with local regulations. IMPORTANT: Parkeon shall not be liable for any modifications made to the terminal or if it used other than as described in this manual.
-
Page 8: Presentation Of The Equipment
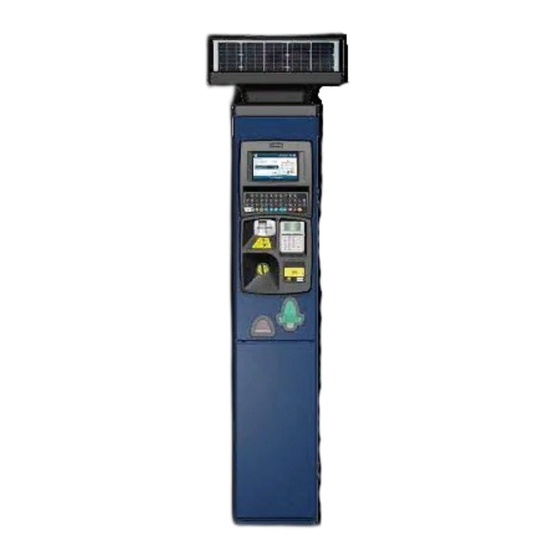
3. Presentation of the equipment 3.1 General presentation The terminal is composed of 5 main zones: a 5W or 16.5 W solar top or antenna cover incorporating an antenna, a zone indicator (9cm or 18cm), a housing with a compartment dedicated to the user interface and maintenance, a quick collection compartment (Transfer, Rapide or Cashless), a floor fixation compartment. -
Page 9: Terminal Dimensions And Weight
3.2 Terminal dimensions and weight The terminal has the following dimensions: Page 9/71... - Page 10 External dimensions The terminal weighs about 90 kg without the battery (the weight may differ depending on the options included). Page 10/71...
-
Page 11: Presentation Of The User Interface
3.3 Presentation of the user interface The following elements are visible on the user interface (1): the colour screen 7" (2), the keyboard (7), the payment zone (3), with: the payment card reader, the numeric keypad, the contactless antenna, the coin slot, the coin bowl, (4), the ticket bowl (5) with banknote slot, the maintenance compartment lock (6). - Page 12 The following elements are visible on the maintenance door: the keyboard card (1), the screen (2), the numeric keypad, the contactless antenna (4) (not visible from the inside of the maintenance door), the coin slot(7), the position of the payment card slot (6), the coin bowl (8), the ticket slot with the key / lock collection interface (5) or the banknote slot and ticket slot (5).
- Page 13 The following elements are visible inside the maintenance compartment: the main board with the solar and modem charger board (1), the payment card reader (2), the selector (3), the escrow (4), the 12V / 27Ah battery with strand (7), the door open detection (8), the ticket stock (9), the printer (10), the banknote reader (11)
-
Page 14: Presentation Of The Rapide Collection Compartment
3.4 Presentation of the Rapide collection compartment The collection compartment is composed of a collection rack (3) equipped with a collection trapdoor (4) with removable coin box (1). A collection light (2) is located on the collection rack and gives indications to the service and maintenance operators on the operation and collection. -
Page 15: Presentation Of The Banknote Reader Collection Compartment
3.5 Presentation of the Banknote reader collection compartment The collection compartment is composed of a collection rack equipped with a collection trapdoor (2) with removable coin box (1) and banknote stacker (4). A collection light (3) is located on the collection rack and gives indications to the service and maintenance operators on the operation and collection. -
Page 16: Presentation Of The Transfer Collection Compartment
3.6 Presentation of the Transfer collection compartment The collection compartment includes: the collection door (1), the paper jam handle (2), the mechanical collection till equipped with a lock (3), the lock of the collection compartment (4), the built-in coin box (not visible from outside). Collection compartment The built-in coin box: allows the storage of cashed coins,... - Page 17 The transfer cassette and the collection trolley: allow the storage of transferred coins, contain the collection key that unlocks the till, are padlocked to ensure the safety of the collection, have a storage capacity of: 5.8 litres for the transfer cassette, approximately 17 litres for the collection trolley.
- Page 18 3.6.2 Presentation of the collection trolley The collection trolley includes: A collection head (4) to allow transfer of the coins from the collection till of the terminal to the trolley through a pipe (5). The collection head is equipped with a slide (1) with the collection key (3) to unlock the collection till and slide it in the collection head to transfer the coins.
-
Page 19: Presentation And Access To The Operating / Maintenance Menu
4. Presentation and access to the operating / maintenance menu 4.1 Sales mode In sales mode, the terminal displays a home screen that differs depending on the sales options and other functions (access to the parking mode as a visitor or other profile, access to the service mode, choice of user type, plate number entry, etc.). -
Page 20: Accessing The Operating / Maintenance Menu
4.3 Accessing the operating / maintenance menu A. Open the maintenance door. B. Press the Maintenance Mode button (1) at the back of the display module. Maintenance Mode button C. The terminal displays the complete main maintenance menu in the language selected when customising the terminal. -
Page 21: Navigating The Operating / Maintenance Menu
4.4 Navigating the operating / maintenance menu Use the integrated keys of the extended keyboard to navigate the operating / maintenance menu. Example of extended keyboard with integrated navigation keys The left and right arrows are used to navigate horizontally through the menus as well as navigate in the menus with their numerical value (going from menu 001 to 002, 003, etc.). -
Page 22: Tickets
4.6 Tickets 4.6.1 Standard parking ticket A parking ticket can be customised. For instance, it can include the following information: the date, the hour of end of parking, the date of end of parking, the ticket price. A resident ticket can also include the RES trigram. 4.6.2 Control ticket A control ticket (or test ticket) can be printed using the programming keyboard (T button) or function 211. -
Page 23: Tools And Consumable
5. Tools and consumable The service operator must use the following tools and consumables: a standard toolbox with at least: sets of screwdrivers (flat, Phillips, Torx), a set of flat keys and sockets (8 to 24), a set of hexagonal keys (Allen), a ratchet, a pair of cutting pliers, a cutter knife. - Page 24 A removable banknote stacker Banknote collection A banknote stacker key A coin box key a transfer cassette a collection trolley Transfer Collection a collection key a coin box key Page 24/71...
-
Page 25: Preliminary Operations
6. Preliminary operations 6.1 Opening / closing the maintenance door with a mechanical lock 6.1.1 Preliminary operations A. Take the maintenance door mechanical key. 6.1.2 Procedure (normal mode) 6.1.2.1 Opening the maintenance door The mechanical lock is equipped with protective flaps to reduce the risk of vandalism. A. -
Page 26: Opening / Closing The Maintenance Door With A Mechanical Lock
6.2.1 Preliminary operations A. Take: the maintenance door mechanical key (degraded mode), the Parkeon door opening tool, to prevent damage to the housing or door paint, a square key, a maintenance card with adapted access rights. 6.2.2 Procedure (normal mode) 6.2.2.1... - Page 27 Opening the maintenance door D. Put the maintenance card in the card slot. When a maintenance card is detected, the terminal switches automatically to maintenance mode. E. If the maintenance card requires the identification code, enter it and validate. F. If necessary, enter the identification code with the user keypad and validate with the V key. When the identification is successfully done, the maintenance menu ("reduced"...
- Page 28 6.2.2.2 Closing the maintenance door A. Select the Padlock command function of the Maintenance menu (function 116). The terminal displays a message prompting maintenance door closing. B. Close the maintenance door and operate the bolts with the square key. When the terminal detects that the door is closed, it is automatically locked. If the maintenance menu is activated, select the Cancel function to trigger the locking function and leave the maintenance menu.
-
Page 29: Opening / Closing The Trapdoor Of The Floor Fixation Compartment
6.3 Opening / closing the trapdoor of the floor fixation compartment 6.3.1 Preliminary operations A. Take a square key. 6.3.2 Procedure (normal mode) 6.3.2.1 Opening the trapdoor of the floor fixation compartment A. Bring forward the slide lock (1) while holding the slide (2) located against the compartment wall. B. - Page 30 B. Bring forward the lock. C. Lower the slide. D. Bring the lock back to its original position to lock the slide. Important: After closing the trapdoor, put its lock in lower position to block access. 6.3.3 Procedure (degraded mode) Contact Parkeon. Page 30/71...
-
Page 31: Powering Off / Up The Equipment
6.4 Powering off / up the equipment Failure to follow the power-off procedure before performing some operations on the terminal may result in the loss of stored data. Do not disconnect the batteries or the battery strands when the terminal is powered. To avoid any data writing issue, wait for a few seconds after the screen is completely off (red LED of the touchscreen controller at the back of the screen off) before operating on the terminal or disconnecting the strands. -
Page 32: Opening / Closing The Transfer Collection Door
C. When the lock can be reached, insert the key (3) and unlock the collection key (4) to access the supports (5). Opening the collection door 6.5.2.2 Closing the collection door A. Close the lower door and perform an anticlockwise quarter turn to lock it. 6.5.3 Procedure (degraded mode) Contact Parkeon. Page 32/71... -
Page 33: Removing The Collection Key From The Slide (Transfer Cassette)
Moving the key introduction end stop allows the removal of the key from the cassette. That way, it is not necessary to have as many cassettes as terminals. This method distinctly lowers the high level of security of the cassette system. Parkeon advises against this method. - Page 34 6.7.2 Procedure Remove the slide end stop to move the key introduction end stop. It is located under the slide, near the pipe fixation. A. Remove the two M3 screws / nuts (3) fixing the end stop (4) to the slide. B.
-
Page 35: Preparing The Transfer Cassette
6.8 Preparing the transfer cassette 6.8.1 Preliminary operations A. Make sure that the transfer cassette is empty. 6.8.2 Procedure A. If the collection key (1) has been removed from the slide (3) of the transfer cassette, the operator must place the key on the slide (4) before collecting (the key must remain on the cassette during the entire collection). -
Page 36: Preparing A Coin Box
6.9 Preparing a coin box 6.9.1 Preliminary operations Non applicable 6.9.2 Procedure A. Arm the "once" system (1) located under the cover. Arming the "once" system B. Check that the light turns grey. C. Put the cover back in place, lock the coin box, and remove the key. Page 36/71... -
Page 37: Preparing A Battery
6.10 Preparing a battery This procedure must be carried out in workshop. 6.10.1 Preliminary operations Non applicable 6.10.2 Procedure A. To connect the 2 terminals, stack as follows (from the outside of the battery): screw, battery terminal, serrated washer, strand terminal, nut with serrated base. -
Page 38: Electronic Money Procedures
7.1.2 Security Parkeon designs its parking terminals to ensure a high level of protection against fraud. Special care must be paid to the various potential risks of fraud and theft. Certain basic precautions must be respected: Always make sure that the cassette is empty and that the "once" opening system is engaged (armament tip of the "once"... - Page 39 C. Turn the key clockwise (3) to unlock the till. Unlocking the till 7.2.2.2 Emptying the till A. Push the locking lever (3) and hold it (5). B. Bring forward (6) the transfer cassette slide (4) to open the cassette and slide the collection till (2). The coins contained in the coin box drop in the transfer cassette.
- Page 40 Closing the till Locking the till Closing the coin box The "once" opening system is armed. The cassette cannot be open again. 7.2.2.4 Removing the transfer cassette and closing the terminal lower door A. Take the cassette off the two supports located in the collection compartment and lift it by its handle. The transfer cassette can weigh up to 25 kg when full.
-
Page 41: Collection By Transfer Cassette (With Trolley)
The ticket slot (1) located on the transfer cassette enables to keep the collection ticket with the cassette that was used to collect the parking terminal. Ticket slot 7.3 Collection by transfer cassette (with trolley) 7.3.1 Preliminary operations A. Make sure that the terminal operates correctly. B. - Page 42 Unlocking the till 7.3.2.2 Emptying the till A. Push the locking lever (3) and hold it. B. Bring forward the collection head slide (4) to open the cassette and slide the collection till (2). The coins contained in the coin box drop in the trolley through the collection head and pipe. C.
- Page 43 7.3.2.3 Closing the coin box A. When the coin box is empty, put the paper jam handle back in its original position. B. Push the locking lever (2) and hold it. C. Slide the collection head slide (3) backward (5) to close the till (1). D.
-
Page 44: Emptying A Transfer Cassette
7.5 Emptying a transfer cassette It is strongly advised to not empty a coin box near a parking terminal. A trolley must be emptied in a safe location (a sorting centre for instance). 7.5.1 Preliminary operations A. Recover a cassette from a collection operator. 7.5.2 Procedure A. -
Page 45: Emptying A Trolley
The collection trolley can then be used for a new collection round. 7.7 Storing the coin box Parkeon recommends vertical storage of the coin boxes. However, horizontal storage is also possible. In the case of horizontal storage, face to face, the handle (1) provides protection against potential shocks to the driving axis (2). -
Page 46: Collecting The Coin Box
7.8 Collecting the coin box 7.8.1 Preliminary operations A. Make sure that the terminal operates correctly. B. Take a prepared and empty coin box. C. If the message MCB collection unauthorised is displayed, it means that the lock was blocked by Parkfolio. - Page 47 The terminal then displays the following menu. Collection menu C. Put the cursor on the Collection function using the Validation button. D. Press the Cancellation button to select the function. The terminal displays a message requesting the collection key. Waiting for collection key E.
- Page 48 With the banknote reader, Put the electronic collection key (1) on the electronic collection key interface located in the tickets bowl (2). Collection key When the key is detected, the collection light turns green and the terminal starts collection. Collection start F.
- Page 49 Opening the collection trapdoor D. Close the collection trapdoor. When the lock is locked and no collection default is present, the collection light turns off and the terminal prints a collection ticket. E. Take the collection ticket from the ticket bowl. If the trapdoor accidentally closes without coin box, the collection light flashes red.
-
Page 50: Emptying A Coin Box (Coins Only Collection)
7.9 Emptying a coin box (Coins only collection) It is strongly advised to not empty a coin box near a parking terminal. A coin box must be emptied in a safe location (a sorting centre for instance). 7.9.1 Preliminary operations A. -
Page 51: Lubricating The Exchangeable Coin Box
7.10 Lubricating the exchangeable coin box This operation is to be performed in a safety workshop or sorting centre. 7.10.1 Preliminary operations Non applicable 7.10.2 Procedure A. The flap and the opening slide of the exchangeable coin box must be lubricated twice a year with a silicon-based lubricant spray. -
Page 52: Collecting The Banknote Stacker
7.12 Collecting the banknote stacker 7.12.1 Preliminary operations A. Make sure that the terminal operates correctly. B. Take an empty stacker. C. If the message MCB collection unauthorised is displayed, it means that the lock was blocked by Parkfolio. Unblocking the lock is possible: with Parkfolio, with function 90 (if a new version of Neops is loaded on the terminal with a different database). - Page 53 The terminal then displays the following menu: Collection menu C. Put the cursor on the Collection function using the Validation button. D. Press the Cancellation button to select the function. The terminal displays a message requesting the collection key. Waiting for collection key E.
- Page 54 When the key is detected, the collection light turns green and the terminal starts collection: Collection start F. Remove the collection key. G. Press simultaneously the cancellation (2) and validation buttons (1). Buttons to enter the collection mode Page 54/71...
- Page 55 7.12.2.2 Replacing the banknote stacker A. Open the collection trapdoor (the coin box flap is locked in closed position) to access the banknote stacker (1). Opening the collection trapdoor B. Remove the banknote stacker located right of the collection trapdoor by pressing on the removal tabs on each side of the stacker.
-
Page 56: Emptying The Banknote Stacker
7.13 Emptying the banknote stacker It is strongly advised to not empty a banknote stacker near a parking terminal. A stacker must be emptied in a safe location (a sorting centre for instance). 7.13.1 Preliminary operations A. Recover a banknote stacker from a collection operator. 7.13.2 Procedure A. -
Page 57: Service Operations
8. Service operations 8.1 Replacing the ticket roll For the ticket count to be accurate: the terminal must be in operation when replacing the ticket roll, Parkeon recommends installing a brand new ticket roll. 8.1.1 Preliminary operations A. Open the maintenance door. - Page 58 The terminal displays the following screen: Paper roll replacement screen K. If the new ticket roll is brand new, validate Yes: the terminal takes the replacement into account and updates the ticket count. To cancel the replacement or if the ticket roll is not brand new, select No and validate. After validation or cancellation of the replacement, the terminal prints a test ticket.
-
Page 59: Basic Functions
8.2 Basic functions Press F on the keyboard to access the maintenance menu. Select the programming function number in the list below, for instance 1 (time setting). Use V to validate. Do not use any other maintenance function number without prior consent from the technical service. 8.2.1 Function 1 - Setting the date and time It is possible to modify all or part of these elements. - Page 60 The screen displays: Setting the warning threshold The setting method depends on the warning threshold requested: For a warning threshold below 500 tickets, directly enter the threshold value (for instance "300"). For a warning threshold above 500 tickets, enter a fictional threshold calculated according to the indications below.
-
Page 61: Correcting Paper Jams In The Printer
The other basic functions are: 8.2.6 Function 95 - Printing the supply voltages 8.2.7 Function 96 - Viewing (and cancelling) the red failure LED 8.2.8 Function 97 - Viewing (and cancelling) the green warning LED Functions 96 and 97 do not allow to cancel failures or warnings coming from the exchangeable coin box. 8.3 Correcting paper jams in the printer 8.3.1 Preliminary operations... -
Page 62: Checking The Batteries Voltage
8.4 Checking the batteries voltage 8.4.1 Procedure Maintenance function 95 triggers the measurement of the batteries when idle and in operation. The terminal asks the operator whether they want to print a supply voltage ticket with the various measurements or just consult them onscreen. Checking the batteries voltage Replace the battery if the operation voltage is below 11.5 V. -
Page 63: Recommendations For The Batteries
In case of accidental contact between the eyes and the electrolyte, rinse immediately with large amounts of water. There is a risk of explosion if batteries recommended by Parkeon are replaced by other batteries. Always replace batteries by batteries certified by Parkeon. -
Page 64: Replacing The Batteries
8.6 Replacing the batteries The battery voltage test does not make it possible to determine whether only one of the batteries is discharged. Always replace both batteries at the same time. 8.6.1 Preliminary operations A. Prepare the batteries in workshop with the battery connection strand the batteries connection strands. B. - Page 65 8.6.2.3 Replacing the floor fixation compartment battery A. Open the trapdoor of the floor fixation compartment. B. Remove the protective cover from the battery located in the floor fixation compartment. Battery protective cover C. Disconnect the adapter strand (1) from the second battery strand (2). D.
-
Page 66: Cleaning
8.7 Cleaning 8.7.1 Preliminary operations Non applicable 8.7.2 Procedure NEVER USE: a wire brush or steel wool, that can damage the surface coating, high-pressure water, that can damage the seals or cause water ingress, solvents on transparent materials (glass, etc.), pressurised air, to avoid deteriorations caused by projection of components (dust, sand, residues, etc.). -
Page 67: Warnings And Failures
9. Warnings and failures 9.1 Green warning LED A green flashing LED is an early warning signal that does not put the parking terminal out of order. It indicates that an intervention is required, for instance low ticket stock or low battery charge. The green warning LED also blinks but less quickly to indicate that the terminal is operational even if the display is in standby mode. -
Page 68: Red Failure Led
9.2 Red failure LED A red flashing LED means that the terminal is out of order. Contact the technical service and provide the following information: failure code, failure message (the list below shows the most frequent), if possible, a control ticket. Display of a failure: It is possible to view the "DIAGNOSTICS"... - Page 69 Communication with the 4702 Test the banknote reader. OMMUNICATION PROBLEM reader failed. Initialisation of the reader 4704 Test the banknote reader. NITIALISATION PROBLEM failed. The reader detected that the OIN BOX FULL PHYSICAL 4705 Collect the banknotes. stacker (coin box) was full. DETECTION Check closing of the collection AD END OF COLLECTION...
-
Page 70: Exchangeable Coin Box Failure Code
9.3 Exchangeable coin box failure code In case of exchangeable coin box failure: If the terminal is equipped with several means of payment, the collection failure LEDs are green. Payment by coins is impossible, but payment by card is available. If payment by coins is the only means of payment available, the respective LEDs are red. - Page 71 ..............................© Copyright November 2017 Parkeon. All rights reserved Parkeon reserves all proprietary rights in the content of this document, the rights on use, reproduction, representation, marketing, translation, adaptation, modification and, more generally, exploitation, by any method, for any and all purposes countries and for the whole duration of protection. Any use of this document requires the prior written permission of Parkeon.