
Related Manuals for Huawei 2288H V5


Summary of Contents for Huawei 2288H V5
- Page 1 2288H V5 Server V100R005 User Guide Issue Date 2018-09-04 HUAWEI TECHNOLOGIES CO., LTD.
- Page 2 Notice The purchased products, services and features are stipulated by the contract made between Huawei and the customer. All or part of the products, services and features described in this document may not be within the purchase scope or the usage scope. Unless otherwise specified in the contract, all statements, information, and recommendations in this document are provided "AS IS"...
-
Page 3: About This Document
V5, and how to install an OS, replace parts, and install, remove, configure, and troubleshoot the server. You can perform installation, removal, power-on, power-off, basic configuration, OS installation, parts replacement, and troubleshooting of the 2288H V5 by referring to this document. Intended Audience... - Page 4 Added TPM specifications. For details, see 13.1 Technical Specifications. l Added built-indrive specifications. For details, see 2.9.1 Drive Slot Numbers. Modified Modified operating temperature specifications. Issue 02 (2017-12-29) This issue is the second official release. Issue 04 (2018-09-04) Copyright © Huawei Technologies Co., Ltd.
- Page 5 2288H V5 Server User Guide About This Document Mode Description Added NVMe SSD configurations. For details, see 2.9.1 Drive Slot Numbers. Issue 01 (2017-08-13) This issue is the first official release. Issue 04 (2018-09-04) Copyright © Huawei Technologies Co., Ltd.
-
Page 6: Table Of Contents
3.5 Installing the Chassis Cover............................51 3.6 Removing a Fan Module.............................. 51 3.7 Removing Cables from a PSU............................52 3.8 Removing the Air Duct..............................55 3.9 Installing the Air Duct..............................57 3.10 Removing the Built-in Drive Assembly........................58 Issue 04 (2018-09-04) Copyright © Huawei Technologies Co., Ltd. - Page 7 5.1 Precautions..................................113 5.2 Front Bezel (Optional)..............................113 5.2.1 Removing the Front Bezel............................113 5.2.2 Installing the Front Bezel............................114 5.3 Drive................................... 116 5.3.1 Removing a SAS/SATA Drive..........................116 5.3.2 Installing a SAS/SATA Drive..........................118 Issue 04 (2018-09-04) Copyright © Huawei Technologies Co., Ltd.
- Page 8 7.10 Internal Cabling for a Server with 25 x 2.5-inch Front Drives (1)................221 7.11 Internal Cabling for a Server with 25 x 2.5-inch Front Drives (2)................226 7.12 Internal Cabling for the Riser Card in I/O Module 3....................230 Issue 04 (2018-09-04) Copyright © Huawei Technologies Co., Ltd.
- Page 9 15.1 Technical Support..............................275 15.2 Product Information Resources..........................276 15.3 Maintenance Tools..............................276 A Appendix............................278 A.1 Logical Structure............................... 278 A.2 RAS Features................................279 A.3 Glossary..................................280 A.4 Acronyms and Abbreviations............................ 282 Issue 04 (2018-09-04) Copyright © Huawei Technologies Co., Ltd. viii...
-
Page 10: Overview
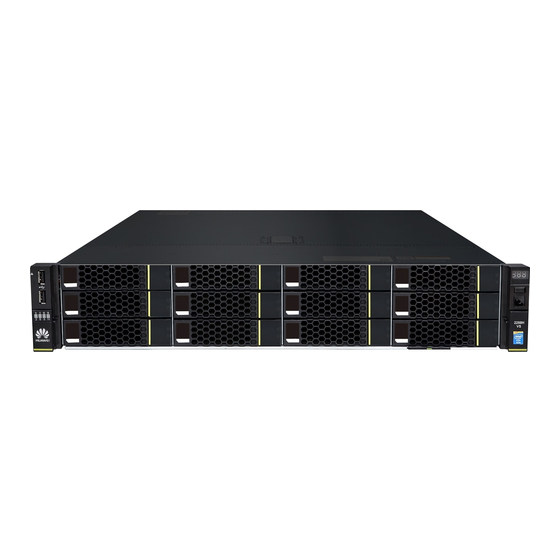
User Guide 1 Overview Overview The Huawei FusionServer 2288H V5 (marked H22H-05 on the nameplate) is a 2U 2-socket rack server developed for Internet, Internet data center (IDC), cloud computing, enterprise, and telecom service applications. The 2288H V5 is ideal for IT core services, cloud computing virtualization, high-performance computing, distributed storage, big data processing, enterprise or telecom service applications, and other complex workloads. -
Page 11: Components
2.10 Riser Cards and PCIe Slots 2.11 Fan Modules 2.12 Physical Structure 2.1 Front Panel Components Figure 2-1 shows the components on the front panel of a server with eight 2.5-inch drives. Issue 04 (2018-09-04) Copyright © Huawei Technologies Co., Ltd. - Page 12 2.5-inch NVMe drives USB 2.0 ports Drive Filler module Label plate with an SN label Figure 2-4 shows the components on the front panel of a server with twenty-four 2.5- inch front drives. Issue 04 (2018-09-04) Copyright © Huawei Technologies Co., Ltd.
- Page 13 NOTE Before connecting an external USB device, check that the USB device functions properly. A server may operate abnormally if an abnormal USB device is connected. Issue 04 (2018-09-04) Copyright © Huawei Technologies Co., Ltd.
-
Page 14: Front Panel Indicators And Buttons
Description SN ID (two characters), which is 21. Material identification code (eight characters), that is, processing code. Vendor code (two characters). The value 10 indicates Huawei and other values indicate outsourcing vendors. Year and month (two characters). l The first character indicates the year. Digits 1 to 9 indicate 2001 to 2009, letters A to H indicate 2010 to 2017, letters J to N indicate 2018 to 2022, and letters P to Y indicate 2023 to 2032. - Page 15 2 Fault diagnostic LED 3 Health indicator 4 UID button/indicator 5 Power button/indicator Figure 2-10 shows the indicators and buttons on the front panel of a server with twenty- four 2.5-inch front drives. Issue 04 (2018-09-04) Copyright © Huawei Technologies Co., Ltd.
- Page 16 Button Fault l ---: The server is operating normally. diagnostic l Error code: A server component is faulty. For details about error codes, see the Huawei Rack Server iBMC Alarm Handling. Issue 04 (2018-09-04) Copyright © Huawei Technologies Co., Ltd.
- Page 17 Before using the NMI button, ensure that the OS has the NMI processing program. Otherwise, the OS may crash. Exercise caution when using this button. Issue 04 (2018-09-04) Copyright © Huawei Technologies Co., Ltd.
-
Page 18: Rear Panel Components
2.3 Rear Panel Components The 2288H V5 has two types of mainboards. One mainboard provides two 10GE and two GE electrical ports. Figure1 Rear panel components 1 shows its rear panel components. - Page 19 Table 2-4 Ports on the rear panel Port Type Quantit Description 10GE 10GBASE-T The 2288H V5 has two types of electrical port mainboards. One mainboard provides two 10GE and two GE electrical ports. The 10GE optical 10GE SFP+ other motherboard provides two 10GE port optical ports and two GE electrical ports.
- Page 20 Auto- 1000 Mbit/s 10/100 Mbit/s port negotiation 1000 Mbit/s (full duplex) NOTE l The LOM ports do not support forcible rates. l The GE LOM electrical port does not support SR-IOV. Issue 04 (2018-09-04) Copyright © Huawei Technologies Co., Ltd.
-
Page 21: Rear Panel Indicators
Connection status l Steady green: The network port is properly optical port indicator/Data connected. transmission status l Blinking green: Data is being transmitted. indicator l Off: The network port is not connected. Issue 04 (2018-09-04) Copyright © Huawei Technologies Co., Ltd. -
Page 22: Flexible Nic
2.5 Flexible NIC Supported flexible NICs include: SM211 (chip: i350) with two GE electrical ports SM210 (chip: 5719)/SM212 (chip: i350) with four GE electrical ports SM233 (chip: X540) with two 10GE electrical ports Issue 04 (2018-09-04) Copyright © Huawei Technologies Co., Ltd. - Page 23 Figure 2-16 SM210/SM212 with four GE electrical ports Figure 2-17 SM233 with two 10GE electrical ports Figure 2-18 SM252 with one 56G IB optical port Figure 2-19 SM251 with two 56G IB optical ports Issue 04 (2018-09-04) Copyright © Huawei Technologies Co., Ltd.
- Page 24 Steady yellow: The logical link is status indicator normal but no data is being transmitted. l Blinking yellow: Data is being transmitted. l Off: No logical link is set up. Issue 04 (2018-09-04) Copyright © Huawei Technologies Co., Ltd.
-
Page 25: Mainboard Components
Blinking green: Data is being indicator transmitted. l Off: The network port is not connected. 2.6 Mainboard Components Figure 2-21 shows the components on the mainboard. Issue 04 (2018-09-04) Copyright © Huawei Technologies Co., Ltd. - Page 26 A 10GE optical port is available on a mainboard that provides two 10GE optical ports and two GE electrical ports. A 10GE electrical port is available on a mainboard that provides two 10GE and two GE electrical ports. Issue 04 (2018-09-04) Copyright © Huawei Technologies Co., Ltd.
-
Page 27: Drive Backplane Connectors
44 RAID controller card connector (RAID CARD/J48) 45 Riser card slot 2 (CPU 2/J155) 2.7 Drive Backplane Connectors Figure 2-22 shows the connectors on the drive backplane connecting eight 2.5-inch drives. Issue 04 (2018-09-04) Copyright © Huawei Technologies Co., Ltd. - Page 28 3.5-inch pass- through drives. Figure 2-24 Backplane connecting twelve 3.5-inch pass-through drives (BOM 03024JMV) 1 Indicator signal cable connector (J30) 2 Mini-SAS HD connector (PORT C/J36) Issue 04 (2018-09-04) Copyright © Huawei Technologies Co., Ltd.
- Page 29 5 Mini-SAS HD connector (PORT 1B/J29) 6 Backplane signal cable connector (J1) 7 Mini-SAS HD connector (PORT 1A/J28) 8 Power connector (J24) Figure 2-27 shows the connectors on the NVMe backplane connecting twenty-four 2.5-inch drives. Issue 04 (2018-09-04) Copyright © Huawei Technologies Co., Ltd.
- Page 30 3.5-inch rear drives. Figure 2-29 Rear drive backplane connecting two 3.5-inch drives (BOM 03022HYE) 1 Mini-SAS HD connector (J3) 2 Indicator signal cable connector (J24) Issue 04 (2018-09-04) Copyright © Huawei Technologies Co., Ltd.
-
Page 31: Dimm Slot Locations
A server provides 24 double data rate 4 (DDR4) DIMM slots. Each processor supports six memory channels and each memory channel supports two DDR4 DIMMs. Figure 2-32 shows the DIMM slots. Issue 04 (2018-09-04) Copyright © Huawei Technologies Co., Ltd. -
Page 32: Drive Slot Numbers And Indicators
2.5-inch drives. Figure 2-33 Server with eight 2.5-inch drives Figure 2-34 shows the drive slot numbers of a server with twelve 3.5-inch drives (expander). Issue 04 (2018-09-04) Copyright © Huawei Technologies Co., Ltd. - Page 33 Figure 2-34 Server with twelve 3.5-inch drives (expander) 1 Figure 2-35 shows the drive slot numbers of a server with twelve 3.5-inch drives (expander). Figure 2-35 Server with twelve 3.5-inch drives (expander) 2 Issue 04 (2018-09-04) Copyright © Huawei Technologies Co., Ltd.
- Page 34 3.5-inch drives (pass- through) 2. Figure 2-37 Server with twelve 3.5-inch drives (pass-through) 2 Figure 2-38 shows the drive slot numbers of a server with twelve 3.5-inch drives (pass- through) 2. Issue 04 (2018-09-04) Copyright © Huawei Technologies Co., Ltd.
- Page 35 2.5-inch NVMe drives. Figure 2-39 Server with 8 x 2.5-inch SAS/SATA + 12 x 2.5-inch NVMe drives Figure 2-40 shows the drive slot numbers of a server with twenty-four 2.5-inch drives (pass-through). Issue 04 (2018-09-04) Copyright © Huawei Technologies Co., Ltd.
- Page 36 Figure 2-41 Server with twenty-four 2.5-inch NVMe SSDs Figure 2-42 shows the drive slot numbers of a server with twenty-five 2.5-inch drives (expander). Figure 2-42 Server with twenty-five 2.5-inch drives (expander) The following table describes the configurations. Issue 04 (2018-09-04) Copyright © Huawei Technologies Co., Ltd.
- Page 37 (pass- through) 2 Server with 12 (SATA or I/O module 3: 4 (NVMe SSD) 4 (SATA twelve 3.5- SAS drive) or SAS RAID inch drives drive) controller (pass- cards through) 3 Issue 04 (2018-09-04) Copyright © Huawei Technologies Co., Ltd.
- Page 38 (expander) Server with 25 (SATA or l I/O module 1: 2 (SATA or twenty-five SAS drive) SAS drive) RAID 2.5-inch controller l I/O module 3: 4 (NVMe drives cards SSD) (expander) Issue 04 (2018-09-04) Copyright © Huawei Technologies Co., Ltd.
-
Page 39: Sas/Sata Drive Indicators
[6]: The drives in slots 0 to 7 can be managed by the RAID controller card or PCH. If the PCH manages the drives, slots 0 to 7 support only SATA drives. 2.9.2 SAS/SATA Drive Indicators Figure 2-43 shows the SAS/SATA drive indicators. Figure 2-43 SAS/SATA drive indicators Issue 04 (2018-09-04) Copyright © Huawei Technologies Co., Ltd. -
Page 40: Nvme Ssd Indicators
RAID status to determine whether the RAID array status is abnormal or whether the drive is faulty. For details about command description, see the Huawei V5 Server RAID Controller Card User Guide. Drive activity indicator l Steady green: The drive is inactive. -
Page 41: Riser Cards And Pcie Slots
2-49, and Figure 2-50 show the riser cards supported by the 2288H V5. Figure 2-45 Riser card 1 (universal) When installed in I/O module 1, this riser card provides slots 1 and 3. When installed in I/O module 2, this riser card provides slots 4 and 6. - Page 42 Figure 2-47 Riser card 3 (dedicated for PCIe SSD cards) When installed in I/O module 1, this card provides slots 1 to 3. When installed in I/O module 2, this card provides slots 4 to 6. Issue 04 (2018-09-04) Copyright © Huawei Technologies Co., Ltd.
- Page 43 When installed in I/O module 1, this card provides slots 1 and 3. When installed in I/O module 2, this card provides slots 4 and 6. Figure 2-49 Riser card 5 Issue 04 (2018-09-04) Copyright © Huawei Technologies Co., Ltd.
- Page 44 Figure 2-50 Riser card 6 Figure 2-51 shows the PCIe slots on the rear panel of the 2288H V5. Figure 2-51 PCIe slots I/O module 1 provides slots 1 to 3, I/O module 2 provides slots 4 to 6, and I/O module 3 provides slots 7 and 8.
- Page 45 1-slot PRM: Port D7/00/ D8/00/0 Half-height half-length l 2-slot PRM: x8 Slot l 1-slot PRM: Port D7/02/ Half-height 00/0 half-length l 2-slot PRM: x8 Port 17/02/ 1D/00/0 contr oller card Issue 04 (2018-09-04) Copyright © Huawei Technologies Co., Ltd.
-
Page 46: Fan Modules
The fan speed can be adjusted. In normal cases, the fans run at the minimum speed. If the server temperature increases, the speed will increase accordingly. Figure 2-52 shows the fan modules. Issue 04 (2018-09-04) Copyright © Huawei Technologies Co., Ltd. -
Page 47: Physical Structure
2288H V5 Server User Guide 2 Components Figure 2-52 Fan modules 2.12 Physical Structure Figure 2-53 shows the components of a server with 12 drives. Figure 2-53 Components Issue 04 (2018-09-04) Copyright © Huawei Technologies Co., Ltd. - Page 48 I/O module 2 I/O module 3 Chassis Supercapacitor tray Air duct Front drive backplane Fan module bracket Fan module Front drive Flexible NIC Mainboard RAID controller card TPM/TCM DIMM Heat sink Issue 04 (2018-09-04) Copyright © Huawei Technologies Co., Ltd.
-
Page 49: Basic Operations
PSUs. To change the value of System State Upon Power Supply, log in to the iBMC WebUI and choose Power > Power Control. Issue 04 (2018-09-04) Copyright © Huawei Technologies Co., Ltd. -
Page 50: Powering Off The Server
2.2 Front Panel Indicators and Buttons. Power off the server using the iBMC WebUI. Log in to the iBMC WebUI. For details, see 4.6.4 Logging In to the iBMC WebUI. Choose Power > Power Control. Issue 04 (2018-09-04) Copyright © Huawei Technologies Co., Ltd. -
Page 51: Removing The Server And Guide Rails
3.3.1 Removing the Server and L-Shaped Guide Rails Step 1 Wear an ESD wrist strap. For details, see 12 Preventing Electrostatic Discharge. Step 2 Power off the server. For details, see 3.2 Powering Off the Server. Issue 04 (2018-09-04) Copyright © Huawei Technologies Co., Ltd. - Page 52 Pull out the server from the cabinet along the guide rails away. See (2) in Figure 3-1. Place the removed server on an ESD platform. Step 5 Remove the screws that secure a guide rail. See Figure 3-2. Issue 04 (2018-09-04) Copyright © Huawei Technologies Co., Ltd.
-
Page 53: Removing The Server And Adjustable Guide Rails
Step 3 Disconnect all power cables and signal cables from the server. Step 4 Remove the server. Loosen the captive screws on the server panel using a screwdriver. See (1) in Figure 3-3. Issue 04 (2018-09-04) Copyright © Huawei Technologies Co., Ltd. - Page 54 Tilt the guide rail to unhook it from the front mounting bar. See (3) in Figure 3-4. Retract the guide rail. See (4) in Figure 3-4. Rilt the guide rail to unhook it from the rear mounting bar, and remove it from the cabinet. Issue 04 (2018-09-04) Copyright © Huawei Technologies Co., Ltd.
-
Page 55: Removing The Server And Holding Rails
Step 3 Disconnect all power cables and signal cables from the server. Step 4 Remove the server. Loosen the captive screws on the server panel using a screwdriver. See (1) in Figure 3-5. Issue 04 (2018-09-04) Copyright © Huawei Technologies Co., Ltd. - Page 56 Pull out the server along the guide rails away from the cabinet. See (2) in Figure 3-5. Lever the latches on both sides upwards and remove the server in the direction of the arrow by holding the server bottom. See Figure 3-6. Issue 04 (2018-09-04) Copyright © Huawei Technologies Co., Ltd.
- Page 57 Step 5 Remove the front end of the holding rail. Hold down the plate on the front end of the holding rail and pull out the hook. See (1) and (2) in Figure 3-7. Issue 04 (2018-09-04) Copyright © Huawei Technologies Co., Ltd.
- Page 58 Remove the front end of the holding rail from the inner side of the mounting bar. See (4) Figure 3-7. Push the plate into the ball bearing rail kit. See (5) in Figure 3-7. Step 6 Remove the rear end of the holding rail. Issue 04 (2018-09-04) Copyright © Huawei Technologies Co., Ltd.
-
Page 59: Removing The Chassis Cover
Figure 3-8 Removing the chassis cover Step 6 Pull out the handle to push the chassis cover backwards. See (2) in Figure 3-8. Step 7 Lift the chassis cover. See (3) in Figure 3-8. ----End Issue 04 (2018-09-04) Copyright © Huawei Technologies Co., Ltd. -
Page 60: Installing The Chassis Cover
Step 6 Power on the server. For details, see 3.1 Powering On the Server. ----End 3.6 Removing a Fan Module Step 1 Wear an ESD wrist strap. For details, see 12 Preventing Electrostatic Discharge. Issue 04 (2018-09-04) Copyright © Huawei Technologies Co., Ltd. -
Page 61: Removing Cables From A Psu
Step 1 Wear an ESD wrist strap. For details, see 12 Preventing Electrostatic Discharge. Step 2 If only one PSU is configured, power off the server. For details, see 3.2 Powering Off the Server. Issue 04 (2018-09-04) Copyright © Huawei Technologies Co., Ltd. - Page 62 Step 3 Undo the velcro strap that secures the power cable. See Figure 3-11. Figure 3-11 Undoing a velcro strap Step 4 Remove the power cable from the PSU to be replaced. See Figure 3-12. Issue 04 (2018-09-04) Copyright © Huawei Technologies Co., Ltd.
- Page 63 Step 3 Hold down the latches above the power cables to be removed using a flat-head screwdriver, and remove the power cables. See (1) and (2) in Figure 3-13. Issue 04 (2018-09-04) Copyright © Huawei Technologies Co., Ltd.
-
Page 64: Removing The Air Duct
Step 6 If the server is configured with a full-height full-length riser card tray, remove it. For details, 3.12 Removing a Riser Card Tray. Step 7 If the server is configured with a supercapacitor, disconnect the supercapacitor from the TFM. Figure 3-14. Issue 04 (2018-09-04) Copyright © Huawei Technologies Co., Ltd. - Page 65 3 Basic Operations Figure 3-14 Removing the supercapacitor cable Step 8 Lift the air duct according to the signs on the air duct. See Figure 3-15. Figure 3-15 Removing the air duct Issue 04 (2018-09-04) Copyright © Huawei Technologies Co., Ltd.
-
Page 66: Installing The Air Duct
Vertically place the air duct downwards. See Figure 3-16. Figure 3-16 Installing the air duct Step 9 If the server is configured with a supercapacitor, connect the supercapacitor to the TFM. See Figure 3-17. Issue 04 (2018-09-04) Copyright © Huawei Technologies Co., Ltd. -
Page 67: Removing The Built-In Drive Assembly
Step 5 Remove the chassis cover. For details, see 3.4 Removing the Chassis Cover. Step 6 Remove all drives from the drive module. For details, see 5.3.1 Removing a SAS/SATA Drive. Issue 04 (2018-09-04) Copyright © Huawei Technologies Co., Ltd. -
Page 68: Installing The Built-In Drive Assembly
3.4 Removing the Chassis Cover. Step 6 Push the plastic structure in the arrow direction on both sides of the chassis, and place the built-in drive tray downwards. See Figure 3-19. Issue 04 (2018-09-04) Copyright © Huawei Technologies Co., Ltd. -
Page 69: Removing A Riser Card Tray
Step 5 Remove the chassis cover. For details, see 3.4 Removing the Chassis Cover. Step 6 Loosen the screw on the riser card tray and lift the riser card tray. See Figure 3-20 Figure 3-21. Issue 04 (2018-09-04) Copyright © Huawei Technologies Co., Ltd. - Page 70 Figure 3-20 Removing a riser card tray (1) Figure 3-21 Removing a riser card tray (2) Step 7 Push the PCIe card latch outwards to release it. See (1) in Figure 3-22. Issue 04 (2018-09-04) Copyright © Huawei Technologies Co., Ltd.
- Page 71 Step 10 Place the removed riser card tray in an ESD bag. Step 11 If a new riser card tray is not installed immediately, install a filler panel. See Figure 3-23 Figure 3-24. Issue 04 (2018-09-04) Copyright © Huawei Technologies Co., Ltd.
- Page 72 2288H V5 Server User Guide 3 Basic Operations Figure 3-23 Installing a filler panel (1) Figure 3-24 Installing a filler panel (2) ----End Issue 04 (2018-09-04) Copyright © Huawei Technologies Co., Ltd.
-
Page 73: Installing A Riser Card Tray
Step 5 Remove the chassis cover. For details, see 3.4 Removing the Chassis Cover. Step 6 Remove the filler panel of the riser card tray if installed. See Figure 3-25 Figure 3-26. Figure 3-25 Removing a filler panel (1) Issue 04 (2018-09-04) Copyright © Huawei Technologies Co., Ltd. - Page 74 5.5 PCIe Card on a Riser Card. Step 9 Install the riser card tray and tighten the screw. See Figure 3-27 Figure 3-28. Figure 3-27 Installing a riser card tray (1) Issue 04 (2018-09-04) Copyright © Huawei Technologies Co., Ltd.
- Page 75 3.1 Powering On the Server. Step 14 Log in to the iBMC WebUI, and check whether the new component is normal. For details, see Huawei Rack Server iBMC User Guide. ----End Issue 04 (2018-09-04) Copyright © Huawei Technologies Co., Ltd.
-
Page 76: Setup
The server draws in cool air from the front of the cabinet and exhausts hot air from the rear. Therefore, the front and rear of the cabinet must be well ventilated for optimal heat dissipation. Figure 4-1 shows the direction of heat dissipation. Issue 04 (2018-09-04) Copyright © Huawei Technologies Co., Ltd. -
Page 77: Temperature And Humidity Requirements
A standard 19-inch cabinet with a depth of more than 1000 mm (39.37 in.). Each server is 2U high and stackable. If space is sufficient, leave a 1U distance between two adjacent servers. Complies with International Electrotechnical Commission 297 (IEC 297). Issue 04 (2018-09-04) Copyright © Huawei Technologies Co., Ltd. -
Page 78: Unpacking The Chassis
4.4 Installing the Server on Guide Rails 4.4.1 Installing with L-Shaped Guide Rails L-shaped guide rails are designed for Huawei cabinets. The 2288H V5 servers are stackable when L-shaped guide rails are used. Step 1 Install the floating nuts. Issue 04 (2018-09-04) - Page 79 Use a floating nut hook to pull the upper end of the floating nut, and fasten it to the upper edge of the square hole. See Figure 4-3. Figure 4-3 Installing a floating nut Issue 04 (2018-09-04) Copyright © Huawei Technologies Co., Ltd.
- Page 80 Step 3 Install the server. Lift the server. This task requires at least two people. Place the server on the guide rails and slide it into the cabinet. See (1) in Figure 4-5. Issue 04 (2018-09-04) Copyright © Huawei Technologies Co., Ltd.
-
Page 81: Installing With Adjustable Guide Rails
Adjustable guide rails are for a cabinet with a depth of 543.5 mm to 848.5 mm (21.40 in. to 33.41 in.) between the front and rear mounting bars. The 2288H V5 servers are not stackable when adjustable guide rails are used. Step 1 Install the adjustable guide rails. - Page 82 Step 2 Install the server. Lift the server. This task requires at least two people. Place the server on the guide rails and slide it into the cabinet. See (1) in Figure 4-7. Issue 04 (2018-09-04) Copyright © Huawei Technologies Co., Ltd.
-
Page 83: Installing With Holding Rails
The holding rails are for a cabinet with a distance of 610 mm to 914 mm (24.02 in. to 35.98 in.) between the front and rear mounting bars. The 2288H V5 servers are stackable onto holding rails. Step 1 Install the holding rails. - Page 84 (Optional) Install an M6 screw in the third square hole at the rear of the holding rail to secure it. See (6) in Figure 4-8. Step 2 Install the server. Pull out the inner rails as far as they will go. See Figure 4-9. Issue 04 (2018-09-04) Copyright © Huawei Technologies Co., Ltd.
- Page 85 Align the screws on the server with the notches on the inner guide rails, push the server inwards until you hear a sound, and ensure that the latches eject and completely block the screws to affix the server to the inner guide rails. See Figure 4-10. Issue 04 (2018-09-04) Copyright © Huawei Technologies Co., Ltd.
- Page 86 Press the release buttons on both sides and push the server into the cabinet along the holding rails. See (1) and (2) in Figure 4-11. Figure 4-11 Pushing the server into the cabinet along the holding rails Issue 04 (2018-09-04) Copyright © Huawei Technologies Co., Ltd.
- Page 87 Figure 4-12. Figure 4-12 Securing the server Step 3 Install the cable management arm (CMA). Insert the support lever into both left and right outer rails. See (1) in Figure 4-13. Issue 04 (2018-09-04) Copyright © Huawei Technologies Co., Ltd.
-
Page 88: Connecting External Cables
4-13. Step 4 Connect power cables to the server and power on the server. Connect a network cable, a VGA cable, or USB devices as required. ----End 4.5 Connecting External Cables Issue 04 (2018-09-04) Copyright © Huawei Technologies Co., Ltd. -
Page 89: Cabling Overview
Determine overhead cabling and underfloor cabling for service data cables based on specific conditions of the equipment room. Place the connectors of all service data cables at the bottom of the cabinet so that the connectors are difficult to reach. Issue 04 (2018-09-04) Copyright © Huawei Technologies Co., Ltd. -
Page 90: Connecting Cables To A Mouse, Keyboard, And Vga Port
A network cable with the shielding function is recommended. According to professional EMC test results, when static is generated, a network cable without the shielding function can cause the system to suspend or restart. Issue 04 (2018-09-04) Copyright © Huawei Technologies Co., Ltd. - Page 91 Power on the device, and ping the peer device connected by the new network cable. If the peer device cannot be pinged, check whether the network cable is damaged or the connectors are securely connected. Step 9 Bind the new network cable with other cables. Issue 04 (2018-09-04) Copyright © Huawei Technologies Co., Ltd.
-
Page 92: Connecting A Cable To A 10Ge Optical Port
Insert the optical module into the optical port. See (1) in Figure 4-16. Close the latch on the optical module to secure it. See (2) in Figure 4-16. Insert the optical cable into the optical module. See (3) in Figure 4-16. Issue 04 (2018-09-04) Copyright © Huawei Technologies Co., Ltd. - Page 93 Remove the old SFP+ cable. Gently push the cable connector inwards and pull the latch out to remove the SFP+ cable. See Figure 4-17. NOTICE Do not directly pull out the latch. Issue 04 (2018-09-04) Copyright © Huawei Technologies Co., Ltd.
- Page 94 If the peer device cannot be pinged, check whether the cable is intact or the connectors are securely connected. Issue 04 (2018-09-04) Copyright © Huawei Technologies Co., Ltd.
-
Page 95: Connecting A 56G Ib Cable
Remove the old 56G IB cable. Release the latch and remove the cable. See Figure 4-19. In this section, an IB NIC with two 56G ports is used as an example for illustration. Issue 04 (2018-09-04) Copyright © Huawei Technologies Co., Ltd. - Page 96 Remove the dust-proof cap on the port, and insert the cable connector into the port. See Figure 4-20. NOTE When you hear a click and the cable cannot be pulled out, the connector is secured. Figure 4-20 Connecting a 56G IB cable Issue 04 (2018-09-04) Copyright © Huawei Technologies Co., Ltd.
-
Page 97: Connecting A Usb Device
You can set it as the iBMC serial port by using the iBMC CLI. The serial port can be used as: System serial port to monitor the OS status iBMC serial port for debugging and fault locating Issue 04 (2018-09-04) Copyright © Huawei Technologies Co., Ltd. -
Page 98: Connecting Cables To A Psu
Connecting a Power Cable to an AC PSU Step 1 Wear an ESD wrist strap. For details, see 12 Preventing Electrostatic Discharge. Step 2 Connect the power cable to the PSU. See Figure 4-23. Issue 04 (2018-09-04) Copyright © Huawei Technologies Co., Ltd. - Page 99 2288H V5 Server User Guide 4 Setup Figure 4-23 Connecting a power cable Step 3 Secure the power cable using a velcro strap. See Figure 4-24. Issue 04 (2018-09-04) Copyright © Huawei Technologies Co., Ltd.
- Page 100 Loosen and remove the screw from the ground hole, connect one end (OT terminal) of the ground cable to the removed screw, install the screw on the ground hole, and tighten the screw. See (2) in Figure 4-25. Issue 04 (2018-09-04) Copyright © Huawei Technologies Co., Ltd.
-
Page 101: Verifying Cable Connections
Ground cable The 2288H V5 server does not provide a separate ground port. l In an AC or HVDC environment, the power cables of AC PSUs are grounded. Ensure that the power cables are in good contact. -
Page 102: Default Data
User name: Administrator l Password: Admin@9000 BIOS data Password: Admin@9000 iBMC U-Boot Password: Admin@9000 data 4.6.2 Configuration Process Figure 4-26 shows the initial configuration process of the 2288H V5. Issue 04 (2018-09-04) Copyright © Huawei Technologies Co., Ltd. - Page 103 Check the server. l Check that no alarm is generated for the server. Change the initial l Change the iBMC user name and password for the server. passwords. l Change the U-Boot password. Issue 04 (2018-09-04) Copyright © Huawei Technologies Co., Ltd.
-
Page 104: Setting The Management Network Port Ip Address
BIOS setup utility. NOTE l To go to the Front Page, press F11 or F3. l To go to PXE, press F12. l To go to the Smart Provisioning GUI, press F6. Issue 04 (2018-09-04) Copyright © Huawei Technologies Co., Ltd. - Page 105 The system will be locked if incorrect passwords are entered three consecutive times. Restart the server to unlock it. Step 7 Choose Advanced > IPMI iBMC Configuration, and press Enter. The IPMI iBMC Configuration screen is displayed. See Figure 4-28. Issue 04 (2018-09-04) Copyright © Huawei Technologies Co., Ltd.
- Page 106 Figure 4-28 IPMI iBMC Configuration Step 8 Select iBMC Configuration and press Enter. The iBMC Configuration screen displayed shows the IP address of the iBMC network port. Figure 4-29. Figure 4-29 iBMC Configuration Issue 04 (2018-09-04) Copyright © Huawei Technologies Co., Ltd.
-
Page 107: Logging In To The Ibmc Webui
If "There is a problem with this website's security certificate" is displayed, click Continue to this website (not recommended). l If the Security Alert dialog box indicating a certificate error is displayed, click Yes. Issue 04 (2018-09-04) Copyright © Huawei Technologies Co., Ltd. -
Page 108: Checking The Server
----End 4.6.5 Checking the Server There are two methods available for checking the 2288H V5. Use the iBMC CLI or the iBMC WebUI based on the actual situation. For details about CLI commands, see the Huawei Rack Server iBMC User Guide. - Page 109 For details, see 4.6.6 Changing Initial Passwords. Choose System > Firmware Upgrade, and view the version information, as shown Figure 4-33. Check that the 2288H V5 versions meet site requirements. Issue 04 (2018-09-04) Copyright © Huawei Technologies Co., Ltd.
- Page 110 The SSH service is enabled by default. If the SSH service is disabled, enable it by choosing Configuration > Services on the iBMC WebUI. View the 2288H V5 version information. Check that the 2288H V5 versions meet site requirements. iBMC:/->ipmcget -d ver ------------------- iBMC INFO ------------------- IPMC CPU: Hi1710 IPMI Version: 2.0...
-
Page 111: Changing Initial Passwords
CPLD Version: complex programmable logical device (CPLD) version of the 2288H V5 BIOS Version: BIOS version of the 2288H V5 Active PME Version: active iBMC version of the 2288H V5 Backup PME Version: backup iBMC version of the 2288H V5 Query the health status of the 2288H V5. - Page 112 Contains at least one space or one of the following special characters: `~!@#$%^&*()-_=+\|[{}];:'",<.>/? Contains at least two types of the following characters: – Lowercase letters: a to z – Uppercase letters: A to Z – Digits: 0 to 9 Issue 04 (2018-09-04) Copyright © Huawei Technologies Co., Ltd.
- Page 113 Un-Protected 1 sectors Erasing Flash..done Erased 1 sectors Writing to Flash... done . done Protected 1 sectors password be changed successfully. Step 10 Run the following command to exit U-Boot: Issue 04 (2018-09-04) Copyright © Huawei Technologies Co., Ltd.
-
Page 114: Configuring Raid
The actual information may differ. Step 4 Configure a RAID array. The RAID configuration method varies according to the RAID controller card model. For details, see the Huawei V5 Server RAID Controller Card User Guide. ----End 4.6.8 Configuring the BIOS Figure 4-37 shows the process for configuring the BIOS. - Page 115 Figure 4-38. NOTE l To go to the front page, press F11 or F3. l To go to PXE, press F12. l To go to the Smart Provisioning GUI, press F6. Issue 04 (2018-09-04) Copyright © Huawei Technologies Co., Ltd.
- Page 116 The system will be locked if incorrect passwords are entered three consecutive times. Restart the server to unlock it. ----End Set the server boot priority. Step 1 Select Boot. The Boot screen is displayed, as shown in Figure 4-39. Issue 04 (2018-09-04) Copyright © Huawei Technologies Co., Ltd.
- Page 117 Step 5 Select a boot option and press F5 or F6 to change the boot order. Press F5 to move a boot option down. Press F6 to move a boot option up. NOTE The server will boot in the order displayed. ----End Set the PXE. Issue 04 (2018-09-04) Copyright © Huawei Technologies Co., Ltd.
- Page 118 If there are multiple boot devices of the same type, you can configure the boot sequence. The following uses PXE as an example. For details about setting other types of devices as boot options, see the Huawei Server Purley Platform BIOS Parameter Reference. Step 1 Choose Advanced > PXE Configuration, and press Enter.
- Page 119 If Simple Password is set to Enabled, password complexity check will not be performed. However, the password must still contain 8 to 16 characters. Step 3 Press F10. The Save Changes&Exit dialog box is displayed. Step 4 Select Yes and press Enter. ----End Issue 04 (2018-09-04) Copyright © Huawei Technologies Co., Ltd.
-
Page 120: Installing An Os
Huawei Server Compatibility Checker to check compatible OSs. The OS installation method varies according to the OS type. For details about the installation procedure, see the Huawei Server OS Installation Guide. Issue 04 (2018-09-04) Copyright © Huawei Technologies Co., Ltd. -
Page 121: Optional Part Installation
After parts replacement, upgrade the software, firmware, and CPLDs of the new components to either the version in the customer environment (recommended) or to the latest version. For details, see the Huawei Rack Server Upgrade Guide (iBMC) Huawei Server Firmware Upgrade Guide. -
Page 122: Precautions
See Figure 5-1. NOTE The front bezel is unlocked when delivered, and the key is in the inner side of the front bezel. Figure 5-1 Unlocking the front bezel Issue 04 (2018-09-04) Copyright © Huawei Technologies Co., Ltd. -
Page 123: Installing The Front Bezel
Step 2 Hook the front bezel onto the side of the left mounting ear, and press the button to secure it to the chassis. See Figure 5-3. NOTE The front bezel is optional and can be selected as required. Issue 04 (2018-09-04) Copyright © Huawei Technologies Co., Ltd. - Page 124 5 Optional Part Installation Figure 5-3 Installing the front bezel Step 3 Lock the front bezel by turning the key counterclockwise and remove the key. See Figure 5-4. Figure 5-4 Locking the front bezel Issue 04 (2018-09-04) Copyright © Huawei Technologies Co., Ltd.
-
Page 125: Drive
Install the chassis cover within 3 minutes. Remove the chassis cover. For details, see 3.4 Removing the Chassis Cover. Open the handles of the built-in drive module. See Figure 5-5. Issue 04 (2018-09-04) Copyright © Huawei Technologies Co., Ltd. - Page 126 If a drive is frequently removed and installed in an interval shorter than 30 seconds, there are risks that the drive cannot be identified. Step 6 Place the removed drive into an ESD bag. Issue 04 (2018-09-04) Copyright © Huawei Technologies Co., Ltd.
-
Page 127: Installing A Sas/Sata Drive
Open the handles of the built-in drive module. See Figure 5-7. Figure 5-7 Opening the handles of the built-in drive module Step 4 Remove the drive filler using the same method for removing a drive. Issue 04 (2018-09-04) Copyright © Huawei Technologies Co., Ltd. - Page 128 Close the handles of the built-in drive module. See Figure 5-9. Figure 5-9 Closing the handles of the built-in drive module Install the chassis cover. For details, see 3.5 Installing the Chassis Cover. Issue 04 (2018-09-04) Copyright © Huawei Technologies Co., Ltd.
-
Page 129: Removing An Nvme Ssd
If the .NET Framework version is 2.0 or 3.5, double-click the HioadmGUI_DotNet_2.0.exe file in the tool installation directory. If the .NET Framework version is 4.0 or 4.5, double-click the HioadmGUI_DotNet_4.0.exe file in the tool installation directory. Figure 5-10 Basic information Issue 04 (2018-09-04) Copyright © Huawei Technologies Co., Ltd. - Page 130 Upgrade the kernel of RHEL 7.3 to kernel-3.10.0-514.26.2.e17.x86_64 or later. Log in to the server whose OS kernel is to be upgraded as root. Check the current kernel version. uname -a Issue 04 (2018-09-04) Copyright © Huawei Technologies Co., Ltd.
- Page 131 Between the added content and its preceding content, a space is required and no line feed is allowed, as shown in Figure 5-13. Figure 5-13 Setting a kernel parameter Press Esc. Enter :wq to save the change and exit. Issue 04 (2018-09-04) Copyright © Huawei Technologies Co., Ltd.
- Page 132 With twelve 2.5- 3A:00.0 3B:00.0 inch front NVMe 3A:01.0 3C:00.0 SSDs 3A:02.0 3D:00.0 3A:03.0 3E:00.0 5D:00.0 5E:00.0 5D:01.0 5F:00.0 85:00.0 86:00.0 85:01.0 87:00.0 85:02.0 88:00.0 85:03.0 89:00.0 AE:02.0 AF:00.0 AE:03.0 B0:00.0 Issue 04 (2018-09-04) Copyright © Huawei Technologies Co., Ltd.
- Page 133 Step 6 If a file system is mounted to the NVMe SSD, unmount it. umount /dev/NVMe SSD drive letter Step 7 Query the mapping between server slot numbers and slot IDs on the OS. For details, see Table 5-2. Issue 04 (2018-09-04) Copyright © Huawei Technologies Co., Ltd.
- Page 134 You do not need to modify the a8 register value when 24 x 2.5-inch NVMe SSDs are configured. You can skip this step. l If the value of the register is not restored to the original one, the hot insertion of the NVMe SSD may be abnormal. Issue 04 (2018-09-04) Copyright © Huawei Technologies Co., Ltd.
-
Page 135: Installing An Nvme Ssd
5.3.4 Installing an NVMe SSD Step 1 Install the NVMe SSD driver. When Huawei series NVMe SSDs are used, to ensure the stable running of NVMe SSDs, you are advised to install the Huawei-developed NVMe SSD drive. For details about the... -
Page 136: Psu
To install an AC PSU, perform the following steps: Step 1 Wear an ESD wrist strap. For details, see 12 Preventing Electrostatic Discharge. Step 2 Remove the PSU filler. See Figure 5-17. Issue 04 (2018-09-04) Copyright © Huawei Technologies Co., Ltd. - Page 137 Step 3 Take a spare AC PSU out of its ESD bag. Step 4 Push the spare AC PSU along the guide rails into the slot until the PSU clicks into place. See Figure 5-18. Figure 5-18 Installing a PSU Issue 04 (2018-09-04) Copyright © Huawei Technologies Co., Ltd.
- Page 138 Step 5 Connect the power cable to the PSU. See Figure 5-19. Figure 5-19 Connecting a power cable Step 6 Secure the power cable using a velcro strap. See Figure 5-20. Issue 04 (2018-09-04) Copyright © Huawei Technologies Co., Ltd.
-
Page 139: Dc Psu
To install a DC PSU, perform the following steps: Step 1 Wear an ESD wrist strap. For details, see 12 Preventing Electrostatic Discharge. Step 2 Remove the PSU filler panel. See Figure 5-21. Issue 04 (2018-09-04) Copyright © Huawei Technologies Co., Ltd. - Page 140 Step 4 Push the spare PSU along the guide rails into a slot until the PSU clicks into place. See Figure 5-22. Figure 5-22 Installing a PSU Step 5 Connect cables to a DC PSU. Issue 04 (2018-09-04) Copyright © Huawei Technologies Co., Ltd.
-
Page 141: Pcie Card On A Riser Card
Step 7 Take a spare PCIe card out of its ESD bag. Step 8 Remove the PCIe card filler panel from the riser card. See (1) and (2) in Figure 5-24. Issue 04 (2018-09-04) Copyright © Huawei Technologies Co., Ltd. - Page 142 Figure 5-25 Installing a PCIe card on a riser card Step 11 Some GPUs need to connect to dedicated power cables. If the PCIe card is a GPU, select a power cable connection method based on the GPU model. Issue 04 (2018-09-04) Copyright © Huawei Technologies Co., Ltd.
- Page 143 3.1 Powering On the Server. Step 17 Log in to the iBMC WebUI, and check whether the new component is normal. For details, see Huawei Rack Server iBMC User Guide. ----End Issue 04 (2018-09-04) Copyright © Huawei Technologies Co., Ltd.
-
Page 144: Dvd Drive
Step 9 Take a spare DVD drive out of its ESD bag. Step 10 Tighten two M2 flat-head screws using the Phillips screwdriver to secure the plastic latch to the DVD drive. See (1) in Figure 5-28. Issue 04 (2018-09-04) Copyright © Huawei Technologies Co., Ltd. - Page 145 Step 11 Insert the DVD drive into the support. See (2) in Figure 5-28. Step 12 Connect the cables to the DVD drive. See (3) in Figure 5-28. Step 13 Install all fan module brackets in the chassis. See Figure 5-29. Issue 04 (2018-09-04) Copyright © Huawei Technologies Co., Ltd.
- Page 146 Step 14 Insert the fan module along the guide rails into the slot until you hear a click. Check that the fan cable connector is securely inserted into the mainboard connector. See Figure 5-30. Issue 04 (2018-09-04) Copyright © Huawei Technologies Co., Ltd.
-
Page 147: Built-In Usb Flash Drive
8 and 24 drives, the USB flash drive can be installed in the USB 3.0 port on the front panel. To install the built-in USB flash drive, perform the following steps: Issue 04 (2018-09-04) Copyright © Huawei Technologies Co., Ltd. - Page 148 Step 7 Determine the position of the USB port on the mainboard. See Figure 5-31. Figure 5-31 USB port position Step 8 Insert the USB flash drive into the USB port. See Figure 5-32. Figure 5-32 Installing the USB flash drive Issue 04 (2018-09-04) Copyright © Huawei Technologies Co., Ltd.
-
Page 149: Screw-In Raid Controller Card
Step 8 If a supercapacitor is required, install it. For details, see 5.11 Supercapacitor. Step 9 Determine the position for installing the RAID controller card on the mainboard. See Figure 5-33. Figure 5-33 Position of the RAID controller card Issue 04 (2018-09-04) Copyright © Huawei Technologies Co., Ltd. -
Page 150: Avago Sas3004Imr Raid Controller Card
5.9 Avago SAS3004iMR RAID Controller Card To install the Avago SAS3004iMR RAID controller card, perform the following steps: Step 1 Wear an ESD wrist strap. For details, see 12 Preventing Electrostatic Discharge. Issue 04 (2018-09-04) Copyright © Huawei Technologies Co., Ltd. -
Page 151: Ssd Module
Step 3 Open the handle that secures the M.2 SSD module, push the module into a slot in the Avago SAS3004iMR RAID controller card, and close the handle. See Figure 5-35. Issue 04 (2018-09-04) Copyright © Huawei Technologies Co., Ltd. -
Page 152: Supercapacitor
Step 6 Take a spare supercapacitor out of its ESD bag. Step 7 Place the supercapacitor downwards and exert even force to install it in the tray. Ensure that the supercapacitor is secured by the latches. See Figure 5-36. Issue 04 (2018-09-04) Copyright © Huawei Technologies Co., Ltd. - Page 153 2288H V5 Server User Guide 5 Optional Part Installation Figure 5-36 Installing a supercapacitor Step 8 Secure the supercapacitor to the air duct. See Figure 5-37. Issue 04 (2018-09-04) Copyright © Huawei Technologies Co., Ltd.
- Page 154 Step 10 Hold down the latches on the cables to the RAID controller card, and remove the cables from the RAID controller card. For details, see 7 Internal Cabling. Step 11 Loosen the screws on the RAID controller card. See (1) in Figure 5-38. Issue 04 (2018-09-04) Copyright © Huawei Technologies Co., Ltd.
- Page 155 Step 12 Slowly lift the RAID controller card upwards away from the connector on the mainboard. See (2) in Figure 5-38. Step 13 Insert the trans flash module (TFM) vertically into the RAID controller card. See (1) and (2) Figure 5-39. Issue 04 (2018-09-04) Copyright © Huawei Technologies Co., Ltd.
- Page 156 3.1 Powering On the Server. Step 21 Log in to the iBMC WebUI, and check whether the new component is normal. For details, see Huawei Rack Server iBMC User Guide. ----End Issue 04 (2018-09-04) Copyright © Huawei Technologies Co., Ltd.
-
Page 157: Cpu
To install a CPU, perform the following steps: NOTICE l Only personnel authorized by Huawei are allowed to install CPUs. l Do not wear ESD gloves because they may damage the pins on the CPU socket. l CPUs in the same server must be of the same model. - Page 158 Ensure that the CPU corner marked with a triangle is in the corner of the carrier with a triangular hole. Figure 5-41 Installing one edge of a CPU Step 12 Bend the other edge of the CPU carrier in the direction of the arrow. See Figure 5-42. Issue 04 (2018-09-04) Copyright © Huawei Technologies Co., Ltd.
- Page 159 The thermal compound layer is as thick as a piece of common paper. Figure 5-44 shows the smeared thermal compound layer. Ensure that the thermal compound is evenly and fully painted. Issue 04 (2018-09-04) Copyright © Huawei Technologies Co., Ltd.
- Page 160 Step 16 Install the CPU carrier on the heat sink and ensure that all positioning pins have been inserted. Figure 5-45. Ensure that the CPU corner marked with a triangle is in the notched corner of the heat sink Issue 04 (2018-09-04) Copyright © Huawei Technologies Co., Ltd.
- Page 161 Figure 5-45 Installing a CPU carrier Step 17 Place the heat sink on a work surface and check that the CPU carrier is securely installed. Press down to secure any raised parts. See Figure 5-46. Issue 04 (2018-09-04) Copyright © Huawei Technologies Co., Ltd.
- Page 162 2288H V5 Server User Guide 5 Optional Part Installation Figure 5-46 Checking the positioning pins Step 18 Remove the CPU protective cover. See Figure 5-47. Figure 5-47 Removing a CPU protective cover Issue 04 (2018-09-04) Copyright © Huawei Technologies Co., Ltd.
- Page 163 If a CPU socket has bent pins or contains foreign matter, or the bonding pad is damaged, stop the installation and contact Huawei technical support. Step 20 Align the two diagonal holes of the heat sink with the positioning pins on the CPU socket and gently position the heat sink in place.
-
Page 164: Dimm
– The lowest of the maximum operating speeds for selected memory configurations (See Maximum operating speed in the following tables.) Table 5-3 RDIMM parameters Item Value Rank Dual rank Rated speed (MT/s) 2666 Issue 04 (2018-09-04) Copyright © Huawei Technologies Co., Ltd. -
Page 165: Memory Subsystem Architecture
Note: The maximum number of DIMMs is based on 2-CPU configuration. If the server has only one CPU, the maximum number of DIMMs is half the value in this table. 5.13.2 Memory Subsystem Architecture The 2288H V5 provides 24 DDR4 DIMM slots. Each CPU supports six channels. Table 5-5 lists channels for each CPU. - Page 166 DIMM010(B) DIMM011(H) DIMM020(C) DIMM021(I) DIMM030(D) DIMM031(J) DIMM040(E) DIMM041(K) DIMM050(F) DIMM051(L) CPU 2 DIMM100(A) DIMM101(G) DIMM110(B) DIMM111(H) DIMM120(C) DIMM121(I) DIMM130(D) DIMM131(J) DIMM140(E) DIMM141(K) DIMM150(F) DIMM151(L) Figure 5-49 shows the DIMM slot locations. Issue 04 (2018-09-04) Copyright © Huawei Technologies Co., Ltd.
- Page 167 Unbalanced DIMM configuration for channels: Five, seven, nine, ten, or eleven DIMMs are configured for a processor. Unbalanced DIMM configuration for processors: Different number of DIMMs are configured for the processors. Issue 04 (2018-09-04) Copyright © Huawei Technologies Co., Ltd.
-
Page 168: Dimm Ranks
A dual-rank DIMM has two single-rank DIMMs on the same module, and only one rank is accessible at a time. A quad-rank DIMM has two dual-rank DIMMs on the same module, and only one rank is accessible at a time. Issue 04 (2018-09-04) Copyright © Huawei Technologies Co., Ltd. -
Page 169: Dimm Identification
16 GB l 32 GB l 64 GB Rank l 1R: single-rank l 2R: dual-rank l 4R: quad-rank Data width on DRAM l x4: 4-bit l x8: 8-bit Memory generation PC4: DDR4 Issue 04 (2018-09-04) Copyright © Huawei Technologies Co., Ltd. -
Page 170: Memory Protection
Install DIMMs in either channels 1 and 2, or channels 3 and 4. The installed DIMMs must be of the same size and organization. For a multi-CPU configuration, each CPU must have a valid memory mirroring configuration. Issue 04 (2018-09-04) Copyright © Huawei Technologies Co., Ltd. -
Page 171: Installing A Dimm
The two retaining clips pop up into place automatically. NOTE Do not touch the edge connector on a DIMM with bare hands. Before inserting a DIMM, ensure that the edge connector is not polluted. Issue 04 (2018-09-04) Copyright © Huawei Technologies Co., Ltd. -
Page 172: Tpm/Tcm
Before removing the TPM/TCM, check whether some TPM/TCM functions have been set on the BIOS. If yes, you need to set these functions again after replacing the TPM/ TCM. For details, see the Huawei Server Purley Platform BIOS Parameter Reference. Issue 04 (2018-09-04) -
Page 173: Installing A Tpm/Tcm
Step 7 Determine the port for installing the TPM/TCM. See Figure 5-55. Figure 5-55 TPM/TCM port Step 8 Insert the TPM/TCM vertically downwards into the TPM/TCM port on the mainboard. See (1) in Figure 5-56. Issue 04 (2018-09-04) Copyright © Huawei Technologies Co., Ltd. -
Page 174: Enabling The Tpm/Tcm
Step 3 Select TPM Operation and press Enter. Step 4 Select Enable. Step 5 Press F10. The Exit Saving changes? dialog box is displayed. Step 6 Select Yes and press Enter. Issue 04 (2018-09-04) Copyright © Huawei Technologies Co., Ltd. -
Page 175: Flexible Nic
Step 5 Remove the chassis cover. For details, see 3.4 Removing the Chassis Cover. Step 6 Remove the drive module (see Figure 5-57) or riser card module (see 3.12 Removing a Riser Card Tray) above the NIC. Issue 04 (2018-09-04) Copyright © Huawei Technologies Co., Ltd. - Page 176 2288H V5 Server User Guide 5 Optional Part Installation Figure 5-57 Removing the rear drive module Step 7 Remove the NIC filler panel. See Figure 5-58. Issue 04 (2018-09-04) Copyright © Huawei Technologies Co., Ltd.
- Page 177 Step 9 Use the Phillips screwdriver to install the NIC panel removed from the NIC to be replaced on the new NIC. Step 10 Push the NIC horizontally into the chassis to have the NIC connected to the connectors on the mainboard. See (1) in Figure 5-59. Issue 04 (2018-09-04) Copyright © Huawei Technologies Co., Ltd.
-
Page 178: Rear Drive Module
Huawei Rack Server iBMC User Guide. ----End 5.16 Rear Drive Module To install a rear drive module, perform the following steps: Step 1 Wear an ESD wrist strap. For details, see 12 Preventing Electrostatic Discharge. Issue 04 (2018-09-04) Copyright © Huawei Technologies Co., Ltd. - Page 179 3.1 Powering On the Server. Step 14 Log in to the iBMC WebUI, and check whether the new component is normal. For details, see Huawei Rack Server iBMC User Guide. ----End Issue 04 (2018-09-04) Copyright © Huawei Technologies Co., Ltd.
-
Page 180: Left Mounting Ear
Step 11 Tighten the screws. See (4) in Figure 5-61. Step 12 Install the air duct or the built-in drive assembly. For details, see 3.9 Installing the Air Duct 3.11 Installing the Built-in Drive Assembly. Issue 04 (2018-09-04) Copyright © Huawei Technologies Co., Ltd. -
Page 181: Right Mounting Ear
Step 7 Take a spare right mounting ear out of its ESD bag. Step 8 Route the mounting ear signal cable through the chassis in the arrow direction. See (1) in Figure 5-62. Issue 04 (2018-09-04) Copyright © Huawei Technologies Co., Ltd. - Page 182 Step 17 Power on the server and check that the indicators on the right mounting ear indicate no fault. For details about the indicator location and status, see 2.2 Front Panel Indicators and Buttons. ----End Issue 04 (2018-09-04) Copyright © Huawei Technologies Co., Ltd.
-
Page 183: Software And Hardware Compatibility
Table 6-1 lists the OSs supported by NVMe SSDs. Table 6-1 OSs supported by NVMe SSDs Type Linux RHEL 7.3 Linux RHEL 7.4 Windows Windows Server 2016 Windows Windows Server 2012 R2 Issue 04 (2018-09-04) Copyright © Huawei Technologies Co., Ltd. -
Page 184: Internal Cabling
In this chapter, the screw-in RAID controller card is used to illustrate cable connections, which are the same for connecting a PCIe plug-in RAID controller card. Huawei Part Number A Huawei part number uniquely identifies a server component. You can find the number on a component or component package. Figure 7-1 shows a cable label with the part number 04151201. -
Page 185: Internal Cabling For A Server With 8 X 2.5-Inch Drives
7.11 Internal Cabling for a Server with 25 x 2.5-inch Front Drives (2) 7.12 Internal Cabling for the Riser Card in I/O Module 3 7.1 Internal Cabling for a Server with 8 x 2.5-inch Drives DVD Drive Cabling Figure 7-2 DVD drive cabling Issue 04 (2018-09-04) Copyright © Huawei Technologies Co., Ltd. - Page 186 (J11) USB Device Cabling Figure 7-3 USB device cabling Table 7-3 USB device cabling Description Huawei Part Number Signal cable for connecting a USB device to the mainboard (J173) 04051947 Issue 04 (2018-09-04) Copyright © Huawei Technologies Co., Ltd.
- Page 187 7 Internal Cabling VGA Board Cabling Figure 7-4 VGA board cabling Table 7-4 VGA board cabling Description Huawei Part Number Signal cable for connecting the VGA board to the mainboard 04051924 (J160) Issue 04 (2018-09-04) Copyright © Huawei Technologies Co., Ltd.
- Page 188 Signal cable for connecting the indicator board of the right 04051922 mounting ear to the mainboard (J167) Signal cable for connecting the USB board of the left mounting 04051921 ear to the mainboard (J161) Issue 04 (2018-09-04) Copyright © Huawei Technologies Co., Ltd.
- Page 189 Figure 7-6 Front drive backplane power cabling Table 7-6 Front drive backplane power cabling Description Huawei Part Number Power cable for connecting the front drive backplane (J24) to the 04051989 mainboard (J166) Issue 04 (2018-09-04) Copyright © Huawei Technologies Co., Ltd.
- Page 190 Figure 7-7 Front drive backplane signal cabling Table 7-7 Front rive backplane signal cabling Description Huawei Part Number Indicator signal cable for connecting the front drive backplane (J1) 04051923 to the mainboard (J162) Issue 04 (2018-09-04) Copyright © Huawei Technologies Co., Ltd.
- Page 191 B of the RAID controller card on the mainboard SAS cable for connecting port A (J28) of the front drive backplane 04051021 to port A of the RAID controller card on the mainboard Issue 04 (2018-09-04) Copyright © Huawei Technologies Co., Ltd.
-
Page 192: Internal Cabling For A Server With 12 X 3.5-Inch Expander Drives (1)
Signal cable for connecting the indicator board of the right 04051922 mounting ear to the mainboard (J167) Signal cable for connecting the USB board of the left mounting 04051921 ear to the mainboard (J161) Issue 04 (2018-09-04) Copyright © Huawei Technologies Co., Ltd. - Page 193 Part Number Indicator signal cable for connecting the front drive backplane (J1) 04051923 to the mainboard (J162) Power cable for connecting the front drive backplane (J24) to the 04051989 mainboard (J166) Issue 04 (2018-09-04) Copyright © Huawei Technologies Co., Ltd.
- Page 194 04051018 backplane to port A of the RAID controller card SAS cable for connecting port B (J29) of the front drive 04051018 backplane to port B of the RAID controller card Issue 04 (2018-09-04) Copyright © Huawei Technologies Co., Ltd.
- Page 195 SAS cable for connecting port B (J29) of the front drive 04051018 backplane to port B of the RAID controller card NOTE The plug-in PCIe RAID controller card is installed on I/O module 2. Issue 04 (2018-09-04) Copyright © Huawei Technologies Co., Ltd.
- Page 196 HDD B, which are connected to the rear backplanes for I/O modules 1 and 2 respectively. Use the connectors based on actual situation. Power cable for connecting the rear drive backplane (J1) to the 04150448-0 mainboard (J172) Issue 04 (2018-09-04) Copyright © Huawei Technologies Co., Ltd.
- Page 197 The Y end of this cable (BOM 04051934) has two connectors HDD A and HDD B, which are connected to the rear backplanes for I/O modules 1 and 2 respectively. Use the connectors based on actual situation. Issue 04 (2018-09-04) Copyright © Huawei Technologies Co., Ltd.
- Page 198 C of the RAID controller card Indicator signal cable for connecting the built-in drive 04051948 backplane (J1) to the mainboard (J122) Power cable for connecting the built-in drive backplane (J2) 04150448-001 to the mainboard (J171) Issue 04 (2018-09-04) Copyright © Huawei Technologies Co., Ltd.
- Page 199 C of the RAID controller card Indicator signal cable for connecting the built-in drive 04051948 backplane (J1) to the mainboard (J122) Power cable for connecting the built-in drive backplane (J2) 04150448-001 to the mainboard (J171) Issue 04 (2018-09-04) Copyright © Huawei Technologies Co., Ltd.
-
Page 200: Internal Cabling For A Server With 12 X 3.5-Inch Expander Drives (2)
Signal cable for connecting the indicator board of the right 04051922 mounting ear to the mainboard (J167) Signal cable for connecting the USB board of the left mounting 04051921 ear to the mainboard (J161) Issue 04 (2018-09-04) Copyright © Huawei Technologies Co., Ltd. - Page 201 Huawei Part Number Indicator signal cable for connecting the front drive 04051923 backplane (J1) to the mainboard (J162) Power cable for connecting the front drive backplane (J24) 04051989 to the mainboard (J166) Issue 04 (2018-09-04) Copyright © Huawei Technologies Co., Ltd.
- Page 202 SAS cable for connecting port B (J29) of the front drive 04051021 backplane to port B of the plug-in PCIe RAID controller card NOTE The plug-in PCIe RAID controller card is installed on I/O module 2. Issue 04 (2018-09-04) Copyright © Huawei Technologies Co., Ltd.
- Page 203 The Y end of this cable (BOM 04051934) has two connectors HDD A and HDD B, which are connected to the rear backplanes for I/O modules 1 and 2 respectively. Use the connectors based on actual situation. Issue 04 (2018-09-04) Copyright © Huawei Technologies Co., Ltd.
-
Page 204: Internal Cabling For A Server With 12 X 3.5-Inch Pass-Through Drives (1)
Signal cable for connecting the indicator board of the right 04051922 mounting ear to the mainboard (J167) Signal cable for connecting the USB board of the left mounting 04051921 ear to the mainboard (J161) Issue 04 (2018-09-04) Copyright © Huawei Technologies Co., Ltd. - Page 205 Huawei Part Number Indicator signal cable for connecting the front drive 04051923 backplane (J1) to the mainboard (J162) Power cable for connecting the front drive backplane (J24) 04051989 to the mainboard (J166) Issue 04 (2018-09-04) Copyright © Huawei Technologies Co., Ltd.
- Page 206 B of the RAID controller card on the mainboard SAS cable for connecting port A (J28) of the front drive 04051078 backplane to port A of the RAID controller card on the mainboard Issue 04 (2018-09-04) Copyright © Huawei Technologies Co., Ltd.
- Page 207 Signal cable for connecting the front drive backplane (J30) 04051053 to the rear drive backplane (J24) SAS cable for connecting the rear drive backplane (J3) to 04051059 port D of the RAID controller card on the mainboard Issue 04 (2018-09-04) Copyright © Huawei Technologies Co., Ltd.
- Page 208 Power cable for connecting the rear drive backplane (J1) to 04150448-001 the mainboard Signal cable for connecting the front drive backplane (J31) 04051053 to the rear drive backplane (J24) Issue 04 (2018-09-04) Copyright © Huawei Technologies Co., Ltd.
-
Page 209: Internal Cabling For A Server With 12 X 3.5-Inch Pass-Through Drives (2)
Signal cable for connecting the indicator board of the right 04051922 mounting ear to the mainboard (J167) Signal cable for connecting the USB board of the left mounting 04051921 ear to the mainboard (J161) Issue 04 (2018-09-04) Copyright © Huawei Technologies Co., Ltd. - Page 210 Huawei Part Number Indicator signal cable for connecting the front drive 04051923 backplane (J1) to the mainboard (J162) Power cable for connecting the front drive backplane (J24) 04051989 to the mainboard (J166) Issue 04 (2018-09-04) Copyright © Huawei Technologies Co., Ltd.
- Page 211 Mini-SAS HD connector B (MINIHD PORT B/J84) on the mainboard SAS cable for connecting port A (J28) of the front drive 04051078 backplane to Mini-SAS HD connector A (MINIHD PORT A/J86) on the mainboard Issue 04 (2018-09-04) Copyright © Huawei Technologies Co., Ltd.
-
Page 212: Internal Cabling For A Server With 12 X 3.5-Inch Pass-Through Drives (3)
Signal cable for connecting the indicator board of the right 04051922 mounting ear to the mainboard (J167) Signal cable for connecting the USB board of the left mounting 04051921 ear to the mainboard (J161) Issue 04 (2018-09-04) Copyright © Huawei Technologies Co., Ltd. - Page 213 Huawei Part Number Indicator signal cable for connecting the front drive 04051923 backplane (J1) to the mainboard (J162) Power cable for connecting the front drive backplane (J24) 04051989 to the mainboard (J166) Issue 04 (2018-09-04) Copyright © Huawei Technologies Co., Ltd.
- Page 214 B of the RAID controller card on the mainboard SAS cable for connecting port A (J28) of the front drive 04051078 backplane to port A of the RAID controller card on the mainboard Issue 04 (2018-09-04) Copyright © Huawei Technologies Co., Ltd.
- Page 215 C of the RAID controller card on the mainboard Indicator signal cable for connecting the built-in drive 04051948 backplane (J1) to the mainboard (J122) Power cable for connecting the built-in drive backplane (J2) 04150448-001 to the mainboard (J171) Issue 04 (2018-09-04) Copyright © Huawei Technologies Co., Ltd.
-
Page 216: Internal Cabling For A Server With 8 X 2.5-Inch Sas/Sata + 12 X 2.5-Inch Nvme Drives
Signal cable for connecting the indicator board of the right 04051922 mounting ear to the mainboard (J167) Signal cable for connecting the USB board of the left mounting 04051921 ear to the mainboard (J161) Issue 04 (2018-09-04) Copyright © Huawei Technologies Co., Ltd. - Page 217 Part Number Indicator signal cable for connecting the front drive backplane 04080588 (J41) to the mainboard (J162) Power cable for connecting the front drive backplane (J37) to the 04152142 mainboard (J166) Issue 04 (2018-09-04) Copyright © Huawei Technologies Co., Ltd.
- Page 218 A of the RAID controller card on the mainboard SAS cable for connecting port B (J16) of the front drive backplane 04051021 to port B of the RAID controller card on the mainboard Issue 04 (2018-09-04) Copyright © Huawei Technologies Co., Ltd.
- Page 219 Mini-SAS HD connector A (MINIHD PORT A/J86) on the mainboard SAS cable for connecting port B (J16) of the front drive backplane 04051021 to Mini-SAS HD connector B (MINIHD PORT B/J84) on the mainboard Issue 04 (2018-09-04) Copyright © Huawei Technologies Co., Ltd.
- Page 220 When connecting a Slimline cable, connect the cable with a shorter length, and then connect the cable with a longer length. l To facilitate operations, remove the backplane before removing the power cables. Issue 04 (2018-09-04) Copyright © Huawei Technologies Co., Ltd.
-
Page 221: Internal Cabling For A Server With 24 X 2.5-Inch Front Drives
Signal cable for connecting the indicator board of the right 04051922 mounting ear to the mainboard (J167) Signal cable for connecting the USB board of the left mounting 04051921 ear to the mainboard (J161) Issue 04 (2018-09-04) Copyright © Huawei Technologies Co., Ltd. - Page 222 Part Number Indicator signal cable for connecting the front drive backplane 04051923 (J1) to the mainboard (J162) Power cable for connecting the front drive backplane (J24) to the 04051989 mainboard (J166) Issue 04 (2018-09-04) Copyright © Huawei Technologies Co., Ltd.
- Page 223 B of the RAID controller card on the mainboard SAS cable for connecting port 1A (J28) of the drive backplane to 04051021 port A of the RAID controller card on the mainboard Issue 04 (2018-09-04) Copyright © Huawei Technologies Co., Ltd.
- Page 224 Table 7-41 USB and VGA signal cabling Description Huawei Part Number Signal cable for connecting a USB device to the mainboard 04051947 (J173) Signal cable for connecting the VGA board to the mainboard 04051924 (J160) Issue 04 (2018-09-04) Copyright © Huawei Technologies Co., Ltd.
-
Page 225: Internal Cabling For A Server With 24 X 2.5-Inch Nvme Ssds
Signal cable for connecting the indicator board of the right 04051922 mounting ear to the mainboard (J167) Signal cable for connecting the USB board of the left mounting 04051921 ear to the mainboard (J161) Issue 04 (2018-09-04) Copyright © Huawei Technologies Co., Ltd. - Page 226 (J128) Indicator signal cable for connecting the front drive 04080550 backplane (J3) to the mainboard (J162) Power cable for connecting the front drive backplane (J2) 04152142 to the mainboard (J166) Issue 04 (2018-09-04) Copyright © Huawei Technologies Co., Ltd.
- Page 227 Table 7-44 SAS signal cabling Description Huawei Part Number SAS cable for connecting port A (J52) of the drive 04051021 backplane to port A of the RAID controller card on the mainboard Issue 04 (2018-09-04) Copyright © Huawei Technologies Co., Ltd.
- Page 228 Table 7-45 USB and VGA signal cabling Description Huawei Part Number Signal cable for connecting a USB device to the mainboard 04051947 (J173) Signal cable for connecting the VGA board to the 04051924 mainboard (J160) Issue 04 (2018-09-04) Copyright © Huawei Technologies Co., Ltd.
- Page 229 When connecting a Slimline cable, connect the cable with a shorter length, and then connect the cable with a longer length. l To facilitate operations, remove the backplane before removing the power cables. Issue 04 (2018-09-04) Copyright © Huawei Technologies Co., Ltd.
-
Page 230: Internal Cabling For A Server With 25 X 2.5-Inch Front Drives (1)
Signal cable for connecting the indicator board of the right 04051922 mounting ear to the mainboard (J167) Signal cable for connecting the USB board of left mounting ear to 04051921 the mainboard (J161) Issue 04 (2018-09-04) Copyright © Huawei Technologies Co., Ltd. - Page 231 Part Number Indicator signal cable for connecting the front drive backplane (J1) 04051923 to the mainboard (J162) Power cable for connecting the front drive backplane (J24) to the 04051989 mainboard (J166) Issue 04 (2018-09-04) Copyright © Huawei Technologies Co., Ltd.
- Page 232 SAS cable for connecting port A (J28) of the front drive backplane 04051018 to port A of the RAID controller card SAS cable for connecting port B (J29) of the front drive backplane 04051018 to port B of the RAID controller card Issue 04 (2018-09-04) Copyright © Huawei Technologies Co., Ltd.
- Page 233 SAS cable for connecting port B (J29) of the front drive backplane 04051020 to port B of the standard RAID controller card NOTE The plug-in PCIe RAID controller card is installed on I/O module 2. Issue 04 (2018-09-04) Copyright © Huawei Technologies Co., Ltd.
- Page 234 The Y end of this cable (BOM 04051934) has two connectors HDD A and HDD B, which are connected to the rear backplanes for I/O modules 1 and 2 respectively. Use the connectors based on actual situation. Issue 04 (2018-09-04) Copyright © Huawei Technologies Co., Ltd.
-
Page 235: Internal Cabling For A Server With 25 X 2.5-Inch Front Drives (2)
Signal cable for connecting the indicator board of the right 04051922 mounting ear to the mainboard (J167) Signal cable for connecting the USB board of left mounting ear to 04051921 the mainboard (J161) Issue 04 (2018-09-04) Copyright © Huawei Technologies Co., Ltd. - Page 236 Part Number Indicator signal cable for connecting the front drive backplane (J1) 04051923 to the mainboard (J162) Power cable for connecting the front drive backplane (J24) to the 04051989 mainboard (J166) Issue 04 (2018-09-04) Copyright © Huawei Technologies Co., Ltd.
- Page 237 SAS cable for connecting port B (J29) of the front drive backplane 04051021 to port B of the plug-in PCIe RAID controller card NOTE The plug-in PCIe RAID controller card is installed on I/O module 2. Issue 04 (2018-09-04) Copyright © Huawei Technologies Co., Ltd.
- Page 238 The Y end of this cable (BOM 04051934) has two connectors HDD A and HDD B, which are connected to the rear backplanes for I/O modules 1 and 2 respectively. Use the connectors based on actual situation. Issue 04 (2018-09-04) Copyright © Huawei Technologies Co., Ltd.
-
Page 239: Internal Cabling For The Riser Card In I/O Module 3
04051931 mainboard (SLIMLINE B/J139) Signal cable for connecting the riser card (SLIMLINE A) to the 04051931 mainboard (SLIMLINE A/J140) Power cable for connecting the riser card to the mainboard (J172) 04150448- Issue 04 (2018-09-04) Copyright © Huawei Technologies Co., Ltd. - Page 240 A (J140) on the mainboard Power cable for connecting the rear drive backplane (J22) 04150448-001 to the mainboard (J172) Indicator signal cable for connecting the rear drive 04051122 backplane (J23) to the mainboard (J164) Issue 04 (2018-09-04) Copyright © Huawei Technologies Co., Ltd.
- Page 241 A (J140) on the mainboard Power cable for connecting the rear drive backplane (J22) 04150448-001 to the mainboard (J172) Indicator signal cable for connecting the rear drive 04051122 backplane (J23) to the mainboard (J164) Issue 04 (2018-09-04) Copyright © Huawei Technologies Co., Ltd.
- Page 242 (J172) Indicator signal cable for connecting the rear drive 04051122 backplane (J23) to the mainboard (J164) NOTE The plug-in PCIe RAID controller card is installed on I/O module 2. Issue 04 (2018-09-04) Copyright © Huawei Technologies Co., Ltd.
- Page 243 A (J140) on the mainboard Power cable for connecting the rear drive backplane (J22) 04150448-001 to the mainboard (J172) Indicator signal cable for connecting the rear drive 04051122 backplane (J23) to the mainboard (J164) Issue 04 (2018-09-04) Copyright © Huawei Technologies Co., Ltd.
-
Page 244: Software And Configuration Utilities
OS. The BIOS also provides the advanced configuration and power interface (ACPI) and hot swap. The Huawei Purley-based server is developed based on Insyde code base and uses a proprietary BIOS. It provides a variety of in-band and out-of-band configuration functions as well as high scalability, and supports customization. -
Page 245: Ibmc
Huawei Server Purley Platform BIOS Parameter Reference. 8.2 iBMC The iBMC is a Huawei proprietary intelligent management system that remotely manages servers. The iBMC complies with Intelligent Platform Management Interface (IPMI) standards and Simple Network Management Protocol (SNMP). It provides various functions, including keyboard, video, and mouse (KVM) redirection, text console redirection, remote virtual media, and reliable hardware monitoring and management. -
Page 246: Upgrading The System
8.3 Upgrading the System NOTE Upgrade server drivers, firmware, and management software as needed. Obtaining Upgrade Packages and Documents Obtain the upgrade package from http://e.huawei.com/us/. The download path is: Support > Software Download > IT > Server > FusionServer > Rack Server. -
Page 247: Fusionserver Tools Umate
Checker. 8.4 FusionServer Tools uMate uMate is a tool used in the acceptance, deployment, and maintenance scenarios of Huawei servers. It provides a GUI and CLI. uMate provides the inspection, log collection, firmware upgrade, and BIOS/BMC/RAID configuration functions and all functions support batch operations. -
Page 248: Fusionserver Tools Toolkit
Provide reference tools and scripts commonly used for configuration and deployment. Create a bootable USB flash drive for easy O&M. Perform automatic diagnosis of configurations. For more information, see the FusionServer Tools 2.0 Toolkit User Guide. Issue 04 (2018-09-04) Copyright © Huawei Technologies Co., Ltd. -
Page 249: Troubleshooting
If a fault occurs on a server, collect logs for fault diagnosis. Fault diagnosis Fault diagnosis rules and tools help Huawei technical support engineers and maintenance engineers to analyze and rectify faults according to alarms and hardware fault symptoms. Software and firmware upgrade Software and firmware upgrade packages can be downloaded by server model and installed as needed. -
Page 250: Battery
Step 5 Remove the chassis cover. For details, see 3.4 Removing the Chassis Cover. Step 6 Pull up the right end of the battery and remove it from the slot. See Figure 10-1. Issue 04 (2018-09-04) Copyright © Huawei Technologies Co., Ltd. -
Page 251: Installing The Battery
Step 7 Hold the battery with the side marked with text facing upwards, insert the left end of the battery into the slot, and gently press down the battery until it is properly installed in the slot. Figure 10-2. Issue 04 (2018-09-04) Copyright © Huawei Technologies Co., Ltd. - Page 252 4.4 Installing the Server on Guide Rails. Step 10 Connect the power cables. For details, see PSU. Step 11 Power on the server. For details, see 3.1 Powering On the Server. ----End Issue 04 (2018-09-04) Copyright © Huawei Technologies Co., Ltd.
-
Page 253: Warranty And Safety
11.2 Safety 11.1 Warranty According to the Huawei Warranty Policy for Servers & Storage Products (Warranty Policy for short), the server has a three-year warranty, the DVD drive and iBBU have a one-year warranty, and the software media have a three-month warranty. -
Page 254: Preventing Electrostatic Discharge
Both ends of an ESD wrist strap must be in good contact. One end contacts your bare skin, and the other is securely inserted into the ESD jack in the chassis. For details about how to wear an ESD wrist strap, see 12.2 ESD Wrist Strap. Issue 04 (2018-09-04) Copyright © Huawei Technologies Co., Ltd. -
Page 255: Esd Wrist Strap
Step 2 Tighten the ESD wrist strap and ensure that it is in good contact with your bare skin. Step 3 Insert the ground terminal of the ESD wrist strap into the ESD jack in the cabinet or chassis. ----End Issue 04 (2018-09-04) Copyright © Huawei Technologies Co., Ltd. -
Page 256: Product Specifications
Maximum frequency: 3.6 GHz (four cores) l Two UPI links: 10.4 GT/s per link l Minimum L3 cache capacity per core: 1.375 MB l Maximum thermal design power (TDP): 205 W Chipset Intel C622 Issue 04 (2018-09-04) Copyright © Huawei Technologies Co., Ltd. - Page 257 4 GB cache) to be configured on the mainboard to improve drive storage performance and ensure user data security. NOTE If the BIOS is in Legacy mode, the server does not support a 4K drive as the system boot drive. Issue 04 (2018-09-04) Copyright © Huawei Technologies Co., Ltd.
- Page 258 13 Product Specifications Item Specifications Network port l The 2288H V5 has two types of mainboards. One mainboard provides two 10GE and two GE electrical ports. The other motherboard provides two 10GE optical ports and two GE electrical ports. NOTE...
- Page 259 P4, P100, and M10 GPUs NOTE l Use the Huawei Server Compatibility Checker to check the PCIe cards supported by the 2288H V5. For PCIe cards not listed in the Huawei Server Compatibility Checker, contact your local Huawei sales representative or Huawei technical support.
-
Page 260: Physical And Environmental Specifications
– Provides the GUI, virtual KVM, virtual media, Serial Over LAN (SOL), intelligent power supply, remote control, and hardware monitoring features. l NC-SI l Huawei eSight management software and integration with third-party management systems, such as VMware vCenter, Microsoft SystemCenter, and Nagios Security... - Page 261 Cabinet depth: ≥ 1000 mm (39.37 in.) Requirements for guide rail installation: l L-shaped guide rails: apply only to a Huawei cabinet. l Adjustable guide rails: apply to a cabinet with a distance of 543.5 mm to 848.5 mm (21.40 in. to 33.41 in.) between the front and rear mounting bars.
- Page 262 SSD cards. (expander) M60 GPUs. l Does not support Server with passive twelve 3.5- cooling inch drives GPUs. (pass- l Does not through) support rear drives. l Does not support built- indrives. Issue 04 (2018-09-04) Copyright © Huawei Technologies Co., Ltd.
- Page 263 Does not l Does not twenty-five support support PCIe 2.5-inch P100 and SSD cards. drives M60 GPUs. l Does not (expander) support passive cooling GPUs. l Does not support rear drives. Issue 04 (2018-09-04) Copyright © Huawei Technologies Co., Ltd.
- Page 264 – The equipment room environment meets the requirements of ISO 14664-1 Class 8. You are advised to hire a professional organization to monitor particle contaminants in the equipment room. – The equipment room is free from explosive, conductive, magnetic conductive, and corrosive dust. Issue 04 (2018-09-04) Copyright © Huawei Technologies Co., Ltd.
-
Page 265: Psu Specifications
1500 W AC 1500 W l AC: 100 V to 240 V Platinum PSU l HVDC: 192 V to 288 V 1200 W DC PSU 1200 W DC: -48 V to -60 V Issue 04 (2018-09-04) Copyright © Huawei Technologies Co., Ltd. -
Page 266: Common Operations
NOTE l To go to the Front Page, press F11 or F3. l To go to PXE, press F12. l To go to the Smart Provisioning GUI, press F6. Issue 04 (2018-09-04) Copyright © Huawei Technologies Co., Ltd. - Page 267 The system will be locked if incorrect passwords are entered three consecutive times. Restart the server to unlock it. Step 6 Choose Advanced > IPMI iBMC Configuration, and press Enter. The IPMI iBMC Configuration screen is displayed. Issue 04 (2018-09-04) Copyright © Huawei Technologies Co., Ltd.
- Page 268 Figure 14-2 IPMI iBMC Configuration Step 7 Select iBMC Configuration and press Enter. The iBMC Configuration screen displayed shows the IP address of the iBMC network port. Figure 14-3 iBMC Configuration ----End Issue 04 (2018-09-04) Copyright © Huawei Technologies Co., Ltd.
-
Page 269: Logging In To The Remote Virtual Console
For details, see 4.6.4 Logging In to the iBMC WebUI. Step 2 Choose Remote Console. The Remote Console page is displayed, as shown in Figure 14-4. Figure 14-4 Remote Console page Issue 04 (2018-09-04) Copyright © Huawei Technologies Co., Ltd. - Page 270 HTML5 Integrated Remote Console (Shared): allows two local users or five VNC users to access and manage the server at a time. The users can see each other's operations. Figure 14-5 Real-time operation console (Java) Issue 04 (2018-09-04) Copyright © Huawei Technologies Co., Ltd.
-
Page 271: Logging In To The Ibmc Cli
Step 2 Connect the client to the server management network port directly or through a network. Step 3 Set the client IP address so that the client can communicate with the server iBMC management network port. Issue 04 (2018-09-04) Copyright © Huawei Technologies Co., Ltd. - Page 272 You are advised to run the ipmcget -d serialdir command to view the value options. For the 2288H V5 server, the options are as follows: – 0: switch from PANEL COM to SYS – 1: switch from PANEL COM to iBMC COM –...
-
Page 273: Logging In To The Server Using The Irc
----End 14.4 Logging In to the Server Using the IRC The independent remote console (IRC) is a tool developed based on the Huawei server management software iBMC. You can use this tool to remotely access and manage the server, without worrying about browser and JRE compatibility. - Page 274 Step 5 Select a login mode, and click Connect. Shared Mode: allows two users to access and manage a server at a time. The two users can see each other's operations. Issue 04 (2018-09-04) Copyright © Huawei Technologies Co., Ltd.
- Page 275 After the CA certificate is imported, the security risk dialog box will no longer be displayed. Step 6 Click Yes to open the IRC. The IRC of the server is displayed, as shown in Figure 14-10. Figure 14-10 IRC of the server ----End Issue 04 (2018-09-04) Copyright © Huawei Technologies Co., Ltd.
- Page 276 Step 7 Select a login mode, and click Connect. Shared Mode: allows two users to access and manage a server at a time. The two users can see each other's operations. Issue 04 (2018-09-04) Copyright © Huawei Technologies Co., Ltd.
- Page 277 Step 8 Click Yes to open the remote console. The IRC of the server is displayed, as shown in Figure 14-13. Figure 14-13 IRC of the server ----End Mac OS Mac OS X El Capitan is supported. Issue 04 (2018-09-04) Copyright © Huawei Technologies Co., Ltd.
- Page 278 Shared Mode: allows two users to access and manage a server at a time. The two users can see each other's operations. Private Mode: allows only one user to access and manage a server at a time. Information shown in Figure 14-15 is displayed. Issue 04 (2018-09-04) Copyright © Huawei Technologies Co., Ltd.
- Page 279 After the CA certificate is imported, the security risk dialog box will no longer be displayed. Step 8 Click Yes to open the IRC. The IRC of the server is displayed, as shown in Figure 14-16. Figure 14-16 IRC of the server ----End Issue 04 (2018-09-04) Copyright © Huawei Technologies Co., Ltd.
-
Page 280: Logging In To The Server Over A Serial Port Using Putty
In COMn, n indicates a serial port number, and its value is an integer. Step 6 In the navigation tree, choose Session. Step 7 Select Serial under Connection type, as shown in Figure 14-17. Issue 04 (2018-09-04) Copyright © Huawei Technologies Co., Ltd. -
Page 281: Logging In To The Server Over A Network Port Using Putty
14.6 Logging In to the Server over a Network Port Using PuTTY Use PuTTY to remotely log in to the server over a local area network (LAN) and configure and maintain the server. Issue 04 (2018-09-04) Copyright © Huawei Technologies Co., Ltd. - Page 282 If no, check the network connection, rectify the fault, and go to Step Step 4 Double-click PuTTY.exe. The PuTTY Configuration window is displayed, as shown in Figure 14-18. Figure 14-18 PuTTY Configuration window Issue 04 (2018-09-04) Copyright © Huawei Technologies Co., Ltd.
- Page 283 If an incorrect user name or password is entered, you must set up a new PuTTY session. If the login is successful, the server host name is displayed on the left of the prompt. ----End Issue 04 (2018-09-04) Copyright © Huawei Technologies Co., Ltd.
-
Page 284: Support And Other Resources
Base. Huawei Technical Support If a fault persists after taking troubleshooting measures specified in documents, contact technical support at your local Huawei office. If your local Huawei office is not available, contact Huawei technical support as follows: Issue 04 (2018-09-04) -
Page 285: Product Information Resources
Calculator calculate server power Calculator. consumption with different configurations. 15.3 Maintenance Tools Table 15-2 lists the software tools required for routine maintenance of Huawei servers. Table 15-2 Software tools for routine maintenance Tool Server Model and Description Software Version FusionServer... - Page 286 FusionServer Tools Download link: FusionServer Tools 2.0 Toolkit User Guide. FusionServer See the ServiceCD is used for installing OSs. Tools ServiceCD FusionServer Tools Download link: FusionServer Tools 2.0 ServiceCD 2.0 User Guide. Issue 04 (2018-09-04) Copyright © Huawei Technologies Co., Ltd.
-
Page 287: A Appendix
2288H V5 Server User Guide A Appendix Appendix A.1 Logical Structure Figure A-1 2288H V5 logical structure ® ® The 2288H V5 supports two Intel Xeon Scalable series CPUs and 24 DDR4 DIMMs. The CPUs interconnect with each other through Ultra Path Interconnect (UPI) links at speeds of up to 10.4 GT/s. -
Page 288: Ras Features
A.2 RAS Features Table A-1 describes the reliability, availability, and serviceability (RAS) features supported by the 2288H V5. You can configure these features for better performance. NOTE For details about how to configure these features, see the Huawei Server Purley Platform BIOS Parameter Reference. -
Page 289: Glossary
BIOS Abstraction Layer The BIOS processes errors and reports the error for Error Handling information to the OS and 2288H V5 in compliance with specifications to improve system serviceability. BIOS-based Predictive The BIOS provides physical unit information for... - Page 290 A PCI system can be turned into a PCIe one by modifying the physical layer instead of software. PCIe delivers a faster speed and can replace almost all existing bus standards including AGP and PCI. Issue 04 (2018-09-04) Copyright © Huawei Technologies Co., Ltd.
-
Page 291: Acronyms And Abbreviations
BIOS Basic Input/Output System Baseboard Management Controller command-line interface direct current DDR4 Double Date Rate 4 DDDC Double Device Data Correction DIMM dual in-line memory module DRAM dynamic random access memory Issue 04 (2018-09-04) Copyright © Huawei Technologies Co., Ltd. - Page 292 Internet Protocol IPMB Intelligent Platform Management Bus IPMI Intelligent Platform Management Interface keyboard, video, and mouse LRDIMM load-reduced dual in-line memory module light emitting diode LAN on motherboard Issue 04 (2018-09-04) Copyright © Huawei Technologies Co., Ltd.
- Page 293 Serial Attached Small Computer System Interface SATA Serial Advanced Technology Attachment SNMP Simple Network Management Protocol Serial Over LAN solid-state drive Trusted Computing Group Trusted Cryptography Module Total Cost of Ownership Thermal Design Power Issue 04 (2018-09-04) Copyright © Huawei Technologies Co., Ltd.
- Page 294 Trans Flash Module TFTP Trivial File Transfer Protocol Trusted Platform Module UEFI Unified Extensible Firmware Interface unit identification light Underwriter Laboratories Inc. universal serial bus Video Graphics Array VLAN virtual local area network Issue 04 (2018-09-04) Copyright © Huawei Technologies Co., Ltd.