Table of Contents
Quick Links
Alcatel-Lucent Enterprise
Myriad Series User Manual (M3/M5/M7)
Alcatel Lucent Enterprise Communication Device Business
Web: www.aledevice.com; www.al-enterprise.com
Email: [email protected]
Table of Contents

Related Manuals for Alcatel-Lucent Myriad Series


Summary of Contents for Alcatel-Lucent Myriad Series
- Page 1 Alcatel-Lucent Enterprise Myriad Series User Manual (M3/M5/M7) Alcatel Lucent Enterprise Communication Device Business Web: www.aledevice.com; www.al-enterprise.com Email: [email protected]...
-
Page 2: Introduction
1 Introduction Thank you for choosing an Alcatel-Lucent phone. This document describes the services offered by the M3, M5 and M7 DeskPhones connected to a SIP server. Alcatel-Lucent M5 DeskPhone (M5). Alcatel-Lucent M7 DeskPhone (M7). Alcatel-Lucent M3 DeskPhone (M3). The phones described in this document are supported on different SIP servers, and some features described in this document depend on the SIP server to which the phone is connected. - Page 3 Peer to peer SIP calls Web Management OpenVPN Client *To know the supported dongle, please refer to the Alcatel-Lucent Enterprise website or contact your administrator. The labels and icons presented in this document are not contractually binding and may be modified without prior warning.
-
Page 4: Table Of Contents
Contents 1 Introduction ..................................1 2 Getting started ................................8 2.1 Unboxing ................................8 2.2 Install your desk phone ..........................8 2.2.1 Install the foot ............................... 8 2.2.2 Connect the device ............................9 2.2.3 Install a comfort wired handset ....................... 9 3 Getting to know your telephone ........................... - Page 5 4.5 Switching between audio modes ......................27 4.6 Redialing ................................28 4.6.1 Call back the last number dialed ......................28 4.6.2 Call back one of the last numbers dialed ................... 28 4.7 Contacts management ..........................29 4.7.1 Contact card ..............................29 4.7.2 Contacts management ..........................
- Page 6 4.21 Placing a call on hold (hold) ........................41 4.22 Switching between calls (Broker call) ....................42 4.23 Transferring a call ............................42 4.23.1 To transfer a call to another contact on hold ................42 4.23.2 To transfer your call to another number ..................42 4.23.3 Blind transfer ............................
- Page 7 6.1 Adjusting the audio functions ........................58 6.1.1 Select the melody ............................58 6.1.2 Adjusting the ringer volume ........................58 6.1.3 Configure the ringtone ..........................58 6.1.4 Configuring discreet mode (beep) ......................59 6.1.5 Seat mode ..............................59 6.2 Selecting language ............................59 6.3 Adjusting the brightness of the desk phone ..................
- Page 8 8.2 Add-on module ............................... 70 8.2.1 install the add-on to the desk phone ....................71 8.2.2 Install more than one add-on module ....................71 8.2.3 Changing or updating the paper label ....................72 8.2.4 Configure Add-on keys ..........................72 8.3 EGO Personal conference module ......................72 8.3.1 Description ..............................
-
Page 9: Getting Started
2 Getting started 2.1 Unboxing Deskphone Handset 2-degree adjustable foot Safety sheet and quick Handset cord Ethernet cable user guide 2.2 Install your desk phone 2.2.1 Install the foot Clip the foot into its compartment behind the phone. Your desk phone provides a 2-degree foot. Depending on the way you insert the foot into the phone, your desk phone will have a different angle: 55°... -
Page 10: Connect The Device
40°/55° 2.2.2 Connect the device Please read safety instructions first. Connect the handset (4) if it is not connected (your phone is usually provided with the handset connected). If your desk phone is correctly configured, you can connect it to the network (2). If your desk phone is not powered by PoE (Power over Ethernet), you have to plug the power adapter to the USB-C connector (1) and connect it to the AC power supply. -
Page 11: Getting To Know Your Telephone
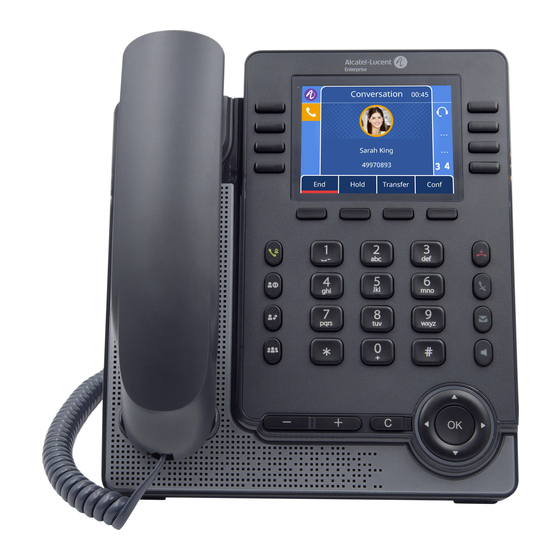
3 Getting to know your telephone 3.1 M7 DeskPhone This phone is part of the IP phone range. With its color display associated to 8 dedicated functions keys, and an intuitive navigation key, the M7 DeskPhone delivers excellent user experience and optimum conversation convenience with outstanding audio quality in either hands-free mode or when using the comfort handset. -
Page 12: M5 Deskphone
3.2 M5 DeskPhone This phone is part of the IP phone range. In addition to a color display associated to 8 dedicated function keys and an intuitive navigation key, the M5 DeskPhone delivers excellent user experience and optimum conversation convenience with an outstanding audio quality in either hands-free mode or when using the comfort handset. -
Page 13: M3 Deskphone
Flashing blue: incoming calls, new events displayed on the screen (voice messages, missed calls). Blue steady: ongoing call. 3.3 M3 DeskPhone This phone is part of the IP phone range. In addition to a clear monochrome display associated to 6 dedicated function keys and an intuitive navigation key, the M3 DeskPhone provides high audio fidelity for telephone calls either in hands-free mode or when using the comfort handset. - Page 14 Flashing blue: incoming calls, new events displayed on the screen (voice messages, missed calls). Blue steady: ongoing call. Copyright @ALE 2020 All Rights Reserved...
-
Page 15: Main Screen
3.4 Main screen Your phone can support up to 8 SIP accounts. The main screen, composed with 4 pages, displays all programmed keys which can be a line key for a registered SIP account, a speed dial or other functions. Menu to access features and configure the phone or manage calls. -
Page 16: Call Management Screen
3.5 Call management screen Softkeys: actions available depending on the call status. Press the softkey under the label to select the corresponding feature. SIP account in conversation. Incoming call and conversation presentation screen. 3.6 Navigation keys OK key: Use this key to validate your choices and options while programming or configuring (short press). left-right navigator: Use to move from one page to another or to move the cursor in a text box. -
Page 17: Permanent Features Keys
3.7 Permanent features keys Take the call key. Redialing the last number dialed (long press). List of last numbers dialed (short press). Placing a call on hold. Recover the call on hold. Transfer a call. Add particitants to a conference call(maxim 5) Reject incoming call. -
Page 18: Programmed Key Icons
Programmed key icons This table lists icons displayed on the screen when you program a key. To program a key, see chapter: Programmable keys. The following icons are listed when the phone is in an idle state and can be changed depending on the status of the phone or the contact’s phone. ... -
Page 19: Status Icons/ Call Icons
Status icons/ Call icons Icons providing information about certain specific configurations on the phone or about the call status. Status icons Depending on the size of the display, all status icons may not be displayed simultaneously. Which icons are displayed depends on their priority. The following icons are listed according to their priority, from the highest to the lowest. -
Page 20: Alpha-Numeric Keyboard
Incoming call icon. Call in progress icon. Call on hold icon. 3.10 Alpha-numeric keyboard Your phone is equipped with alphanumeric keyboard. You can switch between numeric keyboard to dial number, and alphabetic keyboard to enter text by pressing the corresponding preprogrammed key. -
Page 21: Description Of The Connectors
This connector is used for: Connect a USB headset. Connect an add-on module(EM20/EM200). Connect a Wi-Fi dongle*. *To know the supported dongle, please refer to the Alcatel-Lucent Enterprise website or contact your administrator. Copyright @ALE 2020 All Rights Reserved... -
Page 22: Using Your Telephone
4 Using your telephone 4.1 Information about the phone The main page can display all SIP accounts used on the phone and other programmed keys. For each SIP account used on the phone, we recommend creating a programmed key to obtain information about account status. -
Page 23: Program A Line Key For A Sip Account
Your phone supports multiple SIP accounts. Your administrator can declare up to 8 SIP accounts. A default account is used for calls unless you select the relevant account prior the call. When you have programmed It is recommended to program a key for each SIP account in the main page, as a line key. Then the status of the account is displayed on the homepage. -
Page 24: Making Call
Default Account Default Account. Use up-down and 'ok' navigation keys to select: Select the default SIP account. Switch Validate your choice. Save To end the settings. 4.3 Making call This section describes how to make a call. There are different ways to open the dialer before calling your contact. -
Page 25: Calling By Name
Dial the number. Select the contact to call in the list of last number dialed. Use one of the following: Press the 'take the call' key. Make the call with the active device: handset if unhooked, headset if connected, otherwise in hands-free mode. Press the OK key to start the call. -
Page 26: Call From Call Log
Press the 'take the call' key. Make the call with the active device: handset if unhooked, headset if connected, otherwise in hands-free mode. Press the OK key to start the call. Make the call with the active device: handset if unhooked, headset if connected, otherwise in hands-free mode. -
Page 27: Calling Using Speed Dial Key
Press the 'take the call' key. Make the call with the active device: handset if unhooked, headset if connected, otherwise in hands-free mode. Press the OK key to start the call. Make the call with the active device: handset if unhooked, headset if connected, otherwise in hands-free mode. -
Page 28: Receiving A Call
4.4 Receiving a call When receiving a call, you can: Lift the handset to take the call. Press the headset icon to to take the call in headset mode. Press the loudspeaker/hands-free key to take the call in hands-free mode. Press the blinking line key associated with the SIP account receiving the call. -
Page 29: Redialing
You can switch to loudspeaker (group listening mode with handset) when in conversation by pressing the group listening programmable key. First you have to create a group listening programmable key (see chapter: Programmable keys). deactivate conversation loudspeaker Short press Loudspeaker Short press For each audio mode, during the conversation, you can adjust the volume by pressing the volume... -
Page 30: Contacts Management
4.7 Contacts management 4.7.1 Contact card A contact card can be opened from your local directory. Directory Select this softkey to open your directory(-ies). Open a directory (depending on model). Select a contact. More Detail Open the contact card. Use the up-down navigation keys to scroll the page. -
Page 31: Contacts Management
4.7.2 Contacts management Your phone lets you manage contacts in your local directory. With the M7 DeskPhone, you can External Directory import contacts from your mobile phone to a specific directory ( The directory is accessible from the homepage dynamic key or from the menu. Use one of the following: If configured, use the dynamic key from the home page to access to the directory(-ies) Directory... -
Page 32: Call Your Contact
4.7.3 Call your contact Directory Select this softkey to open your directory(-ies). Use one of the following: Search Search a contact in all directories and groups. Open a directory (depending on model). To call your contact: Select the contact to call. First method More Access more features. -
Page 33: Create A New Group
4.7.5 Create a new group Directory Select this softkey to open your directory(-ies). Local Directory Open the local directory. AddGrp Use the up-down navigation keys to switch from one input field to another.<123> Enter the name of the group. Your contact is added to the directory. -
Page 34: Delete All Group In The Local Directory
Select the group to delete. Delete Access to all defined group(s). Confirm the deletion. 4.7.10 Delete all group in the local directory Directory Select this softkey to open your directory(-ies). Group Select the group to delete. Delete all Confirm the deletion. 4.7.11 Import contacts from your mobile phone via Bluetooth®... -
Page 35: Manage The Call Log (History)
The paired device is listed. Select your connected mobile phone. Sync BT Contacts Use up-down and 'ok' navigation keys to select: More Enter > Sync BT Contacts Synchronize the contacts. 4.8 Manage the call log (History) The call log can be consulted and managed when the phone is in the idle state. The main part of the screen is used to display the call log. -
Page 36: Call The Contact
Actions are available from the call log: Delete Delete the selected entry. Note that no confirmation is requested. Call Call the selected contact. More Access more features. Open information about the contact: name, number, time, relevant SIP account, duration. Detail Delete the entire log associated with the selected contact. -
Page 37: Speed Dial Management
4.9 Speed dial management Speed dial lets you manage favorite contacts. You can create speed dial keys by programming keys from the homepage. 4.9.1 Create a speed dial key Use one of the following: Long press on a free programmable key. Menu ->... -
Page 38: Mute, So That Your Contact Cannot Hear You
To activate or deactivate DTMF mode. Switch Validate your choice. Save To end the settings. 4.11 Mute, so that your contact cannot hear you You can hear your contact but he/she cannot hear you: During a conversation. Disable microphone the key lights up. Resume the conversation the key is no longer lit. -
Page 39: Configure The Intercom Incoming Calls
4.14 Configure the intercom incoming calls When you receive an intercom call, the desk phone automatically answers the call if you have authorized the option. You can manage your desk phone behavior when you receive an intercom call. The phone is in idle state. Menu Press the Menu soft key to access the Main Menu. -
Page 40: Lock Your Phone
Phone Lock Phone Lock Use up-down and 'ok' navigation keys to select: Lock Enable Enable the option: Switch To end the settings. Phone Lock To lock/unlock your desk phone, you have to create a programmed key: Label : enter the label of the key, displayed on the home page. 4.16.1 Lock your phone Select the lock/unlock programmed key. -
Page 41: During Conversation
4.17 During conversation Actions available during conversation: End the call. Hold Placing a call on hold. Transfer Transfer a call. Retrieve Retrieve a call (on hold, parked). Make a second call when the first is on hold. Swap Switching between calls. Conf Establishing a three-party conference call. -
Page 42: Answering A Second Call During A Conversation
4.19 Answering a second call during a conversation As long as the call is presented, you can also choose to deflect the call. 4.20 To cancel your second call and recover the first You are in conversation with the second contact and the first one is on hold. Use one of the following: You or the second contact hangs up. -
Page 43: Switching Between Calls (Broker Call)
Use one of the following: Press the hold key. Hold Press the softkey under the following label: Hold Recover the call on hold: Use one of the following: Press the hold key. Retrieve Press the softkey under the following label: Retrieve Press the dedicated account key with call-on-hold icon. -
Page 44: Blind Transfer
-> Call the recipient of the transfer using the dial a number or dial by name feature or the call log or local directory. Call Your contact answers. Use one of the following: Press the transfer key the two callers are connected. Transfer Transfer Press the softkey under the following label:... -
Page 45: After The Conference, To Leave Your Two Contacts Talking Together
4.24.2 After the conference, to leave your two contacts talking together You are in conference mode. Use one of the following: Press the transfer key the two participants remain on the call together. Transfer Press the softkey under the following label: the two participants remain on the Transfer call together. -
Page 46: Hide Your Phone Number
4.26 Hide your phone number you can choose to hide your identity when calling. The phone is in idle state. Menu Press the Menu soft key to access the Main Menu. Features Use up-down and 'ok' navigation keys to select: Features Anonymous Anonymous... -
Page 47: Forwarding To A Number
To end the settings. To deactivate the Do not disturb feature, follow the same procedure. To have a direct access to this feature, program a key on the home page (see chapter: Programmable keys). From the Web Management, it is possible to enable/disable the feature for all accounts declared on the phone (the administrator password of the phone is requested). -
Page 48: Listen To Your Voicemail
Menu Press the Menu soft key to access the Main Menu. Features Features Use up-down and 'ok' navigation keys to select: Call Forward Use up-down and 'ok' navigation keys to select: Call Forward Select the type of call forwarding to cancel. Always Forward All your calls are immediately forwarded to another number. - Page 49 Delay Enter the time delay in seconds before the 'hotline' number is dialed, if no action is performed during this time (0 – 10s). The 'hotline' number is immediately dialed if the delay time is set to 0s. Enable the feature. Switch Validate your choice.
-
Page 50: Do More With Your Desk Phone
5 Do more with your desk phone Your desk phone is designed to evolve with its environment. It can do more than just establish communication between people or keep in touch with your contacts, your enterprise. This chapter describes some use-cases with your phone. Use your desk phone as a USB audiohub for your computer Your phone can be used as an external audio playback/recording device for your personal computer (PC). -
Page 51: Connect Your Computer To Your Desk Phone
USB connector: we recommend a USB 3.0 port (USB 2.0 or 1.0 port can reduce performance). We recommend using the latest version of audio applications or web browser. 5.1.1.2 Connect your computer to your desk phone You can use a USB-A or USB-C connectors of the DeskPhone to connect the PC. A stand-alone USB cable is not provided with your set. - Page 52 the default device. In the 'Recording’ tab: select your desk phone as the default device, if you are using the hands-free mode of your desk phone with communication applications such as Rainbow, OpenTouch Conversation for PC, for example. Activating/Deactivating the sounds If you set your desk phone as the default audio device, all of the sounds from your computer are played on...
-
Page 53: Using Your Phone As An Audio Hub
5.1.1.3.2 Mac OS 10.9 and above Open System Preferences -> Sound. Select your desk phone in output and input tabs: 5.1.2 Using your phone as an audio hub When audio starts playing on the PC, it will also be played on the phone. The audio hub programmable key lets you control the playback: The audio is playing on the phone. -
Page 54: Configure Your Phone For Remote Working
5.2 Configure your phone for remote working Your IP phone is compatible with remote working (VPN) via a secure connection (encrypted). A Virtual Private Network (VPN) is a technology that allows a device to create a tunneling connection to a server and becomes part of the enterprise’s network (VPN server’s network). VPN tunnels are secured with OpenVPN protocol with TLS authentication, credentials and certificates. -
Page 55: Connect Your Phone To The Wi-Fi
(VPN). You have to plug a Wi-Fi dongle into the USB-A connector of your phone: To know the supported dongle, please refer to the Alcatel-Lucent Enterprise website or contact your administrator. The dongle can use 2.4Ghz and 5Ghz bands, but we recommend using a 5Ghz Wi-Fi network to ensure the best audio quality. -
Page 56: Manage Wireless Network
Display all information about the corresponding wireless network, such as the SSID, Detail encryption mode, channel, signal strength. Connect Connect the phone to the selected wireless network. If the wireless network is not already saved, enter the network security key (passphrase) if requested.Use the alpha-numeric keyboard key to switch between the numeric and alphabetic keyboard. -
Page 57: Modify A Saved Wireless Network
5.3.2.3 Modify a saved wireless network Open the Wi-Fi manager. Use up-down navigation keys to select the saved wireless network to edit. Depending on the Wi-Fi network, enter the SSID, security mode, encryption mode and Edit password of the wireless network. Use the alpha-numeric keyboard key to switch between the numeric and alphabetic keyboard. -
Page 58: Logout Of Hot Desking
5.5 Third-Party Call Control (3PCC) with Rainbow application This feature depends on the system configuration. If necessary, contact your administrator. Your phone is compatible with third-party call control to manage calls (basic features) from your computer via the Alcatel-Lucent Rainbow application: Make and answer calls. ... -
Page 59: Programming Your Telephone
6 Programming your telephone 6.1 Adjusting the audio functions These features can be configured via the Web Management. 6.1.1 Select the melody The phone is in idle state. Menu Press the Menu soft key to access the Main Menu. Basic Setting Use up-down and 'ok' navigation keys to select: Basic Setting Sound... -
Page 60: Configuring Discreet Mode (Beep)
6.1.4 Configuring discreet mode (beep) The phone is in idle state. Menu Press the Menu soft key to access the Main Menu. Basic Setting Basic Setting Use up-down and 'ok' navigation keys to select: Sound Use up-down and 'ok' navigation keys to select: Sound Ringing Ringing... -
Page 61: Enable Screensaver And Define The Delay
Use right-left navigation keys to adjust the brightness. Active Level Adjust the brightness when the phone is in use. Inactive Level Adjust the dimmed brightness when the phone is not in use. Backlight Time: Set the time-out duration for the phone backlight. Select the language of your choice. -
Page 62: Create A Programmable Key
6.6.1 Create a programmable key Long press on a programmable key. Define the type of programmable key. Switch Depending on the type of key, fill in the options. Save the programmed key. Save 6.6.2 Delete a key Long press on a programmed key. Undefined Switch Save. - Page 63 Label: enter the label of the key, displayed on the home page. Forward: immediate forward to a number. Label : enter the label of the key, displayed on the home page. Value: dial the destination number. Voicemail : consulting your voice mailbox. Account : select the relevant SIP account.
-
Page 64: Call Pick-Up
6.7 Call pick-up You hear a telephone ringing in an office where no-one can answer. If authorised, you can answer the call on your own telephone. The system can be configured to prevent call pick-up on some telephones. Before using this feature, you have to program a key on the home page with the following feature: GrpPickup, DirectPickup ... -
Page 65: Define Time And Date Format
6.10 Define time and date format The phone is in idle state. Menu Press the Menu soft key to access the Main Menu. Basic Setting Basic Setting Use up-down and 'ok' navigation keys to select: Time and Date Use up-down and 'ok' navigation keys to select: Time and Date Date : choose the date format. -
Page 66: Removing A Bluetooth® Accessory (Headset, Handset, Etc.)
Paired Bluetooth Device Use up-down and 'ok' navigation keys to select: Paired Bluetooth Device The paired devices are listed. Select a device. Display information about the selected device (name, MAC address). MoreDetail 6.11.3 Removing a Bluetooth® accessory (headset, handset, etc.) The phone is in idle state. -
Page 67: Contacting Your Administrator (Technical Support)
7 Contacting your administrator (technical support) If necessary you may need to contact your administrator. Before contacting your administrator, make sure you have information such as your phone's codes and software version to hand. 7.1 Technical code / Date code The codes are located under the backshell of the phone. -
Page 68: Web Based Management (Wbm)
Advanced Setting Advanced Setting Use up-down and 'ok' navigation keys to select:<123> Enter the administrator password. This section allows the administrator to set IP parmeters, certificates, LDAP servers, DM URL (for configuration files), and SIP Accounts. The administrator can also restore factory settings. - Page 69 All configuration parameters of the desk phone can be managed from the Web Management. Audio (Ringing, Tone, hearing aids…). Backlight, Screensaver, automatic lock. Date format, time format. Forward, Do not disturb. Hotline number. Intercom. ...
-
Page 70: Accessories
EGO Personal conference module. 8135s Compact Conference Phone. 8.1.4 USB WIFI Dongle To know the supported dongle, please refer to the Alcatel-Lucent Enterprise website or contact your administrator.with the supported WIFI dongle, Copyright @ALE 2020 All Rights Reserved... -
Page 71: Add-On Module
Add-on module Phone capabilities can be extended with Add-ons: The EM200 add-on offers up to 200 additional keys with LED, color screen. The EM20 add-on offers up to 200 additional keys with LED and paper label. EM200 EM20 LCD screen. -
Page 72: Install The Add-On To The Desk Phone
*To know the supported dongle, please refer to the Alcatel-Lucent Enterprise website or contact your administrator. 8.2.1 install the add-on to the desk phone 1- Insert the add-on USB-A connector into the USB-A socket of the desk phone. 2- Use the add-on support to fix it to the desk phone using the provided screw. -
Page 73: Changing Or Updating The Paper Label
Restart the desk phone (unplug and plug in the power jack if you are using an external power adapter or the Ethernet connector – LAN). 8.2.3 Changing or updating the paper label Remove the protective cover (1): insert a thin object (or your fingernail) in the slot (a) to lift the protective cover. -
Page 74: Description
8.3.1 Description Color display. Off/on button. Push the button to start. Hold down the button for five seconds to manually switch off. The EGO switches off automatically after 30 minutes. USB connector (micro type B). 3.5 mm, 4 pole jack (TRRS standards: CTIA) Audio control buttons ... -
Page 75: Icons Displayed On The Screen
8.3.2 Icons displayed on the screen The icons are normally displayed for a couple of seconds on connection. The same symbol is displayed in red when the connection is broken. Incoming call or call in progress via USB device connected. Bluetooth®. -
Page 76: Using Ego Personal Conference Module
Bluetooth Bluetooth Use up-down and 'ok' navigation keys to select: Paired Bluetooth Device Paired Bluetooth Device Use up-down and 'ok' navigation keys to select: Press the softkey under the following label: Scan Scan Scanning starts. Select the relevant equipment: “Ego” Connect Connect Add the device by pressing on the associated key:... -
Page 77: Wall Mounting Kit
8.4 Wall mounting kit To mount your phone on the wall, you need to install a standard wall plate that you can easily find on the market. Follow the manufacturer's instructions to install the wall plate on the wall. When the wall plate is fixed, you can prepare your phone and mount it on the wall. -
Page 78: Technical Specifications
9 Technical specifications Width 207 mm (8, 2 in) 207 mm (8, 2 in) 207 mm (8,15 in) Height 183 mm (7,2 in) 183 mm (7,2 in) 183 mm (7,2 in) Weight 810 g (1,79 lbs) 800 g (1,77 lbs) 806 g (1,78 lbs) 2-degree adjustable foot 40°... -
Page 79: Ordering Information
10Ordering information M7 DeskPhone 3MK27003AA M5 DeskPhone 3MK27002AA M3 DeskPhone 3MK27001AA EM20 Expansion Module (add-on module) 3MK27006AA EM200 Smart Expansion Module (add-on module) 3MK27007AA Wall mounting kit 3MK27008AA USB-C Power Adapter (100–240 V AC/5 V DC) (US) 3MK08005US USB-C Power Adapter (100–240 V AC/5 V DC) (EU) 3MK08005EU USB-C Power Adapter (100–240 V AC/5 V DC) (RW) 3MK08005RW... -
Page 80: Guarantee And Clauses
11Guarantee and clauses Current Safety and Regulatory Statements relate to the following products (do not apply to accessories): M3 DeskPhone, M5 DeskPhone, M7 DeskPhone. 11.1 Safety Instructions Changes or modifications to the equipment not expressly approved by the party responsible for compliance could void the user's authority to operate the equipment. -
Page 81: Regulatory Statements
Web site: The Alcatel-Lucent name and logo are trademarks of Nokia used under license by ALE. To view other trademarks used by affiliated companies of ALE Holding, visit: www.al- enterprise.com/en/legal/trademarks-copyright. All other trademarks are the property of their respective owners. The information presented is subject to change without notice. Neither ALE Holding nor any of its affiliates assumes any responsibility for inaccuracies contained herein. - Page 82 Related Documentation - Other languages for these Safety and Regulatory Instructions and User Documentation are available at the following Web site: https://www.al- enterprise.com/products. 8AL90382ENAAed02 - The Alcatel-Lucent name and logo are trademarks of Nokia used under license by ALE. ALE International copyright © 2020...
- Page 83 Press this key to open dialer in hands-free mode (idle state). & Pressing this key answers an incoming call in hands-free mode (idle state). When a call is in progress, pressing this key switches from hands-free mode to headset or handset mode.
- Page 84 Contacts management Select the SIP account to use to make the call. A dial area and the list of Directory last number dialed are displayed. Select this softkey to open contacts management. Create a new contact. Dial the number. Delete Delete the selected contact.
- Page 85 Language Press the blinking line key associated with the SIP account receiving the call. Basic Setting Adjust the brightness when the phone is in use. Display Take call Adjust the dimmed brightness when the phone is not in use. Take the call with the headset if connected, or in hands-free mode Set the delay before the screensaver starts.