Table of Contents
Table of Contents

Related Manuals for Pioneer VREC-DZ700DC


Summary of Contents for Pioneer VREC-DZ700DC
- Page 1 VREC-DZ700DC DASH CAMERA Owner’s Manual...
-
Page 2: Table Of Contents
Contents Thank you for buying this Pioneer product. Please read through these instructions so you will know how to operate your model properly. After you have finished reading the instructions, keep this document in a safe place for future reference. - Page 3 Il testo completo della dichiarazione di conformità UE è disponibile al seguente indirizzo Internet: https://www.pioneer-car.eu/eur/compliance Español: Por la presente, Pioneer declara que el tipo de equipo radioeléctrico [*] es conforme con la Directiva 2014/53/UE. El texto completo de la declaración UE de conformidad está disponible en la dirección Internet siguiente: https://www.pioneer-car.eu/eur/compliance Português:...
- Page 4 Celotno besedilo izjave EU o skladnosti je na voljo na naslednjem spletnem naslovu: https://www.pioneer-car.eu/eur/compliance Română: Prin prezenta, Pioneer declară că tipul de echipamente radio [*] este în conformitate cu Directiva 2014/53/UE. Textul integral al declarației UE de conformitate este disponibil la următoarea adresă internet: https://www.pioneer-car.eu/eur/compliance Български:...
-
Page 5: Precaution
This device uses an internal rechargeable lithium ion battery that should last the lifetime of the device. If you suspect your battery may be dead, try charging it several times. If the battery does not recharge, please consult Pioneer support. Important safeguards WARNING •... - Page 6 • If you notice smoke, a strange noise or odour from this product, or any other abnormal signs on the LCD screen, turn off the power immediately and consult your dealer or the nearest authorised Pioneer Service Station. Using this product in this condition may result in permanent damage to the system.
- Page 7 • Never feed power to other electronic products by cutting the insulation of the power supply cable of this product and tapping into the cable. The current capacity of the cable will be exceeded, causing overheating. To prevent damage WARNING •...
-
Page 8: Disclaimer
Disclaimer • Given the large number of variables and conditions that can be involved in an accident, Pioneer cannot guarantee that every accident or occurrence will trigger the recording feature in this device. • This product features may not operate properly due to the effects of settings, how this product is installed, the condition of the microSD card, and driving conditions (including the road conditions). -
Page 9: How To Read This Manual
How to read this Manual Notation Meaning These symbols are used to draw your attention to items you should be aware of when using this product and items you should be aware of to maintain its performance. Notes provide useful tips and extra information about product features. Note /Notes Square brackets are used to indicate selectable items displayed on the [ ○○... -
Page 10: Usage Precautions
• The internal battery is a consumable part. The operating time will slowly decrease as the battery is repeatedly charged. Contact Pioneer support if you feel that the operating time has become too short. • Do not touch the lens with your hands. Wipe the lens off with a soft cloth if you touch it. - Page 11 • Pioneer Corporation does not make any assurances that microSD card problems will be repaired by formatting the card. Pioneer Corporation bears no responsibility for files that are erased from the microSD card or damage that occurs from formatting the card. Format the microSD card according to your own judgement and at your own responsibility.
-
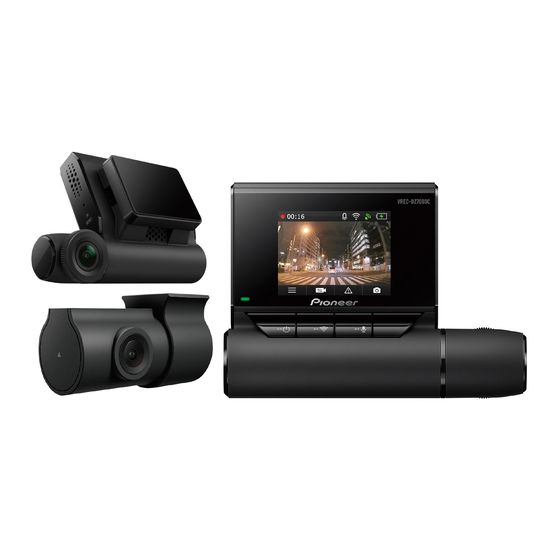
Page 12: Check The Accessories
Check the Accessories Main Unit×1 2nd Camera×1 Mounting Bracket×1 Power Cable (5 m)×1 Mini Pin Jack-RCA Conversion Cable (0.2 m)×1 AV Cable 2nd Camera 2nd Camera microSDHC Card (5 m)×1 Connection Cable Connection Cable (16 GB)×1 (3 m)×1* (6 m)×1* Quick Start Guide×1 Warranty×1 Cleaning Cloth×1... -
Page 13: Before Installing The Product
Before Installing the Product WARNING • When installing the product on vehicles installed with an air bag, never install on the cover of the air bag and at locations that might obstruct the deployment of the air bag. Doing so might prevent the air bag from being deployed normally, cause the product to fly out due to air bag deployment, and cause accident and injury. -
Page 14: Installation Tips
Installation Tips Before Installing and Securing the Product • First, temporarily connect this product and confirm that it operates correctly, and then install it. If the product does not operate correctly, check again if there is a mistake in the connection. Before Applying Double-sided Tape •... -
Page 15: Installation
Installation Specified Installation Position on Front Windscreen When installing this product the inside of the front windscreen, install in a vehicle and in a position that satisfies all of the following conditions. • A position where this entire product is within 20% of the top edge of the height of the front windscreen (range within 20% of the actual length, excluding parts overlapping weatherstrips, mouldings, etc. -
Page 16: Recommended Installation Position On Rear Windscreen
Recommended Installation Position on Rear Windscreen When installing the 2nd camera on the inside of the rear window, installation in a vehicle and in a position that satisfies all of the following conditions is recommended. • A position where the lens part of the 2nd camera is within the wiping range of the wiper. •... - Page 17 4 Connect the power cable, 2nd camera connection cable and AV cable to this product. 2nd camera connection cable 2nd camera Power cable AV Cable Main Unit Notes • Connecting the AV cable is only required if connecting the VREC-DZ700DC to a compatible stereo with an AV Input. − 17 −...
- Page 18 5 Route the power cable, 2nd camera connection cable and AV cable to the passenger seat side. Connection cable This product 2nd camera 6 Connect the power cable and AV cable. → “Connecting the Power Cable” アクセサリー ソケット 7 Turn the vehicle engine on to display the recording screen. シガーライター...
-
Page 19: Connecting The Power Cable
Connecting the Power Cable Be sure to disconnect the ⊖ terminal of the vehicle’s battery before connecting the power cable. The parking mode (security mode allowing 24-hour, 365-day surveillance) can be used by extracting power directly from the vehicle by the power cable. You can also connect the product to a compatible stereo by the AV cable or mini pin jack-RCA conversion cable to project realtime video from this product or movies and photos that are being played back on the screen of the navigation. - Page 20 Video/audio output mini pin jack Connect to the AUX input of the main unit of a Pioneer product with a mini jack terminal compatible with video input. Connection to main units of other brands with RCA input terminals is also possible by using the included mini pin jack-RCA conversion cable (figure below).
-
Page 21: Part Names
Mounting Bracket 6 LCD e Connection Terminal 7 Function Buttons f Lens 8 Lens Pioneer polarised filter AD-PLF100 (sold separately) can help reduce reflections of the dashboard onto the windscreen, and enable the capture of high-contrast videos. − 21 −... -
Page 22: Inserting And Ejecting The Microsd Card
Inserting and Ejecting the microSD Card Turn off the power to this product when inserting and removing the microSD card. → “Manually Turning the Power On and Off ” Inserting the microSD Card Hold the top edge of the microSD card, position the microSD card so that the label is facing the backside of this product, and slowly insert it into the microSD card slot until it clicks. -
Page 23: Backing Up Recorded Files
Backing Up Recorded Files When the free space of the file storage areas is low, files are deleted from the oldest file. We recommend that you back up any important files you want to keep with the following procedure. Note Prepare a spare microSD card in advance. -
Page 24: Using This Product
Using this product Before using this product, first stop the vehicle in a safe location and apply the handbrake. This product Power This product starts when the vehicle’s engine is turned on (ACC ON), and it automatically starts recording. (Video recording) → “Using this product”... -
Page 25: Status Display
Recording 1 Main menu display 2 Switching of camera video Hold down to switch Wi-Fi on/off 3 Manual recording of events Hold down to switch microphone on/off 4 Take photo During playback 5 Back 6 Next file 7 Previous file 8 Play/stop, delete During MENU screen display 9 Back... -
Page 26: Video Recording
*1 When manual event recording is performed or vibration is detected in the event recording mode, and event recording has been activated, “×2” is displayed. *2 A red “\” is displayed when sound recording is set to off. *3 During a Wi-Fi connection, this is displayed in green, and when Wi-Fi is disconnected, this is displayed in white. -
Page 27: Parking Mode
Notes • You can adjust the sensitivity for detecting impacts. → “This product Settings” - “Configurable Features” - “Video Recording” - “G-Sensor Sensitivity” • When impact was detected or manual recording was performed in the event recording mode, event recording is started again after event recording ends. •... -
Page 28: Photography Feature
Photography Feature Photos can be taken during video recording or event recording by pressing the function button. Playing Recorded Files You can play recorded video files and view photo files. 1 Press the function button to open the main menu. In each of the screens displayed from here on, the screen automatically returns to the recording screen if you do not perform any operation for approximately 30 seconds. - Page 29 4 Press the function buttons, select the file, and then press Video Recording The selected file will play. 00:00 00:25 Note function button In the screens in Steps 2 to 4 (excluding the playback screen), pressing the returns you to the previous screen. −...
-
Page 30: This Product Settings
This Product Settings Before using this product, first stop the vehicle in a safe location and apply the handbrake. These settings configure this product. You can reset the settings to the default settings. You can also format the microSD card and check this product version information. Note that video recording will stop while the MENU screen is displayed. - Page 31 4 Press the function buttons, select the setting item, and then press Video Recording Video Clip Length Video Resolution Exposure Compensation 5 Press the function buttons, select the setting value, and then press Video Resolution ▼ This completes setting, and you are returned to the previous screen. Note In the screens in Steps 2 to 4, pressing the function button returns you to the previous screen.
-
Page 32: Configurable Features
Configurable Features Values Setting Setting Details Default Settings Category Sets the recording time for one video recording Video Clip Length 3 min video file in video recording. Video Resolution Sets the image quality of video recording. 1920×1080p Sets use of the feature that automatically adjusts (Wide Dynamic Video the image in situations where there is a large... - Page 33 Setting Setting Details Default Settings Category Link GPS Date Sets the time zone. ±0 time ― Date/Time Sets the time manually. System Sound Sets beeps and playback volume. This can also Level3 Volume be set to OFF. Sets whether or not to record sound around this Mic Mute product during video recording.
-
Page 34: Guide To Recording Time And No. Of Photos
Guide to Recording Time and No. of Photos The following table provides estimates of the video recording times and number of photos possible with different “SD Card Partition” settings. The actual values will depend on various factors, such as the microSD card being used, subject being recorded, and recording conditions. -
Page 35: Exclusive App
Exclusive App The exclusive app “Dash Camera Interface” can be used to check the video recorded on this product or make settings on the screen of an iPhone or smartphone (Android™). To use this app, a Wi-Fi connection must be made between this product and iPhone/smartphone (Android™) beforehand. -
Page 36: Trademarks & Copyrights
Trademarks & Copyrights • microSDHC Logo is a trademark of SD-3C, LLC. • microSDXC Logo is a trademark of SD-3C, LLC. • Android is a trademark of Google Inc. • The Wi-Fi CERTIFIED Logo™ is a certification mark of the Wi-Fi Alliance. •... -
Page 37: Gps
• GPS (Global Positioning System) is a system that measures your current position by receiving position measurement radio signals from GPS satellites. • The GPS satellite signals cannot pass through solid matter (except glass). The signals from GPS satellites may be blocked when this product is in the following locations. —... -
Page 38: Troubleshooting
Troubleshooting Check the following information before sending the product in for repairs. Symptom Cause Action An error occurred during the The microcomputer in this display and operation of this Press the reset button. product is malfunctioning. product. We recommend that you back If there is insufficient space in up any important files you A file that should have been... -
Page 39: Specifications
Specifications Recording Medium microSDHC/microSDXC card, Class 10 (8 GB to 128 GB) Imaging Element Approx. 2 million pixels (on-board high-sensitivity CMOS sensor) Main Unit: 130° horizontal, 68° vertical, 160° diagonal Recording Angles 2nd camera: 112° horizontal, 58° vertical, 137° diagonal Main Unit: F2.0 F-Number 2nd camera: F1.9... - Page 40 Visit www.pioneer-car.eu/uk/ (or www.pioneer-car.eu/eur/) to register your product. PIONEER CORPORATION 28-8, Honkomagome 2-Chome, Bunkyo-ku, Tokyo 113-0021 Japan PIONEER EUROPE NV Haven 1087, Keetberglaan 1 9120 Melsele Tel: 32-3-570-0511 Fax: 32-3-570-0886 © 2020 PIONEER CORPORATION. < KYTZ20C >< OWMWEB_VRECDZ700DC_eg_A >...