Installing a Power Supply
•
•
•
•
•
Power Supply Modules Overview
The switch operates with either one or two active power supply modules. A switch that is part of a StackPower
stack operates with power that is supplied by other stack switches.
You can use two AC modules or one module and blank cover. All power supply modules have internal fans.
All switches ship with a blank cover in the second power supply slot.
The following table describes the supported internal power supply modules. It lists the Platinum certified
power supply modules and the default modules that are shipped with the switch. In a switch, a mix of Platinum
certified and non-Platinum certified power supply modules is supported.
Table 1: Power Supply Module Part Numbers and Descriptions
Part Number
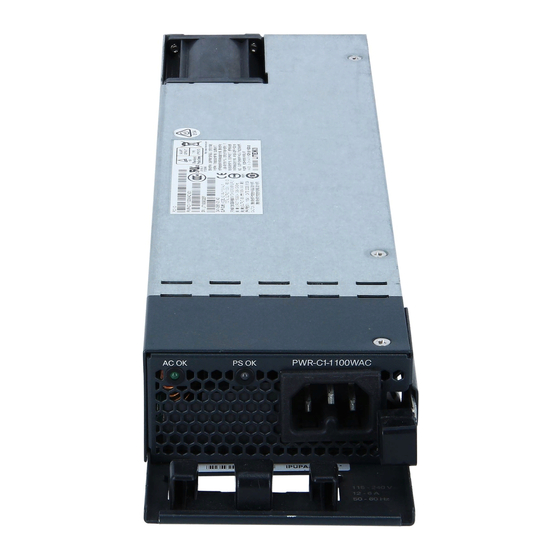
PWR-C1-1100WAC
PWR-C1-715WAC
PWR-C1-350WAC
PWR-C1-350WAC-P
PWR-C1-715WAC-P
PWR-C1-1100WAC-P
PWR-C1-715WDC
PWR-C1-BLANK
Power Supply Modules Overview, on page 1
Installation Guidelines, on page 5
Installing or Replacing an AC Power Supply, on page 6
Installing a DC Power Supply, on page 8
Finding the Power Supply Module Serial Number, on page 13
Description
1100W AC power supply module
715W AC power supply module
350W AC power supply module
350W AC Platinum certified power supply module
715W AC Platinum certified power supply module
1100W AC Platinum certified power supply module
715W DC power supply module
Blank cover
Installing a Power Supply
1
Table of Contents

Related Manuals for Cisco PWR-C1-1100WAC


Summary of Contents for Cisco PWR-C1-1100WAC
- Page 1 In a switch, a mix of Platinum certified and non-Platinum certified power supply modules is supported. Table 1: Power Supply Module Part Numbers and Descriptions Part Number Description PWR-C1-1100WAC 1100W AC power supply module PWR-C1-715WAC 715W AC power supply module PWR-C1-350WAC...
- Page 2 Installing a Power Supply Power Supply Modules Overview For information on available PoE, PoE+, and Cisco UPOE/UPOE+ requirements, see these sections the Power Supply Modules. The 350W and 715W AC power supply modules are autoranging units that support input voltages from 100 through 240 VAC.
- Page 3 Installing a Power Supply Power Supply Modules Overview PS OK LED Keying feature AC power cord connector Figure 3: 350W AC Power Supply 350W AC power supply Release latch module AC OK LED Power cord retainer PS OK LED Keying feature AC power cord connector Installing a Power Supply...
- Page 4 Installing a Power Supply Power Supply Modules Overview Figure 4: 715W DC Power Supply 715W DC power supply Input power terminal module (positive polarity) DC OK LED Input power terminal (negative polarity) PS OK LED Grounding terminal Release latch Terminal block safety cover Extraction handle If no power supply is installed in a power supply slot, install a power supply slot cover.
- Page 5 Installing a Power Supply Installation Guidelines Figure 5: Power Supply Slot Cover Release handles Retainer clips Table 2: Switch Power Supply Module LEDs AC OK Description PS OK Description No AC input power. Output is disabled, or input is outside operating range (AC LED is off).
-
Page 6: Installing Or Replacing An Ac Power Supply
Only trained and qualified personnel should be allowed to install, replace, or service this equipment. Statement 1030 Warning If a Cisco external power system is not connected to the switch, install the provided connector cover on the back of the switch. Statement 386... - Page 7 Installing a Power Supply Installing or Replacing an AC Power Supply Step 4 Press the release latch at the right side of the power supply module inward and slide the power supply out. Caution Do not leave the power-supply slot open for more than 90 seconds while the switch is operating. Warning This unit might have more than one power supply connection.
-
Page 8: Installing A Dc Power Supply
Installing a Power Supply Installing a DC Power Supply Installing a DC Power Supply Warning An exposed wire lead from a DC-input power source can conduct harmful levels of electricity. Be sure that no exposed portion of the DC-input power source wire extends from the terminal block plug. Statement 122 Warning Before performing any of the following procedures, ensure that power is removed from the DC circuit. -
Page 9: Grounding The Switch
Installing a Power Supply Grounding the Switch • Four fork-type terminals from the DC power supply accessory kit. The terminals must be the proper size for M3 screws in a Dinkle DT-35-B25-style terminal block. • M5 screws for 12 AWG wire connection for NEBS installations. Grounding the Switch Follow these steps to install either a single-hole ground lug or a dual-hole ground lug on the switch. - Page 10 Installing a Power Supply Grounding the Switch Figure 8: Stripping the Ground Wire Step 3 Slide the open end of the ground lug over the exposed area of the wire. Step 4 Using a Panduit crimping tool, crimp the ground lug to the wire. Figure 9: Crimping the Ground Lug Step 5 Use the ground screw to attach the single-hole ground lug to the switch rear panel.
- Page 11 Installing a Power Supply Installing the DC Power Supply in the Switch Figure 10: Attaching the Ground Lug and Wire Assembly Attaching the single-hole Attaching the dual-hole ground lug ground lug Step 6 Using a ratcheting torque screwdriver, torque the ground-lug screws to 60 lbf-in. (960 ozf-in.). Step 7 Connect the other end of the grounding wire to an appropriate grounding point at your site or to the rack.
-
Page 12: Wiring The Dc Input Power Source
Installing a Power Supply Wiring the DC Input Power Source Procedure Step 1 Verify that the power supply is not connected to any power sources. Step 2 Remove the plastic safety cover from the power supply terminal blocks. If you are not replacing a DC power supply, go to Step 5. Note Step 3 Use a number-2 Phillips screwdriver to remove the DC-input power wires from the power terminals. -
Page 13: Finding The Power Supply Module Serial Number
Finding the Power Supply Module Serial Number If you contact Cisco Technical Assistance regarding a power supply module, you need to know the serial number. See the following illustrations to find the serial number. You can also use the CLI to find out the serial number. - Page 14 Installing a Power Supply Finding the Power Supply Module Serial Number Figure 14: 715-W and 350-W AC Power Supply Serial Number Installing a Power Supply...