Quick Links
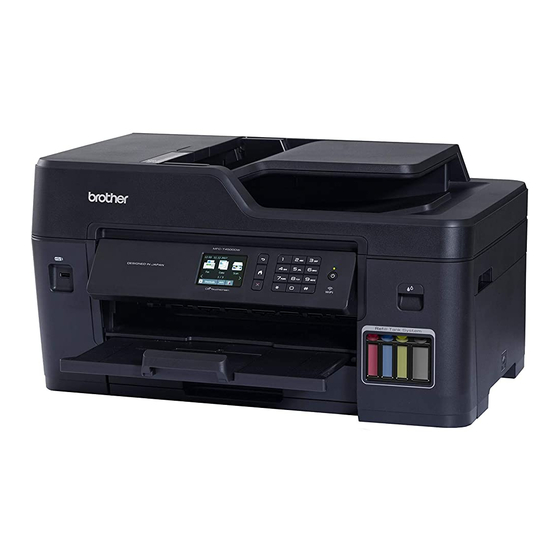
MFC-T4500DW
Quick Setup Guide
Read the Product Safety Guide first, then read this Quick Setup Guide
for the correct installation procedure.
1
Unpack the machine and check the components
Remove the protective tape or film covering the machine.
Inbox Ink Bottles
• [BTD60BK] Black
• [BT5009Y] Yellow
• [BT5009C] Cyan
Operation Videos
• [BT5009M] Magenta
http://www.95105369.com
Installation
& Using
Videos
2
Load plain A4 paper
Pull the paper tray completely out of
the machine as shown by the arrow.
Fan the paper well and load it in the tray.
Set the date and
4
time
Follow the touchscreen instructions to set the date and
time.
Push down on the cap of the
Point the nozzle upward so
ink tank to close it tightly.
that the ink does not spill,
Repeat step
and then remove the nozzle
other ink tanks.
from the ink tank.
Close the ink tank cover. The
machine will prepare the ink
tube system for printing.
Connect the telephone line cord
7
If you are not using your machine as a fax, go to
For more information on using the fax feature, see the Online User's Guide.
Lift the scanner cover.
Quick Setup Guide
Product Safety Guide
Maintenance Sheet
Brother Installation Disc
Do not exceed this
mark (bbb).
Slowly push the paper tray
Adjust the paper guides.
completely into the machine.
5
Fill the ink tanks with the inbox ink
Open the ink tank cover
the tab
downwards to open the
b
cap of the ink tank.
6
When the machine has finished the initial cleaning process,
follow the touchscreen instructions to configure the machine
settings.
• Check print quality
• Configure the tray or paper size settings
• Set Firmware Update Notice
5
for the three
8
.
Connect the telephone line cord.
Use the socket marked LINE and guide
the cord out the back of the machine.
Power Cord
USB Interface Cable
Telephone Line Cord
Pull out the paper support
until it locks into place.
2
Remove the cap and protective
1
film from the ink bottle, and then
replace the cap.
and pull
a
NOTE
Fasten the ink bottle cap tightly to
avoid leakage.
Machine settings
Close the scanner cover.
CHN-ENG
Version A
NOTE
• The Reference Guide for this model is available on the enclosed
installation disc. Visit at the installation disc: \document\userguide\
simplified_chinese\pdf
• Save all packing materials and the box in case you must ship your
machine.
• For a network connection you must purchase a network
interface cable. A USB cable is included with your machine.
USB cable
We recommend using a USB 2.0 cable (Type A/B) that is 2 metres
long.
Ethernet (Network) cable
Use a straight-through Category 5 (or greater) twisted-pair cable
for 10BASE-T or 100BASE-TX Fast Ethernet Network.
Secure Network Access
Your machine's default password is initpass. We
recommend you change it to protect your machine
from unauthorised access.
Connect the power
3
cord
Adjust the control
panel angle to read the
touchscreen more easily.
Connect the power cord. The machine will power
on automatically.
Remove the tip of the ink bottle.
Insert the nozzle of the ink bottle
firmly so that the ink does not
spill. Fill the ink tank by gently
squeezing the bottle as shown.
Empty the entire bottle into the
ink tank.
1

Related Manuals for Brother MFC-T4500DW


Summary of Contents for Brother MFC-T4500DW
- Page 1 Use a straight-through Category 5 (or greater) twisted-pair cable for 10BASE-T or 100BASE-TX Fast Ethernet Network. http://www.95105369.com Installation Secure Network Access Maintenance Sheet Brother Installation Disc Telephone Line Cord & Using Your machine’s default password is initpass. We Videos recommend you change it to protect your machine from unauthorised access.
- Page 2 Print or scan using your mobile device Your mobile device must be connected to the same wireless network as your Brother machine. AirPrint is available for all supported iOS devices including iPhone, iPad, and iPod touch. You do not need to download any software to use AirPrint.