
Related Manuals for Philips MC-110/22


Summary of Contents for Philips MC-110/22
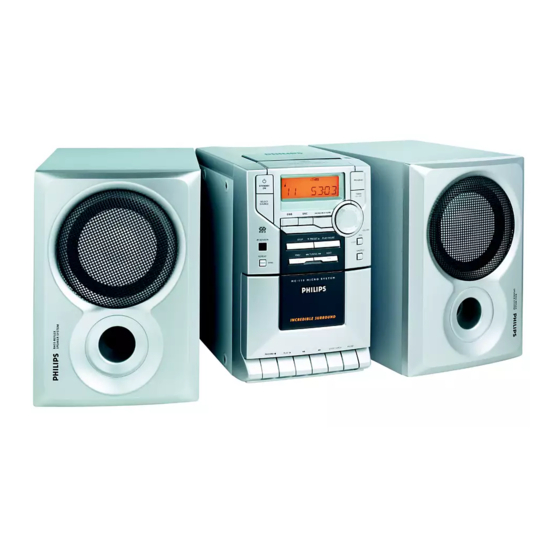
- Page 1 Micro Hi-Fi System pg 001-022/MC1xx/22-Eng Audio Audio 3140 115 28731 10/5/01, 2:45 PM...
-
Page 2: How To Connect Plug
The Performer’s Protection Acts 1958 to 1972. pg 001-022/MC1xx/22-Eng Italia DICHIARAZIONE DI CONFORMITA’ Si dichiara che l’apparecchio MC-100, MC-105, MC-110 Philips risponde alle prescrizioni dell’art. 2 comma 1 del D.M. 28 Agosto 1995 n. 548. Fatto a Eindhoven Philips Consumer Electronics Philips, Glaslaan 2... - Page 3 CD/CD-R/CD-RW COMPATIBLE STANDBY SELECT SOURCE iR SENSOR REPEAT BAND RECORD pg 001-022/MC1xx/22-Eng TUNER REPEAT í Ç á MUTE OPEN • CLOSE & PROGRAM TIMER TIMER PROGRAM PROGRAM TIMER ON • OFF INCREDIBLE SURR. INTERACTIVE SOUND VOLUME STOP PRESET PLAY•PAUSE CLOCK PREV NEXT TUNING...
- Page 4 Advarsel: Usynlig laserstråling ved åbning når sikkerhedsafbrydere er ude af funktion. Undgå utsættelse for stråling. Bemærk: Netafbryderen er sekundært indkoblet og ofbryder ikke strømmen fra nettet. Den indbyggede netdel er derfor tilsluttet til lysnettet så længe netstikket sidder i stikkontakten. Klass 1 laseraparat Varning! Om apparaten används på...
- Page 5 Index English ------------------------------------------------ 6 Français -------------------------------------------- 23 Español --------------------------------------------- 40 Deutsch --------------------------------------------- 57 Nederlands ---------------------------------------- 74 Italiano ---------------------------------------------- 91 Svenska ------------------------------------------- 108 Dansk --------------------------------------------- 125 Suomi --------------------------------------------- 142 Português ---------------------------------------- 159 ∂ÏÏËÓÈο ----------------------------------------- 176 Polski ---------------------------------------------- 193 pg 001-022/MC1xx/22-Eng 10/5/01, 2:45 PM...
-
Page 6: Table Of Contents
Contents General Information Environmental information ... 7 Supplied accessories ... 7 Safety information ... 7 Preparations Rear connections ... 8–9 Optional connection ... 9 Inserting batteries into the remote control ... 9 Controls Controls on the system and remote control ... 10 Basic Functions Switching the system on ... -
Page 7: General Information
This product complies with the radio interference requirements of the European Community. Environmental Information All unnecessary packaging has been omitted. We have tried to make the packaging easy to separate into three materials: cardboard (box), polystyrene foam (buffer) and polyethylene (bags, protective foam sheet). -
Page 8: Preparations
Preparations FM wire antenna speaker (right) AC power cord Rear connections The type plate is located at the rear of the system. Power Before connecting the AC power cord to the wall outlet, ensure that all other connections have been made. WARNING! –... -
Page 9: Optional Connection
FM Antenna For better FM stereo reception, connect an outdoor FM antenna to the FM AERIAL (FM ANTENNA) terminal. Speakers Connection Front Speakers Connect the speaker wires to the SPEAKERS terminals, right speaker to "RIGHT" and left speaker to "LEFT", coloured (marked) wire to "+"... -
Page 10: Control
Controls (illustrations on page 3) Controls on the system and remote control STANDBY ON y – switches the system to standby/on. – on the remote control only - switches the system to standby. SELECT SOURCE – selects the respective sound source for CD/ TUNER/ TAPE /AUX. -
Page 11: Basic Functions
TIMER STANDBY PROGRAM SELECT SOURCE INCREDIBLE SURR. INTERACTIVE SOUND iR SENSOR STOP PRESET PLAY•PAUSE REPEAT PREV TUNING NEXT BAND IMPORTANT: Before you operate the system, complete the preparation procedures. Switching the system on Press 2 STANDBY ON or SELECT SOURCE. The system will switch to the last selected source. -
Page 12: Cd Operation
CD Operation STANDBY PROGRAM SELECT SOURCE INCREDIBLE SURR. INTERACTIVE SOUND iR SENSOR STOP PRESET PLAY•PAUSE REPEAT PREV TUNING NEXT BAND IMPORTANT: The lens of the CD player should never be touched. Playing a disc This CD player plays Audio Discs including CD- Recordables and CD-Rewritables. -
Page 13: Different Play Modes: Shuffle And Repeat
Different play modes: SHUFFLE and REPEAT You can select and change the various play modes before or during playback. The play modes can also be combined with PROGRAMME. SHUFFLE ... tracks of the entire disc/ programme are played in random order SHUFFLE and REPEAT ALL…to repeat the entire disc/ programme continuously in random order... -
Page 14: Radio Reception
Radio Reception TUNER TUNER TIMER STANDBY PROGRAM SELECT SOURCE INCREDIBLE SURR. INTERACTIVE SOUND iR SENSOR STOP PRESET PLAY•PAUSE REPEAT PREV TUNING NEXT BAND Tuning to radio stations Select TUNER source. TUNER is displayed briefly. Press BAND once or more to select your waveband. -
Page 15: Tuning To Preset Radio Stations
Tuning to preset radio stations Press PRESET 4 or 3 (on the remote control ¡ or ™ ) until the desired preset station is displayed. Radio Data System is a service that allows FM stations to show additional information. If you are receiving a RDS station, station name are displayed. -
Page 16: Rds News And Traffic Announcement (Ta)
Radio Reception RDS News and Traffic Announcement (TA) You may set up the tuner in such a way that listening to CD or tape is interrupted by the NEWS of a RDS station. This only works if the RDS station broadcasts a NEWS signal while sending the news. -
Page 17: Tape Operation / Recording
I N C R E D I B L E S U R RO U N D RECORD PLAY STOP • OPEN Tape playback Select TAPE source. The display shows TAPE throughout tape operation. Press STOP•OPEN to open the tape door. Insert a recorded tape and close the tape door. -
Page 18: Recording From The Radio
Cleaning the disc lens After prolonged use, dirt or dust may accumulate at the disc lens. To ensure good playback quality, clean the disc lens with Philips CD Lens Cleaner or any commercially available cleaner. Follow the instructions supplied with cleaner. -
Page 19: Clock/Timer
TIMER STANDBY PROGRAM SELECT SOURCE INCREDIBLE SURR. INTERACTIVE SOUND iR SENSOR STOP PRESET PLAY•PAUSE REPEAT PREV TUNING NEXT BAND Setting the clock There are two possible methods for setting the clock: manually or automatically by using RDS. Automatic clock setting (RDS versions only) Tune to a RDS station (see Radio Reception). -
Page 20: Activating And Deactivating Sleep
Clock/Timer Activating and deactivating SLEEP The sleep timer enables the system to switch off by itself after a set period of time. The clock time needs to be set first before the sleep timer can be used. Press SLEEP on the remote control once or more. -
Page 21: Troubleshooting
WARNING Under no circumstances should you try to repair the system yourself, as this will invalidate the warranty. Do not open the system as there is a risk of electric shock. If a fault occurs, first check the points listed below before taking the system for repair. If you are unable to remedy a problem by following these hints, consult your dealer or service centre. - Page 22 Troubleshooting The remote control does not function properly. The timer is not working. The Clock/Timer setting is erased. pg 001-022/MC1xx/22-Eng – Select the source (CD or TUNER, for example) before pressing the function button (É,í,ë). – Reduce the distance between the remote control and the system.