Table of Contents
Available languages
Available languages
Benutzerhandbuch
ACHTUNG: DER FAHRZEUGFÜHRER IST IMMER SELBST VERANTWORTLICH DAFÜR,
DASS VOR DEM VERLASSEN DES FAHRZEUGS UHRZEIT UND ANKUNFTSZEIT KORREKT
EINGESTELLT WURDEN.
HINWEIS: DIE PARKSCHEIBE WECHSELT AUTOMATISCH ZWISCHEN SOMMER- UND
WINTERZEIT.
HINWEIS. LAUT GESETZGEBUNG IN EINIGEN EUROPÄISCHEN LÄNDERN WIE Z.B.
DÄNEMARK
DARF SICH IN JEDEM FAHRZEUG NUR EINE PARKSCHEIBE BEFINDEN.
ENTFERNEN SIE DARUM BITTE ALLE ANDEREN PARKSCHEIBEN VOR DER MONTAGE DER
JACOB JENSEN™ ELECTRONIC PARKING DISC. IN DEUTSCHLAND KÖNNEN PRINZIPIELL
ANALOGE UND ELEKTRONISCHE PARKSCHEIBEN GLEICHZEITIG BENUTZT WERDEN, DIESE
MÜSSEN DANN ABER GENAU DIESELBE ANKUNFTSZEIT ANZEIGEN !
Disc_UserGuide_DE_UK_14DEC2016.indd 1
14/12/16 14:50
Chapters
Table of Contents

Related Manuals for Jacob Jensen Electronic Parking Disc II


Summary of Contents for Jacob Jensen Electronic Parking Disc II
- Page 1 DARF SICH IN JEDEM FAHRZEUG NUR EINE PARKSCHEIBE BEFINDEN. ENTFERNEN SIE DARUM BITTE ALLE ANDEREN PARKSCHEIBEN VOR DER MONTAGE DER JACOB JENSEN™ ELECTRONIC PARKING DISC. IN DEUTSCHLAND KÖNNEN PRINZIPIELL ANALOGE UND ELEKTRONISCHE PARKSCHEIBEN GLEICHZEITIG BENUTZT WERDEN, DIESE MÜSSEN DANN ABER GENAU DIESELBE ANKUNFTSZEIT ANZEIGEN ! Disc_UserGuide_DE_UK_14DEC2016.indd 1...
- Page 2 Disc_UserGuide_DE_UK_14DEC2016.indd 2 14/12/16 14:50...
-
Page 3: Table Of Contents
Deutsch Einleitung Produktübersicht Aktivierung & Einstellung der Uhrzeit Montage Manuelle Einstellung Fehlersuche & Tipps Pflege & Wartung Garantie Zertifikate & Zulassungen JACOB JENSEN™ Produkte Echtheitszertifikat Disc_UserGuide_DE_UK_14DEC2016.indd 3 14/12/16 14:50... -
Page 4: Einleitung
Bedarf auch manuell eingestellt werden. Weitere Informationen finden Sie auf Seite 8. Die JACOB JENSEN™ Electronic Parking Disc II ist durch eine klare, cha- rakteristische Formensprache gekennzeichnet, die von Jacob Jensen entwi- ckelt und durch seinen Sohn, Timothy Jacob Jensen, vollendet wurde – eine Formensprache, mit der Jacob Jensen Design weltweit Bekanntheit und An- erkennung erlangte. -
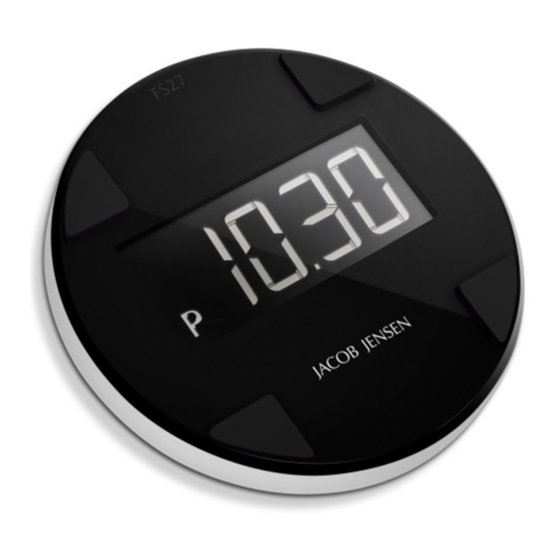
Page 5: Produktübersicht
Produktübersicht Ansicht vom Innenraum des Fahrzeugs LED-Indikator Ansicht von außen Klebekissen halten das Produkt an der Frontscheibe fest. Auf dem LCD-Display werden die Uhrzeit bzw. die Ankunftszeit angezeigt. Das ‘P‘-Symbol an der linken Seite des Displays zeigt an, dass geparkt wird. Unter der Abdeckplatte Tasten für die Einstellung (mehr Informationen dazu finden Sie auf... -
Page 6: Aktivierung & Einstellung Der Uhrzeit
Aktivierung & Einstellung der Uhrzeit 1. Nehmen Sie erst die Abdeckplatte und danach die Abdeckung des Batteriefachs ab. 2. Entfernen Sie die Kunststoffstreifen vom Batteriefach. 3. Auf dem LCD-Display blinkt jetzt die Jahreszahl. Stellen Sie das korrekte Jahr mithilfe der Tasten oder ein. -
Page 7: Montage
Montage 1. Reinigen Sie die Scheibe mit dem mitgelieferten Putztuch. Benutzen Sie keine Glasreiniger, weil diese Wachs oder Öle enthalten können. 2. Entfernen Sie mithilfe des beiliegenden kleinen Messers vorsichtig die rote Schutzfolie von den Klebekissen. 3. Platzieren Sie die Abdeckplatte der Parkscheibe in der unteren Ecke der Frontscheibe auf der Beifahrerseite. -
Page 8: Manuelle Einstellung
Manuelle Einstellung Falls die Ankunftszeit von der automatisch angegebenen Zeit abweicht, oder kann die Ankunftszeit mithilfe der Tasten manuell geändert werden. Die Ankunftszeit wird dann direkt auf dem Display angezeigt. Informieren Sie sich in der Kurzanleitung. Beim Bewegen des Fahrzeugs Wird der Motor gestartet und das Fahrzeug anfährt, wechselt das LCD- Display zurück zur Anzeige der aktuellen Uhrzeit, sobald Fahrtbewegun- gen registriert werden. -
Page 9: Fehlersuche & Tipps
Fehlersuche & Tipps Die Abdeckplatte lässt sich nicht an der Frontscheibe befestigen. Mögliche Ursachen: 1. Die Frontscheibe ist verschmutzt. Reinigen Sie die Scheibe in diesem Fall gründlich (siehe Seite 7). 2. Die Scheibe ist zu kalt oder feucht. Die Klebekissen haften optimal bei Temperaturen über 10°C. -
Page 10: Pflege & Wartung
Pflege & Wartung 1. Mit dem Produkt muss sorgsam umgegangen werden. Es darf niemals harten Stößen, Staub, Feuchtigkeit oder extremen Temperaturen (≤ -20°C oder ≥ +70°C) ausgesetzt werden. 2. Das Produkt darf nicht in Kontakt mit Wasser geraten. 3. Das Produkt darf nicht mit scheuernden oder ätzenden Reinigungsmit- teln gereinigt werden. -
Page 11: Zertifikate & Zulassungen
Zertifikate & Zulassungen Das Produkt ist vom Straßenverkehrsamt für den öffentlichen Verkehr unter der Nummer E1 10 R-057830 zugelassen. WEEE Elektrische und elektronische Geräte (WEEE) enthalten Materialien, Komponenten und Stoffe, die gefährlich und schädigend für die Gesund- heit des Menschen und für die Umwelt sein können, wenn elektrische und elektronische Geräte (WEEE) als Abfall nicht korrekt entsorgt werden. - Page 12 Disc_UserGuide_DE_UK_14DEC2016.indd 12 14/12/16 14:50...
- Page 13 PLEASE NOTE THAT IN SOME EUROPEAN COUNTRIES, E.G. DENMARK, REGULATION DICTATES THAT A CAR MUST NOT FEATURE MORE THAN ONE PARKING DISC. MAKE SURE TO REMOVE ANY OTHER PARKING DISC PRIOR TO INSTALLING THE JACOB JENSEN ELECTRONIC PARKING DISC. Disc_UserGuide_DE_UK_14DEC2016.indd 13 14/12/16 14:50...
- Page 14 Disc_UserGuide_DE_UK_14DEC2016.indd 14 14/12/16 14:50...
- Page 15 English Introduction Product overview Activation & clock setting Mounting the device Manual setting Troubleshooting & good advice Maintenance Warranty Certificates & approvals JACOB JENSEN™ products Certificate of Authenticity Disc_UserGuide_DE_UK_14DEC2016.indd 15 14/12/16 14:50...
-
Page 16: Introduction
The JACOB JENSEN™ Electronic Parking Disc II expresses the characteristic clean form language developed by Jacob Jensen and refined by his son Timothy Jacob Jensen – a form language that has brought the company recognition and distinction all over the world. -
Page 17: Product Overview
Product overview Seen from inside the car LED Indicator Seen from outside the car Adhesive pads holding the product in place on the windscreen. LCD display showing the clock or time of parking. ‘P’ icon next to the displayed time indicates parking mode. -
Page 18: Activation & Clock Setting
Activation & clock setting 1. Remove the front cover, then remove the battery cover. 2. Remove the plastic strips from the battery compartment. 3. The LCD display now flashes the year, set the correct year using or . 4. Press to change the month (‘M’), set the correct month using or . -
Page 19: Mounting The Device
Mounting the device 1. Clean the window using the cleaning cloth provided. Do not use any window cleaning solutions as they may contain lubricants. 2. Carefully remove the red film from the adhesive pads using the slicer provided. 3. Mount the front cover of the parking disc in the corner of the passenger side windscreen. -
Page 20: Manual Setting
Manual setting If the time of parking is different from the automatically set time, the parking time can be manually adjusted by or . The time of parking will be displayed on the unit immediately. See Quick Guide. When the car is moved When you start the engine and drive the car, the LCD display will change back to clock time once driving mode is detected. -
Page 21: Troubleshooting & Good Advice
Troubleshooting & good advice If the frontplate cannot be attached to the windscreen, it may be because: 1. The windscreen is dirty. Clean the windscreen thoroughly (See page 19). 2. The windscreen is exposed to extreme temperatures or moisture. For best results temperature should exceed 10°C. If you need to change the windscreen or if the parking disc needs is to be moved from one car to another, blow hot air on the outside of the windscreen, e.g. -
Page 22: Maintenance
Maintenance 1. Avoid handling the product roughly or exposing it to violent impact, dust, moisture or extreme temperatures (≤ -20°C or ≥ +70°C). 2. Avoid exposing the product to water. 3. Do not clean the product with abrasive or corroding agents. 4. -
Page 23: Certificates & Approvals
Certificates & approvals The product is certified by the German Road Traffic Authority for public transport under the number E1 10 R-057830. WEEE Electrical and electronic equipment (WEEE) contains materials, components and substances that may be dangerous and hazardous to human health and to the environment when waste from electrical and electronic equipment (WEEE) is not disposed of correctly. -
Page 24: Jacob Jensen™ Produkte
JACOB JENSEN™ Products The first product to bear the brand JACOB JENSEN™ was a wrist watch. Shortly after its introduction on the market it was included in the Design Study Collection of The Museum of Modern Art in New York. - Page 25 Smoke Alarm Strata watch series Toasters Electric kettles Disc_UserGuide_DE_UK_14DEC2016.indd 25 14/12/16 14:50...
- Page 26 Disc_UserGuide_DE_UK_14DEC2016.indd 26 14/12/16 14:50...
-
Page 27: Echtheitszertifikat
Certificate of authenticity This is your guarantee of an authentic JACOB JENSEN™ product. Your product has gone through rigorous testing in order to live up to the highest quality standards and carries a 2-year limited international warranty. This warranty is only valid with the stamp of an authorized JACOB JENSEN™... - Page 28 For more information about our products, please visit our website jacobjensen.com JACOB JENSEN™ is trademark of JACOB JENSEN HOLDING A/S and is used under license by JACOB JENSEN DESIGN A/S. © 2015 JACOB JENSEN HOLDING A/S Disc_UserGuide_DE_UK_14DEC2016.indd 28 14/12/16 14:50...