
Related Manuals for E-Mu Drumulator


Summary of Contents for E-Mu Drumulator
- Page 1 DRUMULATOR OWNERS MANUAL...
-
Page 2: How To Use This Manual
Section 5 describes the various page, set up the Drumulator, and prepare control jacks on the back. Section 6 deals to make some absolutely fantastic drum with how to best use the Drumulator in sounds. studio environments. E-mu System, Inc. 1981... - Page 3 Drumulator Owners Manual Table of Contents DRUMULATOR OVERVIEW SECTION 1: GETTING READY 1A Hooking up the Drumulator 1B Instant Gratification! 1C Assigning Drum Sound to Play Buttons 1D Setting Drum/Percussion Levels 1E Setting Drum/Percussion Accents 1F Playing Back Segments 1G Setting Tempo...
- Page 4 Recording a Sync Track on Tape Recovering the Drumulator’s Sync Track from Tape Using the Drumulator with 24 Pulses Per Quarter Note Clocks Using the Drumulator with 48 or 96 Pulses Per Quarter Note Clocks and Audio Rate Clocks Synchronizing Applications External Computer Interface...
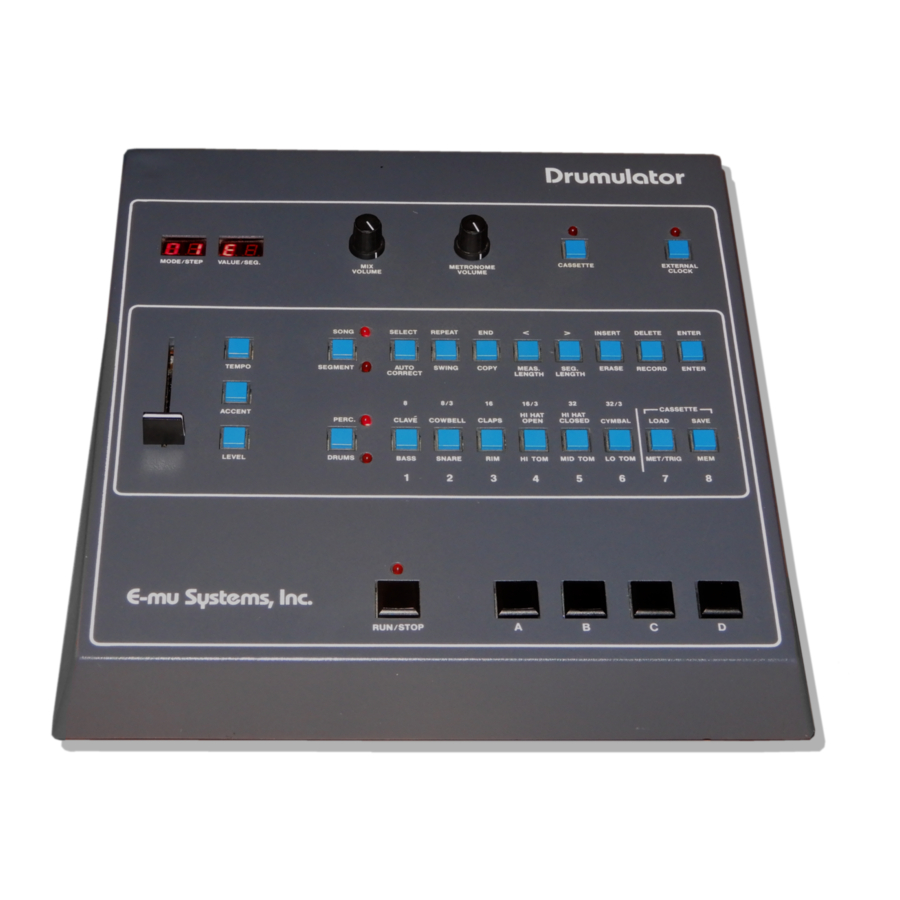
- Page 5 Drumulator Owners Manual Drumulator Overview The Drumulator is a rhythm/drum machine You may play segments individually or that features twelve digitally recorded drum combine them into songs. To create a sounds stored on computer chips, and song, you tell the machine which segments extensive solid-state recording capabilities.
-
Page 6: Section 1: Getting Ready
Drumulator Owners Manual SECTION 1: GETTING READY 1A Hooking up the Drumulator. 1B Instant Gratification! 1C Assigning Drum Sounds to Play Buttons 1D Setting Drum/Percussion Levels 1E Setting Drum/Percussion Accents 1F Playing Back Segments 1G Setting Tempo 1H Programming the Metronome E-mu System, Inc. - Page 7 The Drumulator was set for the AC voltage indicated on the sticker attached to the Drumulator’s AC plug. If this voltage does not agree with the AC voltage present in your part of the world, before turning on the Drumulator make sure the Drumulator is unplugged;...
- Page 8 6. Press the B button to play the snare drum. After or two hours with the Drumulator and this manual. two measures, whatever you played will be repeated. Continue adding snare drum parts if desired.
- Page 9 Select button without first holding down a Drum Play holding it down while you tap any Drum/ button — and the Drumulator now thinks that you have Percussion Sound Select button. In this started to choose a segment (Section 1F describes example, the HI HAT CLOSED is being choosing segments in detail).
- Page 10 Note that segment levels are “remembered” by the drums assume whatever levels were programmed Drumulator only while you are in segment mode. If for Song 1. You may change drum levels with the you switch over to song mode, as described in following procedure;...
- Page 11 Drumulator Owners Manual Notes: ♦ ♦ ♦ ♦ You may set levels while the Drumulator is 4. After setting the level of the last Drum/Per- running (although not while it is in record mode). cussion Sound Select button you want to This is useful when you have completed a song or adjust, press ENTER.
- Page 12 ♦ ♦ ♦ ♦ When you turn on the Drumulator the drums accented drum will become louder, providing assume whatever accent levels were programmed that the sum of the level and accent values for Song 1.
-
Page 13: Playing Back Segments
Drumulator Owners Manual ♦ ♦ ♦ ♦ When accenting drums, you will usually want to ♦ ♦ ♦ ♦ You can set accents while the Drumulator is running (but not while it is in record mode). use modest accent levels (1 to 3). Greater accents are more useful with percussion sounds. - Page 14 In this example, current segment ends. If the current segment we’re selecting segment 2. ends and the Drumulator stops (light goes off), the new segment you’ve selected is empty. 4. Make sure METRONOME LEVEL is up so that...
- Page 15 Drumulator Owners Manual The following summarizes your options: Notes: ♦ ♦ ♦ ♦ In addition to the click, which occurs on each Button Metronome Right heat, there is a louder (accented) click on the first Legend Clicks Every Display beat of each measure. Also, the RUN/STOP light Reads blinks off at the beginning of each segment.
-
Page 16: Section 2: Recording Segments
Drumulator Owners Manual SECTION 2: RECORDING SEGMENTS 2A Recording A Segment: Overview 2B Erasing a Segment 2C “Dimensioning” a Segment Setting the time signature and/or measure length 2D Understanding Auto Correct 2E Setting Auto Correct 2F Recording a Segment 2G Erasing A Specific Drum Sound... -
Page 17: Erasing A Segment
Drumulator Owners Manual 2A Recording A Segment: Overview • Recording a segment: Entering record mode and playing drum sounds. The Drumulator memory remembers • Programming the metronome if necessary. what you play • Erasing previously recorded sounds • Editing the segment in case you want to make necessary). - Page 18 Drumulator Owners Manual 2. To erase a segment stop the Drumulator and erasing 51 you would return to 11. If you want to hold down ERASE. The left-hand display continue working with segment 51, make sure shows Er, the right-hand display shows a you key it back in again so that 51 appears in the blinking cursor.
- Page 19 ♦ ♦ ♦ ♦ If while in real time dimensioning mode you try to 7. To set the number of measures in the segment create a segment length longer than the Drumulator (segment length), press SEC. LENGTH. The can accommodate, the Drumulator will stop, the...
- Page 20 Drumulator Owners Manual ♦ ♦ ♦ ♦ If you are in real time dimensioning mode and miss Notes: the desired end point of the segment, hit ENTER ♦ ♦ ♦ ♦ There is an alternate way to set segment length while still in that mode, and you can immediately try called real time dimensioning mode.
-
Page 21: Setting Auto Correct
(such as sixteenth or even thirty- second notes). 2E Setting Auto Correct To set Auto Correct, the Drumulator must be 2. When in Auto Correct mode, the Drum Sound stopped and in segment mode. Select buttons become Auto Correct Select buttons (time setting of the PERC/DRUMS 1. - Page 22 ENTER. The picture shows how to select six- teenth note Auto Correct resolution. 4. Remember that although you may change the Auto Correct resolution any time that the Drumulator is 3. To select high resolution mode, press AUTO stopped, this change does not affect any parts CORRECT twice and then press ENTER.
-
Page 23: Erasing A Specific Drum Sound
Drum Play button has been erased. (unless it is already assigned). 2. While the Drumulator is stopped, hold down ERASE (the right-hand display shows a blinking Notes: cursor). While holding down ERASE, tap the Drum Play button corresponding to the sound ♦... - Page 24 1. Start off with the Drumulator stopped. To When erasing, you will hear the drum sound in its erase a portion of a drum track, first assign...
- Page 25 To program a segment for swing, you segment have a particular rhythmic swing to it. The must be in segment mode. Then, follow these Drumulator normally provides a “swing factor” of steps: 50%, which means that each quarter note is weighted so that the first eighth note takes up 50% 1.
- Page 26 Drumulator Owners Manual Button Number Swing Factor...
- Page 27 (see Section 4B). After doing segment data in memory. this, you may want to clear all data in the Drumulator to create more space. Another occasion where you might 3. If you indeed want to clear out all the song and want to clear all data is if you’ve finished working on a...