
Related Manuals for Mitsubishi Electric CP-M1


Summary of Contents for Mitsubishi Electric CP-M1
- Page 1 DIGITAL COLOR PRINTER MODEL CP-M1 OPERATION MANUAL THIS OPERATION MANUAL IS IMPORTANT TO YOU. PLEASE READ IT BEFORE USING YOUR DIGITAL COLOR PRINTER.
- Page 2 WARNING : TO PREVENT FIRE OR SHOCK HAZARD, DO NOT EXPOSE THIS APPLIANCE TO RAIN OR MOISTURE. WARNING: Use the included AC power cord so as not to interfere with radio and television reception. If you use other cables, it may cause interference with radio and television reception. CAUTION RISK OF ELECTRIC SHOCK DO NOT OPEN...
- Page 3 This symbol mark is according to the directive 2012/19/EU Article 14 Information for users and Annex IX, and/or to the directive 2006/66/EC Article 20 Information for end-users and Annex II. Your MITSUBISHI ELECTRIC product is designed and manufactured with high quality materials and components which can be recycled and/or reused.
-
Page 4: Table Of Contents
CONTENTS CONTENTS ........................1 SAFETY PRECAUTIONS ....................2 PROTECTIVE MEASURES ................2 INSTALLATION LOCATIONS ................3 FOR LONG OPERATING LIFE................3 OTHER CAUTIONS ....................4 SPECIAL FEATURES ....................5 UNPACKING ........................6 FEATURES AND FUNCTIONS ..................7 FRONT PANEL ....................7 SIDE AND REAR PANELS .................8 BEFORE OPERATION ....................9 PRINTER SETUP PROCEDURE ...............9 INK RIBBON INSTALLATION ................10 PRINT PAPER INSTALLATION ................11 HANDLING OF PAPER / INK RIBBON SET ............13... -
Page 5: Safety Precautions
SAFETY PRECAUTIONS In the interest of safety, please observe the following precautions: POWER REQUIREMENT This Digital Color Printer is designed to operate on 100 - 240 V AC 50/60 Hz. Never connect to any outlet or power supply having a different voltage or frequency. In addition, be sure to supply power to the printer from a receptacle with a ground fault circuit interrupter. -
Page 6: Installation Locations
SAFETY PRECAUTIONS DO NOT LEAVE THE PRINTING UNIT OPEN When the printer is moved with the printing unit open, it may cause injury or damage. CLOSE THE PRINTING UNIT FIRMLY Take care not to pinch your hand when closing the printing unit. When the printing unit is not closed firmly, it may open during transportation and it may cause injury or damage. -
Page 7: Other Cautions
SAFETY PRECAUTIONS HEAD ABRASION The thermal head, like the video head, wears out. When it is abraded, it becomes hard to print out fine details of the picture. In such a case, it is necessary to replace the thermal head. Consult with the sales dealer for replacing the head. CONNECTING DEVICES Read thoroughly “Operating Precautions”... -
Page 8: Special Features
HIGH QUALITY PRINTS CP-M1 is a dye sublimation thermal transfer color printer, which produces superior high quality images. It also produces a continuous tone at 256 gradient for each of Y, M, and C. HIGH SPEED PRINTING... -
Page 9: Unpacking
UNPACKING Take the printer out of the box by the following procedures. Make sure to check the accessories. Open the printer box from the top and remove the top cushion containing the accessories out of the box. Accessories Carefully pull the printer up and out of the box. Pull the printer straight up as shown in the figure. -
Page 10: Features And Functions
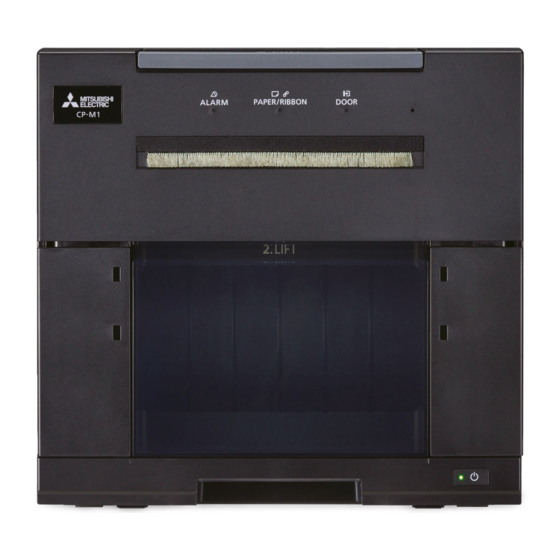
FEATURES AND FUNCTIONS FRONT PANEL ALARM INDICATOR ( OPENING THE DOOR This indicator blinks when the paper strip bin is not Press the horizontal latch bar, pull the printing unit installed or a paper jam occurs. See page 15. forward all the way, and release the bar. The door will automatically open up. -
Page 11: Side And Rear Panels
FEATURES AND FUNCTIONS INSTALLING THE PAPER TRAY 1. Engage the upper hooks of 2. Then, secure the tray by the tray in the upper holes engaging the lower hooks in of the paper strip bin. the lower holes of the bin. NOTE •... -
Page 12: Before Operation
BEFORE OPERATION PRINTER SETUP PROCEDURE Before printing, follow the printer setup listed below. Install the ink ribbon to this printer. (See page 10.) Install the print paper to this printer. (See pages 11 to 12.) Connect the printer to a personal computer. (See page 14.) Make sure to close the printing unit when the setup procedure is completed. -
Page 13: Ink Ribbon Installation
BEFORE OPERATION INK RIBBON INSTALLATION Press the POWER button on the front panel to turn on the power. POWER button Press the latch bar, pull out the printing unit forward, and release the bar to open the door. Rotate the front ink ribbon shaft forward to eliminate any loose ribbon. -
Page 14: Print Paper Installation
BEFORE OPERATION PRINT PAPER INSTALLATION Remove the paper strip bin. Adjust the paper guides according to the paper width. Hold down the tabs on the adjustable paper guides and slide them in or out. 5” 5” 6” 6” NOTE • Make sure to set the adjustable paper guides to the size of the paper width. - Page 15 BEFORE OPERATION Insert the print paper edge to load the paper as illustrated. Stop feeding the paper roll when the paper-feed status light turns GREEN. When no paper is fed, the paper-feed status light blinks slowly in red. Make sure to insert the paper straight. Paper-feed NOTE status light...
-
Page 16: Handling Of Paper / Ink Ribbon Set
BEFORE OPERATION HANDLING OF PAPER / INK RIBBON SET BEFORE PRINTING • Fingerprints or dust on the paper printing surface may produce poor print quality and cause paper jams. • When the print paper or ink ribbon is abruptly transferred from a cool place to a hot place, vapor or dew is generated on the surface, which causes paper jams or degraded print quality. -
Page 17: Connection With Usb Data Signal Equipment
BEFORE OPERATION CONNECTION WITH USB DATA SIGNAL EQUIPMENT CONNECTING TO PERSONAL COMPUTER (EXAMPLE) Check that the printer is turned on before connection. Turn on the power of a personal computer. Install the printer driver. NOTE • Do not yet connect the printer to a personal computer. Connect the printer to a personal computer as shown below. -
Page 18: Error Messages And Countermeasures
ERROR MESSAGES AND COUNTERMEASURES INDICATIONS ON THE FRONT PANEL AND COUNTERMEASURES If, for some reason, printing is not possible or an error occurs during printing, the indicators on the front panel will illuminate or blink. In this case, follow the procedure described below. : Steady on : Off : Blinking... -
Page 19: Overcoming Paper Jams
ERROR MESSAGES AND COUNTERMEASURES OVERCOMING PAPER JAMS Press the latch bar, pull out the printing unit forward, and release the bar to open the door. Make sure that the power is turned on before opening the printing unit. Remove the paper strip bin. Remove the ink ribbon. -
Page 20: Repairing A Torn Ink Ribbon
ERROR MESSAGES AND COUNTERMEASURES REPAIRING A TORN INK RIBBON Position the torn ink ribbon on a flat, clean surface. Place a piece of transparent adhesive cellophane tape on the center of the ink ribbon. Cellophane tape Wind the shaft of the ink ribbon in the direction of the arrow so that the cellophane tape is not seen. -
Page 21: Before Calling For Service
ERROR MESSAGES AND COUNTERMEASURES BEFORE CALLING FOR SERVICE For the following symptoms, check the unit again before calling for service. Symptom Check & Remedy The power is not turned on. Is the power cord plug disconnected from the outlet? →... -
Page 22: Cleaning
CLEANING Cleaning as indicated below will help maintain stable printer operation and extend the printer’s life. Wearing gloves at cleaning is recommended to prevent injury. Make sure to turn off the power before cleaning. VENTILATION INLET CLEANING Maintain the ventilation inlets (rear and left side) clean. You may use a vacuum to clean as illustrated in the diagram. -
Page 23: Platen Roller Cleaning
CLEANING PLATEN ROLLER CLEANING Preparations Alcohol (ethyl alcohol, etc.) Soft and clean cloth Clean the black part of the roller. Wipe the black part carefully with cloth dampened with a small amount of alcohol. Wipe the whole roller by turning it. Platen roller... -
Page 24: Specifications
SPECIFICATIONS Class Digital Color Printer Model CP-M1 Printing method Sublimation Dye Thermal Transfer line print 3-color faces progressive printing (yellow, magenta, and cyan) and surface lamination Print’s resolution 300 x 300 dpi (dpi : dots per inch) Dot resolution 9x13 (3.5x5”) 1082 x 1550 dots 10x15 (4x6”) - Page 25 ♦ Europe, the Middle East and Africa Mitsubishi Electric Europe B.V. German Branch Mitsubishi-Electric-Platz 1, 40882 Ratingen, North Rhine-Westphalia, Germany Phone : +49 (2102) 4860 : +49 (2102) 486 1120 Manufactured by Mitsubishi Electric Corporation Kyoto Works 1 Zusho Baba, Nagaokakyo City, Kyoto 617-8550, Japan WE919C205A4...