Table of Contents
Quick Links
Instructions for Use | Introduction
Trilogy Evo Universal Instructions for Use
For Technical Support and Customer Service, contact Philips Customer Service:
USA
Respironics Inc.
1001 Murry Ridge Lane Murrysville, PA 15668
Email: [email protected],
Web:
www.philips.com\healthcare
Authorized European Representative:
Respironics Deutschland GmbH & Co. KG
Gewerbestrasse 17
D-82211 Herrsching Germany
+49 8152 93060
Copyright © 2018 Koninklijke Philips N.V. All rights reserved.
This work is protected under Title 17 of the United States copyright code and is the sole property of Philips Respironics. No part
of this document may be copied or otherwise reproduced, or stored in any electronic information retrieval system, except as
specifically permitted under United States copyright law, without the prior written consent of Philips Respironics.
Trilogy Evo Universal is the registered trademark of Respironics Inc.
The Bluetooth® word mark and logos are registered trademarks owned by Bluetooth SIG, Inc. and any use of such marks by
Philips Respironics is under license.
Dawn Ultra is a registered trademark of Procter & Gamble.
Other trademarks and trade names are those of their respective owners.
Illustrations and screen images in this document are representative depictions.
Table of Contents

Related Manuals for Philips Trilogy Evo Universal


Summary of Contents for Philips Trilogy Evo Universal
- Page 1 Copyright © 2018 Koninklijke Philips N.V. All rights reserved. This work is protected under Title 17 of the United States copyright code and is the sole property of Philips Respironics. No part of this document may be copied or otherwise reproduced, or stored in any electronic information retrieval system, except as specifically permitted under United States copyright law, without the prior written consent of Philips Respironics.
-
Page 2: Table Of Contents
How to Contact Philips Respironics ......11 Alarm and Event Log ............ 63 About Trilogy Evo Universal ........12 Device Options ............65 Parts of Trilogy Evo Universal ........... 12 Device Settings ............. 65 Parts of the User Interface ..........14 Calibration ..............66 Monitoring Window ............ - Page 3 Instructions for Use | Introduction Power Management ..........84 Specifications ............... 88 Power Sources .............. 84 Standards Compliance ..........91 Battery Power Indicator ..........84 Pneumatic Diagram ............92 Battery Status Indicator ..........84 EMC Information ............92 AC Power ................ 84 Wireless Connectivity ...........
-
Page 4: Introduction
Instructions for Use | Introduction 1. Introduction The Trilogy Evo Universal ventilator is a medical device intended for use by qualified, trained personnel under the direction of a physician according to its technical specifications. Intended Use The Trilogy Evo Universal ventilator provides invasive and non-invasive positive pressure ventilation for the care of patients ≥2.5 kg through adults. -
Page 5: Package Contents
Do not block the cooling and intake air vents. • Do not operate Trilogy Evo Universal in an environment that is outside the specified ranges. Using the ventilator outside of this temperature range or above this altitude can affect the ventilator performance. - Page 6 • Trilogy Evo Universal is a restricted medical device. It is designed for use by respiratory therapists or other trained and qualified caregivers under the supervision of a physician. Only the supervising physician’s orders authorize changes to the prescription and other device settings.
- Page 7 For a list of accessories, such as patient interfaces, circuits, exhalation ports, and cables, see the Trilogy Evo Universal accessories guide. Ensure accessories and parts are compatible before you connect a patient to the device. Consult the accessory’s instructions before use.
- Page 8 Do not connect the ventilator to the battery of a battery-powered wheelchair as this can affect the ventilator performance, which can result in patient death. • An external battery should only be connected to the ventilator using the Philips Respironics approved External Battery Cable. This cable is fused, pre-wired, and properly terminated to ensure safe connection Warnings...
-
Page 9: Symbols Glossary
This glossary contains the symbols on the model label and on the device exterior. Software symbol explanations appear throughout this book. For a complete explanation of symbols appearing on the device and associated labels, go to the following web address: http://www.symbols.philips.com Symbol Definition... - Page 10 Instructions for Use | Introduction Medium or low priority alarm Bluetooth enabled System message Alarm reset Bluetooth connected Symbols on the Screen – Monitoring Views See chapter 2, “About Trilogy Evo.” Symbols on the Screen - Power USB is exporting data See the Power Management chapter.
-
Page 11: How To Contact Philips Respironics
Instructions for Use | Introduction How to Contact Philips Respironics If you need help setting up, using or maintaining Trilogy Evo Universal, or if this device does not perform as expected, contact Philips Respironics. Call Philips Respironics Customer Service at: •... -
Page 12: About Trilogy Evo Universal
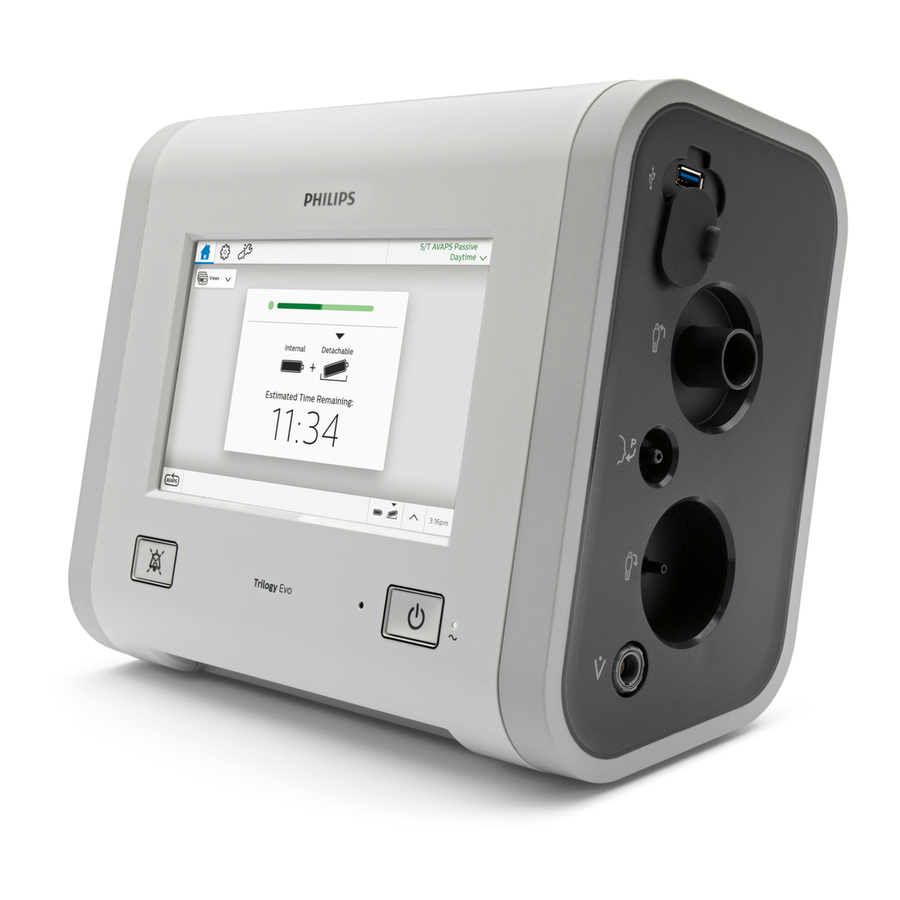
Instructions for Use | About Trilogy Evo Universal 2. About Trilogy Evo Universal Parts of Trilogy Evo Universal Front Panel On/off (standby) button AC power indicator Alarm indicator/alarm silence Alarm bar Touch screen Ambient light sensor Back Panel Carrying handle... - Page 13 Instructions for Use | About Trilogy Evo Universal Patient Panel Accessory USB port (pulse oximeter, CO monitor) Inspiratory port (to patient) Proximal pressure port Active exhalation valve line connection for ActivePAP and Active Flow circuits Dual limb active exhalation valve connection (from...
-
Page 14: Parts Of The User Interface
Instructions for Use | About Trilogy Evo Universal Parts of the User Interface Standard Screen Elements Menu bar Main window Monitored parameters pane Status bar Menu Bar Use the menu bar to navigate, manage alarms, and see the active prescription at a glance. -
Page 15: Monitoring Window
Instructions for Use | About Trilogy Evo Universal Main Window The main window contents vary depending on the action you are performing. The main window can show the standby window, prescription window, monitoring window, and others. Monitored Parameters Pane Use the monitored parameters pane to see measured and calculated values while delivering therapy. - Page 16 Instructions for Use | About Trilogy Evo Universal Types of monitoring windows Monitoring windows may vary based on your model. Views menu icon Monitoring window contents Manometer pressure indicator Set parameters Small manometer Set parameters Measured and calculated parameters Additional parameters based on the prescription (including...
-
Page 17: Therapy Modes And Controls
Instructions for Use | Therapy Modes and Controls 3. Therapy Modes and Controls Overview Trilogy Evo Universal therapy modes can be used for invasive and noninvasive ventilation with all circuit types, including mouthpiece ventilation. Breath Types Trilogy Evo Universal can deliver the following breath types:... - Page 18 Instructions for Use | Therapy Modes and Controls Mixed modes: breaths are spontaneous, assist-control, or mandatory. • S/T: Spontaneous/timed ventilation – spontaneous breaths with pressure support and mandatory breaths with pressure control • SIMV-PC: Synchronized intermittent mandatory ventilation (pressure control) – spontaneous breaths with pressure support, assist— control breaths and mandatory breaths with pressure control •...
-
Page 19: Control Modes
Instructions for Use | Therapy Modes and Controls Control Modes A/C-PC: Assisted/Control-Pressure Control ESCRIPTION The A/C-PC mode provides pressure-controlled mandatory or assist-control breaths. When the Trigger Type is set to Off, the ventilator triggers and cycles all breaths. When the Trigger Type is not set to Off, then the ventilator or the patient can trigger a breath, and the ventilator cycles all breaths. - Page 20 Instructions for Use | Therapy Modes and Controls A/C-VC: Assisted/Control-Volume Control ESCRIPTION The A/C-VC mode provides volume-controlled mandatory and assist breaths. When the Trigger Type is set to Off, both triggering and cycling are performed by the ventilator. When the Trigger Type is not Off, then the trigger can be performed by the vent or patient and the cycle is always performed by the ventilator.
-
Page 21: Spontaneous Modes
Instructions for Use | Therapy Modes and Controls Spontaneous Modes CPAP: Continuous Positive Airway Pressure ESCRIPTION In CPAP mode, the pressure delivered to the patient during both inhalation and exhalation is the CPAP pressure setting. All breaths in this mode are spontaneous breaths. - Page 22 Instructions for Use | Therapy Modes and Controls PSV: Pressure Support Ventilation ESCRIPTION PSV mode is patient-triggered, pressure-limited, and flow-cycled. With this strategy, breaths are assisted by a set inspiratory pressure that is delivered until inspiratory flow drops below a set threshold. In the PSV mode, the ventilator delivers spontaneous, pressure-supported, breaths and user-initiated mandatory breaths.
-
Page 23: Mixed Modes
Instructions for Use | Therapy Modes and Controls Mixed Modes S/T: Spontaneous/Timed ESCRIPTION A bi-level therapy mode where each breath is patient-triggered and patient-cycled or ventilator-triggered and ventilator-cycled. In this mode, an IPAP is delivered during inhalation and a lower EPAP is delivered during exhalation. The duration of a spontaneous breath is determined by the patient effort. - Page 24 Instructions for Use | Therapy Modes and Controls SIMV-PC: Synchronous Intermittent Mandatory Ventilation- Pressure Control ESCRIPTION SIMV-PC mode is a pressure control mode that provides a mixture of mandatory and spontaneous breaths. SIMV-PC mode guarantees one mandatory breath in each cycle. Spontaneous breaths can be delivered with pressure support. The breath rate determines the length of the cycle. The first phase of the cycle is reserved for synchronizing a mandatory breath with patient effort.
-
Page 25: Therapy Features
Instructions for Use | Therapy Modes and Controls SIMV-VC: Synchronous Intermittent Mandatory Ventilation- Volume Control ESCRIPTION Similar to SIMV-PC, but with volume control. ETTINGS Setting Name Description Tidal Volume Target gas volume that the device delivers during a spontaneous breath Pressure Support Target pressure that the device delivers during the inspiratory phase of a spontaneous breath PEEP... - Page 26 Instructions for Use | Therapy Modes and Controls ETTINGS • Backup Ventilation (On/Off): when you turn this setting On, set an Apnea interval in the alarm settings tab. • Backup Rate: when in backup ventilation, the backup breath rate takes precedence over any breath rate set in the therapy mode. The rate cannot be less than the Breath Rate set in the current therapy mode.
-
Page 27: Therapy Actions
Instructions for Use | Therapy Modes and Controls Therapy Actions Oxygen Flush ESCRIPTION This feature requires the oxygen blender. When active, the device delivers 100% oxygen for two minutes. This feature functions independent of any oxygen blending setting. During an oxygen flush, the High FiO alarm is disabled. - Page 28 Instructions for Use | Therapy Modes and Controls Setting Name Setting Range/Increment • All circuits: 0-20 cmH • Increments: 1 cmH Adult patient type: 0-80 BPM, 1BPM increments Breath Rate Pediatric patient type: 0-60 BPM, 1BPM increments Infant patient type: 0-40 BPM, 1 BPM increments Adult and pediatric patient types: 3-25 cmH O, 1 cm H O increments...
-
Page 29: Dynamic Therapy Parameters
Instructions for Use | Therapy Modes and Controls Setting Name Setting Range/Increment Pediatric patient type: Dual limb or active flow: 35-400 ml Passive or Active PAP: 50-400 ml Increment: 5 ml • Auto-Trak (passive circuits only) • Sensitive Auto-Trak (passive circuits only) Trigger Type •... - Page 30 Instructions for Use | Therapy Modes and Controls = − PEEP is the total pressure (intrinsic plus extrinsic) at the start of the breath ( = + Where: ...
-
Page 31: Device Setup
See the “EMC Information” chapter for guidance on possible electromagnetic interference. Connecting AC Power Use the AC cord provided to connect AC power before pressing the power button. Verify Trilogy Evo Universal is using AC power, indicated by the green LED light next to the power button. - Page 32 Instructions for Use | Device Setup Air-Inlet Foam Filter Ensure the air-inlet foam filter is installed correctly. To install the air-inlet foam filter, pinch the filter as you press it into the filter cover as shown. Position it securely behind the top and bottom restraints.
-
Page 33: Connecting A Circuit
Instructions for Use | Device Setup Connecting a Circuit Be certain that any breathing system filter used with this device complies with ISO 23328-1 and ISO 23328-2. · To prevent patient or ventilator contamination, we recommend you use a Respironics-approved main flow bacteria filter (Part Number 342077) on the patient gas outlet port. Filters not approved by Respironics may degrade system performance. - Page 34 Instructions for Use | Device Setup Active PAP Circuits Bacteria filter Proximal pressure port Active exhalation valve line connection Tubing Connect the bacteria filter (1) on the circuit to the Inspiratory Port. Connect the proximal pressure line to the Proximal Pressure Port (2). Connect the active exhalation valve pressure line to the active exhalation valve line connection (3).
-
Page 35: Adding Oxygen
Instructions for Use | Device Setup Connect the flow sensor to the Flow Sensor Cable Connector (4). Dual Limb Circuits Bacteria filters Proximal pressure port Active exhalation valve connection Flow sensor cable connector Tubing Flow sensor connected to circuit Attach the bacteria filter (1) end of the colored inspiratory tube to the Inspiratory Port. Attach the proximal pressure line (2) to the Proximal Pressure Port. -
Page 36: Starting Trilogy Evo Universal
Verify that circuit connections are secure. Press the On/Off (Standby) button. Listen for a minimum of three beeps as Trilogy Evo Universal performs system start up checks. The beeps test all alarm signals to ensure proper functioning. Ensure no system messages appear. -
Page 37: Device Operation
Instructions for Use | Device Operation Device Operation Clinical Assessment Warning Before placing a patient on the ventilator, perform a clinical assessment. Considerations should include: • Choosing alarm settings • Assessing whether alternative ventilation equipment is required • Selecting additional accessories, including the patient monitoring accessories you will use For ventilator-dependent patients, always have alternate ventilation equipment, such as a back-up ventilator or manual resuscitator available. - Page 38 Instructions for Use | Device Operation Parts of the Prescription Settings Window 7-1: Parts of the Prescription Settings Window Editing Prescription and Alarm Settings To edit prescription settings: In the menu bar, tap the prescription settings icon. In the prescription grid, tap Circuit. In the workspace below the grid, select the circuit Type and Size. If you are using a humidifier, in the Active Humidification section, tap Yes.
-
Page 39: Starting And Stopping Ventilation
Instructions for Use | Device Operation Deleting a Prescription To delete a prescription: In the Home window, tap the prescription you want to delete and then tap the trashcan icon. Starting and Stopping Ventilation To start ventilation: In the Prescription Settings window, select the prescription you want to use and then tap Start Therapy. To stop ventilation and put the ventilator on standby: Press the On/Off (Standby) button on the front panel. - Page 40 Instructions for Use | Device Operation To unlock the screen, tap the screen. On the screen unlock dialog box, tap and hold Yes for three seconds. When an alarm or system message becomes active, the screen saver is stopped and the automatic screen lock is disabled. For more information, see the “Alarms”...
-
Page 41: Alarms And System Messages
• Low Priority – Requires awareness. Trilogy Evo Universal also shows system messages to inform you about changing conditions. These messages are described in “Alarms and System Messages. When an alarm or system message becomes active, Trilogy Evo Universal stops the screen saver and disables the automatic screen lock. -
Page 42: The Alarm List
Instructions for Use | Alarms and System Messages Alarm and Message Indictors Icon Description Light and sound indicators Low alarm Light bar glows steady yellow Audible alarm repeats slowly Message Single beep Resolved alarm None or message The Alarm List The Alarm List appears in the menu bar. -
Page 43: Setting The Alarm Volume
Instructions for Use | Alarms and System Messages Setting the Alarm Volume Warning: Ensure the alarm volume is set loud enough for the caregiver to hear it. Consider the use of a remote alarm. If you do use a remote alarm, test it before starting ventilation. -
Page 44: Alarms And System Messages
Instructions for Use | Alarms and System Messages Alarms and System Messages This section contains the details of each alarm and system message: Alarm See page Alarm See page High-priority System Alarms Low Oxygen Input Pressure Ventilator Inoperative High Oxygen Input Pressure Ventilator Service Required Medium-priority Patient Alarms with Variable Settings... - Page 45 The system self-test indicates a failure or malfunction of a component that causes therapy to stop or not meet essential performance criteria. What to do Contact Philips Respironics Customer Service Device Therapy is stopped and both audible and visual alarms are continuous. Depending on the systems performance impacted, you may or may not see a message on the screen.
- Page 46 Instructions for Use | Alarms and System Messages Requirements Device The alarm is automatically resolved when the delivered pressure comes within 5 cmH O of the target performance patient pressure during the expiratory phase. during active alarm Device will continue to operate. NSPIRATORY RESSURE Priority...
- Page 47 Instructions for Use | Alarms and System Messages during active Monitored parameters and alarms that use the flow measurement such as tidal volume will not alarm function. Monitored parameters and alarms that use the pressure measurement will continue to function. XTERNAL ENSOR EVERSED...
- Page 48 Instructions for Use | Alarms and System Messages • Ensure that the oxygen source is appropriate. • Contact Philips Respironics Customer Service Requirements Oxygen source Device Device will continue to operate. performance during active alarm Algorithm The controller cannot regulate flow to guarantee FiO accuracy within 10% ±...
- Page 49 Instructions for Use | Alarms and System Messages Device The alarm is automatically resolved when the calculated minute ventilation is greater than the low performance minute ventilation alarm setting. during active volume under delivery alarm Device will continue to operate. Alarm Settings Adult and Pediatric patient types: 0.2 to 30 LPM in increments of 0.1 LPM.
- Page 50 Instructions for Use | Alarms and System Messages Algorithm The flow from the device at the end of the expiratory phase is greater than a threshold based on a summary typical flow that would result if a 0.25” diameter orifice leak were present in the circuit. EBREATHING ETECTED Priority...
- Page 51 Instructions for Use | Alarms and System Messages OSS OF IGNAL Priority Medium Why it occurs The EtCO sensor is reporting invalid data, the sensor signal is lost, or no breaths are detected for more than 10 seconds while the device is delivering therapy. What to do Ensure that the EtCO sensor is properly attached to the ventilator and the patient circuit.
- Page 52 Instructions for Use | Alarms and System Messages during active alarm XPIRATORY RESSURE Priority Medium Why it occurs During the expiratory phase, the delivered pressure is 5 cmH O or more below the target patient pressure. What to do • Check the circuit for a leak or disconnect.
- Page 53 Instructions for Use | Alarms and System Messages XYGEN NPUT RESSURE Priority Medium Why it occurs The measured oxygen inlet pressure is greater than or equal to 87psig. What to do Check the O source. Requirements Additional oxygen Device Device will continue to operate. performance during active alarm...
- Page 54 Instructions for Use | Alarms and System Messages The alarm is automatically resolved when a breath occurs in which the exhaled tidal volume exceeds the low tidal volume alarm setting. Device will continue to operate. Alarm Settings 10 to 2000 ml in increments of 5 ml. INUTE ENTILATION Priority...
- Page 55 Instructions for Use | Alarms and System Messages Priority Medium Why it occurs The measured SpO is less than or equal to the Low SpO alarm setting while the device is delivering therapy or is in standby. What to do •...
- Page 56 Priority Medium Why it occurs A stuck On/Off (Standby) button or Alarm Silence button has been detected for at least 120 seconds. What to do Contact Philips Respironics Customer Service Device Device will continue to operate. performance during active alarm...
- Page 57 Instructions for Use | Alarms and System Messages Why it occurs The proximal pressure line may be improperly connected or it may contain water droplets that affect the pressure reading. What to do • Verify the proximal pressure line is connected properly at both ends and the line is clean and untangled.
- Page 58 Instructions for Use | Alarms and System Messages The alarm is medium priority and the icons are yellow when 25 minutes of time remains. The alarm is high priority and the icons are red when 15 minutes of time remains. What to do Switch to alternate battery or AC power to recharge the low battery.
- Page 59 The system is unable to charge the detachable battery due to temperature. Start On Battery Trilogy Evo Universal is turned on and AC power is not detected. Reconnect AC power. Power is restored after losing all power and AC power is not detected.
-
Page 60: Prescription Alarm Availability By Therapy Mode
Instructions for Use | Alarms and System Messages Prescription Alarm Availability by Therapy Mode Most alarms operate regardless of the therapy mode being delivered. However, certain alarms operate only when certain therapy modes are being delivered. The chart below lists those alarms and the therapy modes in which the alarms are available. Alarm A/C-PC A/C-VC... - Page 61 To test power alarms: Connect Trilogy Evo Universal to AC power. Ensure Trilogy Evo Universal is using AC power. You should see the green LED light next to the power button. Disconnect AC power (pull the power cord out of the outlet).
- Page 62 Instructions for Use | Alarms and System Messages Disconnect the external battery. Confirm that the External DC Source Disconnected system message appears. Confirm that the device continues to operate, the detachable battery icon appears in the Status Bar, and that the Battery-in-use Indicator is pointing to the detachable battery.
-
Page 63: Alarm And Event Log
Instructions for Use | Alarms and System Messages Set the High EtCO alarm limit below the measured EtCO value. Confirm that the High EtCO alarm activates. Restore the alarm limit. Set the Low EtCO alarm limit above the measured EtCO value. - Page 64 Instructions for Use | Alarms and System Messages Parts of the Alarm and Event Log Item Description 1. Date Range Tap to filter events by date. On the Select Date Range dialog box, select the date range and then tap Accept. 2.
-
Page 65: Device Options
Information Device Settings Use the Device Settings feature to customize Trilogy Evo Universal. When working with settings, ensure you save your changes. After 30 seconds of inactivity, the system reverts to the previous setting and your changes are not saved. -
Page 66: Calibration
Circuit Calibration Concepts The Trilogy Evo Universal is optimized for circuits that are within the specifications shown in the Circuit section of the Accessories chapter. If you want to use a different circuit, you can perform an optional Circuit Calibration, intended to characterize compliance and resistance. The circuit... - Page 67 Instructions for Use | Device Options Leak Test A leak test is available for times when you want to perform only a leak test and not complete an entire circuit calibration. Prerequisites: • Ensure the prescription is for an active circuit: Active Flow Active PAP Dual Limb...
-
Page 68: Data Transfer
Instructions for Use | Device Options The system performs the test. The results appear in the test progress pane. If the test: • Fails: Review the failure reasons. If you want to try again, tap Retest; otherwise, tap Quit. To deactivate the FiO sensor, turn off the FiO sensor in Device Options, Device Settings. - Page 69 Instructions for Use | Device Options In the Data Transfer window, tap the procedure you would like to perform and then follow the prompts on the screen: Function Description Export Data - USB Export details about the patient’s therapy to a storage device connected to the USB port.
-
Page 70: Information
Information The information window shows general information about the Trilogy Evo Universal device, including the following: To change pages, tap the page icons at the bottom of the window. To view software licenses and photography credits, tap the item you want to view. -
Page 71: Cleaning And Disinfection
8. Cleaning and Disinfection This chapter contains instructions for cleaning and disinfecting Trilogy Evo Universal, and cleaning, disinfecting, and sterilizing Trilogy Evo Universal accessories. Because Trilogy Evo Universal is intended for multi-patient use, ensure you follow the cleaning, disinfection, and sterilization instructions in this chapter. -
Page 72: Cleaning The Detachable Battery
Open the detachable battery access door. Slide the battery into the bay until you hear a click. Rinsing the Air-Inlet Foam Filter The air-inlet foam filter is the gray foam located on the back panel. It protects Trilogy Evo Universal from dirt and dust. Only use Philips Respironics-supplied filters. Ventilation can continue while you are replacing the filter. -
Page 73: External Active Exhalation Valve Cleaning And Disinfection
Figure 2 Figure 4 Remove the valve from Trilogy Evo Universal: Squeeze the two tabs and pull out from the device (Figure 1). Open the valve: Squeeze the two tabs (Figure 2)and pull apart (Figure 3). Detach the silicon diaphragm. (If you are going to disinfect or sterilize the valve, discard the diaphragm according to your local regulations on discarding biohazardous waste.) - Page 74 Instructions for Use | Cleaning and Disinfection To disinfect the valve: Disassemble the valve, discarding the silicon diaphragm according to your local regulations on discarding biohazardous waste. Then proceed to clean and dry the valve according to the instructions in the previous section, “Cleaning the External Active Exhalation Valve.” Read and follow the manufacturer’s instructions on how to prepare, activate, use, and dispose of the Cidex solution.
-
Page 75: Service And Maintenance
For non-invasive ventilation, dispose of the air-inlet foam filter. Replacing the Air-Inlet Foam Filter The air-inlet foam filter is the gray foam located on the back panel. It protects Trilogy Evo Universal from dirt and dust. This filter is for single patient use. -
Page 76: Replacing The Particulate Filter
If you used an external storage device that contains patient information, such as a USB flash drive, ensure you delete that data by reformatting the storage device. Before using Trilogy Evo Universal with a new patient, perform the following actions. Cleaning and disinfection instructions are in the “Cleaning and Disinfection” chapter. -
Page 77: Trilogy Evo Universal Accessories
10. Trilogy Evo Universal Accessories To prevent adverse performance, use Trilogy Evo Universal only with accessories intended for use with this device, including all patient interfaces, masks, circuits, exhalation ports, and carrying cases. For a list of accessories, see the Trilogy Evo Universal accessories guide at: https://www.usa.philips.com/healthcare/product/HCDS2110X11B/trilogyevo. - Page 78 Instructions for Use | Trilogy Evo Universal Accessories Because this sensor contains lead and a corrosive solution, contact a licensed professional waste disposal service for disposal. Specifications: Range Of Measurement: 0 TO 100% Output Range: 9.0 TO 16.0 mV Zero Offset: 0.250 mV when exposed to 100% nitrogen...
- Page 79 Instructions for Use | Trilogy Evo Universal Accessories To replace the sensor: Tools required: T20 Torx screwdriver Scratch awl or similar slender, pointed tool To remove the FiO sensor: 1. Using a T20 Torx screwdriver, unscrew the FiO sensor cover and set aside.
-
Page 80: Filters
Air-inlet foam filter The air-inlet foam filter protects Trilogy Evo Universal from dirt and dust. This filter is for single patient use. For instructions on rinsing the filter, see the “Cleaning and Disinfection” chapter. For instructions on replacing the filter, see the “Service and Maintenance” chapter. -
Page 81: Patient Circuits
Instructions for Use | Trilogy Evo Universal Accessories Patient Circuits For instructions on attaching circuits to the ventilator, see the “Device Setup” chapter. Circuit Principles Each patient circuit has a different compliance and resistance. During Circuit Calibration, the ventilator verifies that the maximum pressure drop does not exceed the specifications below. -
Page 82: Dual Limb Active Exhalation Valve
Dual Limb Active Exhalation Valve The Philips Respironics Dual Limb Active Exhalation Valve is a dual limb circuit accessory. The valve will close during inspiration and open during exhalation to divert flow into the expiratory limb for venting outside of the breathing circuit. This device is intended for multi-patient use. Clean and disinfect or clean and sterilize this item between uses on different patients. -
Page 83: Portability And Travel Accessories
Instructions for Use | Trilogy Evo Universal Accessories Portability and Travel Accessories When using mounting hardware, confirm that the ventilator is secured to the wheelchair mount or roll stand mount. See the instructions that accompany the accessory. Remote Alarms If you are using a remote alarm or nurse call, ensure you test the accessory before starting ventilation. Ensure that you can hear the ventilator’s audible alarms on the remote alarm. -
Page 84: Power Management
Secure the cord to the device using the retention clip. Verify Trilogy Evo Universal is using AC power. You should see the green LED light next to the power button. If you do not see this light, contact Philips customer service. -
Page 85: External Battery
External Battery You can use an external DC power source, such as a vehicle battery, to power Trilogy Evo. You must use the Philips Respironics External Battery Cable to connect the battery to the device. Do not use any other cable or improper operation of the device may occur. This cable is pre-wired and properly terminated to ensure safe connection of an external battery to the ventilator. -
Page 86: Internal Battery
Several alarms are related to power management and power loss. For information about these alarms and how to test them, see the “Alarms” chapter. If all power sources are lost while Trilogy Evo Universal is delivering therapy, as soon as a power source is connected, the device will begin to deliver therapy again. All alarm settings are retained and restored. - Page 87 Instructions for Use | Power Management Discharging Nearly depleted Discharging 21-40% capacity Depleted, 0% capacity or failed not charging Discharging 01-20% capacity External Status Capacity remaining Battery Discharging Low power remaining Discharging 81-100% capacity Discharging Nearly depleted Discharging 61-80% capacity Discharging 0% capacity Discharging...
-
Page 88: Technical Specifications
Instructions for Use | Technical Specifications 12. Technical Specifications Specifications Ventilation types and modes • A/C-PC: Assist control (pressure control) • A/C-VC: Assist control (volume control) • CPAP: Continuous positive airway pressure • PSV: Pressure support ventilation • S/T: Spontaneous/timed ventilation •... - Page 89 Instructions for Use | Technical Specifications Environmental Operating Temperature: 0°C to 40°C Relative humidity: 5% to 90% RH, non-condensing Atmospheric pressure: 62 to 106 kPa Altitude: -1261 to 12,971 feet Battery charging temperature: 5°C to 40°C Transient operating temperature, -20°C to 50°C excluding high pressure oxygen blending Storage temperature...
- Page 90 Instructions for Use | Technical Specifications Monitored Parameter Accuracy Airway pressure ±(2 cmH O + 4% of actual) Tidal volume ± (4 ml + 15% of actual) for volumes ≥ 35 ml ± 10 ml for volumes < 35 ml ±(2.5% FiO + 2.5% of actual reading) within a 24-hour 2-point calibration period, or a change in altitude...
-
Page 91: Standards Compliance
Medium Access Control (MAC) and Physical Layer (PHY) Specifications • Hereby, Respironics Inc. declares that this class 1 radio equipment is in compliance with Directive 2014/53/EU. The full text of the EU declaration of conformity is available at the following internet address: http://incenter.medical.philips.com/PMSPublic Standards Compliance... -
Page 92: Pneumatic Diagram
Instructions for Use | Technical Specifications Pneumatic Diagram FiO2 Sensor Flow Blower Filter Machine Flow Sensor / Outlet Flow Path Element Inlet Flow Path Air Inlet High O2 Flow Flow Sensor O2 Press Dual AECM Limb / Monitor Outlet System PCA Pressure Pressure EMC Information... - Page 93 Instructions for Use | Technical Specifications Guidance and Manufacturer’s Declaration - Electromagnetic Emissions This device is intended for use in the electromagnetic environment specified below. The user of this device should make sure it is used in such an environment. Emissions Test Compliance Electromagnetic Environment - Guidance...
- Page 94 Instructions for Use | Technical Specifications Guidance and Manufacturer’s Declaration - Electromagnetic Immunity This device is intended for use in the electromagnetic environment specified below. The user of this device should make sure it is used in such an environment. Immunity Test IEC 60601 Test Level Compliance Level...
- Page 95 Instructions for Use | Technical Specifications Immunity Test IEC 60601 Test Level Compliance Level Electromagnetic Environment - Guidance IEC 61000-4-8 30 A/m 30 A/m Power frequency magnetic fields should be at levels Electromagnetic characteristic of a typical location in a typical hospital compatibility or home environment.
-
Page 96: Wireless Connectivity
Notices: The Bluetooth® word mark and logos are registered trademarks owned by Bluetooth SIG, Inc. and any use of such marks by Philips Respironics is under license. Other trademarks and trade names are those of their respective owners. The Trilogy Evo device transmits data between the therapy device and a mobile device, but it does not store any of your personal data. -
Page 97: Nfc Actions
Instructions for Use | Wireless Connectivity NFC Actions To access the NFC window: In the menu bar, tap the Options icon. In the Options window, tap Device Settings. In the Device Settings window, tap Bluetooth. To enable NFC connections, in the Near-Field Communication window, tap On. To disable NFC connections, in the Near-Field Communication window, tap Off. -
Page 98: Glossary
Instructions for Use | Glossary 14. Glossary The following terms and acronyms appear throughout this manual. Term Definition Active Circuit Circuit that includes an active exhalation device Airway Pressure Pressure measured at the patient connection port. Apnea Temporary cessation of breathing. Blower Hours The total number of hours that the blower has been on over the life of the device. - Page 99 Instructions for Use | Glossary Term Definition Ventilator breathing system; inspiratory or expiratory pathways through which gas flows at respiratory pressures and bounded by the port through which fresh gas enters, the patient connection port and the exhaust port. Volume Control Ventilation in which breaths are controlled by an operator-defined volume, flow pattern, breath rate, and inspiratory time.
-
Page 100: Warranty
Respironics will be the sole and exclusive remedy of the original purchaser. Philips Respironics reserves the right, in its sole discretion, to refund the purchase price in lieu of repair or replacement of the Product. In no event will Philips Respironics’...