Dell OptiPlex XE3 Setup Manual
Hide thumbs
Also See for OptiPlex XE3:
- Re-imaging manual (22 pages) ,
- Service manual (71 pages) ,
- Service manual (80 pages)

Related Manuals for Dell OptiPlex XE3


Summary of Contents for Dell OptiPlex XE3
- Page 1 OptiPlex XE3 Tower Setup and Specifications Guide Regulatory Model: D18M Regulatory Type: D18M005...
- Page 2 GUID-089FFA4B-3A62-4B51-BDE1-309C58A451D9 Status Released © 2017 2018 Dell Inc. or its subsidiaries. All rights reserved. Dell, EMC, and other trademarks are trademarks of Dell Inc. or its subsidiaries. Other trademarks may be trademarks of their respective owners. 2018 - 05 Rev. A00...
-
Page 3: Table Of Contents
Contents 1 Set up your computer.............................5 2 Chassis................................8 System front view................................8 System back view................................9 Tower motherboard layout...............................10 3 System specifications........................... 11 Physical system dimensions............................. 11 Chipset....................................12 Processor...................................12 Memory....................................13 Storage....................................14 Storage combinations...............................14 Audio....................................15 Video....................................15 Communications................................17 Ports and connectors............................... - Page 4 Downloading the Wi-Fi driver...........................35 Realtek HD audio drivers..............................36 Downloading the audio driver...........................36 6 Getting help..............................38 Contacting Dell................................. 38 Contents...
-
Page 5: Set Up Your Computer
Identifier GUID-B865C4E3-4B5C-4213-B18E-0D0397346C24 Status Released Set up your computer Connect the keyboard and mouse. Connect to your network using a cable, or connect to a wireless network. Connect the display. Set up your computer... - Page 6 NOTE: If you ordered your computer with a discrete graphics card, the HDMI and the display ports on the back panel of your computer are covered. Connect the display to the discrete graphics card. Connect the power cable. Press the power button. Set up your computer...
- Page 7 Follow the instructions on the screen to finish Windows setup: Connect to a network. b Sign-in to your Microsoft account or create a new account. Locate Dell apps. Table 1. Locate Dell apps Register your computer Dell Help & Support SupportAssist — Check and update your computer...
-
Page 8: Chassis
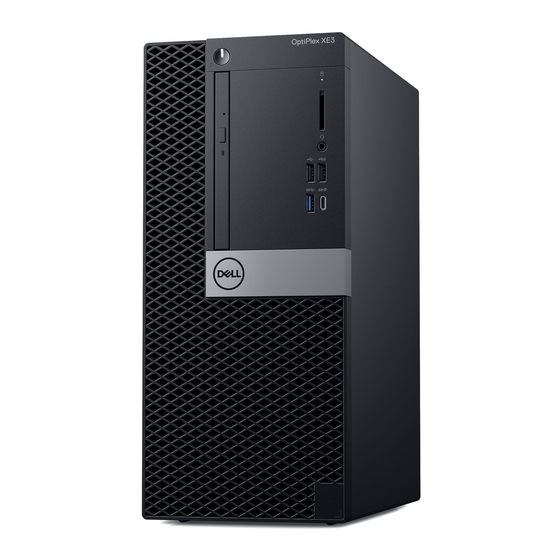
Identifier GUID-CB1A02B5-9C9E-49F6-BB49-C6E3B1BB96C2 Status Released Chassis Identifier GUID-90CDF8EC-4B25-4728-9637-92FA920F0A9C Status Released System front view Power button and power light Optical drive (optional) Hard drive activity light Memory card reader (optional) Headset port / Universal Audio Jack USB 2.0 port with PowerShare USB 2.0 port USB 3.1 Gen 2 port with PowerShare USB 3.1 Gen 1 port Chassis... -
Page 9: System Back View
Identifier GUID-6BA15263-D5D9-4BBD-8F53-A7C970453392 Status Released System back view Line-out port PS/2 Keyboard port Serial port PS/2 Mouse port DisplayPort DisplayPort/HDMI 2.0b/VGA/USB Type-C Alt-Mode (optional) USB 3.1 Gen 1 ports Service tag label USB 2.0 ports (supports Smart Power On) Network port Expansion card slots Power connector port External antenna connectors (optional) -
Page 10: Tower Motherboard Layout
Identifier GUID-3C259F41-9654-4AB7-B6CE-47A84C6B83DD Status Released Tower motherboard layout PCIe-X16 slot wired as x4 (Slot4) PCI Connector (Slot3) PCI-eX16 Connector (Slot2) PCI-eX1 Connector (Slot1) USB type-C Alt-mode connector Video connector(VGA/DP1.2/HDMI2.0) System fan connector(FAN_SYS) Intruder switch connector Processor Socket CPU Power Connector(ATX_CPU) CPU fan connector(FAN_CPU) Memory Connector (DIMM1~DIMM4) Memory card reader connector Power button and power light connector... -
Page 11: System Specifications
Identifier GUID-AB67ED37-0818-4592-A25C-F04B3A73C18D Status Released System specifications NOTE: Offerings may vary by region. The following specifications are only those required by law to ship with your computer. For more information about the configuration of your computer, go to Help and Support in your Windows operating system and select the option to view information about your computer. -
Page 12: Chipset
Processor Global Standard Products (GSP) are a subset of Dell’s relationship products that are managed for availability and synchronized transitions on a worldwide basis. They ensure the same platform is available for purchase globally. This allows customers to reduce the number of configurations managed on a worldwide basis, thereby reducing their costs. -
Page 13: Memory
Table 6. Processor specifications Type UMA Graphics Intel Core i3-8100 (4 Cores/6MB/4T/3.6GHz/65W) Intel UHD 630 Graphics integrated in the CPU Intel Core i3-8300 (4 Cores/8MB/4T/3.7GHz/65W) Intel UHD 630 Graphics integrated in the CPU Intel Core i5-8400 (6 Cores/9MB/6T/up to 4.0GHz/65W) Intel UHD 630 Graphics integrated in the CPU Intel Core i5-8500 (6 Cores/9MB/6T/up to 4.1GHz/65W) Intel UHD 630 Graphics integrated in the CPU... -
Page 14: Storage
Identifier GUID-294E7C6D-9B82-4BA0-8966-280FB874C026 Status Released Storage Table 8. Storage specifications Type Form factor Interface Capacity Solid-State Drive (SSD) M.2 2280 Up to 512 GB • SATA AHCI, Up to 6 Gbps • PCIe 3 x4 NVME, Up to 32 Gbps Hard drive (HDD) 2.5 and 3.5 inch SATA AHCI, Up to 6 Gbps Up to 2 TB at 5400/7200 RPM... -
Page 15: Audio
Identifier GUID-E7BDD5F1-773B-46E2-BB43-83B776D12E91 Status Released Audio Table 10. Audio specifications Controller Realtek ALC3234 Type Integrated Speakers Internal Business speaker (mono) Interface • AC511 Sound Bar (optional) • Microsoft PlayReady3 Ready • Multi-streaming audio support • Stereo headset/mic combo Internal speaker amplifier 2W (RMS) per channel Identifier GUID-5EDFCC74-C5E1-4618-A8BC-5AAA60923B57... - Page 16 Controller Type CPU Dependency Graphics Capacity External Maximum memory display resolution type support AMD Radeon R5 Discrete GDDR5 DisplayPort VGA: 2048x1536@60 Hz Multiple Video DisplayPort: option (VGA, 4096x2304@60 Hz DP1.2, HDMI 2.0 and USB HDMI : Type-C Alt- 1920x1080@60 Hz mode) Discrete GDDR5...
-
Page 17: Communications
Identifier GUID-445784C5-5B55-40B1-8251-A9043055D554 Status Released Communications Table 12. Communications Network adapter Intel i219-V Gigabit1 Ethernet LAN 10/100/1000 (Remote Wake Up, PXE and support) Intel 10/100/1000 PCIe Gigabit Network Card (optional) Wireless • Qualcomm QCA61x4A Dual-band 2x2 802.11ac Wireless with MU-MIMO + Bluetooth 4.2 •... -
Page 18: System Board Connectors
Identifier GUID-A828EBB5-0563-42E5-826A-ED9EE262D30B Status Released System board connectors Table 14. System board connectors M.2 Connectors • 1 - 2230/2280 • 1 - 2230 (keyed to support Integrated or Discrete WiFi, Support Intel CNVi or USB2.0/PCIe) Serial ATA (SATA) connector 4 (one Gen2 port for ODD and the rest of the ports support Gen3) PCIe X16 slot PCIe X1 slot PCI slot... -
Page 19: Security
Identifier GUID-27DB6204-A15E-4331-8BFC-A406A293D52F Status Released Environmental NOTE: For more details on Dell environmental features, please go to the environmental attributes section. See your specific region for availability. Table 18. Environmental Energy efficient power supply Standard BFR/PVC-free chassis Vertical orientation packaging support... -
Page 20: System Setup
Boot Sequence allows you to bypass the System Setup–defined boot device order and boot directly to a specific device (for example: optical drive or hard drive). During the Power-on Self Test (POST), when the Dell logo appears, you can: •... -
Page 21: Navigation Keys
The boot sequence screen also displays the option to access the System Setup screen. Identifier GUID-B1EB55B6-FAB5-4252-ACBD-4E69ADBBB2E9 Status Released Navigation Keys The following table displays the system setup navigation keys. NOTE: For most of the system setup options, changes that you make are recorded but do not take effect until you re-start the system. -
Page 22: Assigning A System Password And Setup Password
Identifier GUID-D91DBF33-F0AB-477E-A22D-D6CD2D066BBE Status Released Assigning a system password and setup password You can assign a new System Password only when the status is in Not Set. To enter the system setup, press F2 immediately after a power-on or re-boot. In the System BIOS or System Setup screen, select Security and press Enter. The Security screen is displayed. -
Page 23: System Setup Options
Identifier GUID-F361D412-AF33-44BE-A275-37E871F705FC Status Released System Setup options NOTE: Depending on the computer and its installed devices, the items listed in this section may or may not appear. Table 21. General Option Description System Information Displays the following information: • System Information: Displays BIOS Version, Service Tag, Asset Tag, Ownership Tag, Ownership Date, Manufacture Date, and the Express Service Code. - Page 24 Option Description • COM 1 – Default setting • COM 2 • COM 3 • COM 4 Drives Allows you to enable or disable the various drives on-board: • SATA-0 • SATA-1 • SATA-2 • SATA-3 • SATA-4 Smart Reporting This field controls whether hard drive errors for integrated drives are reported during system startup.
- Page 25 Table 24. Security Option Description Admin Password Allows you to set, change, and delete the admin password. System Password Allows you to set, change, and delete the system password. Internal HDD-0 Password Allows you to set, change, and delete the computer’s internal HDD. Internal HDD-3 Password Allows you to set, change, and delete the computer’s internal HDD.
- Page 26 Option Description CPU XD Support Allows you to enable or disable the Execute Disable mode of the processor. This option is enabled by default. OROM Keyboard Access This option determines whether users are able to enter Option ROM Configuration screens via hotkeys during boot.
- Page 27 Option Description • 128 MB (Disabled by default) Table 27. Performance Option Description Multi Core Support This field specifies whether the process will have one or all cores enabled. This option is enabled by default. options: • All (selected by default) •...
- Page 28 Option Description Wake on LAN/WWAN This option allows the computer to power up from the off state when triggered by a special LAN signal. This feature only works when the computer is connected to AC power supply. • Disabled - Does not allows the system to power on by special LAN signals when it receives a wake-up signal from the LAN or wireless LAN.
-
Page 29: Updating The Bios In Windows
If BitLocker is enabled, it must be suspended prior to updating the system BIOS, and then re-enabled after the BIOS update is completed. Restart the computer. Go to Dell.com/support. • Enter the Service Tag or Express Service Code and click Submit. -
Page 30: Updating Your System Bios Using A Usb Flash Drive
Insert the USB Flash drive into the system that requires the BIOS update. Restart the system and press F12 when the Dell Splash logo appears to display the One Time Boot Menu. Using arrow keys, select USB Storage Device and click Return. -
Page 31: Enabling Smart Power On
Figure 1. DOS BIOS Update Screen Identifier GUID-BA107C84-45F9-4B4C-B103-DD9B316D6D1A Status Released Enabling smart power on To enable Smart Power On and the ability to wake a system from S3, S4, and S5 sleep states with a move of a mouse or press of a key on the keyboard, perform these steps: Make sure the following BIOS settings under Power Management setup option are set as mentioned here: •... -
Page 32: Software
Released Downloading drivers Turn on the computer. Go to Dell.com/support. Click Product Support, enter the Service Tag of your computer, and then click Submit. NOTE: If you do not have the Service Tag, use the auto detect feature or manually browse for your computer model. -
Page 33: Downloading The Chipset Driver
Released Downloading the chipset driver Turn on the computer. Go to Dell.com/support. Click Product Support, enter the Service Tag of your computer, and then click Submit. NOTE: If you do not have the Service Tag, use the autodetect feature or manually browse for your computer model. -
Page 34: Downloading Graphic Drivers
Released Downloading graphic drivers Turn on the computer. Go to Dell.com/support. Click Product Support, enter the Service Tag of your computer, and then click Submit. NOTE: If you do not have the Service Tag, use the auto detect feature or manually browse for your computer model. -
Page 35: Intel Wi-Fi And Bluetooth Drivers
Released Intel Wi-Fi and Bluetooth drivers In the Device Manager, check if the network card driver is installed. Install the driver updates from dell.com/support. In the Device Manager, check if the Bluetooth driver is installed. Install the driver updates from dell.com/support. -
Page 36: Realtek Hd Audio Drivers
Released Downloading the audio driver Turn on your computer. Go to dell.com/support. Click Product support, enter the Service Tag of your computer, and then click Submit. NOTE: If you do not have the Service Tag, use the auto-detect feature or manually browse for your computer model. - Page 37 Save the file, and after the download is complete, navigate to the folder where you saved the audio driver file. Double-click the audio driver file icon and follow the instructions on the screen to install the driver. Software...
-
Page 38: Getting Help
Dell product catalog. Dell provides several online and telephone-based support and service options. Availability varies by country and product, and some services may not be available in your area. To contact Dell for sales, technical support, or customer service issues: Go to Dell.com/support.