Mitsubishi Electric PZ-60DR-E Operating Instructions Manual
Lossnay remote controller
Hide thumbs
Also See for PZ-60DR-E:
- Technical manual (105 pages) ,
- Handbook (64 pages) ,
- Handbook (123 pages)
Lossnay Component for residential, commercial or light-industrial use
Lossnay Remote Controller
PZ-60DR-E
Operating Instructions
This remote controller is to be connected to a Lossnay unit to allow that unit to
be started and stopped, and to allow selection of the ventilation mode and of the
fan speed.
In order to ensure that the remote controller and Lossnay unit can be operated
both correctly and safely, it is important that this user's manual be read fully and
carefully.
1 Safety Precautions ......................................................................... 2
2 Parts Names .................................................................................. 4
3 Setting the Day of the Week and Time........................................... 6
4 Using the Remote Controller .......................................................... 7
ON/OFF
5 Care and Maintenance ................................................................. 16
6 Servicing ...................................................................................... 17
7 Specifications ............................................................................... 18
- 1 -
Contents
Typical System Setup ............................................................................7
Using the Timer ......................................................................................9
1 Using the Weekly Timer .............................................................9
2 Using the Simple Timer ............................................................12
Using the Night Purge ..........................................................................14
Using the operation lock ......................................................................15
Centrally Controlled .............................................................................16
When interlocked with external device ................................................16
English
Table of Contents

Related Manuals for Mitsubishi Electric PZ-60DR-E


Summary of Contents for Mitsubishi Electric PZ-60DR-E
-
Page 1: Table Of Contents
English Lossnay Component for residential, commercial or light-industrial use Lossnay Remote Controller PZ-60DR-E Operating Instructions Contents 1 Safety Precautions ................. 2 2 Parts Names .................. 4 3 Setting the Day of the Week and Time........... 6 4 Using the Remote Controller ............7 Typical System Setup ................7... -
Page 2: Safety Precautions
Safety Precautions Precautions are classified as follows, according to the level of potential danger. WARNING Denotes a condition or operation which, if handled incorrectly, may lead to serious injury or death. CAUTION Denotes a condition or operation which, if handled incorrectly, may lead to bodily injury or property damage. WARNING Do not attempt to install this equipment yourself. - Page 3 CAUTION Keep hazardous materials away from this equipment. Do not use sharp-tipped objects to press the buttons. Do not install this equipment in locations where there is risk of Use of sharp tips may lead to electric shock or equipment failure. combustible gas leakage.
-
Page 4: Parts Names
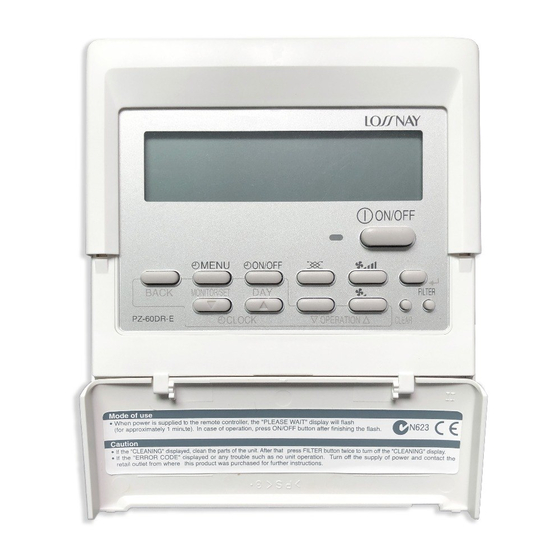
Parts Names Display Section For purposes of this Day-of-Week explanation, all parts of the display are shown as lit. Shows the current day of the week. During actual operation, only the relevant items will be lit. TIME/TIMER Display “Locked” indicator Shows the current time, unless the simple timer is Indicates that remote controller set. - Page 5 Operation Section Operation lamp ON/OFF button On during operation. Flashes Switches between “run” and “stop”. when a malfunction occurs. Switches between “Operation” and “24- hour Ventilation (Extra Low fan speed)” Function selector when 24-hour Ventilation is set. button Used to select the ventilation Fan Speed Adjustment button mode from among Heat exchange.
-
Page 6: Setting The Day Of The Week And Time
Note: Setting the Day of the Week and Time Your new entries at Steps 2 and 3 will be cancelled if you press the BACK button 2 button 4. before pressing the Use this screen to change the current day of the week and time setting. 5. -
Page 7: Using The Remote Controller
Using the Remote Controller Typical System Setup In either case, up to two remote controllers can be used. Two remote controller operation • When two individual remote controllers have been installed, the most recent control signals will be given priority. Independent operation of the Lossnay unit: Lossnay Remote controller(s) - Page 8 Dot display ON/OFF button Function selector button Fan Speed Adjustment button “Extra Low” fan speed button Operation Relevant button Relevant display items Sequence 1. Starting the Lossnay unit Press the [ ON/OFF] button and confirm that the Operation lamp turns on. Operation lamp “High”...
-
Page 9: Using The Timer
Pressing Function Selector button Ventilation mode Display Display will change AUTO automatically depending on environmental circumstances. HEAT EX. * If either “HEAT EX.” or “BY-PASS” is selected and 1 and 2 blink alternately at an interval of five seconds in the dot display, it is recommended to select “AUTO”. -
Page 10
1. Be sure that you are at a standard control screen, and that the weekly timer indicator 1 is shown in the display. MENU] button b, so that the “TIMER SET” appears on the screen 2. -
Page 11
Shows the time setting Timer Settings Shows the selected operation (ON or OFF) * Does not appear if operation is not set. Shows the fan speed setting CLOCK] button a as necessary to set the desired time (at 5). -
Page 12: Using The Simple Timer
2 Using the Simple TimerYou can set the simple timer in any of three ways. Timer Setting • Start time only: The Lossnay unit starts when the set time has elapsed. • Stop time only: The Lossnay unit stops when the set time has elapsed. -
Page 13
Examples If ON and OFF times have both been set at the simple timer, operation and display are as Timer Setting indicated below. Example 1: Start the timer, with ON time set sooner than OFF time ON Setting: 3 hours OFF Setting: 7 hours 1. -
Page 14: Using The Night Purge
Using the Night Purge Night purge operation is used in the summer to automatically ventilate a room at night while the air conditioner is stopped, to discharge accumulated heat and Night Purge mode is active; no operation thereby reduce the air conditioning load the next morning. If Night purge is enabled per the “Installation Manual”... -
Page 15: Using The Operation Lock
Using the operation lock1. While holding down the FILTER button 4, press and hold down the [ ON/OFF] Locking the remote controller buttons (Operation Lock) button 1 for 2 seconds. The “Locked” indication appears on the screen (at 1), If you wish, you can lock the remote controller buttons. -
Page 16: Centrally Controlled
Centrally Controlled Care and Maintenance “CENTRAL” will be displayed when operation is locked in the centralized controller or REMOTE is ON in Remote Input, and also during the external interlocking priority Button Display Sequence mode (during interlocking, when the interlocking mode is “External Signal Priority.”) The following operations are locked: Cleaning of the Clean the air filter, Press the FILTER... -
Page 17: Servicing
ServicingBasic System M-NET System Operation lamp Operation lamp (Flashing) (Flashing) ERROR CODE ERROR CODE Alternating Display Unit address No. Unit No. Unit No. Alternating Display The contact telephone number will be displayed if CALL has been set. Pressing the CLEAR button once will display the contact telephone number even when an error code is not displayed. -
Page 18: Specifications
Specifications Item Details Dimensions 120 (H) × 130 (W) × 19 (D) mm Weight 0.2 kg Power Source 10 to 15V DC (Supplied from Lossnay unit) Power Consumption 0.3 W Ambient Usage Environment 0°C to 40°C, 30% to 80% relative humidity Composition –...