Table of Contents
Table of Contents

Summary of Contents for Safety Vision SV-BODYCAM
- Page 1 SV-BODYCAM USER GUIDE...
- Page 2 SV-BODYCAM USER GUIDE...
- Page 3 This material is confidential and the property of Safety Vision. It is shared with your company for the sole purpose of helping you with the operation of the described equipment.
-
Page 4: Table Of Contents
SV-BODYCAM USER GUIDE CONTENTS Overview Installation Configuration Components LCD Screen Display Basic Operation Sleep Mode Video Recording Event (IMP) Feature Camera Snapshot Function Audio Recording Zoom (+) / (-) Playback Menu Button... -
Page 5: Sv-Bodycam User Guide
SV-BODYCAM USER GUIDE Appendix A: Disabling Driver Signature Enforcement on Windows 8.1 and Windows 10 Appendix B: Specifications Appendix C: Dimensions FCC Compliance Statement... -
Page 6: Overview
2” color LCD screen. With up to 32 GB of internal video storage and up to 9.5 hours of continuous HD recording, the SV-BODYCAM effectively supplies video evidence of every police interaction from the officer’s point of view. -
Page 7: Installation
The SV-BodyCam requires a USB driver to be installed to properly communicate with a PC and the SV-BodyCam Local Agent II software. The appropriate software downloads can be found at Safety Vision’s FTP site - Contact your Safety Vision Account Executive for URL and login information to access Safety Vision’s FTP site. -
Page 8: Configuration
Open the Local Agent II software The SV-BodyCam Local Agent II software is required to mount the SV-BodyCam as a hard drive on your PC to securely browse or download recorded data. Select YES if prompted by windows to allow this unknown... - Page 9 The Local Agent II window appears and displays the name of the SV-BodyCam unit that is connected. Enter the SV-BodyCam unit’s password in the Password field The default password is 888888 Select one of the three options: Settings, Import Files, or Browse Files See the following pages for details.
- Page 10 SV-BODYCAM USER GUIDE Settings Click the Settings button to access the configuration menu for both the SV-BodyCam and the Local Agent II software. When finished changing settings click Save Changes. Device Settings Change Device ID: Enter a unique alphanumeric ID up to 8 characters long for the attached SV-BodyCam unit.
- Page 11 Device Record Resolution settings. OSD Name: Enter a unique ID for the attached SV-BodyCam unit that will appear on the unit’s on-screen display and embedded into video and picture files (can be different from the Device ID) Enable Pre-recording: Select this option to record video from before the record button is pressed.
- Page 12 These file extensions are used by PrimaView playback software to identify SV-BodyCam files. NOTE: If you will not be using PrimaView playback software to view files, unselect this option to save files in standard AVI form, which can be played back on any standard media player •...
- Page 13 Import Files Click the Import Files button to automatically import all files saved on the SV-BodyCam to the location specified in the Local Agent II settings as described previously. A status bar appears displaying the progress of the transfer. Once the transfer is complete, files are automatically deleted from the SV-BodyCam.
-
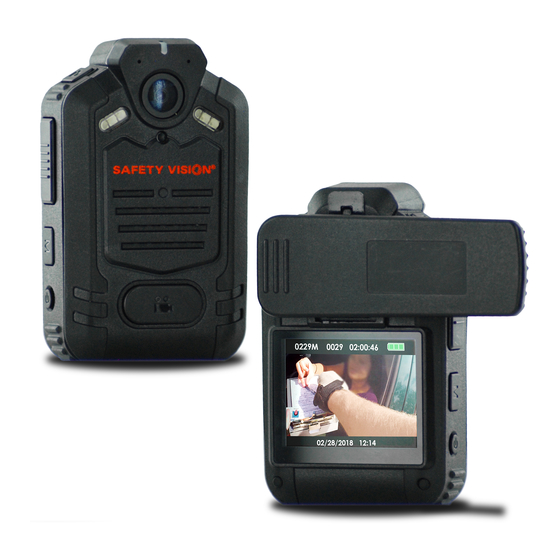
Page 14: Components
SV-BODYCAM USER GUIDE Components 1 - Status LED Indicator 11 - Audio Speaker 2 - Voice Recording Microphone 12 - Video Record Button 3 - Camera Snapshot/Zoom (+) 13 - Docking Station Button Connector 4 - Infrared (IR) Illuminators 14 - Audio Record / Zoom (-) -
Page 15: Lcd Screen Display
SV-BODYCAM USER GUIDE LCD Screen Display 1 - Photo Resolution: 7 - OSD (On-screen Display) Displays the resolution of photos the Metadata: Displays the date/ unit is configured to time stamp & metadata applied to the recorded file 2 - Recording Indicator:... -
Page 16: Basic Operation
When powered ON, the Status LED indicator on the front of the unit displays solid green. To power OFF the SV-BodyCam, press and hold the Power Button for 2 seconds, until you hear the power down chime. The unit is now turned off. -
Page 17: Video Recording
SV-BODYCAM USER GUIDE Video Recording To start a video recording when the unit is powered ON, single-press the Video Record Button located on the front of the unit. The Status LED indicator on the front of the unit displays flashing red when video is recording. -
Page 18: Event (Imp) Feature
SV-BODYCAM USER GUIDE Event (IMP) Feature To mark a video recording as an important (IMP) file, press the Event (IMP) Button located on the side of the unit while in video recording mode. The Event (IMP) icon will be displayed on the LCD screen. -
Page 19: Camera Snapshot Function
SV-BODYCAM USER GUIDE Camera Snapshot Function The SV-BodyCam captures snapshots in JPEG (.jpg) format. NOTE: A snapshot can be captured while video is being recorded. To capture a snapshot image, ensure the unit is powered ON (turn on LCD screen to use as a visual aid when taking snapshots). Single-press the Camera Snapshot Button to take a photo, the unit will make a camera “shutter”... -
Page 20: Audio Recording
SV-BODYCAM USER GUIDE Audio Recording The SV-BodyCam records audio-only files in WAV (.wav) format. To record an audio-only file, ensure the unit is powered ON. If the LCD screen is also turned on, single-press the Audio Record Button located at the top of the unit, to start audio recording. -
Page 21: Zoom (+)
SV-BODYCAM USER GUIDE Zoom (-) Zoom (+) Zoom (+) / (-) NOTE: Zoom (+) / (-) can be performed while video is being recorded. To Zoom (+) in the camera image, press and hold down the Camera Snapshot / Zoom (+) Button located at the top of the unit, to activate the digital-zoom feature. -
Page 22: Playback
SV-BODYCAM USER GUIDE Playback Video files, snapshots, audio-only files, and IMP video files, can all be reviewed on the SV-BodyCam’s LCD screen. To access and review previously recorded files, ensure the unit is powered ON. Single-press the Playback Button located on the side of the unit. - Page 23 SV-BODYCAM USER GUIDE To navigate the Playback Menu, use the Camera Snapshot Button to scroll Right, and the Audio Record Button to scroll Left, to select the folder of the type of files to review. To open the selected folder,...
- Page 24 Playback Button functions as play/pause. When playback is over, the LCD screen will automatically return to the thumbnail view. To exit Playback Mode, single-press the Menu Button located on the side of the unit, to return the SV-BodyCam back into normal operation mode.
- Page 25 SV-BodyCam is off. NOTE 3: Charge the batteries once every 3 months during long-term non-use, to avoid failure of the batteries. NOTE 4: The SV-BodyCam is also available to charge by car charger, and multi-bay docking station.
-
Page 26: Menu Button
SV-BODYCAM USER GUIDE Menu Button The SV-BodyCam includes a Menu Button that displays a system setting menu. See below for descriptions. NOTE: It is highly recommended that users DO NOT touch / change any settings on this system setting menu. For all configuration settings, please use the Local Agent II software. -
Page 27: Enforcement On Windows 8.1 And Windows 10
SV-BODYCAM USER GUIDE Appendix A: Disabling Driver Signature Enforcement on Windows 8.1 and Windows 10 The process to disable Driver Signing Enforcement has changed in Windows 8.1 and Windows 10. Following these directions will temporarily disable enforcement. Enforcement will be re-enabled upon a reboot of the PC. - Page 28 SV-BODYCAM USER GUIDE NOTE: The following steps will need to be performed by the customer. These steps are performed pre-boot and cannot be performed remotely. WARNING: These steps can cause major issues if performed incorrectly!! **BE CAREFUL!!** The PC will reboot and go into the Advanced Options window. Select the Troubleshoot option.
- Page 29 SV-BODYCAM USER GUIDE On the next screen, select Startup Settings. On the next screen, click the Restart button.
- Page 30 SV-BODYCAM USER GUIDE On the next screen, press the 7 or F7 key to select “Disable driver signature enforcement”. After performing these steps, your PC will reboot and you will be able to install unsigned drivers without any error message.
-
Page 31: Appendix B: Specifications
SV-BODYCAM USER GUIDE Appendix B: Specifications SPECIFICATIONS Part No. SV-PRIMAFACE32G Sensor CMOS sensor LCD 2.0" High light LCD Lens F/NO=2.5, 160° wide angle lens Storage 32 GB SHD: 2304 × 1296, FHD: 1920 × 1080, Video resolution HD: 1280 × 720, WVGA: 848 × 480 Frame Rate 30 fps (all channels, all resolutions), HD up to 60 fps File Compression Video: MP4/H.264, Image: JPEG, Audio: WAV... -
Page 32: Appendix C: Dimensions
SV-BODYCAM USER GUIDE Appendix C: Dimensions... -
Page 33: Fcc Compliance Statement
SV-BODYCAM USER GUIDE FCC Compliance Statement NOTE This device has been tested and found to comply with the limits for a Class A digital device, pursuant to part 15 of the FCC Rules. These limits are designed to provide reasonable protection against harmful interference when the equipment is operated in a commercial environment. - Page 34 CORPORATE HEADQUARTERS 6100 W. Sam Houston Pkwy. N. Main: 713.896.6600 Houston, TX 77041-5113 Toll Free: 800.880.8855 www.safetyvision.com Fax: 713.896.6640 Co pyright © 2018 Saf ety Vision, LLC All Rights Reserved.