Table of Contents
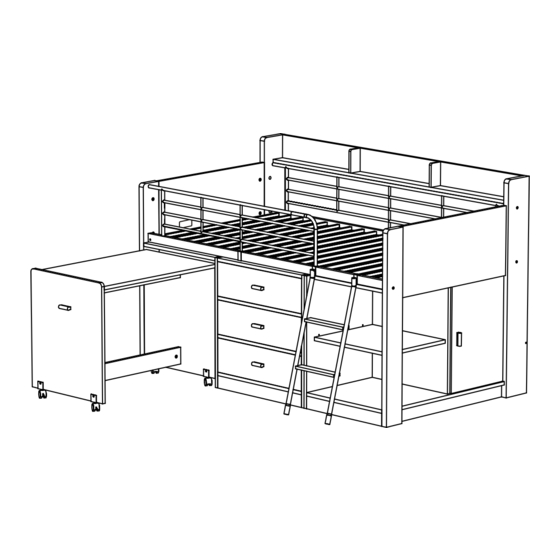
CHARLESTON
LOFT BED
Thank you for choosing Rack Furniture. Before starting, we suggest
reading through this instruction manual to ensure that you completely
understand the assembly of this product.
Rack Furniture
Suite 1, 2713 SE I Street, Bentonville, AR 72712 USA
Customer Service: 1-479-715-6445
www.rackfurniturellc.com
Made in Malaysia
PRN: AIM-36-1001-RAC [11.03.17]
Table of Contents

Summary of Contents for Rack furniture CHARLESTON LOFT BED
- Page 1 CHARLESTON LOFT BED Thank you for choosing Rack Furniture. Before starting, we suggest reading through this instruction manual to ensure that you completely understand the assembly of this product. Rack Furniture Suite 1, 2713 SE I Street, Bentonville, AR 72712 USA Customer Service: 1-479-715-6445 www.rackfurniturellc.com...
- Page 2 Ensure that you check regularly that all bolts are securely fastened and all components are in place. If spare parts are required, contact Rack Furniture at 1-479-715-6445 or write to us at 2713 SE I Street Bentonville, Arkansas 72712.
- Page 3 PART LIST Carton 1 of 3 Carton 2 of 3 Part Name Part Name Center Panel Bottom Panel Plinth Panel (Side) Center Panel Support Panel Plinth Panel (Front) Right Panel Left Panel Support Panel Back Panel Top Panel Left Panel (Cabinet) Support Panel (Cabinet) Plinth Panel (Cabinet) Bottom Panel (Cabinet)
- Page 4 PART LIST Sticker Date Code (Back side) Sticker Date Code (Back side) Sticker Date Code Page 4 of 32...
- Page 5 HARDWARE LIST Part Name Cam Bolt Cam Lock 45mm Chipboard Screw Solid Aluminum Handle (silver) 20mm Handle Screw PVC Door Spring Magnet 30mm Chipboard Screw M6 x 25mm Allen Bolt (Silver) U Shape Casters (Black) Dome Locking Nut (Black) 25mm Allen Bolt (Black) Metal Shelf Support M8 x 95mm Allen Bolt (Black) M8 Round Nut...
- Page 6 How to correctly install Cam Bolt and Lock Cam Lock INTERSECTING HOLE Cam Lock arrow facing towards the hole. When fitting cam bolts into holes ensure that the arrow on the top of the cam points to the intersecting hole, which is usually on the nearest Screw in end edge of the panel.
- Page 7 STEP 1 - DESK ASSEMBLY Sticker Date Code Hardware needed to assemble the Desk (x8) (x8) (x14) (x4) (x4) (x4) (x1) (x2) Page 7 of 32...
- Page 8 STEP 1 - DESK ASSEMBLY Assemble the wood dowels, cam locks and cam Bolts first as per the diagram below. 1-1a Slide board (25) onto cam stud with board (26), make sure both boards are flush. With screw driver turn cam 180°...
- Page 9 STEP 1 - DESK ASSEMBLY Sticker Date Code 1-2a Slide board (27) onto both (26) boards then tighten both cams by turning 180°. 1-3a Slide board (28) into board (25) and onto board (27). Tighten all 4 cam locks 180°. 1-4a Attach caster (J) with allen bolt (L) and nut (K) as shown.
- Page 10 STEP 1 - DESK ASSEMBLY 1-5a Attach handle (D) with handle screw (E) to front panel (25) as shown. Desk assembly complete. STEP 2 - DRAWER AND CABINET ASSEMBLY Hardware needed to assemble the Drawer and Cabinet (x48) (x25) (x24) (x3) (x6) (3 set)
- Page 11 STEP 2 - DRAWER & DRESSER ASSEMBLY Assemble the wood dowels, cam locks and cam Bolts first as per the diagram below. TURN OVER TURN OVER Page 11 of 32...
- Page 12 STEP 2 - DRAWER AND CABINET ASSEMBLY 2-1a Tighten back panel (20) with side panel (21 & 22) as shown. Make sure back panel with cams is facing out. Once cam bolt is slid into cam lock then then turn cam lock 180° or until locked. Insert bottom panel (23) as shown.
- Page 13 STEP 2 - DRAWER & DRESSER ASSEMBLY 2-4a Tighten handle (D) with screw (E) as shown. Repeat steps #1-4 on the two remaining drawers. Fixing drawer slide (Z3) with Screw (Z4) as shown. Third Hole Last third hole Front Back 2-6a 2-6b Attach (13) to bottom of (14).
- Page 14 STEP 2 - DRAWER & DRESSER ASSEMBLY Place (17) onto unit and tighten. Insert back panel (18) into channels as shown. 2-9a Make sure all cam studs line up. Tighten right panel (12) as shown, repeat for left panel (19). Dresser assembly complete. Page 14 of 32...
- Page 15 STEP 3 - SHELF ASSEMBLY Hardware needed to assemble the Shelf (x6) (x6) (x31) (x15) Page 15 of 32...
- Page 16 STEP 3 - SHELF ASSEMBLY Assemble the wood dowels, cam locks and cam Bolts first as per the diagram below. TURN OVER Page 16 of 32...
- Page 17 STEP 3 - SHELF ASSEMBLY 3-1a Tighten panel (2) to panel (1) as shown. Then tighten panel (3) as shown. 3-1b 3-2a Tighten bottom panel (4) with screw (C) as shown. Page 17 of 32...
- Page 18 STEP 3 - SHELF ASSEMBLY 3-3a 3-3b 3-3c Push in panel (6) to the panel (5) as shown in 3-3a. Push in panel (5 & 6) into bottom of panel (4). Then tighten to bottom panel as shown 3-3b & 3-3c. 3-4a Tighten panel (7) as shown.
- Page 19 STEP 3 - SHELF ASSEMBLY (x2) 3-5a Push in back panel (10) as shown. Then tighten support panel (9) with screw (C) as shown. 3-6b 3-6a (x5) Attach panel (11) onto unit. Make sure all dowels are inserted and the panel is flush with unit. Secure with screws (C) as shown.
- Page 20 STEP 3 - SHELF ASSEMBLY (x9) 3-7a Tighten panel (8) with screw (C) as shown. Shelf assembly complete. STEP 4 - BED ASSEMBLY Sticker Date Code Sticker Date Code (Back Side) Page 20 of 32...
- Page 21 STEP 4 - BED ASSEMBLY Hardware needed to assemble the Bed Assemble the wood dowels, cam locks and cam bolts first as per the diagram below. Page 21 of 32...
- Page 22 STEP 4 - BED ASSEMBLY (x8) Attach double ended dowel (X) as shown. Attach double ended dowel (X) as shown. 4-1a 4-2a Tighten left and right panel (29 & 31) to center panel (30) as shown. Page 22 of 32...
- Page 23 STEP 4 - BED ASSEMBLY 4-3a Insert panel (34) along with panel (33) as shown. Then tighten left and right panel (32 & 35) to center panel (33 & 34) as shown. 4-4a (x2) Tighten panel (3) with allen bolt (I) as shown. Page 23 of 32...
- Page 24 STEP 4 - BED ASSEMBLY Put Up (x3) 4-6a Tighten cabinet with allen bolt (I) as shown. Page 24 of 32...
- Page 25 STEP 4 - BED ASSEMBLY 4-7a Tighten support panel (36) as shown. Tighten end panel as shown. Page 25 of 32...
- Page 26 STEP 4 - BED ASSEMBLY TURN OVER Tighten shelf (39) to panel (38) with screw (C) as shown in 4-9a. Tighten panel (37) with screw (C) as shown in 4-9b. Then tighten (x7) panel 38 with screw (C) as shown in 4-9c. 4-10 (x4) Tighten panel to left and right end panel as shown.
- Page 27 STEP 4 - BED ASSEMBLY 4-11 4-11a Tighten side rails (42 &43) with allen bolt (N) and nut (P) as shown. (x4) (x4) 4-12 4-12a (x36) Tighten base (44) with allen bolt (U) as shown. Page 27 of 32...
- Page 28 STEP 4 - BED ASSEMBLY 4-13 4-13a Front View Sticker Date Code (x1) 4-13b (x2) (x2) 4-13c Tighten guardrail (45) with allen bolt (R,S,V) as shown. Front View 4-14 4-14a (x2) (x2) (x2) (x2) 4-14b Tighten brace (47) with allen bolt (V) to base as shown 4-14b, Tighten panel (9) with screw (H) as shown.
- Page 29 STEP 4 - BED ASSEMBLY 4-15 4-15a 4-15b (x1) (x1) (x1) Tighten guardrail (46) with allen bolt (R,S,V) as shown. 4-15c 4-16 4-16a (x1) (x1) (x1) Tighten ladder as shown. Page 29 of 32...
- Page 30 STEP 4 - BED ASSEMBLY 4-17 4-17b 4-17a (x1) (x2) (x2) Attach handle (D) with screw (E) as shown in 4-17a. Attach PVC door spring (F) to door panel (40) as shown 4-17b. 4-18 4-18a (x1) (x1) Insert the door panel into cabinet as shown. Then attach magnet (G) as shown. Page 30 of 32...
- Page 31 STEP 4 - BED ASSEMBLY 4-19 (x16) 4-19a Slide drawers into the dresser assembly as shown. Then attach Stickers (Y) to cover the cams (B). 4-20 Assembly is complete. Make sure that all of the hardware is tightened and secure. Page 31 of 32...
- Page 32 Please use this area to make notes on assembly or where you stored the hardware when item is disassembled. Product Packaging Information Rack Furniture Master Model #: Suite 1, 2713 SE I Street, Box Model #: Bentonville, AR 72712 USA...