
Related Manuals for Audiovox Satellite Radio Receiver


Summary of Contents for Audiovox Satellite Radio Receiver
-
Page 2: Congratulations
Your Audiovox Xpress XM receiver must be used with an accessory kit, such as the Audiovox Home Kit, Boom Box or Vehicle Kit as required by your specific installation needs. These kits are available at retailers where Audiovox main units are sold. -
Page 3: Fcc Information
The user is cautioned that changes or modifications not expressly approved by XM Satellite Radio, Inc. can void the user’s authority to operate this device. Please note that the cables that have been supplied with your XMC10 car cradle are supplied with permanently attached ferrite beads. -
Page 4: Table Of Contents
Table of Contents Congratulations ... FCC Information ... Table of Contents ... List of Illustrations ... Xpress System Components ... Introduction ... Optional Accessories ... Getting Started ... XM Activation ... 10 Controls ... 13 Receiver Control Features ... 13 Basic Operation ... - Page 5 Table of Contents (Cont) Stock Ticker ... 33 Add Stock ... 34 Erase Stock ... 35 Erase All Stock ... 35 Erase Some Stock ... 36 Info Extras ... 36 Display Screen Mode ... 38 Scrolling Display ... 39 Background Mode ... 40 Set Clock ...
-
Page 6: List Of Illustrations
Figure 2. Xpress Receiver Unit ... 12 Figure 3. Xpress Receiver Unit Display Screen ... 15 Figure 4. XM and Audiovox Logos Power ON Screen ... 17 Figure 5. Active Channel Screen ... 17 Figure 6. Main Menu Screen ... 18 Figure 7. - Page 7 List of Illustrations (Cont) Figure 24. Add Stock Screen ... 34 Figure 25. Erase Stock Screen ... 35 Figure 26. Erase All Stock Screen ... 35 Figure 27. Erase Some Stock Screen ... 36 Figure 28. Info Extra Screen ... 37 Figure 29.
-
Page 8: Xpress System Components
Xpress System Components XM® Receiver Model Xpress Remote Control Unit Part Number 136-4042 3 Vdc Battery for Remote, (1) CR2032... -
Page 9: Introduction
Introduction The Audiovox Xpress XM® unit processes the XM satellite signals received by the externally mounted antenna (purchased separately for Home or Boom Box Kits). The Xpress XM® unit recognizes and decodes the incoming XM program information and provides an audio signal to your radio or other audio output equipment. -
Page 10: Getting Started
Getting Started XM Activation Activating your XM® radio service is easy. You have one of two choices to activate your service: Online or by Phone. Online Activation Process First, please make sure the Xpress XM® unit is working properly by tuning to the XM®... -
Page 11: Figure 1. Your Receiver 8-Character Alphanumeric Id
Please check your 8-character alphanumeric XM® ID code carefully. There is no “I” (eye), “o” (oh), “S” or “F” used. You may wish to double check your ID code on the outside of your tuner box. Enter the ID code below: Figure 1. -
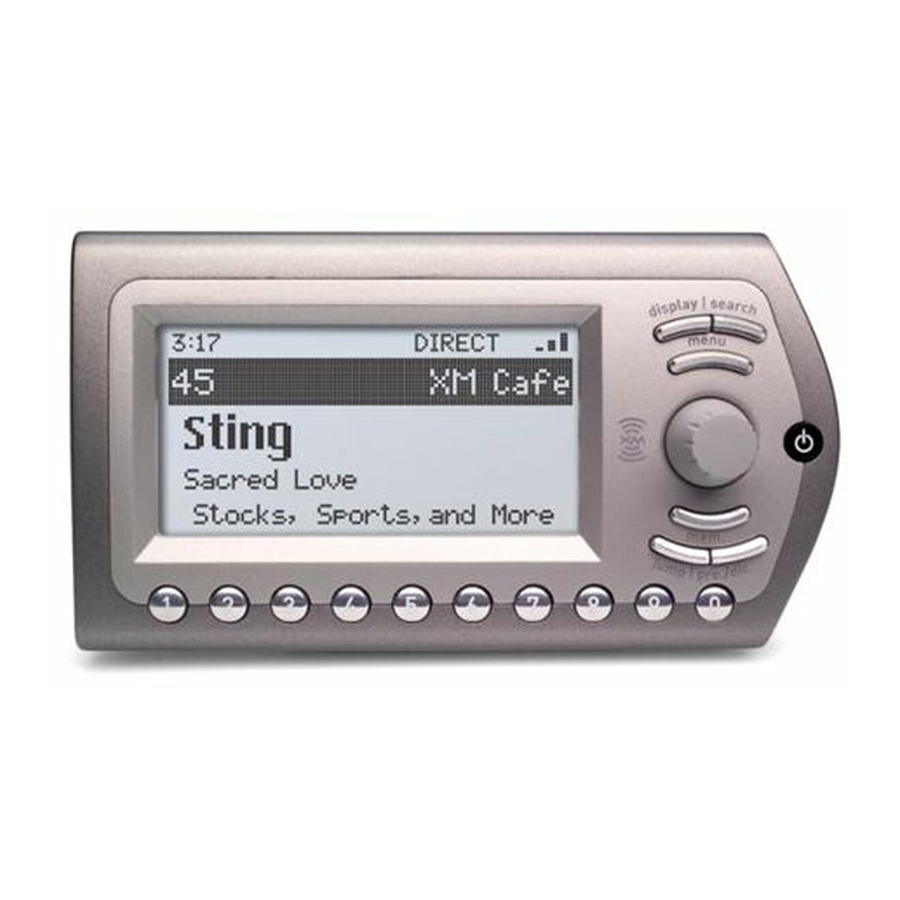
Page 12: Figure 2. Xpress Receiver Unit
The Audiovox Xpress XM® unit provides: 7 control buttons 1 Rotary/Select Knob 10 number keys. DISPLAY PRESET KEYPAD (NUMBER) BUTTON Figure 2. Xpress Receiver Unit SEARCH DISPLAY BUTTON BUTTON MENU BUTTON ROTARY / SELECT KNOB POWER / IR EYE BUTTON... -
Page 13: Controls
Controls Receiver Control Features Display Button - This button allows the user to choose one of four (4) different formats to present the Artist, Song Title and data service information on the LCD screen. Search Button - This button allows the user to search the next channel category as well as between preset channels or perform a continuous search. - Page 14 the various menus and lists. The current selection from the list will be highlighted on the display. When the item is highlighted, press the Rotary/Select Knob to enter the selection. Power Button - This button applies power to and removes power from the Xpress XM®...
-
Page 15: Figure 3. Xpress Receiver Unit Display Screen
Display Screen Features - Shown to the right is an example of an active Display Screen (see Figure 3). Pressing the DISPLAY button from the Default display switches between the artist name/song title screen, artist name/song title with stock screen, artist name/song title with sports screen, or large letter format. -
Page 16: Basic Operation
Press the Power button to turn the unit ON. When the unit turns ON the XM® logo will appear for 3-seconds (curved lines on either side of the XM® logo gradually appear) (see Figure 4) followed by the Audiovox logo. These screens will be followed by the active channel (see Figure 5), which defaults to the last tuned channel setting prior to power being turned OFF. -
Page 17: Menu Options
Figure 4. XM and Audiovox Logo Power ON Screen Figure 5. Active Channel Screen Menu Options To enter the Menu Options page, press the MENU Button on either the remote control or the main unit. The Main Menu list will appear on the screen (see Figure 6). -
Page 18: Figure 6. Main Menu Screen
The following options are available: FM Frequency Brightness + Contrast Backlight Timer Audio Level Antenna Aiming Direct Tune Search Mode Channel Skip/Add Memory Recall While in the menu screen function, if a button is not pressed within 12-seconds from the previously selected function, the unit exits the menu screen function and reverts to the default screen display. -
Page 19: Fm Frequency
FM Frequency The following Frequency Setting adjustments are possible only when using the Xpress XM® unit in your vehicle. NOTE: The Xpress XM® unit has an internal wireless FM transmitter, which allows you to play the audio through any standard vehicle FM receiver, eliminating the need for hardwire connections. -
Page 20: Figure 7. Fm Off Screen
Figure 7. FM OFF Screen The selected frequency must be an unused frequency or a frequency used by a low powered FM station in your area. If not, the strong signal from the FM station may overpower the Xpress XM® unit FM transmitted signal which may result in interference. -
Page 21: Brightness + Contrast
Brightness + Contrast This feature allows the user to adjust the brightness and contrast of the unit’s display (see Figure Upon entering either the brightness or contrast adjustment mode, a horizontal bar graph is displayed with a minus (-) sign on the left and a plus (+) on the right. Use the Rotary/ Select Knob to highlight the contrast or the brightness adjustment. -
Page 22: Backlight Timer
NOTE: When the Receiver is to be used in battery-operated accessories, such as the Xpress Boom Box (XMB10), to maximize battery life, it is suggested that the brightness setting be reduced to a minimal level. Figure 9. Brightness and Contrast Screen Backlight Timer The Backlight Timer feature allows the user to set the amount of time the display backlight is turned on, or the period before the display darkens,... -
Page 23: Figure 10. Backlight Timer Options
Always On 10 Seconds 20 Seconds 30 Seconds Figure 10. Backlight Timer Options If the desired backlight time is 20 seconds, turn the Rotary/Select knob CW to scroll down through the timer selections until 20 Seconds is highlighted (Figure 10); then press the Rotary/Select knob. The selection will appear as shown in Figure 11. -
Page 24: Audio Level
As a result, the display backlight will turn off 20 seconds after this selection is entered, provided no other button is pressed in the meantime. Audio Level This feature allows the user to set the audio output signal level (see Figure 12). -
Page 25: Antenna Aiming (Home Installation)
Antenna Aiming (Home Installation) This feature allows the user to aim the antenna to optimize XM® signal reception (see Figure 13). Upon entering the antenna aiming mode, a horizontal bar graph is displayed with a minus (-) sign on the left and a plus (+) on the right. -
Page 26: Direct Tune
Direct Tune Turn the Rotary/Select Knob CW or CCW to highlight choice (Direct Tune On or Direct Tune Off). When the desired setting is highlighted, press the Rotary/Select Knob or the (XM) Select Button on the remote control to confirm (see Figure 14). The direct tune function when enabled (ON), allows the user to manually tune to a station using the Rotary/Select Knob or the remote control UP and DOWN buttons. -
Page 27: Search Mode
Search Mode This feature allows the user to change the way the search button on the Xpress XM® unit functions. The Search button can be set to search categories, to scan through all presets (A, B, C) or all available channels. -
Page 28: Channel Skip/Add
Channel Skip/Add The Channel Skip/Add function provides the ability to skip over certain channels when using the Rotary/Select Knob or the UP and DOWN buttons on the Remote Control. Upon entering this mode, a channel list is displayed with the current channel in play highlighted (see Figure 16). In front of each channel is a plus sign (+) signifying that the channel is not skipped or a minus sign (-) signifying the channel is skipped. -
Page 29: Memory Recall
Memory Recall This feature allows the user to capture and store the current program data information (Artist & Song title) with up to 20 listings (20 Artist/Song Title combinations) (see Figure 17). Press and release the memory (mem) button to save the information of the current broadcast song or program. -
Page 30: Tune Select
Figure 18. Tune Select Screen Tune Select This feature allows the user to store current program information (Artist and Song title) for future comparison against the incoming XM® signal. The Xpress XM® unit can hold up to 20 entries, after which any new information saved will replace the oldest entry in memory. -
Page 31: Tune Select Erase Some
“Yes or No” (see Figure 19). Press the Rotary/Select Knob or the (XM) Select Button on the remote control to confirm the selection. Figure 19. Tune Select Erase All Screen Tune Select Erase Some To delete individual and multiple artists/song titles from the Tune Select list use the Rotary/Select Knob or the UP and DOWN buttons on the remote control to choose the Artist name or Song title (see Figure 20). -
Page 32: Select By-Song
Select By-Song This feature enables the Xpress XM® unit to search incoming XM® broadcast for stored content by song title. Use the Rotary/Select Knob or the UP and DOWN buttons on the remote control and select the “Select by Song”. Press the Rotary/Select Knob or the (XM) Select Button on the remote to confirm the selection (see Figure 21). -
Page 33: Stock Ticker
Figure 22. Select by Artist Confirmation Screen Stock Ticker This feature allows the user to monitor various stocks . The Xpress XM® unit can monitor up to 20 stock symbols. Use the Rotary/Select Knob or the remote control up down buttons to select “Add Stocks” or “Erase Stocks”... -
Page 34: Add Stock
Add Stock Two screens will appear “Please Wait” and “Enter Symbol” (see Figure 24). When the “Enter Symbol” screen appears use the Rotary/Select Knob or the remote control up down buttons to select each letter in the stock symbol. Press the Rotary/Select Knob or the (XM) Select Button on the remote control to confirm each letter of the symbol. -
Page 35: Erase Stock
Erase Stock This feature allows the user to erase Stock Tickers individually or all together (see Figure 25). Use the Rotary/Select Knob or the UP or DOWN buttons on the remote control to highlight the desired action, and press the Rotary/Select Knob or (XM) Select Button on the remote control to confirm the selection. -
Page 36: Erase Some Stock
This feature allows the user to display the available Info Extras, primarily sports information. When “Sports” is selected you can receive XM® Satellite Radio broadcasts sports information such as various team scores etc. (see Figure 28). Use the Rotary/Select Knob or Up and DOWN buttons on the remote control and select “Sports”. -
Page 37: Figure 28. Info Extra Screen
To select the various sports available use the Rotary/Select Knob or the Up and DOWN buttons on the remote control to highlight and choose the desired sport. Press the Rotary/Select Knob or the (XM) Select button on the remote control to confirm the selection and have the unit display teams if available for the selected category. -
Page 38: Display Screen Mode
Display Screen Mode This feature allows the user to personalize the display of the unit to individual preferences. Upon entering Display Screen mode (see Figure 29), the user can adjust the way information is viewed. Use the Rotary/Select Knob or the remote control UP and DOWN buttons to highlight the setting you wish to adjust then press the Rotary/Select Knob or the (XM) Select button on the remote control to confirm the selection. -
Page 39: Scrolling Display
Scrolling Display The Scrolling Display feature allows the user to program the Xpress XM® unit to scroll stock tickers or Info Extra information across the bottom portion of the screen (continuous stream of information). The paging mode feature presents the data one page at a time and is useful when viewing the display at a distance. -
Page 40: Background Mode
Background Mode The Background Setting feature allows the user to change the color of the characters being displayed to white characters on black (Negative) or black characters on a white background (Positive Display). Upon entering Background Setting mode (see Figure 31), use the Rotary/ Select Knob or the remote control UP and DOWN buttons to highlight either Negative Display or Positive Display then press the Rotary/Select Knob or the Remote’s (XM) Select button. -
Page 41: Set Clock
Set Clock This feature allows the user to personalize the clock display. The clock data is provided via the XM® signal, and is displayed according to the users settings. Use the Rotary/Select Knob or the UP and DOWN buttons on the remote control and highlight one of the three options on the Set Clock Screen (See figure 32). -
Page 42: Time Zone
Time Zone This feature is used set the clock to the Time Zone in which the user resides (see Figure 33). Use the Rotary/Select Knob or the remote control UP and DOWN buttons to highlight the desired time zone. Press the Rotary/Select Knob or the Remote’s (XM) Select button to enter your selection. -
Page 43: Figure 34. 12 / 24 Hour Selection Screen
12/24 Hour This feature is used to set the time displayed to either a 12-hour(Default) or 24-hour format (see Figure 32). Use the Rotary/Select Knob or the remote control UP and DOWN buttons to highlight either “12 hour Clock” or “24 Hour Clock” then press the Rotary/Select Knob or the Remote’s (XM) Select button to enter your selection. -
Page 44: Savings Selection
Savings Selection This feature allows the user to enable or disable Daylight Savings Time (see Figure 33). Use the Rotary/Select Knob or the remote control UP and DOWN buttons to highlight either Standard or Daylight Savings then press the Rotary/Select Knob or the Remote’s (XM) Select button to enter your selection. -
Page 45: Auto-On
Auto-On The Xpress XM® unit is configured to shut down when the vehicle is shut OFF or power is disconnected. By default, when the power to the unit is reapplied the user must press the Power button to turn the unit back ON. -
Page 46: Auto-Off / Sleep Timer
Auto-Off / Sleep Timer This feature allows the user to program the Xpress XM® unit to automatically shut OFF if the unit remains in an inactive state for a period of time ranging between 15 Minutes and 3 hours (see Figure 37). -
Page 47: Set Factory Defaults
Figure 37. Auto-Off / Sleep Timer Screen Set Factory Defaults This feature allows the user to reset the Xpress XM® unit back to the original factory settings. Upon entering the Factory Default mode, use the Rotary/Select Knob or the UP and DOWN buttons on the remote control to switch between the No or Yes function. -
Page 48: Figure 38. Setting Factory Defaults Screen
If yes is selected all of the users preset settings are erased and the unit returns to the original factory default settings. A second and third screen will appear to confirm the selection (see Figure 38). NOTE: Once Yes is selected the change cannot be undone and all user personal settings will be lost. -
Page 49: Exit Menu
Exit Menu To exit the menu options rotate the Rotary/Select Knob CW or press the down arrow on the remote control to highlight ‘Exit Menu’. Press the Rotary/Select Knob or the (XM) Select button on the remote control to confirm the selection. Search Button The Search button provides the ability to search by category or to scan directly through each of the available channels or through each of the... -
Page 50: Figure 39. Category Search Screen
Figure 39. Category Search Screen Figure 40. Scanning Search Screen... -
Page 51: Memory
Memory This feature allows the user to program into memory favorite song titles, artist names and channel information. To make an entry, press the memory (mem.) button and a “Saved in Memory” confirmation screen will appear (see Figure 41). Up to 20 entries can be stored. When 20 entries have been stored any new information that is saved will replace the oldest entry in memory. -
Page 52: Pre./Dir
To recall the saved information, press and hold the memory (mem.) button for three (3) seconds and the MEMORY RECALL screen will be displayed (see Figure 42). If there is more than one (1) entry in memory, use the Rotary/Select Knob or the remote control UP and DOWN buttons to scroll through all stored entries. -
Page 53: Figure 43. Direct Channel Entry Screen
Numbered Buttons 0-9 The numbered buttons (0 through 9) provide the operator with a means of selecting stations by entering the station number when the unit is set to DIRECT, or selecting preassigned stations when the unit is set to operate in PRESET (A, B, C). -
Page 54: Turning The Xpress Unit Off
Turning The Xpress Unit OFF To turn the Xpress XM® unit OFF, press the power button on the unit or on the remote control. The following screen will appear, the curved lines on either side of the XM® logo gradually disappear and the unit will shut down. -
Page 55: Figure 45. Xpress Receiver Remote Control
(+) Button (-) Button Figure 45. Xpress Receiver Remote Control Menu Button (menu) – The MENU button is used to access “Main Menu” options which allows the user to make feature function adjustments and set personal preferences. Upon entering the main menu mode, use the UP and DOWN buttons to highlight the desired function. - Page 56 Select Button (XM) – This button is used to confirm a desired channel/ category selection and various menu options. This button is also used to program the ARTIST/SONG into the Tune Select feature by pressing and holding for two (2) seconds (see Tune Select 7). Mute Button (mute) –...
- Page 57 When in any of the three preset banks, momentarily pressing any of the number buttons will recall the stored channel. In the Direct (Dir) mode, use the number buttons to directly enter the desired channel number. Search Button (search) – Depressing the Search button will cause the unit to initiate a search based on the search mode stored in the unit.
-
Page 58: Care And Cleaning
Care and Cleaning Keep the unit away from excessive moisture or where it may get wet. It is strongly recommended that the unit be installed and kept away from heat sources or direct sunlight. When cleaning, use only a soft, dry cloth. Never use any chemicals, abrasives, solvents, alcohol based cleaning solutions or ammonia. -
Page 59: Troubleshooting
Troubleshooting... -
Page 60: Specifications
5 Volt, 2 Amp Maximum, Negative Ground, DC Input. CAUTION: Use only the Audiovox approved adapter specified in the kit for the Xpress XM® Satellite Radio Receiver, or the unit could be severely damaged. 1 RF SMB Connector H X W X D 2.44 Inches X 4.44 Inches X 1.22 Inches... -
Page 61: Warranty
12 MONTH LIMITED WARRANTY AUDIOVOX ELECTRONICS CORPORATION (the Company) warrants to the original retail purchaser of this product that should this product or any part thereof, under normal use and conditions, be proven defective in material or workmanship within 12 months from the date of original... - Page 62 This Warranty gives you specific legal rights and you may also have other rights which vary from state to state. U.S.A. : AUDIOVOX ELECTRONICS CORPORATION, 150 MARCUS BLVD., HAUPPAUGE, NEW YORK 11788 (1-800-645-4994) 128-7351...
-
Page 63: User Notes
User Notes... - Page 64 © 2006 Audiovox Electronics Corporation 128-7454C...