Bosch TCA 6301 UC Use And Care Manual
Hide thumbs
Also See for TCA 6301 UC:
- Use and care manual (34 pages) ,
- User and care manual (108 pages)
Table of Contents
Quick Links
See also:
Use and Care Manual
Table of Contents

Related Manuals for Bosch TCA 6301 UC


Summary of Contents for Bosch TCA 6301 UC
- Page 1 Use and Care Manual For Household Use Only Notice d'utilisation et d'entretien Usage domestique uniquement Manual de instrucciones y cuidado sólo para uso doméstico Automatic Coffee Center TCA 6301 UC Downloaded from CoffeeMachineManual.com Manuals...
- Page 2 Use and Care Manual ..... . . READ THIS MANUAL thoroughly for important safety and operating instructions before using this appliance. Notice d'utilisation et d'entretien .
-
Page 3: Important Safeguards
d IMPORTANT SAFEGUARDS WARNING: A risk of fire and electrical shock exists in all electrical appliances and may cause personal injury or death. When using electrical appliances, basic safety precautions should always be followed, including the following: 1. Read all instructions. 2. -
Page 4: Downloaded From Coffeemachinemanual.com Manuals
d CAUTION This appliance is designed for domestic use and for processing normal quantities of food and not for industrial use. Any servicing other than cleaning and user maintenance should be performed by an authorized service representative. q Do not immerse base in water or try to disassemble. q To reduce the risk of fire or electrical shock, do not remove the base. -
Page 5: Table Of Contents
Table of Contents IMPORTANT SAFEGUARDS ....Overview ........Before using your appliance for the first time General . -
Page 6: Overview
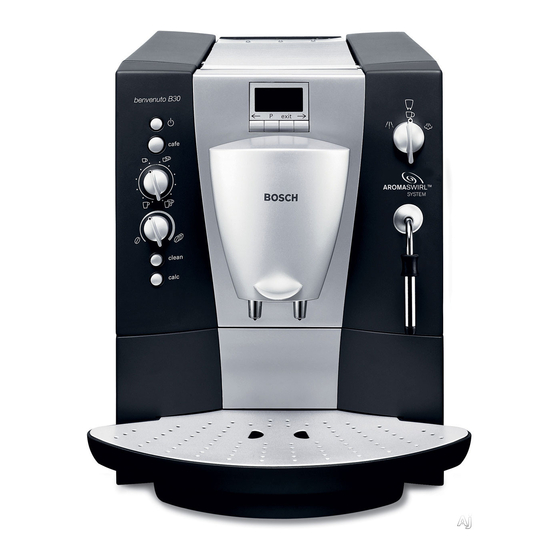
Overview Controls 1 Mains switch 2 Function selector coffee/steam/hot water 3 Display with 4 function buttons d button 5 2 button 6 Rotary knob for adjusting the filling quantity 7 Rotary knob for adjusting the coffee strength 8 + button 9 4 descaling button Appliance components... - Page 7 Appliance components 14 Right cover of the appliance 15 Door for brewing unit 16 Ground coffee duct with cover = cleaning tablet duct 17 Rotary knob for degree of ground coffee 18 Bean container with aroma cover 19 Cup shelf (pre warming function) 20 Left cover of the appliance 21 Detachable water tank...
-
Page 8: Before Using Your Appliance For The First Time
Before using your appliance for the first time Fill the respective containers with pure water and General coffee beans only. Do not use coffee beans which have been glazed, caramelised or treated with other additives containing sugar. Ascertain the water hardness with the enclosed test strip. -
Page 9: Filling Up The Pipe System
For production reasons when switched on for the first Filling up the pipe time, the water pipe system in the appliance may system occasionally have to be refilled: q Press the 2 button 5. FILL UP PRESS PIPE-SYS CAFE PIPE-SYS FILLS UP To change the display to the desired language: Selecting the language... -
Page 10: Controls
Controls Mains switch 1 The mains switch 1 on the rear of the appliance switches the power supply on or off. When the mains switch has been switched on, the illuminated ring on button d 4 is lit green. The appliance is in standby mode. - Page 11 Display 3 Display 3 indicates the settings, the processes which are running and any messages issued by the appliance. The appliance has been programmed ex works with standard settings for optimum operation. These settings can be changed see chapter Changing settings / programming".
- Page 12 Rotary knob for adjusting the filling quantity 6 The amount of liquid is adjusted with rotary knob - 8 6. One of 6 settings can be selected by rotating the knob in an anti clockwise direction: SMALL ESPRESSO ESPRESSO SMALL COFFEE COFFEE LARGE COFFEE ESPRESSO...
-
Page 13: Preparation
Preparation This fully automatic espresso/coffee machine grinds General fresh coffee for each brewing process. Preferably use a mixture of espresso and coffee beans. Store or deep freeze in cool, air tight and sealed containers. Deep frozen coffee beans can also be ground. -
Page 14: Adjusting The Grinding Unit
q The desired degree of ground coffee can be Adjusting the selected with the Rotary knob for degree of ground grinding unit coffee 17. WARNING Adjust the degree of grinding only while the grinding unit is running! Otherwise the appliance may be damaged. q Open the right cover of the appliance 14. -
Page 15: Preparing Hot Water
q Push down the sleeve a on nozzle 13. Preparing hot water q Place an appropriate cup under the nozzle 13. q Rotate function selector 2 to 0 and fill the cup. CAUTION Risk of scalding! When the function selector is set to 0, the nozzle may spurt slightly. -
Page 16: Preparing Frothy Milk
q Push down the sleeve a on nozzle 13. Preparing frothy milk q Fill a cup approx. D full of milk. q Immerse nozzle 13 approx. 1 cm into the milk. q Slowly rotate function selector 2 to =. The appliance now heats up for approx. 20 seconds. -
Page 17: Changing Settings / Programming
Changing settings / programming The appliance has been set ex works so that coffee can be brewed without any additional programming. These basic settings can be changed with the function buttons under display 3. < Selection button Access to programming mode / Save settings Terminate programming &... -
Page 18: Language
To change the display to the desired language: Language q Hold down button on display 3 for at least 3 Sprache seconds. deutsch q Press button until the display flashes. q Select the desired language with < or >. q Press button to save the setting. -
Page 19: Filter
A filter 22 (order no. 46 1732) is available as an Filter optional accessory for the water tank 21. Follow the instructions enclosed with the filter 22. i First insert filter 22, then change the appliance setting. q Hold down button on display 3 for at least 3 FILTER Ä... -
Page 20: Current Time
The current time is programmed with this function. Current time This is required when using the timer function. q Hold down button on display 3 for at least 3 seconds. q Select TIME with < or >. TIME q Press button - hours display flashes. -
Page 21: Energy Saving Mode
This function is used to specify after how many hours Energy saving mode following the last brew the appliance automatically switches to standby mode. q Hold down button on display 3 for at least 3 seconds. q Select OFF IN with < or>. OFF IN q Press button , hours display flashes. -
Page 22: System Messages
System messages The appliance indicates processes and messages on display 3. Meaning Remedial action No water. Pour fresh, cold water into the water tank 21. WATER WATER Note: There is always a small amount of water left in the water tank 21. Water tank 21 is missing Insert water tank 21. -
Page 23: Cleaning The Appliance
Meaning Remedial action Door of brewing unit 15 Close door of brewing unit 15. CLOSE is not closed. THE DOOR Set function selector 2 to TURN ON COFFEE Note: While the messages ADD WATER, CLOSE THE DOOR, EMPTY TRAYS or TRAYS MISSING are displayed, coffee cannot be brewed. -
Page 24: Cleaning Program
If the illuminated ring on the + button 8 is lit red Cleaning program and the message CLEAN UNIT is indicated on display 3 when the appliance is switched on, the appliance must be cleaned as quickly as possible. CLEAN Clean the appliance with the enclosed cleaning tablet. - Page 25 Start cleaning program q Completely fill water tank 21. q Hold down+ button 8 for at least 3 seconds. q Empty and re insert tray 24 and coffee dregs tray EMPTY TRAYS Note: The appliance is automatically cleaned. Wait for UNIT IS the next display (approx.
-
Page 26: Cleaning The Nozzle
WARNING Cleaning the nozzle Clean the nozzle 13 after each use. q Place a suitable receptacle under the nozzle 13. q Briefly set function selector 2 to 0. CAUTION Risk of scalding! When the function selector is set to 0, the nozzle may spurt slightly. Escaping steam is very hot. -
Page 27: Descaling The Appliance
Descaling the appliance If the illuminated ring on the 4button 9 is lit red UNIT and the message UNIT CALCIF. is displayed CALCIF. when the appliance is switched on, descale the appliance immediately. If the appliance is not descaled as instructed, it may be damaged. CAUTION Risk of injury! Do not place the descaling agent in... - Page 28 WARNING FILTER The descaling program starts in NO/OLD FILTER NO/OLD programming mode only. Never descale the appliance while the filter is inserted. While the descaling program is running - UNIT approx. 35 minutes - processes and instructions are CALCIF. COFFEE indicated on display 3.
- Page 29 q Rinse out the water tank 21, fill with fresh water up to max and re insert. WATER q Empty the receptacle and place back under the nozzle 13. q Set function selector 2 to 0. TURN ON WATER Note: The appliance is automatically rinsed. Water UNIT DE- flows at intervals into the receptacle.
-
Page 30: Eliminating Minor Faults Yourself
Eliminating minor faults yourself Fault Cause Remedial action ADD BEANS is Grinder has still not been filled Press the 2 button 5. displayed despite a full automatically. bean container. No hot water or steam Nozzle 13 is blocked. Thoroughly clean nozzle 13. discharge. - Page 31 Fault Cause Remedial action Display ERROR 1 Appliance too cold. Wait until the appliance has warmed up to room temperature. Display ERROR 5 Technical fault. Switch OFF the device at the or ERROR 8 or ERROR 8 mains switch 1 for at least ten mains switch 1 for at least ten seconds.
-
Page 32: Guarantee
No attempt to alter, modify or amend this warranty shall be effective unless authorized in writing by an officer of BOSCH. Some states do not allow limitations on how long implied warranties last or the exclusion or limitation of incidental or consequential damages, so the foregoing limitations and exclusions may not apply to you. - Page 33 Downloaded from CoffeeMachineManual.com Manuals...
- Page 34 BSH Home Appliances Corporation 5551 McFadden Avenue Huntington Beach, CA 92649 Web site: www.boschsmallappliances.com Customer Service (toll free): 1-866-44BOSCH (1-866-442-6724) Appelez le service client (gratuit) : 1-866-44BOSCH (1-866-442-6724) Servicio al cliente (libre de cargo): 1-866-44BOSCH (1-866-442-6724) 0504 Downloaded from CoffeeMachineManual.com Manuals 0000000000...