Table of Contents
DEHUMIDIFIER
MODEL
MJ-E152AK-H
INSTRUCTION MANUAL
Features
z 2 Types of Laundry Mode
z Independent Air Purifying Function
z Bathroom Mildew Guard
Table of Contents
z Recommended Ways of Using the
z Precautions
z Warning
Unit/Control Panel/LCD Display
AUTO
HIGH/LOW/EASY
OFF TIMER/ON TIMER
English
2
3
4
6
6
7
10
11
12
13
14
16
17
17
18
19
20
22
23
24
25
25
26
28
Table of Contents

Related Manuals for Mitsubishi Electric MJ-E152AK-H


Summary of Contents for Mitsubishi Electric MJ-E152AK-H
-
Page 1: Table Of Contents
DEHUMIDIFIER MODEL MJ-E152AK-H INSTRUCTION MANUAL English Table of Contents Features z Recommended Ways of Using the z 2 Types of Laundry Mode Unit z Features of This Dehumidifier z Independent Air Purifying Function z Precautions z Bathroom Mildew Guard z Warning... -
Page 2: Recommended Ways Of Using The Unit
Recommended Ways of Using the Unit When you want to dry laundry When you want to perform automatic operation z INTELLIGENT LAUNDRY Reducing blowing sound and performing automatic operation z NIGHT LAUNDRY When you want to perform continuous operation Tips on Drying Laundry z HIGH When you want to dehumidify When you want to set the humidity... -
Page 3: Features Of This Dehumidifier
Features of This Dehumidifier z Room temperature may rise 2–4°C during operation. The dehumidifier does not have a cooler function. Due to heat produced during operation, the room temperature may rise 2–4°C. As a result, the unit may blow warm air, but this is not due to a malfunction. (During winter, the air may not feel warm as the temperature is below body temperature.) How does the dehumidifier work? Dry (Warm) Air... -
Page 4: Louvre
(Keep pets from biting the cord.) This may result in fire and/or electric shock. Refer servicing to your dealer or Mitsubishi Electric Service Centre. The cord may be damaged resulting in fire, Exclusively use 220 V AC power electric shock or heat generation. - Page 5 CAUTION Do not cover an air outlet or Do not use the unit for special air intake with laundry, cloth, purposes, such as curtain, etc. preservation of food, art or scientific works. This results in poor ventilation and may cause heat generation/fire. This may negatively affect the quality of the items stored.
-
Page 6: Tips On Dehumidification
Precautions (Cont.) Tips on Dehumidification CAUTION Grasp the plug and remove Drain the water tank before use. from the power socket. When removing the plug from the power socket, do not pull Close the door and windows during operation. on it diagonally or by the cord as this may cause the projections/wiring to be damaged resulting in a short circuit, electric shock or fire. -
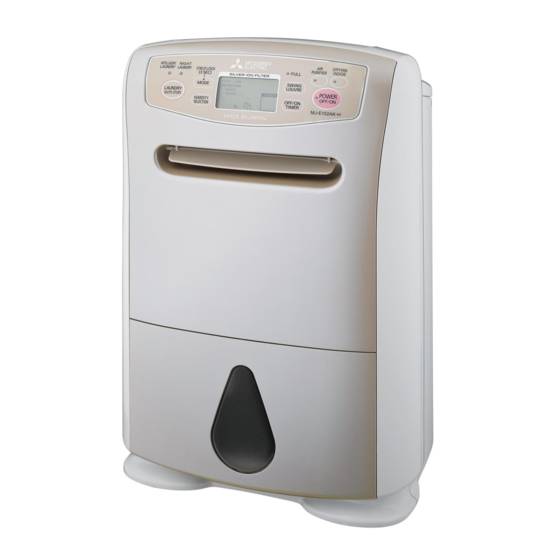
Page 7: Names And Functions Of Parts
Names and Functions of Parts Front Louvre Main Air Outlet Control Panel Downward Louvre Downward Air Outlet Tank Lid 10·22 Tank Guard 10·22 Floating Element Water Tank 10·22 The water tank may contain water residue at time of purchase. This is Level Window Sensor from final product testing at the factory... -
Page 8: Control Panel
Names and Functions of Parts (Cont.) Control Panel z LAUNDRY z MODE Switch z SWING LOUVRE Lamps Switches operating ON/OFF Switch modes. The lamp for the Sets swinging louvre z HUMIDITY selected mode lights. direction or locks it into z LAUNDRY position. - Page 9 z FULL Lamp Lights when the tank is full of water. You can select from 8 operating modes z POWER Lamp z DRYING INSIDE INTELLIGENT Lights during operation. Lamp z POWER Switch LAUNDRY z Flashes during the Turns the power ON/OFF. DRYING INSIDE NIGHT LAUNDRY All modes...
-
Page 10: Before Using Your Dehumidifier
Before Using Your Dehumidifier Setting the silver ion Set the silver ion filter. filter The silver ion filter is supplied with the unit at time With the strips facing up, set the silver ion of purchase. Please install it before using the unit. filter inside the tabs on the pre-filter. -
Page 11: Carrying The Unit
Carrying the Unit Hold the handle and move it. Wheels can be used to move the unit. First make sure to remove water from the water tank and close the louvre before carrying the unit. z Do not put the unit in horizontal position during z If wheels are unable to roll smoothly, do carrying as this may cause malfunctions. -
Page 12: Drying Laundry
Drying Laundry When in the operation of INTELLIGENT LAUNDRY or NIGHT LAUNDRY, the unit will estimate the laundry drying time and stop automatically. z After the unit stops or the power plug is Blip inserted, the compressor will not be activated Press (for compressor protection). -
Page 13: Tips On Drying Laundry
Tips on Drying Laundry Make full use of the laundry drying operation to shorten the laundry drying time. How to Hang Clothes z Pull to remove any wrinkles on the laundry. z Properly space the laundry for better ventilation (approximately 5 cm between the laundry). z Hang out the laundry which is difficult to dry to the place with good ventilation. -
Page 14: Dehumidifying
Dehumidifying There are 5 operation modes to choose from: HIGH, LOW, MILDEW GUARD, EASY and AUTO. (HIGH, LOW, EASY ... , MILDEW GUARD ... AUTO It is recommended for setting the humidity level of dehumidification. z AUTO Blip Press In order to maintain the humidity level, the unit operates intermittently after automatic switching of Press to set the humidity... - Page 15 z HIGH Blip Press The blower operates continuously in HIGH airflow mode. It is recommended for strong dehumidification. Press , and select the z LOW operation mode. The blower operates continuously in LOW airflow z Operation Blip mode. Blip mode It is recommended when you want to dehumidify with lower blower sounds.
-
Page 16: Reducing Growth Of Mildew In Bathroom (Mildew Guard)
Reducing Growth of Mildew in Bathroom In this mode, the unit can dehumidify the bathroom to remove residual moisture and water drops, thus suppressing the mildew growth as a means of mildew prevention. To install the unit To install the dehumidifier in the changing room Install the unit in the changing room (entrance to the bathroom) -
Page 17: Cleaning The Air (Air Purifier)
Cleaning the Air Using Child Lock The switches can be locked. To prevent children from operating this unit, use this function. To operate the air purifier only. Press for 3 seconds or Press Blip more. z The child lock indicator is displayed. Blip Press ... -
Page 18: Using Louvre
Using Louvre The louvre can be made to swing. Select from 5 possible settings to suit the purpose. Louvre stopped Wide Each time the switch is pressed, Upward the swing Blip direction Press changes. Automatic louvre starts Downward The monitor displays louvre direction Remove the plug from the power socket and Rear connect again, automatic louvre stops. -
Page 19: Drying Inside Operation
Drying Inside Operation The inside of the unit can be dried to suppress mildew growth on the cooler. The DRYING INSIDE operation is recommended after each use of the unit (approx. one hour). Automatic Operation Manual Operation The DRYING INSIDE operation can only start To activate DRYING INSIDE operation after each use when the POWER is OFF. -
Page 20: Using Timer
Using Timer The OFF TIMER can be set between 1 to 9 hours. Set the timer when the power is switched on. Cancellation Switch the power ON.Select operation mode. Press POWER switch J OFF 12–17 Select the desired operation mode. - Page 21 The ON TIMER can be set between 1 to 9 hours. Set the timer when the POWER is off. 1 . 5 Example of setting ON TIMER to 5 hours with AUTO mode (setting: 60%), louvre swing setting “Wide” Switch the power OFF. Set the time you wish the unit to turn ON.
-
Page 22: Draining
Draining When the tank is full (approximately 4.7 L), the unit automatically stops and the FULL lamp lights. Please empty the tank. z After pouring out the water, replace the water tank, When the water tank becomes full, the FULL lamp lights. and the FULL lamp will go out. -
Page 23: Continuous Drainage
Continuous Drainage If a drain is available, the unit can continuously drain water by attaching a commercially available hose (with an internal diameter of 15 mm) to the drain. The unit can be operated for a long period of time without the need to empty the water tank. z Commercially available hose (ID 15 mm) Insert hose onto the drainage Items to... -
Page 24: Maintenance
Maintenance Do not use detergents, cleaning agents for heat exchange equipment, decontaminative powders, chemically treated cloth, gasoline, volatile oil, thinners, etc. They can damage the water tank or main body, which may result in leakage. When Cleaning the Unit Silver ion filter Wipe with a soft cloth. -
Page 25: Replacement Parts
Silver ion filter for replacement z Type: MJPR-18WXFT Drain any water from the water tank and wipe off any remaining water. Contact the Mitsubishi Electric Service Centre for purchase. Clean the pre-filter. Use a vacuum cleaner to suck up dirt. -
Page 26: Troubleshooting
Troubleshooting z For the symptoms listed below, refer to the remedies listed right. Symptom Cause/Remedy z The unit blows out warm air because dehumidified air passes The unit blows warm air. through the re-heater. (There is no cooler function.) This is not a malfunction. - Page 27 If the symptoms persist even after following the prescribed remedies, or the error message does not disappear, unplug the power cord, and contact the Mitsubishi Electric Service Centre. z If the power cord is damaged, it must be replaced by the manufacturer, its services agent or similar qualified...
-
Page 28: Specifications
If the unit has any malfunctions, contact the Mitsubishi Electric Service Centre. Sole Agent in Hong Kong Mitsubishi Electric (Hong Kong) Ltd. Head office – Tel.: 2510 0555, Service Centre – Tel.: 2427 8484 Please complete the following form for your future reference.