Motorola ASTRO XTL 5000 User Manual
Digital mobile radio
Hide thumbs
Also See for ASTRO XTL 5000:
- Detailed service manual (528 pages) ,
- Basic service manual (199 pages) ,
- User manual (158 pages)
Table of Contents
Quick Links
Table of Contents

Related Manuals for Motorola ASTRO XTL 5000


Summary of Contents for Motorola ASTRO XTL 5000
- Page 1 O5 Control Head User’s Guide...
-
Page 3: O5 Control Head Foldout Page
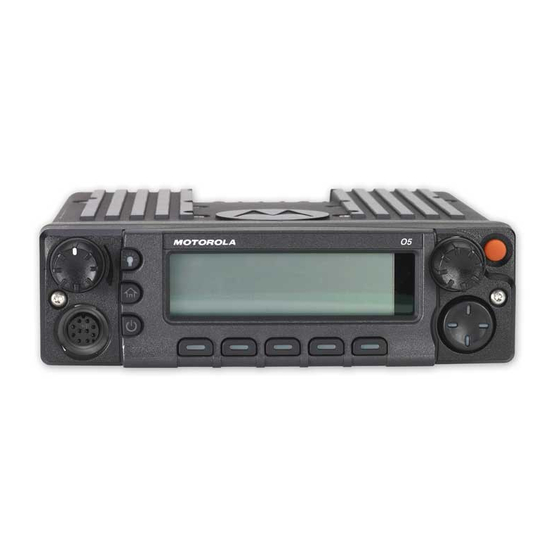
O5 Control Head Foldout Page O5 Control Head EMERGENCY Emer BUTTON VOLUME MODE KNOB INDICATORS KNOB HOME POWER SOFT MENU NAVIGATION ON/OFF KEYS KEYS ASTRO XTL 5000 Digital Mobile Radio with O5 Control Head... -
Page 5: Declaration Of Conformity
This declaration is applicable to your radio only if your radio is labeled with the FCC logo shown below. DECLARATION OF CONFORMITY Per FCC CFR 47 Part 2 Section 2.1077(a) Responsible Party Name: Motorola, Inc. Address: 1301 East Algonquin Road. Schaumburg, IL 60196-1078, USA Phone Number: 1-800-927-2744 Hereby declares that the product:... -
Page 6: Computer Software Copyrights
No duplication or distribution of this document or any portion thereof shall take place without the express written permission of Motorola. No part of this manual may be reproduced, distributed, or transmitted in any form or by any means, electronic or mechanical, for any purpose without the express written permission of Motorola. -
Page 7: Notations Used In This Manual
Buttons and keys are shown in bold print or as a key Light button or symbol. Menu items (softkeys) are similar to the way they PHONE appear on the radio’s display. ASTRO XTL 5000 Digital Mobile Radio with O5 Control Head... - Page 8 Notes...
-
Page 9: Table Of Contents
Selecting or Changing the Zone ..........23 Selecting or Changing a Mode in the Current Zone ....24 Selecting or Changing to a Mode Not in the Current Zone ..25 Mode Select Button ..............26 ASTRO XTL 5000 Digital Mobile Radio with O5 Control Head... - Page 10 Selecting the Home Mode ...............27 Transmitting (Conventional Modes Only) ........28 Transmitting (Trunked Modes Only) ..........28 Selecting the Transmit Power Level ..........29 Monitoring Conventional Mode Activity ...........29 Adjusting the Squelch Level ............30 General Radio Features ..... . . 31 Often-Used Features ...............31 Emergency Call and Alarm ..............32 Emergency Call .................32...
- Page 11 SmartZone ..................80 Site-Button Operation ............... 80 Locking onto a Site ..............81 Site Trunking ................81 Out-of-Range Indication ..............82 Trunked Announcement ..............83 Initiating an Announcement ............83 ASTRO XTL 5000 Digital Mobile Radio with O5 Control Head...
- Page 12 ARS User Login and Text Messaging Features ..85 Automatic Registration Service (ARS) ..........85 Selecting or Changing ARS Mode ..........85 ARS User Login Feature ..............87 Accessing the User Login Feature ..........87 To Login as a User ..............88 Selecting a Predefined Username ..........93 Text Messaging ................94 Accessing TMS Feature ............94...
- Page 13 Glossary ........127 Commercial Warranty and Service ... . . 131 Limited Warranty ................131 Service ..................135 Index ..................... 137 ASTRO XTL 5000 Digital Mobile Radio with O5 Control Head...
- Page 14 Notes...
-
Page 15: Introduction
• Turning On the Radio (page 5) • Setting the Volume (page 6) • Adjusting the Display Brightness (page 6) • Display Status (page 8) • Feature Control (page 10) • Alert Tones (page 11) ASTRO XTL 5000 Digital Mobile Radio with O5 Control Head... -
Page 16: Getting Started
These channels provide maximum communications capability under varying operating conditions. One of the newest in a long line of quality Motorola products, the ASTRO XTL 5000 Digital Mobile Radio provides improved voice quality across more of your coverage area. The digital process called... - Page 17 FLASHport allows you to add software to your radio as your needs change and as technology advances, making your radio investment go further. FLASHport is the future of radio communications, and it’s yet another example of Motorola’s commitment to your satisfaction. ASTRO XTL 5000 Digital Mobile Radio with O5 Control Head...
-
Page 18: Identifying Your Radio
Introduction Identifying Your Radio The ASTRO XTL 5000 Digital Mobile Radio has two major components: the radio unit installed in your vehicle and the control head that is used to activate various radio features. Keep the foldout page opened for reference as you read this manual. Your radio has... -
Page 19: Turning On The Radio
If ERROR ##/## appears, some non-critical data has been changed. If either of these displays appear, if the display goes blank, or if the unit appears to be locked up, refer to the “Troubleshooting” section. ASTRO XTL 5000 Digital Mobile Radio with O5 Control Head... -
Page 20: Setting The Volume
Introduction Setting the Volume Rotate the Volume knob clockwise to increase the volume and counterclockwise to decrease the volume. Adjusting the Display Brightness Press the dimmer button (DIM) to change the display brightness to one of four levels: • Off to high •... -
Page 21: Trunked Modes Or Conventional Channels
You can see all the key operating information, including the mode selected or being scanned, and the on/off status of various features. The operating conditions are shown either by the display or by visual/ audio indicators, or by both. ASTRO XTL 5000 Digital Mobile Radio with O5 Control Head... -
Page 22: Display Status
Introduction Display Status The control head display indicates your selected mode, or the currently active receive mode when scan is on. Status Symbols The top two display rows contain symbols that indicate radio operating conditions. Table 1: Status Symbols Symbol Indication Call Received Blinks when an Individual Call is received. - Page 23 Off (Not tinted) = User is currently not associated with the radio; • Blinking = Device registration or user registration with the server failed due to an invalid username or pin. ASTRO XTL 5000 Digital Mobile Radio with O5 Control Head...
-
Page 24: Feature Control
Introduction Feature Control You can turn the various radio features on or off, change modes, and adjust the volume. To exit a feature, such as phone, press the HOME button. Menu You can access the features supported by your radio through the Menu. -
Page 25: One Touch Button
(PTT) button, busy signal that you cannot transmit because all system radio channels are in use. Release the PTT button and wait for call back. ASTRO XTL 5000 Digital Mobile Radio with O5 Control Head... - Page 26 Introduction Tone Type Name Description A series of Automatic Call Indicate that a channel is now available two short, Back for your previously requested high-pitched transmission. tones A series of Talk Permit Indicates, when you press the two short, (optional) microphone PTT button, the system is high-pitched accepting your transmission.
- Page 27 Unique, low- New Message Indicates the arrival of a new message. pitched chirping sound Unique, high- Priority Indicates the arrival of a priority pitched Message message. chirping sound ASTRO XTL 5000 Digital Mobile Radio with O5 Control Head...
- Page 28 Introduction Notes...
-
Page 29: Multiple Control Head Features
MCH feature in the CPS, the radio will display EXTRA CH or CH ID # ERR. Both errors are fatal. EXTRA CH CH ID # ERR EXTRA CH EXTRA CH ZONE CHAN ZONE CHAN ASTRO XTL 5000 Digital Mobile Radio with O5 Control Head... -
Page 30: Setting The Initial Control Head's Id
Multiple Control Head Features Setting the Initial Control Head’s ID The Front Panel Programming (FPP) mode allows you to define which control head in a Multi Control Head setup becomes Control Head Number 1, Control Head Number 2, Control Head Number 3 and Control Head Number 4. -
Page 31: All Active Mode
Upon power up, if a control head of a different type is connected to the radio, the radio reports the fatal error CH MISMATCH on the display of all attached control heads. ASTRO XTL 5000 Digital Mobile Radio with O5 Control Head... -
Page 32: One Active Mode
Multiple Control Head Features One Active Mode The One Active mode enables only one control head to be visibly active at a time in a two control head system. The active control head commands the system normally while the inactive control head displays REMOTE. - Page 33 In the One Active mode, upon power up, if more than two control heads are present, the radio shows a a fatal error EXTRA CH on the display of all attached control heads. ASTRO XTL 5000 Digital Mobile Radio with O5 Control Head...
-
Page 34: Intercom Feature
Multiple Control Head Features Intercom feature The intercom feature allows a user at one control head to talk to the user at the other control heads of a Multiple Control Head configuration. This feature only applies to control heads in the All Active mode. - Page 35 Note: Only one intercom call can be initiated at one time. Radio (PTT is pressed) INTERCOM Transmitting Radio 1 EXIT Control Head 1 INTERCOM Receiving Radio 1 EXIT Control Head 2 ASTRO XTL 5000 Digital Mobile Radio with O5 Control Head...
-
Page 36: Basic Operating Procedures
Basic Operating Procedures Basic Operating Procedures Basic Functions This chapter shows you how to access the radio’s basic functions and includes the following topics: • Selecting the Zone or Mode (page 23) • Selecting the Home Mode (page 27) • Transmitting (Conventional Modes Only) (page 28) •... -
Page 37: Selecting The Zone Or Mode
Note: Positions of the ZNUP or ZNDN softkey on the display may differ each time you release the button . Press the PTT button to begin transmitting on the displayed zone. ASTRO XTL 5000 Digital Mobile Radio with O5 Control Head... -
Page 38: Selecting Or Changing A Mode In The Current Zone
Basic Operating Procedures Selecting or Changing a Mode in the Current Zone Use the Mode Knob Rotate the Mode knob until the display shows the desired mode name. Use the Menu Entry CHAN Press and hold to scroll to the CHAN softkey. Press the below CHAN. -
Page 39: Selecting Or Changing To A Mode Not In The Current Zone
Do one of the following: • Select a desired zone (page 23). • Select a desired mode in the current zone (page 24). ASTRO XTL 5000 Digital Mobile Radio with O5 Control Head... -
Page 40: Mode Select Button
Basic Operating Procedures Mode Select Button This feature lets you program the current zone and channel to a Mode Select button with a long press on the Mode Select button. After the buttons are programmed, you can return to the preprogrammed zone and channel with a short press on the programmed Mode Select button. -
Page 41: Astro Xtl 5000 Digital Mobile Radio With O5 Control Head
This feature must first be enabled by a qualified radio technician. Press the HOME button to select the home mode contained within the home zone, from any other zone and mode in the radio. ASTRO XTL 5000 Digital Mobile Radio with O5 Control Head... -
Page 42: Transmitting (Conventional Modes Only)
Basic Operating Procedures Transmitting (Conventional Modes Only) Lift the microphone off-hook, and listen for activity on that mode. If you hear no activity, press and hold the microphone PTT button. Transmitting (Trunked Modes Only) Lift the microphone off-hook, and press the microphone PTT button. -
Page 43: Selecting The Transmit Power Level
Pressing MON softkey momentarily toggles between MONITOR ON and MONITOR OFF. MONITOR ON shown on the display indicates that the radio is monitoring. Pressing MON softkey again turns monitor off and you don’t hear all channel traffic. ASTRO XTL 5000 Digital Mobile Radio with O5 Control Head... -
Page 44: Adjusting The Squelch Level
Basic Operating Procedures Adjusting the Squelch Level Your radio’s ability to transmit or receive signals varies as you move away from or close to your base station. You can adjust your radio’s squelch to improve its ability to receive transmissions. Do the following: Press the button to scroll to the MON softkey. -
Page 45: General Radio Features
Push-To-Talk Identification (PTT-ID) (page 48) • Telephone Interconnect List (Conventional and Trunking) (page 49) • Unlimited Telephone Interconnect (page 52) • Call Alert Page (Conventional and Trunking—Digital Modes Only) page 57 ASTRO XTL 5000 Digital Mobile Radio with O5 Control Head... -
Page 46: Emergency Call And Alarm
General Radio Features Emergency Call and Alarm The emergency call and alarm features allow you to have priority channel access and/or send an emergency data transmission to the dispatcher in an emergency situation. The desired type of emergency feature—alarm, call, call and alarm, or silent alarm—can be preprogrammed by a qualified radio technician. -
Page 47: Initiating An Emergency Alarm
Press the PTT button and announce your emergency. After completing the emergency call, press and hold the emergency button until a tone sounds. The alternating EMERGENCY display disappears, and the radio returns to normal operation. ASTRO XTL 5000 Digital Mobile Radio with O5 Control Head... -
Page 48: Initiating An Emergency Call And Alarm
General Radio Features Initiating an Emergency Call and Alarm If the radio has both emergency call and alarm features, it automatically proceeds to the call mode after the alarm is acknowledged. Press the emergency button to activate the emergency call/ alarm feature. -
Page 49: Initiating A Silent Emergency Alarm
When an emergency is active, changing to another mode where emergency is enabled (trunked or conventional) causes an emergency alarm and/or emergency call to be active on the new mode. ASTRO XTL 5000 Digital Mobile Radio with O5 Control Head... -
Page 50: Scan Operation
General Radio Features Scan Operation The scan feature allows you to monitor activity on different conventional or trunked modes by scanning a scan list of modes. The modes to be scanned in a scan list are programmed by a qualified radio technician. -
Page 51: Turning On Scan
Priority Monitor and Conventional scan types only). A blinking PRI indicator means that the active mode is the priority 1 member of the scan list (Trunking Priority Monitor and Conventional scan types only). ASTRO XTL 5000 Digital Mobile Radio with O5 Control Head... -
Page 52: Turning Scan On While Disregarding The Squelch Code (Conventional Modes Only)
General Radio Features Turning Scan On While Disregarding the Squelch Code (Conventional Modes Only) Do the following: Press the button to scroll to the MON softkey. Press the button below MON. The brief MONITOR ON display indicates that the radio is disregarding the squelch code. -
Page 53: Viewing A Scan List
Press RCL softkey to review only modes that are already in the scan list. Press the HOME button momentarily to exit the scan list and resume scanning. ASTRO XTL 5000 Digital Mobile Radio with O5 Control Head... -
Page 54: Transmitting While Scan Is On
General Radio Features Transmitting While Scan Is On Radio Programmed for Talkback Scan Press the microphone PTT button to transmit on the mode indicated by the display. The radio does not begin scanning again for a predetermined hang time (programmable by a qualified radio technician) after you release the PTT button, allowing the other party to respond. -
Page 55: Temporarily Deleting A Nuisance Mode With Scan On
Turn scan off, then on. • Change modes. • Turn off the radio, and then turn it back on. Note: Nuisance mode delete can be disabled by the system administrator. ASTRO XTL 5000 Digital Mobile Radio with O5 Control Head... -
Page 56: Changing Mode Priorities While Scan Is On
General Radio Features Changing Mode Priorities While Scan Is On When active, this dynamic priority feature allows you to change the priority of a non-priority mode in the scan list to priority 2. Press DYNP softkey to change the priority of a non- priority channel in the scan list to priority 2. -
Page 57: Programming A Scan List
SEL softkey, and the desired channel will not be assigned to the list. Press the HOME button to exit scan list programming and return to normal scan operation. ASTRO XTL 5000 Digital Mobile Radio with O5 Control Head... - Page 58 General Radio Features Deleting a Channel from the Scan List Do the following: Press the button to scroll to the PROG softkey. Press the button below PROG. Press the button to scroll to the SCAN softkey. Press button below SCAN. The scan indicator blinks and a good-key chirp is heard.
-
Page 59: Hang Up Box (Hub)
The last selected alarm(s) are enabled, and the display alternately shows the enabled alarm(s), then the selected mode. Press the H/L softkey a second time to turn off the alarm(s). ASTRO XTL 5000 Digital Mobile Radio with O5 Control Head... -
Page 60: Changing The Selected Alarms
General Radio Features Permanent Horn and Lights Press the H/L softkey momentarily. The last selected alarm(s) are enabled. The display briefly shows the enabled alarms, and then reverts back to the selected mode. Press the H/L softkey a second time to turn off the alarm(s). Changing the Selected Alarms Press and hold the H/L softkey until a tone sounds and the display indicates the currently selected alarm. -
Page 61: Receiving A Call While Alarms Are Turned On
To re-arm the feature, press the H/L softkey momentarily. The Volume knob and the DIM button have no effect on the state of the external alarms. ASTRO XTL 5000 Digital Mobile Radio with O5 Control Head... -
Page 62: Time-Out Timer
General Radio Features Time-Out Timer Your ASTRO XTL 5000 Digital Mobile Radio provides a time-out timer function that prevents locking up a repeater or channel by prolonged keying of the transmitter. You cannot transmit longer than the preset timer setting. If you attempt to do so, the radio automatically stops your transmission, and you hear a talk-prohibit tone. -
Page 63: Telephone Interconnect List (Conventional And Trunking)
Press the PTT button to talk; release it to listen. When the call is completed, press the HOME button or PHON softkey to hang up and return to normal operation. ASTRO XTL 5000 Digital Mobile Radio with O5 Control Head... -
Page 64: Initiating A Telephone Call From The List
General Radio Features Initiating a Telephone Call from the List Press the PHON softkey momentarily to select the phone function. A valid-key chirp is heard. The display shows the last number dialed or a blank scratchpad appearing as a series of dashes. Press the button to locate the number you want to call. - Page 65 General Radio Features When the call is completed, press the PHON softkey to hang up and return to normal operation. ASTRO XTL 5000 Digital Mobile Radio with O5 Control Head...
-
Page 66: Unlimited Telephone Interconnect
General Radio Features Unlimited Telephone Interconnect Calling a Phone Number Not in the List Press the button to access the PHON feature. Press the softkey under the phone feature. Enter the desired phone number from the optional keypad mic. The display updates as the numbers are entered. Press Enter on the keypad mic to make the call When your party answers, press the PTT button to talk, and release it to listen. -
Page 67: Storing A Number In The List
Press the SEL softkey to store the new number. Do one of the following: • Press the HOME button to return to normal radio operation. • Press the PHON softkey to return to normal phone operation. ASTRO XTL 5000 Digital Mobile Radio with O5 Control Head... -
Page 68: Editing A Name In The List
General Radio Features Editing a Name in the List Press and hold the PHON softkey to enter the phone ID list programming. The Phon indicator blinks and a high-pitched tone sounds. Use the navigation keys, to locate the list member you want to change. - Page 69 Repeat steps 2 through 4 until you have modified all the desired names, Do one of the following: • Press the HOME button to return to normal radio operation. • Press the PHON softkey to return to normal phone operation. ASTRO XTL 5000 Digital Mobile Radio with O5 Control Head...
- Page 70 General Radio Features Table 2: Entering Characters Using the Keypad Number of times the key is pressed...
-
Page 71: Call Alert Page (Conventional And Trunking-Digital Modes Only)
It features a unique list of up to 100 preprogrammed ID numbers. A name can be assigned to each ID in the list for your convenience. ASTRO XTL 5000 Digital Mobile Radio with O5 Control Head... -
Page 72: Sending A Call Alert Page
General Radio Features Sending a Call Alert Page Press the PAGE softkey. The Page indicator lights and a valid-key chirp sounds. The display shows the last transmitted/received unit ID number. Select a radio in one of the following ways: • From the ID number list: –... - Page 73 NO ACK. Try again by pressing the PTT button or the SEL softkey, Press the HOME button or the PAGE softkey to exit. ASTRO XTL 5000 Digital Mobile Radio with O5 Control Head...
-
Page 74: Conventional Radio Features
Conventional Radio Features Features Used in Conventional Operation This chapter shows you how to access features available in conventional operation. The following topics are covered: • Status Calls (Digital Modes Only) (page 61) • Smart PTT (page 63) • Conventional Talkgroup Calls (page 63) •... -
Page 75: Status Calls (Digital Modes Only)
The radio then returns to normal dispatch operation. • If the status is not acknowledged after approximately six seconds, the display alternates between NO ACKNOWLEDGE and the associated status name. A low-pitched tone also sounds continuously. ASTRO XTL 5000 Digital Mobile Radio with O5 Control Head... - Page 76 Conventional Radio Features • If there is no acknowledgment, do one of the following: Press the microphone PTT button to resend the status transmission. Press the HOME button to return to normal dispatch operation.
-
Page 77: Smart Ptt
Talkgroups can be slaved to a personality through programming, or you can select them. Encryption keys are slaved to talkgroups. When conventional talkgroups are enabled, encryption keys are changed by changing the active talkgroup. ASTRO XTL 5000 Digital Mobile Radio with O5 Control Head... -
Page 78: Selecting A Conventional Talkgroup
Conventional Radio Features Selecting a Conventional Talkgroup The Talkgroup Select feature allows you to manually select any one of the available talkgroups. Press the TGRP softkey. The display changes to show the last-selected talkgroup. Rotate the Mode knob to choose a different talkgroup. Press the SEL softkey to save the talkgroup. -
Page 79: Conventional Talkaround
The O5 Control Head is capable of responding to a Selective Call initiated by another radio. It features a unique list of preprogrammed ID numbers. A name may be assigned to each ID in the list for your convenience. ASTRO XTL 5000 Digital Mobile Radio with O5 Control Head... -
Page 80: Answering A Selective Call
Conventional Radio Features Answering a Selective Call When a Selective Call is received, two high-pitched tones sound and the display alternates between CALL RECEIVED and the home display. Press the CALL softkey within 20 seconds of receiving the call. (This time is programmable by a qualified radio technician.) The display shows the ID number of the calling unit. -
Page 81: Initiating A Selective Call
If the list has been entered, scroll to the first display. Press the microphone PTT button. A telephone-type ringing sounds if the unit you are calling is in service. The display shows PLEASE WAIT. ASTRO XTL 5000 Digital Mobile Radio with O5 Control Head... - Page 82 Conventional Radio Features Choose one of the following conditions that applies to your current call: • If the receiving unit answers, identify yourself and begin your Selective Call. • If, after a programmable time period, you are not connected, the display shows NO ACKNOWLEDGE and a momentary, low- pitched tone sounds.
-
Page 83: Viewing Your Unit Id Number
Use the left navigation key to locate the MY ID display. The display will alternate between MY ID and your ID number. To return to normal operation, press the HOME button. ASTRO XTL 5000 Digital Mobile Radio with O5 Control Head... -
Page 84: Storing A Unit Id Number In The List
Conventional Radio Features Storing a Unit ID Number in the List The Selective and Call Alert page features share the same prestored list of units’ IDs. Press and hold the CALL softkey to review the Call ID list. The Call indicator blinks and a high-pitched tone sounds. Use the navigation keys to locate the list member you want to change. -
Page 85: Editing A Name In The List
2 key three times. • To leave a space in the text, press the up navigation key to move the blinking cursor to the next character position, and then enter the next character. ASTRO XTL 5000 Digital Mobile Radio with O5 Control Head... - Page 86 Conventional Radio Features • To delete characters, press the down navigation key to move backwards over existing characters. When the last character on the display has been erased, press the down navigation key again to leave the name- edit mode, without making any changes, and begin the procedure again at step 2.
-
Page 87: Trunking Operation
• Enhanced Private Conversation (Digital Modes Only) (page 74) • Failsoft (page 77) • Dynamic Regrouping (Digital Modes Only) (page 78) • SmartZone (page 80) • Out-of-Range Indication (page 82) • Trunked Announcement (page 83) ASTRO XTL 5000 Digital Mobile Radio with O5 Control Head... -
Page 88: Enhanced Private Conversation (Digital Modes Only)
Trunking Operation Enhanced Private Conversation (Digital Modes Only) The enhanced Private Conversation feature not only allows you to carry on a conversation that is heard only by the two parties involved, but also enables you to determine whether the unit you are calling is in service. -
Page 89: Initiating An Enhanced Private Conversation Call
If the list has been entered, scroll to the first display. Press the microphone PTT button. A telephone-type ringing sounds if the unit you are calling is in service. The display shows PLEASE WAIT. ASTRO XTL 5000 Digital Mobile Radio with O5 Control Head... - Page 90 Trunking Operation Choose one of the following conditions that applies to your current call: • If the receiving unit answers, identify yourself and begin your Private Conversation. • If, after a programmable time period, you are not connected, the display shows NO ACKNOWLEDGE and a momentary, low- pitched tone sounds.
-
Page 91: Failsoft
This time period can be changed by a qualified radio technician. This allows the operator to monitor the failsoft frequency for activity before resuming scanning. ASTRO XTL 5000 Digital Mobile Radio with O5 Control Head... -
Page 92: Dynamic Regrouping (Digital Modes Only)
Trunking Operation Dynamic Regrouping (Digital Modes Only) The dynamic regrouping feature allows the dispatcher to temporarily reassign selected individuals, operating in separate trunked talkgroups, into a single group so that they can communicate. Receiving a Dynamic Regrouping ID Assignment When your unit receives a dynamic regrouping ID assignment, a unique chirp sounds to alert you that your unit has been dynamically regrouped. -
Page 93: Selecting Enable And Disable (Digital Modes Only)
At this time, do the following: • Press the PTT button to resend the regroup request • Press the HOME button to return to normal operation. ASTRO XTL 5000 Digital Mobile Radio with O5 Control Head... -
Page 94: Smartzone
Trunking Operation SmartZone The SmartZone ® feature extends communications beyond the reach of a single-trunked site (antenna location) when operating in a SmartZone system. SmartZone units provide expanded wide-area coverage. SmartZone automatically switches the radio to a different site when the current site signal becomes unacceptable. -
Page 95: Locking Onto A Site
The display alternates with the current mode display as long as the radio remains in site trunking. The radio also sounds a valid-key chirp when it first detects site trunking. ASTRO XTL 5000 Digital Mobile Radio with O5 Control Head... -
Page 96: Out-Of-Range Indication
Trunking Operation Out-of-Range Indication The out-of-range display/audible indication feature can be enabled by a qualified radio technician. The display alternately shows OUT OF RANGE and the current selected mode, and a low-pitched tone sounds every six seconds: • When the radio is out of range of the system and can no longer lock onto the control channel •... -
Page 97: Trunked Announcement
Initiating an Announcement If your radio has been programmed to allow announcement calls: Rotate the Mode knob to locate the announcement-group mode. Press the microphone PTT button to initiate the announcement. ASTRO XTL 5000 Digital Mobile Radio with O5 Control Head... - Page 98 Trunking Operation Notes...
-
Page 99: Ars User Login And Text Messaging Features
CHAN find CHAN. Press the button directly below CHAN. The display shows the current ARSNSVR channel/mode name (in this case, ARSNSVR) blinking and the zone (Z1), not blinking. ASTRO XTL 5000 Digital Mobile Radio with O5 Control Head... - Page 100 ARS User Login and Text Messaging Features Press the button to find the channel /mode you want. Z1 ARSSVR Rotate the Mode knob. ZONE CALL PAGE PROG Server mode Z1 ARSSVR CALL ZONE PAGE PROG ARS non-server mode Press the button to confirm the displayed zone and mode / channel.
-
Page 101: Ars User Login Feature
Note: See “Programmable Buttons” on page 10 for information on preprogrammed buttons. The user login screen appears. 09:19AM PIN: LOGN ASTRO XTL 5000 Digital Mobile Radio with O5 Control Head... -
Page 102: To Login As A User
ARS User Login and Text Messaging Features To Login as a User Press the button below ID to enter your username at the prompt. Note: Username will not be case sensitive in server mode and will be case sensitive in non-server mode. 09:19AM ID:| PIN:... - Page 103 Note: Valid characters for a username entry are capital letters A-Z, small letters a-z, numbers 0-9, ‘*’, ‘#’, ‘-‘, ‘/’ and the space character. The maximum length for a username is 8 characters. ASTRO XTL 5000 Digital Mobile Radio with O5 Control Head...
- Page 104 ARS User Login and Text Messaging Features Press the button below PIN to enter your PIN (Personal Identification Number) number at the prompt. You need to use the keypad microphone to manually enter a PIN number. The maximum PIN length is 4 digits. The PIN number will appear as asterisks.
- Page 105 PIN, login fails 09:19AM and the user login screen ID:User228 will display a momentary LOGIN FAILED text LOGIN FAILED. The user login failure indicator (blinking IP indicator) is shown on the display. ASTRO XTL 5000 Digital Mobile Radio with O5 Control Head...
- Page 106 ARS User Login and Text Messaging Features To log out: 09:19AM Press the button below LOGT CLEAR PRIVATE DATA? Upon pressing the LOGT button, a confirmation screen appears. Press the button below YES to clear all your private data. A momentary 09:19AM text PRIVATE DATA PRIVATE DATA...
-
Page 107: Selecting A Predefined Username
Note: A predefined username may sometimes be invalid because the programming software that is used to set predefined usernames allows you to set usernames comprising of 8 characters or more. 09:19AM INVALID ID PIN: LOGN ASTRO XTL 5000 Digital Mobile Radio with O5 Control Head... -
Page 108: Text Messaging
ARS User Login and Text Messaging Features Text Messaging The Text Messaging Service (TMS) is an application service through which you can send and receive text messages. You can send 3 types of text messages, namely • A new text message (free form messages) •... - Page 109 See “TMS Menu Options” on page 96 for explanation on each menu option. Press the button to scroll through the main menu options. User228 0000009 INBX COMP DRFT SENT BACK ASTRO XTL 5000 Digital Mobile Radio with O5 Control Head...
- Page 110 ARS User Login and Text Messaging Features Table 3: TMS Menu Options Menu Options Description/ Function This is used to store new incoming messages or INBX messages that you have received. The Inbox can hold up to 30 messages. This menu option brings you to the compose COMP screen.
- Page 111 “Request Reply”. Inbox Full This icon is displayed when the Inbox folder is full. New Message Icon This icon is displayed when a new incoming message is received. ASTRO XTL 5000 Digital Mobile Radio with O5 Control Head...
- Page 112 ARS User Login and Text Messaging Features Symbol Indication Message Sent This icon indicates that the selected message has been successfully sent. Message Unsent This icon indicates that the selected message was not successfully sent. Read Message This icon is used to indicate that the selected message in the Inbox has been read.
-
Page 113: Receive A Message
Press the button to scroll through the messages. Rotate the Mode knob. To delete the message, press the button below DEL. See “Delete a Message” on page 106 for further details. ASTRO XTL 5000 Digital Mobile Radio with O5 Control Head... -
Page 114: Compose A New Text Message
ARS User Login and Text Messaging Features Compose a New Text Message Press the button below COMP to compose a new message. The Compose Message Screen appears. LIST or NEW option appears on the display. LIST OR NEW LIST BACK Press the button below NEW to type a new message. - Page 115 1 . , ? ! ; @ _ - * # & $ / + = \ “ ‘ ( ) Space Delete a character ASTRO XTL 5000 Digital Mobile Radio with O5 Control Head...
- Page 116 ARS User Login and Text Messaging Features Addressing a message Press the button ADDR:| below ADDR to address your outgoing message. IMPT BACK RQRP The Address input screen appears. Press the button to scroll through the address list. Use direct address entry via multi-tap. Note: The Address will not be case sensitive in server mode and will be case sensitive in non-server mode.
-
Page 117: Send A Predefined Message
Press the preprogrammed Quick Text button. Note: Any programmable button on the keypad microphone can be programmed to access the Quick Text Messages feature. See “Programmable Buttons” on page 10. ASTRO XTL 5000 Digital Mobile Radio with O5 Control Head... -
Page 118: Edit A Quick Text Message
ARS User Login and Text Messaging Features The first predefined message appears. QT 001/002 I will be late ADDR EDIT BACK Press the button to scroll through the messages. Rotate the Mode knob. When a message has been selected from the list, address your message and press the PTT button to send the message. -
Page 119: Reply To A Received Message
NEW to type a new message. Press the button below LIST to use the predefined message / quick text message. See “Send a Predefined Message” on page 103 for further details. ASTRO XTL 5000 Digital Mobile Radio with O5 Control Head... -
Page 120: Delete A Message
ARS User Login and Text Messaging Features Delete a Message From the Inbox, Draft or Sent screen, scroll to select a message for deletion. After selecting a message, INBOX 01/01 press below DEL. The FROM:User826 display shows 2 delete Hello options. -
Page 121: To Access The Draft Folder
The first draft in the list is displayed. DRAFT 01/01 Have a nice day EDIT BACK Press the button to scroll through the list of drafts. Rotate the Mode knob. ASTRO XTL 5000 Digital Mobile Radio with O5 Control Head... -
Page 122: To Access The Sent Folder
ARS User Login and Text Messaging Features To Access the Sent Folder The Sent folder stores the messages that were sent out previously. The Sent folder can hold up to 10 messages. The oldest Sent message in the folder will be deleted when the 11th message comes Press the button below SENT. -
Page 123: Secure Operation
• Selecting an Encryption Index (Conventional Only) (page 114) Note: Keyloading is not available from the control head in a remote mount configuration; however, it is available from the front of the transceiver. ASTRO XTL 5000 Digital Mobile Radio with O5 Control Head... -
Page 124: Receiving A Private Message
Secure Operation Receiving a Private Message Select a mode by rotating the Mode knob. Using the Volume Knob, adjust the volume to a comfortable listening level. In conventional modes and, if enabled, in trunking modes, the BUSY light blinks and the radio unmutes when the radio is receiving a private message. -
Page 125: System Considerations
The keyfail reminder will not sound when the radio is in clear mode. ASTRO XTL 5000 Digital Mobile Radio with O5 Control Head... -
Page 126: Selecting An Encryption Key (Conventional Only)
Secure Operation Selecting an Encryption Key (Conventional Only) The Select Key feature allows you to manually select any one of the 16 encryption keys. If the current mode is programmed with key selection being strapped to force the current mode to use a predetermined key, the Select Key menu will not appear as a Secure menu item. - Page 127 Pressing the PTT button exits the menu without saving the selected key choice and allows the radio to transmit. When you abort the key-select menu, the radio uses the key that was selected prior to entry into the menu. ASTRO XTL 5000 Digital Mobile Radio with O5 Control Head...
-
Page 128: Selecting An Encryption Index (Conventional Only)
Secure Operation Selecting an Encryption Index (Conventional Only) The Select an Index feature allows you to select one or more groups of several encryption keys from among the available keys stored in the radio. For example, you could have a group of three keys structured to one index, and another group of three different keys structured to another index. -
Page 129: Troubleshooting
Similar problems indicate a system malfunction rather than a radio failure. If symptoms persist or, if your unit exhibits other problems, contact a qualified radio technician. ASTRO XTL 5000 Digital Mobile Radio with O5 Control Head... - Page 130 Troubleshooting Notes...
-
Page 131: Accessories
VHF, 144–150.8 MHz, quarterwave RAD4004_RB VHF, 150.8–162 MHz, quarterwave RAD4005_RB VHF, 162–174 MHz, quarterwave RAD4010_RB VHF, 136–174 MHz, halfwave, roof mount HAE4003_ UHF, 450–470 MHz, quarterwave whip HAE4004_ UHF, 470–512 MHz, quarterwave ASTRO XTL 5000 Digital Mobile Radio with O5 Control Head... - Page 132 Accessories HAE4011_ UHF, 450–470 MHz, 3.5 db, roof mount HAE4012_ UHF, 470–495 MHz, 3.0 db, roof mount HAE4013_ UHF, 494–512 MHz, 3.0 db, roof mount HAE6010_ UHF, 380–433 MHz, 3.5 db gain HAE6011_ UHF, 380–433 MHz, 5.0 db gain HAE6012_ UHF, 380–433 MHz, quarterwave whip HAE6013_ UHF, 380–470 MHz, 2.0 db gain,...
-
Page 133: Bull Horns For Siren And Public Address
HKN6168_ Remote Mount Cable (CAN) - 10M (30 FT) HKN6169_ Remote Mount Cable (CAN) - 5M (17 FT) HKN6170_ Remote Mount Cable (CAN) - 3M (10 FT) HKN6182_ Cable/Adapter, Keyloader ASTRO XTL 5000 Digital Mobile Radio with O5 Control Head... -
Page 134: Microphones
Accessories HKN6184_ Cable, CH Programming (RS-USB) HKN6183_ Cable, CH Programming (RS-232) HKN6184_ Flash/Programming cable (USB) HKN6183_ Flash/Programming cable (RS232) YLN1148_ Armored, for handset/hang-up mic HMN4082_ Armored, for handset/hang-up mic Microphones Part No. Description HMN1079_ Motorcycle Palm D-Sub 9 connector HMN4081_ Motorcycle Palm GCAI connector HMN4079_ Keypad Mic... -
Page 135: Remote Mounting Kits
13 W remote weather-resistant HSN6003_ Motorcycle, weather-resistant Trunnion Kits Part No. Description HLN6909_ Quick-release, high-power HLN6910_ Standard high-power HKN6186_ Trunnion, CH Remote Mount HLN6861_ HDWR Millenium St. Install - Mid Power ASTRO XTL 5000 Digital Mobile Radio with O5 Control Head... - Page 136 Accessories Notes...
-
Page 137: Appendix: Maritime Radio Use In The Vhf Frequency Range
11 If you do not receive an immediate response, remain by the radio and repeat the transmission at intervals until you receive a response. Be prepared to follow any instructions given to you. ASTRO XTL 5000 Digital Mobile Radio with O5 Control Head... -
Page 138: Non-Commercial Call Channel
Appendix: Maritime Radio Use in the VHF Frequency Range Non-Commercial Call Channel For non-commercial transmissions, such as fishing reports, rendezvous arrangements, repair scheduling, or berthing information, use VHF Channel 9. Operating Frequency Requirements A radio designated for shipboard use must comply with Federal Communications Commission Rule Part 80 as follows: •... - Page 139 157.050 161.650 157.100 161.700 157.150 161.750 157.200 161.800 157.250 161.850 157.300 161.900 157.350 161.950 157.400 162.000 156.025 160.625 156.075 160.675 156.125 160.725 156.175 160.775 156.225 160.825 156.275 160.875 156.325 160.925 ASTRO XTL 5000 Digital Mobile Radio with O5 Control Head...
- Page 140 Appendix: Maritime Radio Use in the VHF Frequency Range Table A-1: VHF Marine Channel List (Continued) Frequency (MHz) Channel Number Transmit Receive 67** 156.375 156.375 156.425 156.425 156.475 156.475 156.575 156.575 156.625 – 156.675 156.675 156.725 156.725 77** 156.875 – 156.925 161.525 156.975...
-
Page 141: Glossary
Squelch Dispatcher An individual who has radio system management duties. Failsoft A back-up system allowing you to communicate in a non-trunked, conventional mode should the trunked system fail. ASTRO XTL 5000 Digital Mobile Radio with O5 Control Head... - Page 142 Glossary Federal Communications Commission. Hang Up Disconnect. Home Display The first display information after the radio completes its self test. Liquid-Crystal Display. Mode A programmed combination of operating parameters; for example, a channel or talkgroup. Mode-Slaving Radio programmed to automatically give the proper operation for a given mode you have selected.
- Page 143 Conventional). Allows radio users to share a smaller number of frequencies because a repeater, or communications path, is assigned to a talkgroup for the length of a conversation. Zone A grouping of channels or talkgroups. ASTRO XTL 5000 Digital Mobile Radio with O5 Control Head...
- Page 144 Glossary Notes...
-
Page 145: Commercial Warranty And Service
Product Accessories One (1) Year Motorola, at its option, will at no charge either repair the Product (with new or reconditioned parts), replace it (with a new or reconditioned Product), or refund the purchase price of the Product during the warranty period provided it is returned in accordance with the terms of this warranty. - Page 146 Product item, transportation and insurance prepaid, to an authorized warranty service location. Warranty service will be provided by Motorola through one of its authorized warranty service locations. If you first contact the company which sold you the Product, it can facilitate your obtaining warranty...
- Page 147 Product, does not function in accordance with MOTOROLA’s published specifications or the FCC type acceptance labeling in effect for the Product at the time the Product was initially distributed from MOTOROLA. ASTRO XTL 5000 Digital Mobile Radio with O5 Control Head...
- Page 148 A) that MOTOROLA will be notified promptly in writing by such purchaser of any notice of such claim; B) that MOTOROLA will have sole control of the defense of such suit and all negotiations for its settlement or compromise; and C) should the Product or parts become, or in MOTOROLA’s...
-
Page 149: Service
Motorola two-way radio dealer. For more information about ESP, contact the Motorola Radio Support Center, 2204 Galvin Drive, Elgin, IL 60123, 1-800-227-6772. ASTRO XTL 5000 Digital Mobile Radio with O5 Control Head... - Page 150 Commercial Warranty and Service Notes...
-
Page 151: Index
..25 trunking system considerations ... mode priorities ......42 selected alarms ....... 46 answer zone ........23 Enhanced Private Conversation channels, conventional ....7 ASTRO XTL 5000 Digital Mobile Radio with O5 Control Head... - Page 152 control head index selection ...... 114 operation ........4 selecting ........ 112 status display ......8 Enhanced Private Conversation conventional answer a call ..... 66, 74 channel ........7 description ....... 74 mode ........28 initiate call ......67, 75 scan list ........36 select unit to call ....67, 75 selecting talkgroup ....64 entering keypad characters ..
- Page 153 ........24 powering on radio ..... 5, 6 changing outside current zone 25 predefined priorities, changing ....42 message,quick text message 103 selecting ........24 username ......20, 93 selecting Home .......27 preemption ASTRO XTL 5000 Digital Mobile Radio with O5 Control Head...
- Page 154 non-ruthless ......83 talkback ........40 ruthless ........83 transmit while on ..... 40 preprogrammed phone numbers .49 turning on ........ 37 PRI (priority) indicator ....37 scan list priority add a channel ......43 priority flag ......102 conventional ......36 priority message ......97 delete a channel ......
- Page 155 ........7, 28 volume, adjusting ......6 priority scan list ......36 system considerations ...111 trunking warranty ........132 answer phone call ....49 writing text ........ 100 emergency call ......32 Enhanced Private ASTRO XTL 5000 Digital Mobile Radio with O5 Control Head...
- Page 156 zone selection ......23...
- Page 157 Product Safety and RF level or counterclockwise to decrease squelch level. blinks. Exposure booklet enclosed with your radio (Motorola 6 Press Home button to save the squelch level. Publication part number 6881095C99) to ensure 2 Use the navigation keys to select the mode you want compliance with RF energy exposure limits.
- Page 158 Sending an Emergency Alarm or Call Initiating a Call Alert Page Alarm Type Indications/Actions Alarm and Call After ACK RECEIVED (see Non-Silent Press the emergency actuator (Emer button, 1 Press the Page softkey. Alarm above) is displayed, the radio footswitch, hidden pushbutton) to begin an has priority voice-channel access.
- Page 159 Selecting Secure Mode Selecting a Key Index DISPLAY AND LIGHT INDICATORS Display/Light Meaning Press and release the SEC softkey. The D indicator 1 Press and hold the SEC softkey until a tone sounds. lights up. BUSY light on Displayed conventional mode has 2 Use the navigation keys to scroll to INDX SEL.
-
Page 160: Alert Tones
ALERT TONES ALERT TONES (Continued) ALERT TONES (Continued) Type of Tone Name Explanation Type of Tone Name Explanation Type of Tone Name Explanation 1 Low-Pitched Invalid Key Alert Feature button A series of low- Scan Alert On Indicates that Scan Low-Pitched Talk Prohibit/ Out of trunked radio... - Page 162 Motorola, Inc. 1301 E. Algonquin Rd. Schaumburg, IL 60196-1078 U.S.A. MOTOROLA, the Stylized M Logo, and ASTRO are registered in the U.S. Patent and Trademark Office. All other product or service names are the property of their respective owners. © Motorola, Inc. 2005–2008.