AEG HK654070XB User Manual
Hide thumbs
Also See for HK654070XB:
- User manual (272 pages) ,
- User manual (80 pages) ,
- User manual (19 pages)
Table of Contents
Quick Links
See also:
User Manual
Table of Contents

Related Manuals for AEG HK654070XB


Summary of Contents for AEG HK654070XB
- Page 1 NL KOOKPLAAT HK654070XB GEBRUIKSAANWIJZING EN HOB USER MANUAL FR TABLE DE CUISSON NOTICE D'UTILISATION DE KOCHFELD BENUTZERINFORMATION ES PLACA DE COCCIÓN MANUAL DE INSTRUCCIONES...
-
Page 2: Table Of Contents
Contents CONTENTS 19 Safety information 20 Installation instructions 22 Product description 23 Operating instructions 27 Helpful hints and tips 28 Care and cleaning 29 What to do if… 30 Environment concerns The following symbols are used in this user manual: Important information concerning your personal safety and information on how to avoid damaging the appliance. -
Page 3: Safety Information
Safety information SAFETY INFORMATION For your safety and correct operation of the appliance, read this manual carefully before the installation and use. Always keep these instructions with the appliance also if you move or sell it. The users must fully know the operation and safety functions of the appliance. Children and vulnerable people safety WARNING! Do not let persons, children included, with reduced physical sensory, reduced mental func-... -
Page 4: Installation Instructions
Before the installation, note down the serial number (Ser. Nr.) from the rating plate.The rating plate of the appliance is on its lower casing. 949 595 011 00 HK654070XB 58 HAD 56 AO 220-240 V 50-60-Hz 7,1 kW The Safety Instructions... - Page 5 Installation instructions • Install correctly to give shock protection. • Loose and incorrect plug and socket connections can make the terminal become too hot. • A qualified electrician must install the connections in the clamps correctly. • Use a strain relief clamp on cable. •...
-
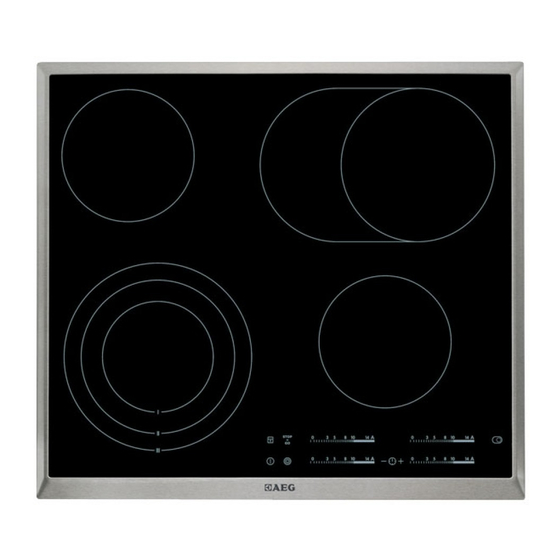
Page 6: Product Description
Product description If you use a protection box (the additional acces- sory ), the protective floor directly below the ap- pliance is not necessary. You can not use the protection box if you install the appliance above an oven. PRODUCT DESCRIPTION General overview Single cooking zone 1200 W Oval zone 1500/2400 W... -
Page 7: Operating Instructions
Operating instructions sensor field function It activates Automatic Heat Up function. It activates and deactivates the outer ring. A heat setting display It shows the heat setting. A control bar To set the heat setting. It increases or decreases the time. It sets the cooking zone. -
Page 8: The Heat Setting
Operating instructions • You spill something or put something on the control panel for more than 10 seconds, (a pan, a cloth, etc.). The sound operates some time and the appliance deactivates. Remove the object or clean the control panel. •... - Page 9 Operating instructions Immediately touch the necessary heat setting. After 3 seconds comes on in the dis- play. To stop the function change the heat setting. Timer Count Down Timer Use the Count Down Timer to set how long the cooking zone operates for only this one time.
-
Page 10: The Child Safety Device
Operating instructions STOP+GO function sets all cooking zones that operate to the lowest heat setting ( When operates, you cannot change the heat setting. function does not stop the timer function. • To activate this function touch . The symbol comes on. -
Page 11: Helpful Hints And Tips
Helpful hints and tips Activation of the sounds Deactivate the appliance. Touch for 3 seconds. The displays come on and go out. Touch for 3 seconds. comes on, because the sound is off. Touch comes on. The sound is on. HELPFUL HINTS AND TIPS Cookware •... -
Page 12: Care And Cleaning
Care and cleaning Heat Use to: Time Hints setting Cook larger quantities of food, stews 60-150 Up to 3 l liquid plus ingredients. and soups 9-12 Gentle fry: escalope, veal cordon bleu, as nec- Turn halfway through. cutlets, rissoles, sausages, liver, roux, essary eggs, pancakes, doughnuts 12-13... -
Page 13: What To Do If
What to do if… WHAT TO DO IF… Problem Possible cause and remedy You cannot activate the appli- • Activate the appliance again and set the heat setting in 10 ance or operate it. seconds. • You touched 2 or more sensor fields at the same time. Only touch one sensor field. -
Page 14: Environment Concerns
Environment concerns ENVIRONMENT CONCERNS The symbol on the product or on its packaging indicates that this product may not be treated as household waste. Instead it should be taken to the appropriate collection point for the recycling of electrical and electronic equipment. By ensuring this product is disposed of correctly, you will help prevent potential negative consequences for the environment and human health, which could otherwise be caused by inappropriate waste handling of this product. - Page 15 Guarantee/Customer Service Centres EURO-LINE APPLIANCES LENGTH OF WARRANTY EURO-LINE WILL PAY FOR: TWO YEAR FULL WARRANTY Replacement parts and/or labour to repair defects in materials or workmanship. Service from original date of purchase, including parts must be provided by an authorized Euro-Line and labour, to the first purchaser of this company (unless advised otherwise).
- Page 16 EURO-PARTS, USA EURO-PARTS, CANADA EURO-LINE APPLIANCES Tel: 1-800-561-4614 Tel: 1-800-678-8352 1-800-421-6332 Fax: 1-519-528-5001 Fax: 1-519-528 5001 Tel. Direct: 1-905-829-3980 Fax: 1-905-829-3985 User Instructions & Installation Manual Service & Repair To save you time and money please have the following information ready in case you have to call for service: •...