3D Systems Cube User Manual
2nd generation
Hide thumbs
Also See for Cube:
- User manual (121 pages) ,
- Quick start manual (32 pages) ,
- Lesson (15 pages)

Related Manuals for 3D Systems Cube


Summary of Contents for 3D Systems Cube
- Page 1 Cube 2nd Generation User Guide 3D Printer...
-
Page 2: Table Of Contents
ACTIVATE YOUR CUBE IN CUBIFY.COM ......................19-20 UNLOCK YOUR CUBE ............................20-21 DOWNLOAD AND INSTALL CUBE SOFTWARE (WINDOWS) ................. 22-23 DOWNLOAD AND INSTALL CUBE SOFTWARE (MAC OSX) ................24-25 DOWNLOAD YOUR FREE CREATIONS ........................26 Cube SOFTWARE OVERVIEW ........................... 27-30 Key File Types ...............................27 WI-FI SET-UP ................................ - Page 3 FINISHING YOUR CREATION ........................51-52 Removing your Creation From the Print Pad ....................51 Removing Raft ..............................52 Removing Supports ............................52 MAINTAINING YOUR CUBE ...........................51-52 Cleaning the Exterior ............................52 Cleaning the Print Pad .............................52 Cleaning the Print Tip ............................52 Cleaning the Touchscreen ..........................53 4 Amp Fuse Replacement ..........................53...
-
Page 4: Introduction
INTRODUCTION Thank you for purchasing “The Cube” It’s portable, plug and print design enables everybody in the family to express their creativ- ity like never before.With ten different material colors to choose from, enjoy the freedom to print in your true colors or to mix it up. -
Page 5: Copyright
Cube 3D Printer. The warranty period for the Cube 3D Printer is ninety (90) days and shall start on the earlier of the date your Cube 3D printer is activated or the thirtieth day after your purchase of the Cube 3D printer. -
Page 6: Important Safety Information
Cube’s appropriate use. Ensure small 3D prints are not accessible to young children. These 3D prints are potential choking hazards for young children. • When the Cube is operating, the print tip on the printjet becomes hot; avoid touching this area until it has cooled down. •... - Page 7 Warnhinweise in diesem Handbuch. • Modifizieren Sie keine Sicherheitsmerkmale und nehmen Sie keine Änderungen am Cube-Drucker vor. Dies ist verboten und kann zum Erlöschen der Gewährleistung führen. • Die Verwendung von Druckmaterialien oder 3D-Drucken, die keine Originalteile von 3D Systems sind, kann zum Erlöschen der Gewährleistung führen. • Die Beaufsichtigung durch Erwachsene ist erforderlich; beobachten Sie Kinder genau und greifen Sie gege- benenfalls ein, um mögliche Sicherheitsprobleme zu vermeiden und um sicherzustellen, dass der Cube-Drucker ordnungsgemäß verwendet wird. Stellen Sie sicher, dass kleine 3D-Drucke für kleine Kinder nicht zugänglich...
- Page 8 El uso de materiales de impresión o de piezas impresas en 3D que no sean componentes auténticos de 3D Sys- tems puede anular la garantía. • Se requiere la supervisión de un adulto; observe a los niños de cerca e intervenga cada vez que sea necesa- rio para prevenir cualquier posible problema de seguridad y asegurar el uso adecuado de la impresora Cube. Asegúrese de que las piezas pequeñas impresas en 3D no estén al alcance de niños pequeños. Estas piezas impresas en 3D representan un posible peligro de asfixia para los niños pequeños. •...
- Page 9 La supervision d’un adulte est requise ; surveillez les enfants en restant à proximité et intervenez si néces- saire pour éviter tout problème de sécurité potentiel et garantir la bonne utilisation du Cube. Assurez-vous que les petits imprimés en 3D restent hors de portée des jeunes enfants. Ces imprimés en 3D présentent un risque d’étouffement pour les jeunes enfants.
- Page 10 3D, poiché questi potrebbero costituire un pericolo di soffocamento. • Durante l’attività di Cube, la puntina di stampa del getto d’inchiostro si riscalda; evitare il contatto con quest’area fino al completo raffreddamento. •...
- Page 11 3D-prints kunnen komen. Deze 3D-prints houden potentieel verstikkingsgevaar in voor jonge kinderen. • Wanneer de Cube in werking is, wordt de printtip op de printjet heet. Raak dit oppervlak niet aan totdat het is afgekoeld. • Wijzig de kleur van het materiaal niet tijdens het printen, anders kan de Cube worden beschadigd.
- Page 12 Forsigtig: Viser at der kunne ske noget som kan resultere i datatab, beskadigelse af udstyr eller personskade. Forsigtig: Viser at der findes en knusefare, som kan forårsage personskade. Sikkerhedsretningslinier • Følg alle sikkerhedsreglerne i denne sektion og overhold forsigtighedsregler og advarsler i denne vejledning. • Sikkerhedsfeatures må ikke modificeres og der må ikke foretages andre modifikationer til Cube. Det er forbudt at gøre det og det vil ugyldiggøre garantien. • Brugen af andre printmaterialer eller 3D prints end de ægte 3D Systems komponenter kan ugyldiggøre garantien. • Det er påkrævet at en voksen holder opsyn; hold nøje øje med børn og træd ind hvis det er nødvendigt for at undgå potentielle sikkerhedsproblemer og at sikre at Cube bruges rigtigt. Sørg for at små børn ikke har adgang til...
- Page 13 高熱面の危険:このシンボルサインの近くまたはプリントジェット部には表面が高熱となっている部分があります。触れないよう に注意してください。高熱面で火傷することになります。 要注意:データの喪失、機器の損傷、または人身傷害を引き起こすような何かが起こる場合もあることを示します。 要注意: 人身傷害を引き起こす可能性のある危険個所を示します。 Sik 安全ガイドライン • 本項の安全ルールのすべてに従い、また本書のすべての要注意および警告事項を守ってください。 • • 安全機能を修正したり、Cube に改変を加えたりしないでください。そうすることは禁じられており、保証は無効 になります。 • • 純正 3D Systems コンポーネント以外のプリント材料や 3D プリントの使用は、保証を無効にする場合がありま す。 • • 大人の監視が必要です。子供が使用している時には身近で見守り、安全上の問題を未然に防ぎ、Cube が適切に使 用されるよう、必要に応じて介入するようにしてください。小型の 3D プリントが幼児の手に届くことのないよ うにしてください。これらの 3D プリントは幼児にとっては、のどを詰まらせる危険物となります。 • • Cube が動作中は、プリントジェット上のプリントチップが熱くなります。その部分が冷めるまでは、触れない ようにしてください。 • •...
-
Page 14: Cube 3D Printer Features
CUBE 3D PRINTER FEATURES The printjet print tip heats the material and produces a thin flowing material of plastic creating layers that adheres to the print pad. After each layer is produced, the print pad lowers so that a new layer can be drawn on top of the last. This is the process continues until the last layer of the creation is jetted. -
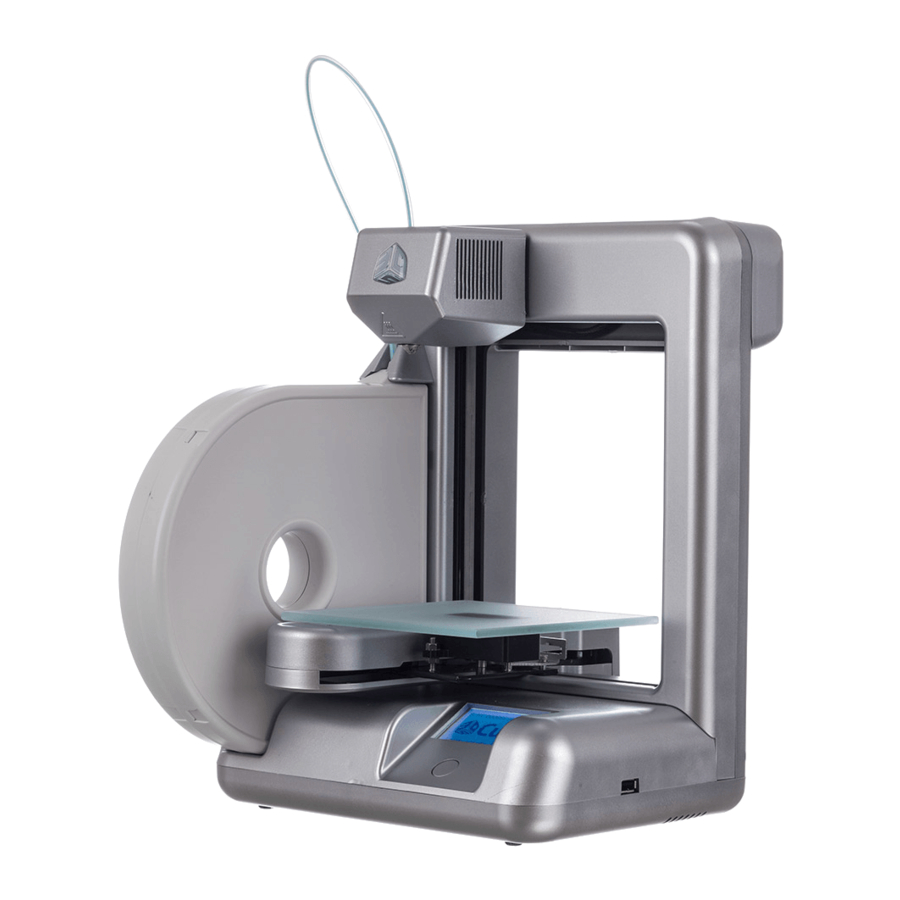
Page 15: At A Glance
AT A GLANCE Cube Tube Print Jet Print Tip Material Cartridge USB Connection- For Print Files Only Power Cord (Right side of printer) Connection Operator’s Touch ON/OFF Push-Button Screen USB Port- For firm- Power Switch & ware updates only Menu Function Button... -
Page 16: Requirements For Your Cube
XP operating systems • Nozzle- 280 C (536 • If not already installed, the Cube Software installer will auto- • Print Pad- 66-77° C (150-170°F) matically install the Microsoft .NET 4.0 Framework • Non-condensing Relative Humidity: 5% - 25% Wireless Options: •... -
Page 17: Unpacking And Setting Up The Cube
Note: Retain packaging and Cube carton for future transporting. Remove white plastic inserts from each side of box. Pinch and bend insert out. Next, pull insert out of box to remove. Lift top of carton up and remove. - Page 18 Lift foam from the top of Cube. Remove foam from the midsection and below the pad by gently pulling out from the front. 3. Lift Cube out of the box and place on table that has a flat working surface which is at least 4 times as large as base of the Cube. Remove Foam Remove print pad from foam under Cube and set aside. Lift foam that Cube was sitting on to access power supply and other accessories.
-
Page 19: Activate Your Cube In Cubify.com
If you have not created an account in Cubify.com, please do so now to receive your one time activation code. Once your se- rial number is entered in “Activate my Cube,” your activation code will be sent to your e-mail account. If your e-mail was not received because spam filtered it, please check your spam e-mail. This code will be used to unlock your Cube so that you can... - Page 20 Using the links in your activation code e-mail or the “My Cube” section in your account, download your free software and gifts from Cubify: • 25 Free creations - all by top artists, ready for printing on your Cube!
-
Page 21: Unlock Your Cube
UNLOCK YOUR CUBE Once you have successfully activated your Cube account, the next step is to unlock your Cube to begin your creations. Your unique activation code appears in the ”Congratulations” screen after you activated your Cube; your code was also sent to your e-mail account. -
Page 22: Download And Install Cube Software (Windows)
Tap in your activation code and then tap on the check box to unlock your Cube. If an error is made while entering your code, finger tap “Delete” and re-enter your code; tap on the check box. Your Cube is unlocked and you can now start your creation. You are now at the main menu. Main Menu Tap Here DOWNLOAD AND INSTALL CUBE SOFTWARE FOR WINDOWS Download the Cube Software to begin experimenting with the software to create your own prints. - Page 23 2. Click on Setup.exe in the Cube.zip file; the next screen will ask if you would like to open this file; click Yes. Click Here Click Here and then Here The Cube Setup Wizard will guide you through the steps to install the software on your computer. Select Next to start the Setup Wizard. Click Next...
-
Page 24: Download And Install Cube Software (Mac Osx)
DOWNLOAD AND INSTALL CUBE SOFTWARE FOR MAC OSX While your first creation is being built, download the Cube Software to begin experimenting with the software to create your own prints. • It is required to download the Cube software so you can import .STL or .creation files into the software to convert them to a .Cube file. • The .Cube file is a machine code file that the Cube printer can read. 1. In the menu, Click on “Download Cube software.” Double click on the zip file and the “Cube Mac installer dmg” will appear. Double click “Cube Mac installer.dmg,” a new window will open. Drag the Cube software into the “Applications” folder to install. - Page 25 If the “Drag to install” window did not open, locate the “Cube” driver in your device panel. Click on “Cube” to download soft- ware. Note: Safari users will not have to unzip the dmg.; it will unzip as it downloads.
-
Page 26: Download Your Free Creations
DOWNLOAD YOUR FREE CREATIONS Download your free 25 free creations by following these simple steps. 1. Click on “Download free creations;” your download will start immediately. Click Here 2. Click on “Extract” folder in the Creation zip file and extract it to your computer. Click Here... -
Page 27: Cube Software Overview
The Cube Software allows you to manipulate your design before sending it to the Cube for printing. It simulates the Cube’s print pad so you can orient, scale, re-size and rotate the 3D print to get the best result when printing. - Page 28 Click on “Print” to transfer your creation to the Cube. The two methods of sending your creation to print are: Set up Ad hoc or WPS WI-FI modes; or USB memory stick connected to your computer for downloading your creation for print.
- Page 29 Hollow: Part will be hollow - less material is used. Solid: Part will be solid- more material is used. Strong: Normal print. Cube Model: Select your Cube and then select the print material. The Cube 2nd Generation can print using all materials; Cube can only print with ABS.
- Page 30 Select “Yes” to delete the 3D print or “No” if you would like to continue. Allows connection between your computer and the Cube through WI-FI. It also downloads firmware upgrades to your Cube. Click on the Help button to access the Cube 3-D Printer User Guide and Material Safety Data Sheet (MSDS).
-
Page 31: Wi-Fi Set-Up
NOTE: Ad hoc will not connect to operating systems running Windows XP. An ad hoc network is a temporary connection to your Cube Printer through your computer or your wireless smart phone. Ad hoc networks can only be wireless, so you must have a wireless network adapter installed in your computer to setup or join an ad hoc network. -
Page 32: Set Up A Computer (Wps) Network
Note: Always select your Cube from your network settings be- fore opening Cube Software. Scroll and select your Cube on the menu. Click on “con- nect.” This may take several minutes to connect. Once connected, you can send print files from Cube software straight to your Cube. - Page 33 Tap on “WPS” in the menu screen. The next screen will show your printer connecting to your computer and then “WPS Con- nected” if the connection was successful. If connection was not successful, unplug the power to your Cube and then plug your Cube in;...
-
Page 34: Update Cube Firmware
If your USB memory stick is connected to the Cube, please remove the memory stick (the screen will display the directions to do this). Tap the “NEXT” arrow on the display; locate the USB cable and connect the cable to the Cube USB port located on the back of the Cube (again, these instructions will be displayed on the screen). - Page 35 “Firmware Updated Successfully”, click OK. Disconnect the USB cable from your Cube and computer; unplug the Cube power cord. Plug power cord back in and press the Cube power button (front button); a message will display on the touchscreen “Settings restored,” click on the...
-
Page 36: Print Pad Installation
The print tip must be set to the correct distance between the print tip and the print pad to ensure the first printed layer adheres properly to the printpad. When the Cube is operating, the print tip on the print jet nozzle becomes hot; avoid touching this area until it has cooled down. Finger tap “Set Up” on the touchscreen and press “Next” until “Set Gap” appears. - Page 37 Finger tap “Set Gap;” The print jet and print pad will move into position to set the gap. Next, place a standard sheet of paper between the print tip and the print pad. If the paper can not slide between the print tip and print pad, tap the “down”...
-
Page 38: Material Cartridge Installation
1. Remove material cartridge from packaing; using scissors cut top portion of bag and remove the cartridge. Tap “Setup” on Cube touch screen then select “Load Cartridge,” press Next. 3. Remove thumbscrew on the side of the material cartridge. Remove the blue tape from material. Retain screw to re-install in cartridge when you need to store cartridge again. - Page 39 Locate the clear tube (Cube tube) in packaging and thread the material through the Cube tube until it comes out of the other end of tube. Pull approximately 2” (50 mm) of material out of the other end of tube.
- Page 40 6. Insert Cube tube (clear tube) into print jet and press Next; loading of the cartridge is completed. If the first attempt at loading the cartridge is not successful because the material did not jet from the print tip, remove the material from the print jet. Repeat the Material Cartridge Installation. Insert Cube tube into the top opening of print jet.
-
Page 41: Printing Preparation
1. Stand Cube Stick on it’s cap until the glue flows to the cap; remove cap. Remove print pad from the Cube; slowly apply a coat of glue in rows moving the bottle up and then down until the glue is evenly distributed on the entire print pad. Check the pad after applying the glue to ensure there are noticeable gaps where glue was not applied. -
Page 42: Printing Your First Creation
Do not change color of material or cartridge during printing; doing so may damage the Cube. NOTE: Your Cube will have printed test creations before leaving the factory. These test creations may have been printed in a different material color than you are using. Therefore, a small amount of material may be remaining in the print jet. - Page 43 2. Click on “Import” and select a file from the .creation files that you downloaded from Cubify.com or a .STL file. The creation that you selected will appear on software’s print pad. The software’s print pad is a simulation of your Cube print pad. Click here In the software you can orient, scale, and manipulate your creation to ensure that you obtain the optimum printing...
- Page 44 4. To prepare your .stl or .creation file for printing, click on “Build” and save your creation as a .Cube file. Click here Printing with WI-FI Connection 1. If you have a WI-FI connection, click on “Print” and select the .Cube file saved from your .creation file; click on “Open” to send your file to your Cube.
-
Page 45: Printing From The Usb Memory Stick
2. On the Cube touchscreen, finger tap check box to start the print process or tap the X box to cancel. The Cube will begin a two (2) minute heating process. During the heating process, the print tip will reach the temperature that has been preset by the manufacturer. Once the temperature is reached, your creation will begin to print. -
Page 46: Aborting Your Print
Here The Cube will begin a two (2) minute heating process. During the heating process, the print tip will reach the tempera- ture that has been preset by the manufacturer. Once the temperature is reached, your creation will begin to print. Once the creation is finished printing, your touch screen will display “Print Finished,” press the check box to confirm. - Page 47 CLOUD PRINTING FROM CUBIFY.COM Download files and print straight to your Cube from Cubify.com. This app allows you to dowload files from your Cubify account and save your file to your computer or send your file directly to your Cube for printing. Simply follow these steps to start printing or saving files from Cubify.com. Click on “My Cube” and select “My Account.” Click on “My Downloads.”...
- Page 48 3. If you would like to download a file to save on your computer or print using Cube software, click on “DOWNLOAD’. The file will download to the Cube software on your computer to save your creation. Click Here 4. Your file can download directly to your Cube by clicking on “PRINT ON MY CUBE.” Then Select Cube Printer screen will appear and will search for available Cube printers on your network. Your Cube must be set up on Ad-Hoc or WPS to communicate with your computer. Click Here...
- Page 49 NOTE: If using Ad-hoc, it may take a few minutes for WI-FI connection. NOTE: If you are having problems with your Cube not being discover in your network, Windows Firewall may be blocking the program. The firewall can be turned off through you PC’s Control Panel or add theCubePrinterForm in Control Panel\System and Security\Windows Firewall\Allowed Programs.
- Page 50 REPLACING MATERIAL CARTRIDGE Do not change cartridge or material during printing; doing so can cause damage to your Cube. 1. Pull Cube Tube away from top of print jet. Please do not pull the material out until the touch screen instructs you to do so.
-
Page 51: Finishing Your Creation
FINISHING YOUR CREATION Removing your Creation From the Print Pad • Place print pad with the creation in a container (not supplied) filled with regular warm tap water and let soak approxi- mately five minutes or until your creation becomes free from the print pad. Clean and dry print pad before next use. -
Page 52: Removing Raft
Removing Raft (If Required) • If supports are present, use small pliers first to remove support from part. Use pliers to remove the raft away from the bottom of your creation. In places where the supports are inside your creation and are hard to reach, use little wire snips or needle nose pliers to remove the supports. Removing Supports (If Required) • Carefully break the supports away from your creation. In places where the supports are inside your creation and are hard to reach, use small needle nose pliers (not supplied) to remove the supports. -
Page 53: Maintaining Your Cube
MAINTAINING YOUR CUBE Cleaning the Exterior • Clean the Cube’s exterior with a lint free cloth and water. Dampen the cloth with water and wipe the outer surfaces of any debris that is visible. Cleaning the Print Pad • Submerge print pad in a container filled with warm city (tap) water. -
Page 54: Cleaning The Touchscreen
4 Amp Fuse Replacement Caution: Before replacing the fuse, switch Cube’s power off and unplug power cord. 4 Amp, 250V fast blow fuse is located on the back left side of your Cube. 2. Using a flat screwdriver, turn screwdriver counterclockwise to remove fuse from the fuse holder. 3. Using a flat screwdriver, turn screwdriver clockwise to install new fuse into the fuse holder. After new fuse is installed, plug power cord into outlet and switch power on. -
Page 55: Print Pad Plate Leveling Instructions
PRINT PAD PLATE LEVELING INSTRUCTIONS Your print pad pad may become un-leveled when transporting your Cube, If this occurs, please follow these instructions to level your print pad pad for optimum creation experience. Tools Required: 7-mm Open-end Wrench- Supplied in Cube packaging The print pad plate is mounted on three bolts;... - Page 56 • Touch the “clockwise” and “counter-clockwise” buttons to automatically move the print jet around the four corners of the print pad. During each movement along the sides of the print pad, observe any gaps between the pad and the print jet. If there are gaps on one side of print pad and the print jet tip is barely touching the print pad on the other side, the print pad plate is not level.
- Page 57 ROLL SIDE TO SIDE If the gap between the print pad and print jet tip is at the right or left side, adjust the pad using the rear adjusting knob bolt. EXAMPLE: If the gap appears on the side of print pad, the pad is too low and will need to be moved up.
- Page 58 TILT FRONT TO BACK If the gap between the print pad and print jet tip is at the front or back of pad, adjust the pad using the adjusting knob bolt. EXAMPLE: If the gap between the print jet tip and the print pad is too low, the pad is too low and will need to be moved up.
- Page 59 The print tip must be re-set to the correct distance between the new print tip and the print pad to ensure the first printed layer sticks properly. When the Cube is operating, the print tip on the print jet and the print pad become hot; avoid touching these areas until they have cooled down. Finger tap “Set Up” on the touchscreen and press “Next” until “Set Gap” appears.
- Page 60 3D Systems, Inc. 333 Three D Systems Circle | Rock Hill, SC | 29730 www.Cubify.com ©2012 3D Systems, Inc. All rights reserved. The 3DS logo and Cube are registered trademarks of 3D Systems, Inc. pn 350341-01, Rev. A...