Before Use
Please read the user instructions carefully and completely before using the appliance and retain for future reference. Remove all packaging and labels and dispose them appropriately.
![]()
The blades are very sharp!
To avoid injuries, please handle blades with utmost care.
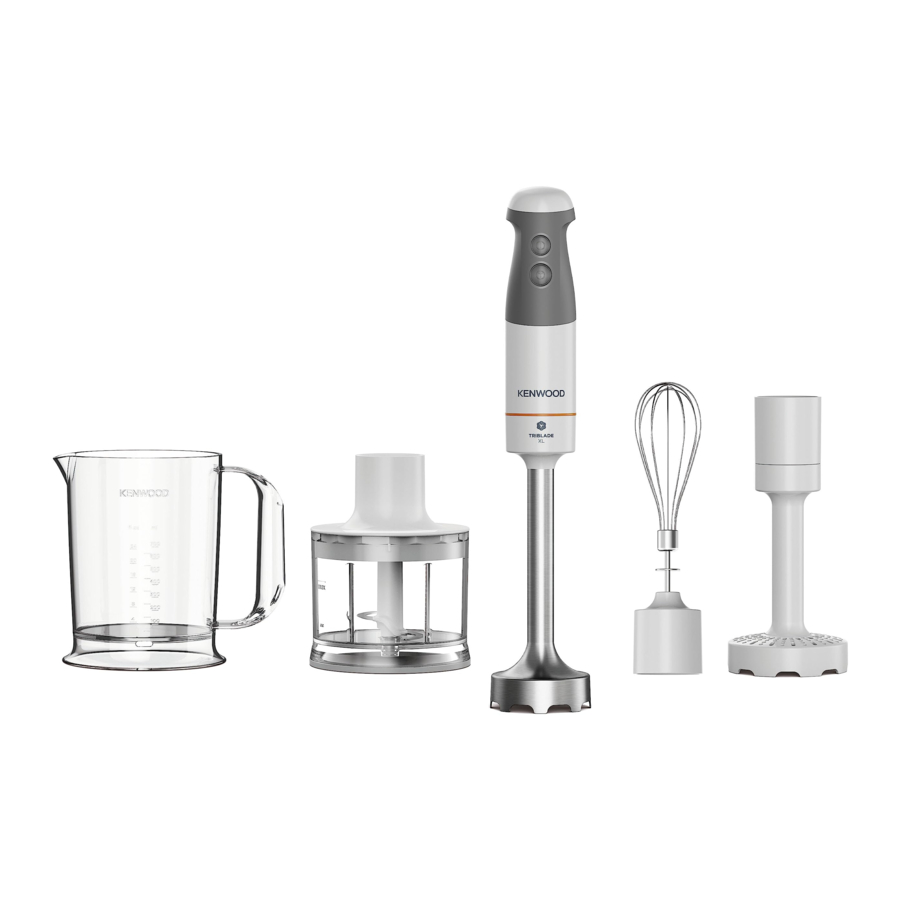
Parts and Accessories

- Variable speed button (on/off)
- Turbo button (T)
- Motor part
- Twist lock
- Blender shaft
- Beaker
- Whisk accessory
- Puree accessory
- 500 ml chopper accessory «mc»
How to Use the Appliance
Blending Shaft

The hand blender is perfectly suited for preparing dips, sauces, salad dressings, soups, baby food, as well as drinks, smoothies and milkshakes. For best results, use the Turbo speed.
Assembly and Operation
- Place the motor part (3) on the blender shaft (5) and turn the twist lock (4) counter-clockwise until it audibly clicks into place.
- Place the blending shaft into the mixture to be blended. Then switch the appliance on.

- If using the appliance to purée hot food in a saucepan or pot, remove the saucepan or pot from the heat source and ensure the liquid is not boiling. Allow hot food to cool slightly to avoid risk of scalding.
- Do not let the hand blender sit in a hot pan on the cooktop when not in use.
- Do not operate continuously for longer than 1 minute.
- Let the appliance cool down for 3 minutes before you continue processing.
Recipe Example: Mayonnaise
250 g oil (e.g. sunflower oil)
1 egg and 1 extra egg yolk
1–2 tbsp. Vinegar
Salt and pepper to taste
- Place all ingredients (at room temperature) into the beaker in the order as above.
- Place the hand blender at the bottom of the beaker. Blend at maximum speed until the oil starts emulsifying.
- With the hand blender still running, slowly raise the shaft to the top of the mixture and back down to incorporate the rest of the oil.
NOTE: Processing time: approx. 1 minute for salads and up to 2 minutes for a thicker mayonnaise (e.g. for dip).
Whisk Accessory
(A)
Use the whisk only for whipping cream, beating egg whites, making sponge cakes and ready-mix desserts.
Assembly and Operation
- Attach the whisk (7b) to the gearbox (7a).
- Align the motor part and the assembled whisk and turn the parts together until you hear them click into place.
- After use, unplug and turn the whisk clockwise (7) to detach the motor part. Then pull the whisk out of the gearbox.
- Do not operate continuously for longer than 3 minutes.
- Let the appliance cool down for 3 minutes before you continue processing.
Tips for Best Results
- Move the whisk clockwise while holding it at a slight incline.
- To prevent splattering, start slowly and use the whisk accessory in deep containers or pans.
- Place the whisk in a bowl and only then switch the appliance on.
- Always ensure the whisk and mixing bowl are completely clean and free of fat before whisking egg whites. Only whip up to 4 egg whites.
Recipe Example: Whipped Cream
1.8 cups / 400 ml chilled cream (min. 30% fat content, 4 - 8°C / 39 - 46 F)
Puree Accessory

The puree accessory can be used to mash cooked vegetables and fruits such as potatoes, sweet potatoes, tomatoes, plums and apples.
Before Use
- Do not mash hard or uncooked food, as this may damage the unit.
- Peel and remove any stones or hard parts; cook and drain then mash the fruit/ vegetable.
Assembly and Operation
- Never use the puree accessory in a saucepan over direct heat.
- Always remove the saucepan from the heat and allow to cool slightly.
- Sit the saucepan or bowl on a stable, flat surface, and support it with your free hand.
- Do not tap the puree accessory on the side of the cooking vessel during or after use. Use a spatula to scrape excess food away.
- For best results when mashing never fill a saucepan or bowl more than half full with food.
- Do not process more than one batch without interruption.
- Let the appliance cool down for 4 minutes before you continue processing.
Recipe Example: Mashed Potatoes
1 kg cooked potatoes 200 ml warm milk
Chopper Accessory

The chopper (9) is perfectly suited for chopping meat, hard cheese, onions, herbs, garlic, vegetables, bread, crackers and nuts.
Use the «mc» chopper (9) for larger quantities and for hard foods.
For «mc» chopper do not exceed the quantity of ingredients higher than max line. For «hc» chopper do not exceed the quantity of ingredients higher than max line. Maximum operation time for the «hc» chopper: 1 minute for large amounts of wet ingredients, 30 seconds for dry or hard ingredients.
NOTE: leave an interval of at least 3 minutes before operating again (To prevent faults). Immediately stop processing when motor speed decreases and/or strong vibrations occur.
Refer to the Processing Guide C for maximum quantities, recommended times and speeds.
Before Use
- Pre-cut foods into small pieces for easier chopping.
- Remove any bones, tendons and gristle from meat to help prevent damage to the blades.
- Make sure the anti-slip rubber ring (9e) is attached to the bottom of the chopper bowl.
Assembly and Operation
- The blade (9b) is very sharp! Always hold it by the upper plastic part and handle it carefully.
- Place the blade on the center pin of the chopper bowl (9c). Press it down and give it a turn so that it locks into place.
- Fill the chopper with food and put on the lid (9a).
- Always chop harder foods (e.g. parmesan cheese) at full speed.
- After use, unplug and turn the motor part (3) to detach.
- Lift the lid up. Carefully take out the blade before pouring out the contents of the bowl. To remove the blade slightly turn it then pull it off.
- Do not use the chopper accessory to process extremely hard foods, such as unshelled nuts, ice cubes, coffee beans, grains, or hard spices e.g. nutmeg. Processing these foods could damage the blades.
- Never place the chopper bowls in the microwave oven.
«hc» Recipe example: Honey-Prunes (as a pancake stuffing or spread)
50 g prunes
75 g creamy honey
70 ml water (vanilla-flavoured)
- Fill the «hc» chopper bowl with prunes and creamy honey.
- Store at 3°C in refrigerator for 24 hours.
- Add 70 ml water (vanilla-flavoured).
- Resume chopping for another 1,5 seconds at maximum speed.
Care and Cleaning

When processing foods with high pigment content (e.g. carrots), the accessories may become discolored. Wipe these parts with vegetable oil before cleaning them.
Warranty and Service
If you experience any problems with the operation of your appliance, before requesting assistance refer to the "troubleshooting guide" section in the manual or visit www.kenwoodworld.com.
Please note that your product is covered by a warranty, which complies with all legal provisions concerning any existing warranty and consumer rights in the country where the product was purchased.
If your Kenwood product malfunctions or you find any defects, please send it or bring it to an authorised KENWOOD Service Centre. To find up to date details of your nearest authorized KENWOOD Service centre visit www.kenwoodworld.com or the website specific to your Country.
Both the design specifications and these user instructions are subject to change without notice.
Troubleshooting Guide
| Problem | Potential Causes | Solution |
| Hand blender does not operate. | No power | Check appliance is plugged in. Check the fuse /circuit breaker in your home. If none of the above contact Kenwood Service. |
Kenwood Ltd, New Lane, Havant, Hampshire PO9 2NH www.kenwoodworld.com Thank You for choosing Kenwood. We are confident that you will get excellent service from this product. TO IMPROVE YOUR EXPERIENCE Register now at www.kenwoodworld.com
By registering we may send you from time to time details on exclusive offers, promotions, recipes and inside tips.

Documents / Resources
References
Download manual
Here you can download full pdf version of manual, it may contain additional safety instructions, warranty information, FCC rules, etc.


