
Panasonic SC-PM250 CD Stereo System Manual
- Owner's manual (32 pages) ,
- Operating instructions (2 pages) ,
- Operating instructions manual (18 pages)
- 1 Overview of controls
- 2 Preparing the remote control
- 3 Preparing the media
- 4 Media playback
- 5 Radio
- 6 Clock and timers
- 7 Sound effects
- 8 Others
- 9 Maintenance
- 10 Troubleshooting
- 11 About Bluetooth
- 12 Licenses
- 13 Making the connections
- 14 Supplied accessories
- 15 Safety precautions
- 16 Caution for AC mains lead
- 17 Sales and Support Information
- 18 Specifications
- 19 Documents / Resources
For optimum performance and safety, please read these instructions carefully.
Please keep this manual for future reference.
"EB" indicates the United Kingdom model.
Overview of controls
Do the procedures with the remote control. You can also use the buttons on the main unit if they are the same.

- Standby/on switch [
![]() ], [
], [![]() /I]
/I]
Press to switch the unit from on to standby mode or vice versa. In standby mode, the unit is still consuming a small amount of power. - Select the audio source
On the remote control:
Press the corresponding button to select the source.
On the main unit:
![]()
* For Australia and New Zealand - Decrease the brightness of the display panel
To cancel, press the button again. - Mute the sound
To cancel, press the button again.
"MUTE" is also cancelled when you adjust the volume or when you switch off the system. - Remote control sensor
Distance: Within approximately 7 m
Angle: Approximately 20° up and down, 30° left and right - USB port (
![]() )
) - Select "BLUETOOTH" as the audio source
To start Bluetooth® pairing, press and hold the button.

Preparing the remote control
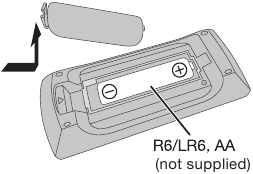
Use alkaline or manganese battery.
Install the battery so that the poles (+ and –) align with those in the remote control.
Preparing the media
Disc
- Press [CD
![]() ] (main unit: [
] (main unit: [![]() OPEN/CLOSE]) to open the disc tray.
OPEN/CLOSE]) to open the disc tray.
Put in a disc with the label facing up.
![]()
Press again to close the disc tray. - Press [USB/CD] to select "CD".
 ] (main unit: [
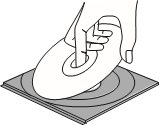
USB
- Reduce the volume and connect the USB device to the USB port.
Hold the main unit when connecting or disconnecting the USB device.

- Press [USB/CD] to select "USB".

Note:
Do not use a USB extension cable. The system cannot recognise USB device connected through a cable.
Bluetooth®
You can connect and play an audio device wirelessly through Bluetooth®.
Preparation
- Switch on the Bluetooth® feature of the device and put the device near the system.
Pairing a device
Preparation
If this system is connected to a Bluetooth® device, disconnect it (→ "Disconnecting a device").
- Press [
![]() ].
].
If "PAIRING" is shown, continue with step 4. - Press [PLAY MENU] to select "PAIRING".
Or press and hold [![]() –PAIRING] on the main unit until "PAIRING" is shown. Continue with step 4.
–PAIRING] on the main unit until "PAIRING" is shown. Continue with step 4. - Press [
![]() ] to select "OK? YES" and then press [OK].
] to select "OK? YES" and then press [OK].
"PAIRING" is shown.
To cancel, select "OK? NO". - Select "SC-PM250" from the Bluetooth® menu of the device.
If prompted for a passkey, input "0000".
The device connects with this system automatically after pairing is complete.
The name of the connected device is shown for a few seconds.
Note:
You can pair up to 8 devices with this system. If a 9th device is paired, the device that has not been used for the longest time will be replaced.
Connecting a device
Preparation
If this system is connected to a Bluetooth® device, disconnect it (→ "Disconnecting a device").
- Press [
![]() ].
].
"BLUETOOTH READY" is shown. - Select "SC-PM250" from the Bluetooth® menu of the device.
The name of the connected device is shown for a few seconds. - Start playback on the device.
Note:
Disconnecting a device
- Press [
![]() ].
]. - Press [PLAY MENU] repeatedly to select "DISCONNECT?".
- Press [
![]() ] to select "OK? YES" and then press [OK].
] to select "OK? YES" and then press [OK].
"BLUETOOTH READY" is shown.
To cancel, select "OK? NO".
Using the main unit
Press and hold [ –PAIRING] until "PAIRING" is shown.
Note:
A device is disconnected when you:
- Disable the Bluetooth® transmission of the device.
Media playback
The following marks indicate the availability of the feature.
CD: CD-R/RW in CD-DA format or with MP3 files.
USB: USB device with MP3 files.
BLUETOOTH: Bluetooth® device.
Basic playback
CD USB BLUETOOTH
| Play | Press [ ]. ]. | |||||
| Stop | Press [ USB The track is memorised. | |||||
| Pause | Press [ Press again to continue playback. | |||||
| Skip | Press [ CD USB Press [ | |||||
| Search | Press and hold [ ] or [ ] or [ ]. ]. | |||||
 ].
].Note:
Depending on the Bluetooth® device, some operations may not work.
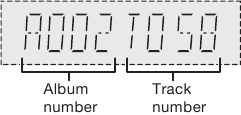
Viewing available information
CD USB BLUETOOTH
You can view the available information on the display panel.
Press [DISPLAY].
Note:
- Maximum characters that can be shown:
CD USB: approximately 32
BLUETOOTH: approximately 16 - Example: MP3 album and track number display.
![]()
Play menu
CD USB
- Press [PLAY MENU] repeatedly to select "PLAYMODE" or "REPEAT".
- Press [
![]() ] to select the setting and then press [OK].
] to select the setting and then press [OK].
| PLAYMODE | |
| OFF PLAYMODE | Cancel the setting. |
| 1-TRACK 1TR | Play one selected track. Press [ ] or [] to select the track. |
| 1-ALBUM 1ALBUM | Play one selected MP3 album. Press [  ] to select the MP3 album. ] to select the MP3 album. |
| RANDOM RND | Play all tracks randomly. |
| 1-ALBUM RANDOM 1ALBUM RND | Play all tracks in one selected MP3 album randomly. Press [ ] to select the MP3 album. |
| REPEAT | |
| OFF REPEAT | Cancel the setting. |
ON REPEAT | Repeat playback. |
Note:
Link mode
BLUETOOTH
You can change the link mode to suit the connection type.
Preparation
If this system is connected to a Bluetooth® device, disconnect it (→ "Disconnecting a device").
- Press [PLAY MENU] repeatedly to select "LINK MODE".
- Press [
![]() ] to select the mode and then press [OK].
] to select the mode and then press [OK]. MODE 1 Emphasis on connectivity. MODE 2
(default)Emphasis on sound quality.
Input level
BLUETOOTH
You can change the input level setting if the sound input level of the Bluetooth® transmission is too low.
- Press [PLAY MENU] repeatedly to select "INPUT LEVEL".
- Press [
![]() ] to select the level and then press [OK].
] to select the level and then press [OK].
![]()

Note:
Select "LEVEL 0" if the sound is distorted.
Note on disc
Note on USB device
Note on MP3 file
MP3 file on disc
- This system can access up to:
MP3 file on USB device
- This system can access up to:
Radio
Preparation
For Australia and New Zealand
Press [RADIO] to select "FM" or "AM".
For others
Press [RADIO].
Manual tuning
- Press [PLAY MENU] repeatedly to select "TUNEMODE".
- Press [
![]() ] to select "MANUAL" and then press [OK].
] to select "MANUAL" and then press [OK]. - Press [
![]() ] or [
] or [![]() ] to tune in to the station.
] to tune in to the station.
To tune automatically, press and hold the button until the frequency starts changing quickly.
"STEREO" is shown when a stereo broadcast is being received.
Memory presetting
You can preset up to 30 FM stations.
For Australia and New Zealand
You can preset up to 15 AM stations.
Automatic presetting
- Press [PLAY MENU] to select "A.PRESET".
- Press [
![]() ] to select the setting and then press [OK].
] to select the setting and then press [OK].
The tuner presets all the stations it can receive into the channels in ascending order.LOWEST Tuning begins from the lowest frequency. CURRENT Tuning begins from the current frequency.
To cancel, press [![]() ].
].
Manual presetting
- Press [PLAY MENU] repeatedly to select "TUNEMODE".
- Press [
![]() ] to select "MANUAL" and then press [OK].
] to select "MANUAL" and then press [OK]. - Press [
![]() ] or [
] or [![]() ] to tune in to the station.
] to tune in to the station. - Press [OK].
- Press [
![]() ] to select a preset number and then press [OK].
] to select a preset number and then press [OK].
Do steps 3 through 5 again to preset more stations. The new station replaces any station that occupies the same preset number.
Selecting a preset station
- Press [PLAY MENU] repeatedly to select "TUNEMODE".
- Press [
![]() ] to select "PRESET" and then press [OK].
] to select "PRESET" and then press [OK]. - Press [
![]() ] or [
] or [![]() ] to select the preset station.
] to select the preset station.
Improving the sound quality
When "FM" is selected
- Press [PLAY MENU] repeatedly to select "FM MODE".
- Press [
![]() ] to select "MONO" and then press [OK].
] to select "MONO" and then press [OK].
To cancel, select "STEREO".
"MONO" is also cancelled when you change the frequency.
To memorise the setting
Continue with step 4 of "Manual presetting".
Checking the signal status
When "FM" is selected
For Continental Europe, the United Kingdom and Ireland
Press [PLAY MENU] repeatedly to select "FM STATUS" and then press [OK].
For others
Press [DISPLAY].
| FM | The FM signal is in monaural. The system is not tuned in to a station. |
| FM ST | The FM signal is in stereo. |
| FM MONO | "MONO" is selected as the "FM MODE". |
RDS broadcasting
For Continental Europe, the United Kingdom and Ireland
This system can show the text data transmitted by the radio data system (RDS) available in some areas.
Press [DISPLAY].
| PS | Programme service |
| PTY | Programme type |
| FREQ | Frequency |
Note:
RDS may not be available if the reception is poor.
AM allocation setting
For Australia and New Zealand
This system can also receive AM broadcasts allocated in 10 kHz steps.
- Press [RADIO] to select "AM".
- Press and hold [SELECTOR] on the main unit.
After a few seconds, the display panel shows the current minimum radio frequency. Release the button when the minimum frequency changes.
Clock and timers
Setting the clock
This is a 24-hour clock.
- Press [SETUP] repeatedly to select "CLOCK".
- Press [
![]() ] to set the time and then press [OK].
] to set the time and then press [OK].
To check the time
Press [SETUP] repeatedly to select "CLOCK" and then press [OK].
In standby mode, press [DISPLAY].
Note:
Reset the clock regularly to maintain accuracy.
Sleep timer
The sleep timer switches off the system after the set time.
- Press [SETUP] to select "SLEEP".
- Press [
![]() ] to select the setting (in minutes) and then press [OK].
] to select the setting (in minutes) and then press [OK].
To cancel, select "OFF".
![]()

Note:
Play timer
(Except for Bluetooth® source)
You can set the timer to come on at a certain time to wake you up.
Preparation
Set the clock.
- Press [SETUP] repeatedly to select "TIMER ADJ".
- Press [
![]() ] to set the start time and then press [OK].
] to set the start time and then press [OK]. - Do step 2 again to set the end time.
- Press [
![]() ] to select the source you want to play and then press [OK].
] to select the source you want to play and then press [OK].
To start the timer
- Press [SETUP] repeatedly to select "TIMER SET".
- Press [
![]() ] to select "SET" and then press [OK].
] to select "SET" and then press [OK].
"![]() " is shown.
" is shown.
To cancel, select "OFF".
The system must be switched off for the timer to operate.
 " is shown.
To check the setting
Press [SETUP] repeatedly to select "TIMER ADJ" and then press [OK].
In standby mode, press [DISPLAY] two times.
Note:
Sound effects
- Press [SOUND] repeatedly to select the sound effect.
- Press [
![]() ] to select the setting and then press [OK].
] to select the setting and then press [OK].
| PRESET EQ | "HEAVY" (default), "SOFT", "CLEAR", "VOCAL" or "FLAT" |
| BASS | –4 to +4 (default: 0) Using the main unit
|
| TREBLE | –4 to +4 (default: 0) Using the main unit
|
| D.BASS | "ON D.BASS" (default) or "OFF D.BASS" |
| SURROUND | "ON SURROUND" or "OFF SURROUND" (default) |
Others
Auto off
This system automatically switches off when you do not use it for 20 minutes.
- Press [SETUP] repeatedly to select "AUTO OFF".
- Press [
![]() ] to select "ON" and then press [OK].
] to select "ON" and then press [OK].
To cancel, select "OFF".
Note:
This function does not work when you are in radio source or when a Bluetooth® device is connected.
Bluetooth® standby
This function automatically switches on the system when you establish a Bluetooth® connection from a paired device.
- Press [SETUP] repeatedly to select "BLUETOOTH STANDBY".
- Press [
![]() ] to select "ON" and then press [OK].
] to select "ON" and then press [OK].
To cancel, select "OFF".
Checking the software version
- Press [SETUP] repeatedly to select "SW VER." and then press [OK].
The software version is shown. - Press [OK] again to exit.
Maintenance
To clean this system, wipe with a soft, dry cloth.
Troubleshooting
Before requesting service, make the following checks. If you are in doubt about some of the check points, or if the solutions indicated do not solve the problem, consult your dealer for instructions.
Common problems
No operations can be done with the remote control.
Sound is distorted or no sound.
A humming sound can be heard during playback.
Disc
Display not shown correctly.
Playback does not start.
USB
The USB device or the contents in it cannot be read.
Slow operation of the USB device.
The elapsed time shown is different from the actual play time.
Radio
Sound is distorted.
A beat sound is heard.
A low hum is heard during AM broadcast.
Bluetooth®
Pairing cannot be done.
- Check the Bluetooth® device condition.
The device cannot be connected.
The device is connected but audio cannot be heard through the system.
- For some built-in Bluetooth® devices, you have to set the audio output to "SC-PM250" manually. Read the operating instructions of the device for details.
Sound from the device is interrupted.
Playback image and sound are not synchronised.
Main unit displays
"--:--"
"ADJUST CLOCK"
"ADJUST TIMER"
"AUTO OFF"
"ERROR"
"F61"
"F77"
"F70"
- Examine the Bluetooth® device.
- Disconnect the Bluetooth® device. Switch off the system and then switch on again.
"F76"
"NODEVICE"
"NO DISC"
"NO PLAY"
"PLAYERROR"
"REMOTE 1"
"REMOTE 2"
- The remote control and the main unit are using different codes. Change the code of the remote control.
- When "REMOTE 1" is shown, press and hold [OK] and [
![]() ]for a minimum of 4 seconds.
]for a minimum of 4 seconds.
- When "REMOTE 1" is shown, press and hold [OK] and [
"USB OVER CURRENT ERROR"
"–VBR–"
Remote control code
When other Panasonic equipment responds to the remote control of this system, change the remote control code for this system.
Preparation
Press [USB/CD] to select "CD".
To set the code to "REMOTE 2"
- Press and hold [SELECTOR] on the main unit and [USB/CD] on the remote control.
"REMOTE 2" is shown. - Press and hold [OK] and [USB/CD] for a minimum of 4 seconds.
To set the code to "REMOTE 1"
- Press and hold [SELECTOR] on the main unit and [
![]() ] on the remote control.
] on the remote control.
"REMOTE 1" is shown. - Press and hold [OK] and [
![]() ] for a minimum of 4 seconds.
] for a minimum of 4 seconds.
System memory reset
Reset the memory when the following situations occur:
- Disconnect the AC mains lead.
- While you press and hold [
![]() /I] on the main unit, connect the AC mains lead again.
/I] on the main unit, connect the AC mains lead again.
Continue to press and hold the button until "– – – – – – – –" is shown. - Release [
![]() /I].
/I].
All the settings are set back to the factory preset. It is necessary to set the memory items again.
About Bluetooth®
Panasonic cannot be held responsible for data and/or information that can possibly be compromised during a wireless transmission.
Frequency band
Certification
- The actions below are punishable by law:
Restrictions of use
- Wireless transmission and/or usage with all Bluetooth® equipped devices is not guaranteed.
- This system supports Bluetooth® security features. But depending on the operating environment and/or settings, this security is possibly not sufficient. Transmit data wirelessly to this system with caution.
- This system cannot transmit data to a Bluetooth® device.
Range of use
Interference from other devices
- This system may not function properly and troubles such as noise and sound jumps may arise due to radio wave interference if this unit is located too close to other Bluetooth® devices or the devices that use the 2.4 GHz band.
Intended usage
Licenses
| MPEG Layer-3 audio coding technology licensed from Fraunhofer IIS and Thomson. |
| The Bluetooth® word mark and logos are owned by the Bluetooth SIG, Inc. and any use of such marks by Panasonic Corporation is under license. Other trademarks and trade names are those of their respective owners. |
Making the connections
Connect the AC mains lead only after all the other connections have been made.
The illustrations shown are of the model for Australia and New Zealand. Your unit may differ in appearance.

- Connect the FM indoor antenna.
Place the antenna where reception is best.
![]()
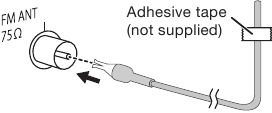
For the United Kingdom and Ireland
Connect the FM outdoor antenna.
Use an outdoor antenna if the reception is poor.

![]()
Keep the antenna plug adaptor out of reach of children to prevent swallowing.Note:
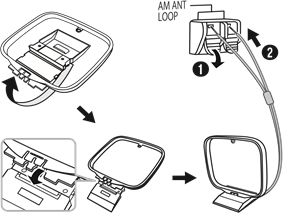
- For Australia and New Zealand
Connect the AM loop antenna.
Stand the antenna up on its base until it clicks.
![]()
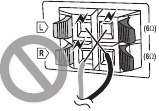
- Connect the speakers.
![]()
Be careful not to cross (short-circuit) or reverse the polarity of the speaker wires as doing so may damage the speakers.
![]()
- Connect the AC mains lead.
(For the AC mains plug of three pins)
READ THE "Caution for AC mains lead" BEFORE CONNECTION.
![]()
Do not use an AC mains lead from other equipment.


Conserving power
The system consumes a small amount of power (→ "Specifications") when it is in standby mode. Disconnect the power supply if you do not use the system.
Some settings will be lost after you disconnect the system. You have to set them again.
Your system and the illustrations can look differently. These operating instructions are applicable to the following system.
| System | SC-PM250 |
| Main unit | SA-PM250 |
| Speakers | SB-PM02 |
Back of product
Supplied accessories
Check and identify the supplied accessories.
For the United Kingdom and Ireland
Use numbers indicated in parentheses when asking for replacement parts. (Product numbers correct as of February 2014. These may be subject to change.)
- For the United Kingdom and Ireland
1 AC mains lead (K2CT2YY00097) - For Continental Europe, Australia and New Zealand
1 AC mains lead - For Asia and the Middle East
3 AC mains leads
![]()
- For Australia and New Zealand
1 AM loop antenna - For the United Kingdom and Ireland
1 Antenna plug adaptor (K1YZ02000013) - 1 FM indoor antenna (RSAX0002)
![]()
- 1 Remote control (N2QAYB000984)


Safety precautions

Unit
- To reduce the risk of fire, electric shock or product damage,
AC mains lead

Unit
- To reduce the risk of fire, electric shock or product damage,
- For Asia and the Middle East
This unit is intended for use in tropical climates.
For others
This unit is intended for use in moderate climates.
Battery
Caution for AC mains lead
(For the AC mains plug of three pins)
For your safety, please read the following text carefully.
This appliance is supplied with a moulded three pin mains plug for your safety and convenience.
A 5-ampere fuse is fitted in this plug.
Should the fuse need to be replaced please ensure that the replacement fuse has a rating of 5-ampere and that it is approved by ASTA or BSI to BS1362.
Check for the ASTA mark ![]() or the BSI mark
or the BSI mark ![]() on the body of the fuse.
on the body of the fuse.
If the plug contains a removable fuse cover you must ensure that it is refitted when the fuse is replaced.
If you lose the fuse cover the plug must not be used until a replacement cover is obtained.
A replacement fuse cover can be purchased from your local dealer.
Before use
Remove the connector cover.
How to replace the fuse
The location of the fuse differ according to the type of AC mains plug (figures A and B). Confirm the AC mains plug fitted and follow the instructions below.
Illustrations may differ from actual AC mains plug.
- Open the fuse cover with a screwdriver.

- Replace the fuse and close or attach the fuse cover.


Disposal of Old Equipment and Batteries
Only for European Union and countries with recycling systems

These symbols on the products, packaging, and/or accompanying documents mean that used electrical and electronic products and batteries must not be mixed with general household waste.
For proper treatment, recovery and recycling of old products and used batteries, please take them to applicable collection points in accordance with your national legislation. By disposing of them correctly, you will help to save valuable resources and prevent any potential negative effects on human health and the environment.
For more information about collection and recycling, please contact your local municipality.
Penalties may be applicable for incorrect disposal of this waste, in accordance with national legislation.
Note for the battery symbol (bottom symbol):

This symbol might be used in combination with a chemical symbol. In this case it complies with the requirement set by the Directive for the chemical involved.
Sales and Support Information
For the United Kingdom and Ireland
Customer Communications Centre
- For further support on your product, please visit our website: www.panasonic.co.uk
Direct Sales at Panasonic UK
- Or go on line through our Internet Accessory ordering application at www.pas-europe.com.
Specifications
Amplifier section
RMS output power stereo mode
Front Ch (both ch driven) 10 W per channel (6 Ω), 1 kHz, 10% THD
Total RMS stereo mode power 20 W
For Asia and the Middle East
PMPO output power 220 W
Tuner, terminals section
Preset memory FM 30 stations
For Australia and New Zealand
AM 15 stations
Frequency modulation (FM)
Frequency range 87.50 MHz to 108.00 MHz (50 kHz step)
Antenna terminals 75 Ω (unbalanced)
For Australia and New Zealand
Amplitude modulation (AM)
Frequency range 522 kHz to 1629 kHz (9 kHz step)
520 kHz to 1630 kHz (10 kHz step)
Disc section
Disc played (8 cm or 12 cm) CD, CD-R/RW (CD-DA, MP3![]() )
)
Pick up
Wavelength 790 nm (CD)
![]() MPEG-1 Layer 3, MPEG-2 Layer 3
MPEG-1 Layer 3, MPEG-2 Layer 3
USB section
USB port
USB standard USB 2.0 full speed
Media file format support MP3 (*.mp3)
USB device file system FAT12, FAT16, FAT32
USB port power DC OUT 5 V, 500 mA
Bluetooth® section
Version Bluetooth® Ver. 2.1 + EDR
Class Class 2
Supported profiles A2DP, AVRCP
Operating frequency 2.4 GHz band FH-SS
Operation distance 10 m line of sight
Speaker section
Speaker unit(s)
Full range 10 cm cone type x 1 per channel
Impedance 6 Ω
Dimensions (W x H x D) 139 mm x 224 mm x 136 mm
Mass 1.3 kg
General
Power supply
For Asia and the Middle East AC 110 V to 240 V, 50/60 Hz
For others AC 220 V to 240 V, 50 Hz
Power consumption 14 W
Dimensions (W x H x D) 184 mm x 123 mm x 228 mm
Mass 1.1 kg
Operating temperature range 0°C to +40°C
Operating humidity range 35% to 80% RH (no condensation)
Power consumption in standby mode
(With "BLUETOOTH STANDBY" set to "OFF")
0.2 W (approximate)
Power consumption in standby mode
(With "BLUETOOTH STANDBY" set to "ON")
0.3 W (approximate)
Note:
Manufactured by: Panasonic Corporation
Kadoma, Osaka, Japan
Importer for Europe: Panasonic Marketing Europe GmbH
Panasonic Testing Centre
Winsbergring 15, 22525 Hamburg, Germany

Panasonic Corporation
Web Site: http://panasonic.net
© Panasonic Corporation 2014

Documents / Resources
References
Electronics, Beauty & Appliances | Panasonic UK & Ireland
![www.pas-europe.com]() Panasonic UK/Eire Spare Part Sales
Panasonic UK/Eire Spare Part SalesPanasonic Holdings Corporation

Download manual
Here you can download full pdf version of manual, it may contain additional safety instructions, warranty information, FCC rules, etc.
Thank you! Your question has been received!


Need Assistance?
Do you have a question about the SC-PM250 that isn't answered in the manual? Leave your question here.