Table of Contents
Quick Links
DLP PROJECTOR
USER'S GUIDE
Thank you for purchasing the DLP Projector.
Please read this user's guide to ensure correct use of the device. Save this user's guide
for future reference.
OUTLINE
This DLP Projector can display various computer signals and NTSC/PAL/SECAM video
signals.
FEATURES
1. High Brightness
2. High Resolution
3. Compact Size, Feather Weight for Portability
4. Durable Magnesium Alloy Body
5. RGB input Terminal
6. One Touch Auto-Adjustment Function
7. Easy Keystone Adjustment
Table of Contents

Related Manuals for LG 1024X768 XGA


Summary of Contents for LG 1024X768 XGA
- Page 1 Thank you for purchasing the DLP Projector. Please read this user’s guide to ensure correct use of the device. Save this user’s guide for future reference. OUTLINE This DLP Projector can display various computer signals and NTSC/PAL/SECAM video signals. FEATURES 1. High Brightness 2.
- Page 2 Copyright Copyright © 2003. All rights reserved. No part of this publication may be reproduced, transmitted, transcribed, stored in a retrieval system or translated into any language or computer language, in any form or by any means, electronic, mechanical, magnetic, optical, chemical, manual or otherwise, without the prior written permission of the company.
-
Page 3: Table Of Contents
Projector Description ........ - Page 4 Projector Specifications ........
-
Page 5: Introduction
ATE YOUR PROJECTOR. SAVE THIS USER’S GUIDE FOR FUTURE REF- ERENCE . Safety Instructions Read this user’s guide before you operate your projector and save it for future reference. The lamp becomes extremely hot during operation. Allow the projector to cool for approximately 45 minutes prior to removing the lamp assembly for replacement. -
Page 6: Fcc Statement
• Always open the lens shutter when the projector lamp is on. • Do not look straight at the projector lens during operation. The intense light beam may damage your eyes. • In some countries, the line voltage is NOT stable. This projector is designed to operate safely within a bandwidth of 100 to 240 volts, but could fail if power cuts or surges of + 10 volts occur. -
Page 7: Shipping Contents
Shipping Contents The Projector is shipped with the cables required for connection to standard PC or laptop computers. Carefully unpack and verify that you have all the items shown below. If any of these items are missing, please contact personnel at the place of purchase. -
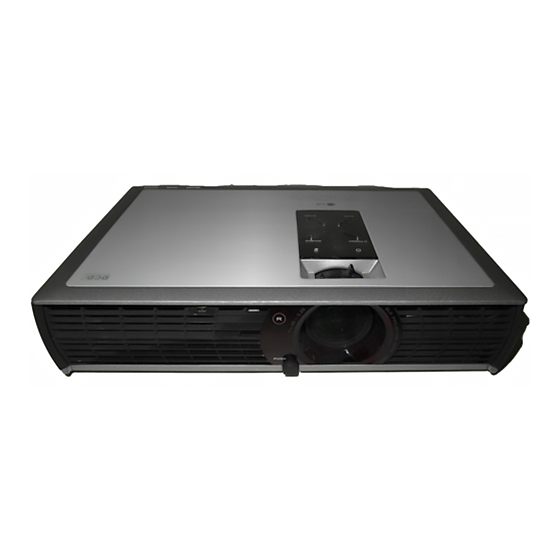
Page 8: Projector Description
IR remote sensor External control panel Projection lens "External Control Panel" on adjuster (see page 5 Projection lens DLP Personal Projector USB MOUSE connector VIDEO connector S-VIDEO connector AC power cord inlet Kensington lock for more detailed information) Open here to release the front cover. -
Page 9: External Control Panel
See “Lamp Information” on page 20 for more detailed information. SOURCE Selects signal sources from among PC, Video, S-Video and YP BLANK Selects to display an entirely blue, black, green or LG logo screen. DLP Personal Projector Lamp indicator SOURCE BLANK... -
Page 10: Adjuster
Lift the projector up and press the adjuster button to release the adjuster. The adjuster will drop into position and be locked. Note: The adjuster can only bear the weight of the projector itself . Please do not place any additional weight burden on it. -
Page 11: Remote Control Description
Remote Control Description The remote control sensors are located in the front/ back of the projector. POWER SOURCE Selects signal sources from among PC, VIDEO, S-VIDEO and YP L-Mouse/ R-Mouse Serves as a left/ right click button of a mouse when the remote mouse function is activated. - Page 12 "ENTER" button and then it can be adjusted by Joystick. DLP Personal Projector MOUSE DRAG When the remote control works as a mouse, choose your desired item and press MOUSE DRAG.
-
Page 13: Installing Or Replacing Batteries
Dispose of used batteries according to the manufacturer’s instructions. Install batteries as indicated by the diagram inside the compartment. DLP Personal Projector Position the lid over the compartment and snap it back into place. -
Page 14: Installation
INSTALLATION Display Size Place the projector at the required distance from the screen according to the desired picture size (see the table below). The effective display size is from 26 to 178 inches diagonally for RD-JT31 and from 33 to 228 inches diagonally for RD- JT30. -
Page 15: Connecting To Various Equipment
) OSD selections. Connecting to Various Equipment It only takes a few seconds to connect your projector to your desktop or notebook computer, VCR, or other systems. However, a Mac adapter (an optional accessory) is needed for connection to Macintosh computers. -
Page 16: Operation
When plugging-in, the ORANGE Leds light. Press the Power button to turn on the projector. Then, the fan will start to operate while the ORANGE Led is blinking. After 15 seconds, LG logo will display and pictures will be on after the next 15 seconds. (Green Led on) Switch on all connected equipment. -
Page 17: Digital Keystone Correction
In some cases, you may need to optimize the picture quality. To do this, press the AUTO key on the control panel of the projector or on the remote control. The built-in Intelligent Auto Adjustment function will re-adjust settings to provide the best picture quality. -
Page 18: Source Selection
Source Selection When several input sources are available, press the SOURCE key to make a selection from the control panel of the projector or the remote control. Menu System Press Menu for the main menu, and then press Joystick to select a sub-menu. -
Page 19: Video Menu
Increases or decreases the color temperature (R, G, B) of the Color R image. Color G Color B *This function is only available when the input mode is PC. Reset Returns all settings to the factory preset values. DESCRIPTION DLP Personal Projector... -
Page 20: Position Menu
4:3 and 16:9. When in PC mode, users have two options for the image ratio: Resize Scaled and Original. JT30(XGA) operates in SVGA and VGA modes and JT31(SVGA) operates only in VGA mode. DLP Personal Projector... -
Page 21: Special Menu
English, French, German, Italian, Spanish, Korean, Simpli- fied Chinese and Traditional Chinese. Default Flip Horizontal Default Flip Vertical Chooses blank image from among blue, black, green and LG Blank Image logo. Lamp Time Shows lamp usage time. DESCRIPTION Projects images when the projector is 180 degrees horizontally rotated. -
Page 22: Tracking Menu
This sub-menu only works in PC mode. FUNCTION DESCRIPTION It’s the same function with the AUTO button on the Auto Tracking remote control. Clock Adjusts to fit in the desired image size. Adjusts to avoid the occurrence of flicker. Phase DLP Personal Projector... -
Page 23: Shutdown
To cool down the projector, the fan will continue to run for approximately 90 seconds, during which the LED will flash. * After the projector is turned off, there is a 90-second cooling period before the projector can be re-started. -
Page 24: Maintenance
Lamp Replacement Please check with LG service center for the information of lamp replacement. Caution HIGH VOLTAGE/ HIGH TEMPERATURE/ HIGH PRESS WHEN REPLACING THE LAMP, TURN OFF THE PROJECTOR AND PULL OUT THE CORD FROM THE RECEPTACLE BEFORE REPLACING THE LAMP. -
Page 25: Operative Information
Error Toggle Lamp Case Green Open LEDs Display Status LED Projector runs as Normal State. No color Lamp Time < 1400 hours Temperature < 72°C Orange Check whether the Lamp is lit or not. Orange Tog- 1400 hours < Lamp Time < 1500 hours Lamp Time >... -
Page 26: Troubleshooting
• Select the correct video system. • Adjust brightness, contrast, or saturation. • Press Auto on the control panel of the projector or the remote control unit to get better picture quality. • Adjust the focus. • Reposition the unit to improve its projection angle. -
Page 27: Specifications
RGB input (HDTV: YP Video signal input S-VIDEO VIDEO Output USB mouse connector Personal Projector RD-JT30 1024X768 XGA RD-JT31 800X600 SVGA 1-CHIP DMD F/2.4 150W NSH lamp AC100 ~ 240V, 3A, 50/60 Hz (Automatic) 250 W (Max) 248 mm (W) x 59 mm (H) x 170 mm (D) 3 lbs (1.7 Kg) -
Page 28: Timing Chart
31.5 37.9 31.5 37.9 31.5 35.0 37.9 43.3 35.2 37.9 48.1 46.9 53.7 49.7 48.4 56.5 60.0 68.7 64.0 DLP Personal Projector Remark 70.1 85.1 VESA 70.0 85.1 VESA 60.0 VESA 66.7 Macintosh 72.8 VESA 85.0 VESA 56.3 VESA 60.3 VESA 72.2... -
Page 29: Dimensions
DIMENSIONS Unit: mm DLP Personal Projector...