
Related Manuals for Philips Pocket Memo DPM8900


Summary of Contents for Philips Pocket Memo DPM8900
- Page 1 Register your product and get support at www.philips.com/dictation DPM8900 English Italiano Deutsch Français Nederlands Español...
-
Page 3: Table Of Contents
Connect the remote control Hands-free recording Connect and position the meeting microphones Hands-free transcription Install the recorder Use Philips SpeechExec software Insert and eject the memory card Advanced configuration Charge the battery Download recordings to the computer Charge using the docking station... - Page 4 Delete all File information Record menu Profile Line-in Record notification beep Edit mode Encryption Voice activation Display menu Brightness Backlight Appearance Record lamp Language Device menu Beep Acoustic feedback Power save Date & time Slide switch Auto backspace Device information Format card USB charge USB audio...
-
Page 5: Important
1 Important • Only Philips rechargeable Li-ion batteries ACC8100 (and no others) can be charged in the device. Replace only with the same or equivalent type. • Remove the battery from the device if it will not be used for an extended period of time. -
Page 6: Legal Restrictions On Recording
About this user manual temporarily discontinue use. • Do not use headphones while operating a motorized vehicle, cycling, or skateboarding, etc. You could be a hazard to your- You can find a quick overview of your device in the following self and other road users, and possibly be breaking the law. -
Page 7: Your Digital Dictation Recorder
2 Your digital dictation What's in the box recorder We are delighted that you have chosen a Philips device. Visit our website for comprehensive support such as user manuals, software downloads, warranty information and more: www . philips . com / dictaton. -
Page 8: Overview Of The Recorder
Overview of the recorder a LED light • Red: device is recording in overwrite or append mode • Green: device is recording in insert mode • Yellow: data is being transferred to/from the computer b Microphones c Screen d Function keys F1, F2, F3 •... -
Page 9: Start-Up Screen
File is encrypted ( Encryption, p. 27) A foot switch is connected to the docking station • The recorder can be used for hands-free recording and transcription by connecting the optional Philips foot switch to the docking station. Hands-free recording and transcription, p. 22. -
Page 10: Overview Of The Docking Station
USB port v Current file number/Total number of files • Micro USB connection for the computer Foot pedal port • Connect the Philips foot control LFH2210 (optional) for hands-free dictation and transcription. Hands-free recording and transcription, p. 22. Power adapter port... -
Page 11: Overview Of The Remote Control
Overview of the remote control a REC Start/Stop recording b Insert an index mark c EOL/File lock, Priority • Mark a file as finished and protect it from being deleted • Prioritize urgent recordings during transcription... -
Page 12: Get Started
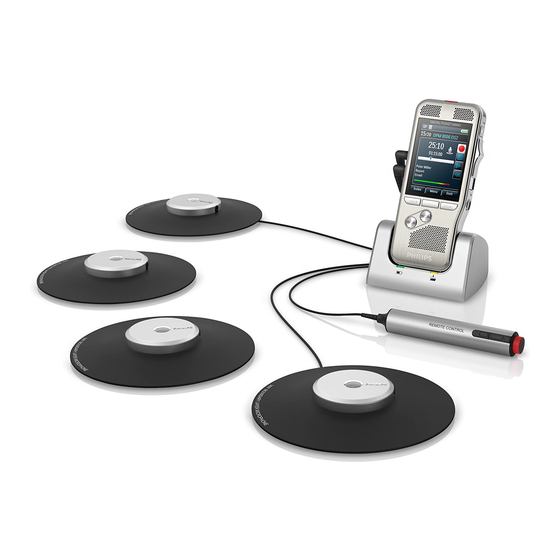
3 Get started Connect and position the meeting microphones Connect the plug of splitter cable to the microphone (MIC) socket of the recorder. Caution Connect the plug of each microphone to one socket of the • Ensure you have read the safety instructions before you splitter cable connect and install your recorder. -
Page 13: Install The Recorder
Install the recorder Note 2 m / 6.5 ft. • Charge the battery for 3 hours before first use. 13 m / 42.5 ft. The battery is pre-installed in the recorder. Pull the battery tape off from the battery door before charging. 2 m / 6.5 ft. -
Page 14: Charge The Battery
• Do not remove the memory card while recording is in progress. Data may be damaged or lost. Charge using the USB cable • Philips uses approved industry standards for memory cards, but some brands may not be fully compatible with your device. Using an incompatible memory card may damage Plug the USB connector into a USB port on your computer. -
Page 15: Initial Installation Process
Initial installation process Power-save mode The initial installation process starts when first using the device By default, the recorder will enter power-save mode after 5 or possibly if there has been a long interruption to the power minutes of inactivity. Lift up the recorder or press any button to supply. -
Page 16: Use Your Recorder
Add to or overwrite a recording The recorder can be used for hands-free recording by con- necting the optional Philips foot switch to the docking station. You can edit an existing recording by overwriting a part of it or Hands-free recording, p. 22. -
Page 17: Playback
Playback • Insert mode: insert additional recording without overwriting existing recording in a file. X The symbol is displayed in the information bar at the Selecting a file top of the screen when in insert mode and the LED lights in green while recording. Press + while the device is in stop mode. -
Page 18: Adjusting Playback Speed
Delete Adjusting playback speed Press F3 (Speed) repeatedly during playback to toggle You can delete individual files from the device, part of a file or between faster, slower and normal playback speed. delete all files simultaneously. X Playback speed becomes faster (+30 %) and the D icon will be displayed. -
Page 19: Delete All Files
Delete all files While the recorder is in stop mode, press F2 (Menu) and select File > Delete all. Press F2 (OK) to confirm the deletion. X All files are deleted. -
Page 20: Use More Of Your Recorder
5 Use more of your Index marks recorder Index marks can be used to mark certain points in a recording as points of reference. To add an index mark, press F1 (Index) during recording or playback. Voice-activated recording X The index number is displayed for one second. X Up to 32 index marks can be set per file. -
Page 21: Assign Keywords (Author Id And Work Type)
Note tion bar. To locate an instructions, press + / – while the recorder is in • Keywords must first be set up with Philips Speech Exec software. Advanced configuration, p. 24. stop mode ( Selecting a file, p. 17). • By default, the keyword category Author with the To delete an instruction, follow the steps for deleting a part keywords ‘DPM8900’... -
Page 22: File Lock And Priority
The recorder can be used for hands-free recording and tran- ing accidentally deleted and mark them as finished. With the scription by connecting the optional Philips foot pedal LFH2210 priority-setting option, urgent recordings can be prioritized to the docking station. In this operating mode, you can control during transcription. -
Page 23: Hands-Free Transcription
• T (Toggle) position: Press and release the right pedal to start recording. For short pauses, press the right pedal Connect the optional Philips foot pedal to the food pedal of the foot pedal again. To continue recording, press the... -
Page 24: Use Philips Speechexec Software
Connect the recorder to the computer using the USB cable Advanced configuration or the docking station. Philips SpeechExec software provides a wizard that guides users By default, the recordings on the recorder will be down- through the configurations and settings of the device. The wizard... -
Page 25: Settings
Slide switch Note Auto backspace Device information • Some settings, such as defining keywords, file encryption or Format card device lock, are available only through Philips SpeechExec USB charge software. Advanced configuration, p. 24. USB audio Hands-free mode Menu list... -
Page 26: File Menu
Keywords can be controlled by the integrated motion sensor. The motion used to identify recordings and automatic file routing in Philips sensor senses when the device is placed on the desk SpeechExec software. Assign keywords (author ID and work or held in the hand and sets the microphone mode type), p. -
Page 27: Line-In
• All recording profiles can be customized with Philips • Encrpyted files can only be played with Philips Speech Exec SpeechExec software. Advanced configuration, p. 24. software. -
Page 28: Display Menu
Record lamp You can customize the functionality of the slide switch. By default, Enable/disable the LED light. the slide switch is set to International. Position Interna- Philips Philips German tional classic* Language Set the language for the device’ s user interface: English, Deutsch, FranÇais, Español, Italiano. -
Page 29: Device Information
Hands-free mode The recorder can be used for hands-free recording and tran- scription by connecting the optional Philips foot switch LFH2210 to the docking station. In this operating mode, you can control the recording and playback functions with the foot switch. -
Page 30: Service
Failure to properly update the firmware may result in the device malfunctioning. • Press F1 (Back) to cancel the operation. • Firmware updates can be performed automatically via Philips SpeechExec software. Use Philips SpeechExec software, p. 24. -
Page 31: Troubleshooting
Troubleshooting Problem Possible cause/solution The device does not turn on • Battery is empty. X Recharge the battery. • The device is turned off. X Turn the power on. Power on/off, p. 14. • The device is in power-save mode. X Lift up the recorder or press any button to reactivate it. -
Page 32: Technical Data
• Speaker output power: 200 mW • Docking connector • Memory card slot Power • Battery type: Philips rechargeable Li-ion battery ACC8100 • Battery lifetime: up to 27 hours of recording (QP mode), up Display • Type: color TFT to 200 hours standby •... -
Page 33: Declaration Of Conformity
2006/95/EC, 2004/108/EC Canadian interference-causing equipment regulations. and 2009/125/EC. A complete declaration of conformity for this product is available at www . philips . com / dictation. Avis Canadien Neither Speech Processing Solutions GmbH nor its affiliates shall Cet appareil numérique de la classe B respecte toutes les exi-... - Page 34 Specifications are subject to change without notice. © 2013 Speech Processing Solutions GmbH. All rights reserved. Philips and the Philips’ shield emblem are registered trademarks of Koninklijke Philips N.V. and are used by Speech Processing Solutions GmbH under license from Koninklijke Philips N.V. All trademarks are the property of their respective owners.