Motorola CLEARTONE CM5000 Feature User Manual
Hide thumbs
Also See for CLEARTONE CM5000:
- Basic service manual (142 pages) ,
- Installation manual (104 pages) ,
- User manual (212 pages)

Related Manuals for Motorola CLEARTONE CM5000


Summary of Contents for Motorola CLEARTONE CM5000
- Page 1 CLEARTONE CM5000 FEATURE USER GUIDE January 2012 *6866539D54* 6866539D54-E © 2012 Motorola Solutions, Inc. All rights reserved.
-
Page 3: Table Of Contents
Contents General Information ......Safety Information ........Copyright Information . - Page 4 DMO Calls ........Selecting Gateway or Repeater Mode Operation ..General .
- Page 5 Selecting DMO Group Call via Repeater ....Selecting DMO Group Call via Gateway and Repeater . . . Making Group Call ....... . . Receiving Group Call .
- Page 6 Menu Icons ........List of Menu Items .
- Page 7 Networks ........Location ........Packet Data .
- Page 8 For technical support on this product call the helpdesk on 0044 1256 484433 during normal office hours. In case of a defect device please contact your local dealer.
-
Page 9: General Information
Exposure booklet (Motorola Publication part number 6866537D37 for Europe, Middle East and Africa) enclosed with your terminal. • Motorola recommends the usage of Motorola approved accessories only. • Only specialized workshops should be contacted for installation, maintenance and repair work. -
Page 10: Computer Software Copyrights
Motorola. Furthermore, the purchase of Motorola products shall not be deemed to grant either directly or by implication, estoppel, or otherwise, any license under the copyrights, patents or patent applications of Motorola, except for the normal non-exclusive license to use that arises by operation of law in the sale of a product. -
Page 11: Getting Started
Getting Started This manual contains everything you need to know about how to operate your CM5000 Repeater. If you have any questions regarding the operation and care of this mobile device please contact your local dealer. You can display different languages on your mobile, for more information please refer to the relevant section in this handbook. -
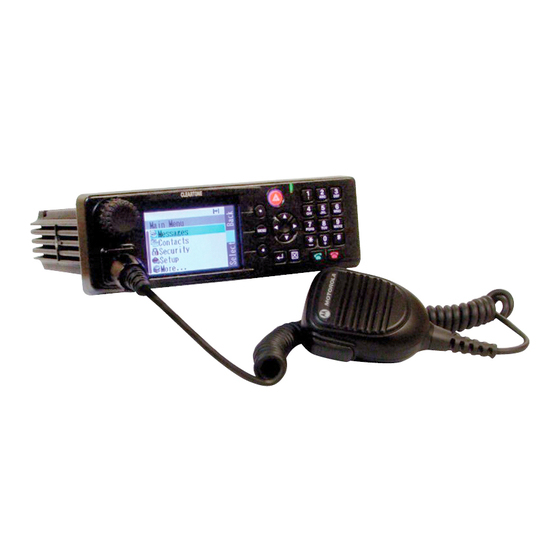
Page 12: Controls And Indicators
Controls and Indicators Item Description Rotary Knob Pressing turns the radio ON/OFF Adjust the volume level Microphone Connector Provides connection for a fist microphone Soft Key(s) Press to select the option that is shown on the display Menu Button Used to enter the main menu. -
Page 13: Powering On/Off
Item Description Emergency Key Used to send Emergency Alarms. Navigation Keys Press up, down, left or right for scrolling or text editing. Enter Key Used to select the required item. Clear Key Used to clear character or back to the previous screen. Alphanumeric Keypad Used to enter alphanumeric characters for dialling, address book entries and text messages. -
Page 14: Powering On (Emergency Button)
Powering On (Emergency Button) Press and hold the Emergency button to power on. The CM5000 will power On in Emergency Operation or in standard mode (as programmed). The terminal powers On and Off without visible and audible notification if Silent Emergency Mode is activated. It is not recommended to use Silent Emergency with a SIM PIN protected radio as there is no indication to the user when the PIN number is required. -
Page 15: Powering On With Sim Card Authentication
Powering On with SIM Card Authentication The SIM card stores the keys for End-to-End Encryption. 1. Press and hold the Rotary Knob to power on. 2. Ignore or Update the End-to-End Encryption keys when prompted for New Key?. 3. In the Home display the End-to-End Encryption icon appears. -
Page 16: Unlocking The Cm5000
Unlocking the CM5000 Your CM5000 may be locked at power up. To unlock the CM5000 after powering on, enter the code at the prompt. The CM5000 enters the default Home display. The unlock code is originally set to 0000. Your Service Provider may change this number before you receive your terminal. -
Page 17: The Display
The Display Home (Idle) Display A powered-on, idle terminal shows the following typical Home display: Trunked Mode Home Display status icon area soft key area menu/context sensitive icon soft key area text display area Direct Mode Home Display status icon area soft key area menu/context sensitive icon soft key area... - Page 18 Icon Description New Message Has Arrived Indicates a new message just arrived. It disappears on changing the display. New Message(s) in Inbox Indication of unread message in stack. It disappears when new message has been read. All Tones Off No alert tones will be heard. The screen will display incoming calls.
-
Page 19: The Led Status Indicator
Icon Description Gateway Mode Indicates in-service state for Gateway Mode. Indicates CM5000 fixed communication through Gateway. Repeater Mode Indicates in-service state for Repeater Mode. Indicates CM5000 fixed communication through Repeater. The LED Status Indicator The LED indicator shows the in-service states of your CM5000. -
Page 20: Menu Button
Menu Button Press the Menu button to enter: • The menu (when there is no on-going activity). The CM5000 menus allow you to control your CM5000 settings. Menus are organised in a hierarchy. See “List of Menu Items” on page 53. The menu options provide access to a further list of options called a sub-menu. -
Page 21: Screen Saver
Screen Saver If your Service Provider configured this feature, the screen saver will automatically cover the CM5000 display after the CM5000 stays idle for a pre-programmed period of time. If you press a key or a call arrives, the screen saver is deactivated and the CM5000 resumes standard operation. -
Page 22: Selecting Tmo Or Dmo Operation
Selecting TMO or DMO Operation General In Trunked Mode Operation (TMO) the CM5000 is used with the infrastructure services within system coverage. In Direct Mode Operation (DMO) the CM5000 is used without infrastructure services required. While operating in DMO the propagation travels directly from the transmitting terminal antenna to the receiving terminal antenna, with no assistance from any base station or tower. -
Page 23: Tmo Calls
• Press the Menu button and select More... > Networks > Trunked Mode if the CM5000 is in DMO. • Press the Menu button and select More... > Networks > Direct Mode if the CM5000 is in TMO. Your terminal can alert you of an incoming call. Select the alert settings in the Tones menu items. -
Page 24: Entering Gateway Mode
In Repeater Mode Operation the CM5000 re-transmits information received from one DMO terminal to other DMO terminal enhancing coverage area. Entering Gateway Mode When the radio is in Gateway Mode, the radio will work only as a gateway radio. It cannot work as a standard TMO/DMO radio (the user cannot press PTT button, cannot hear the communication voice, etc.). -
Page 25: Entering Repeater Mode
Entering Repeater Mode When the radio is in Repeater Mode, the radio will work only as a gateway radio. It cannot work as a standard TMO/DMO radio (the user cannot press PTT button, cannot hear the communication voice, etc.). When your CM5000 is in TMO enter Repeater Mode in one of the following ways: •... -
Page 26: Packet Data
Packet Data The Packet Data (PD) Service allows you to transfer data in a TETRA system using the Internet Protocol (IP). Check with your Service Provider for the availability of this feature. For transferring data from a standard computer over the air connect the computer via the Active Data Cable GMKN1022 with your CM5000. - Page 27 Error Message Description Encryption Key Error When SCK key(s) have been lost or not programmed and encryption is enabled, this message is displayed. Under this condition, it is not possible to use the radio: i.e. the menu access, entering the "Optional Features Menu"...
-
Page 29: Trunked Mode Operation - Tmo
Trunked Mode Operation - TMO General A Group Call is an instant communication between you and others in a talkgroup that you select. Participants may join (late entry) and leave an on-going Group Call. A talkgroup is a pre-defined set of subscribers enabled to participate in and/ or invoke a Group Call, that is set up by your Service Provider. -
Page 30: Selecting A Group
Selecting a Group You can select a talkgroup in one of the following ways, by using the: • folder search. • alphabetical search feature. • index. Using Folder Search From the Home display, press Optns Select a group by folder search (“TG by Folder”). -
Page 31: Changing One Touch Group (Otg) Assignment
Changing One Touch Group (OTG) Assignment To change your OTG assignment, you need to: 1. Go to the list of the talkgroups. 2. Select a group and press Menu button. 3. In the TG List Menu screen, select One Touch Group and press Select. -
Page 32: Receiving Group Call
Group Folder name Group name When you start a call, all members of the selected group who have their units turned on, will receive the Group Call. The “No Group” message is displayed when you are out of the normal coverage area of your selected group. You must then select a new group that is valid for your working location. -
Page 33: Dynamic Group Number Assignment (Dgna)
All CM5000 functions and keys which cause transmission, e.g. registration to the network, change of talkgroup or folder, sending messages, pressing PTT, etc. are disabled. When no danger to safety exists anymore (for instance if you leave the RF sensitive area), the TXI Mode can be deactivated and the CM5000 returns to standard operation. -
Page 34: Selecting Assigned Talkgroup
Selecting Assigned Talkgroup 1. From the Home display, press Optns. Select Assigned TG, and select the desired Assigned Talkgroup. The display shows the Assigned Talkgroups list. 2. Press Attach. The terminal attaches to the Assigned Talkgroup and returns to the Home display. -
Page 35: Direct Mode Operation - Dmo
Direct Mode Operation - DMO DMO Group Call In DMO, the CM5000 can be used without your Service Provider’s infrastructure. Direct Mode (DMO) allows communication with other terminals also operating in Direct Mode, which are on the same frequency and talkgroup as your CM5000. -
Page 36: Selecting A Folder
Selecting a Folder See “Selecting a Folder” on page 22. Gateway/Repeater Selection Use the DMO Config sub-menu for setting the Gateway and Repeater options. 1. Press Optns to enter the options menu in DMO. DMO Options sub-menu Option (TMO) Folder TG by Folder TG by abc Trunked Mode... -
Page 37: Selecting Dmo Group Call Via Gateway
Selecting DMO Group Call via Gateway While in DMO, proceed as follows to choose a gateway to set up a call via Gateway for the selected talkgroup: 1. Press Optns, scroll to Comm Type and press Select. 2. Scroll to Via Gateway and press Select. Your CM5000 communicates through Gateway only. -
Page 38: Making Group Call
Making Group Call Select the group from Talkgroup list you require. Press PTT button and wait for the grant tone before speaking into the microphone remembering to release the PTT to listen. Group Folder name Group name Receiving Group Call When an Group call is received the mobile will automatically go into group mode and receive the call, also the group caller name will appear in the screen. -
Page 39: Tetra/Uhf Analogue Gateway Mode
TETRA/UHF Analogue Gateway Mode General The CM5000 allows you to establish gateway connection between the TETRA network and a UHF analogue system. To notify TETRA users of an unencrypted user on the network (while TETRA/UHF analogue gateway mode is active), an audible warning tone is sent every time the analogue unit transmits to the TETRA network. -
Page 41: Private Call
Private Call General A Private Call, also called Point-to-Point or individual call, is a call between two individuals. No other terminal can hear the conversation. If your Service Provider has restricted access to the Contacts list, it might not be possible to create a new contact, edit existing contacts or dial up a number which is not in the Contacts list. -
Page 42: Making Private Pre-Emption Interconnect Call
4. To end the call press On Hook key. Private In Use: Called ID Number Call set-up procedure is completed Terminal is in Traffic mode Encryption Disabled Private In Use: Called ID Number Call set-up procedure is completed Terminal is in Traffic mode Encryption Enabled Making Private Pre-emption Interconnect Call If a placed private call cannot be initiated as the receiving... -
Page 43: Receiving Private Call
Receiving Private Call 1. The CM5000 switches to the incoming Private Call. The display shows incoming call notification and the caller’s identity. 2. To answer an incoming call, press PTT. 3. To reject or end the call, press On Hook key. -
Page 45: Phone And Pabx Calls
Phone and PABX Calls General The Phone Call allows you to call a landline telephone number or a cellular mobile phone number. The Private Automatic Branch Exchange (PABX) Call allows you to call local office extension numbers (if programmed by your service provider). -
Page 46: Making A Phone Or Pabx Call
Making a Phone or PABX Call 1. From the Home display select Phone or PABX Mode using right/left navigation keys. 2. When in Phone or PABX, select a pre-programmed number from the contact book or dial a number. 3. Press and release Off Hook key. You will hear a ringing tone. -
Page 47: Speed Dial
Speed Dial The Speed Dial function is available in TMO to make a phone call or PABX call. A Speed Dial number can be assigned to a contact. To use Speed Dial, input the Speed Dial number to the idle display and press #. -
Page 49: Emergency Operation
Emergency Operation General Emergency Operation is available in TMO and in DMO, if the CM5000 is in service. Emergency Mode indication (alert tones) can be disabled by your Service Provider. Pressing the Emergency button even if Transmit Inhibit is activated causes immediately the CM5000 to transmit. When entering Emergency Operation the CM5000 should not be within the RF sensitive area any longer! Entering Emergency Mode... -
Page 50: Exiting Emergency Mode
Upon entry into Emergency Mode any existing call or service other than packet data service will be aborted or cleared down. In Emergency Mode, the terminal will automatically reject Phone, PABX and Private Calls, and will not monitor the groups in the user selected scan list. Exiting Emergency Mode The terminal exits Emergency Mode and switches to the Home display:... -
Page 51: Receiving Emergency Call
Receiving Emergency Call When the CM5000 receives Emergency Call, the display will show Emgcy In Use and switches to Emergency Mode automatically. Receiving Emergency Call During Private Call When the CM5000 receives Emergency Call and a Private Call is currently ongoing, the display will show Emgcy In Use and enables to choose whether to Join or End the Emergency... -
Page 53: Gps Location Service
GPS Location Service Your terminal’s GPS Location feature uses information from Global Positioning System (GPS) satellites orbiting the earth to determine the approximate geographical location of your terminal. The availability and accuracy of this location information (and the amount of time that it takes to calculate it) will vary depending on the environment in which you are using the terminal. -
Page 54: Enhancing Gps Performance
• When your GPS antenna is covered (for example, by your hand or other object) or facing the ground • In temperature extremes outside the operating limits of your terminal Even where location information can be calculated in such situations, it may take longer to do so. Therefore, in any emergency situation, always report your location to your dispatcher. -
Page 55: Gps Icon
GPS Icon When your terminal is receiving valid GPS location data, a GPS icon will be shown in the display: Please note, that during emergency mode, your terminal will not display the GPS icon even when receiving GPS location data. If valid GPS location data is available when you leave emergency mode the GPS icon will be displayed again. -
Page 56: Viewing Your Position
This estimate of accuracy of the calculated location is only a very rough estimate and may vary substantially from the actual accuracy of the approximate location information reported. The variation will vary in accordance to the GPS Configuration set by your Service Provider. The availability of the GPS Location menus is dependent on your terminal configuration, please contact your Service Provider for further details. - Page 57 Each time approximate location of your terminal is calculated, the latest location information is stored in your terminal and remains there even when your terminal is powered off. You will see this information the next time you view the Position screen. If you received a terminal call or alert while attempting to determine your location, the Position screen will disappear, but your terminal will continue attempting to determine its...
-
Page 59: The Menu
The Menu To Enter the Menu Items You can enter the menu items during a call. If you are viewing a menu when a new call starts, the terminal will exit the menu. 1. Press the Menu button. 2. Scroll to the required item, press Select to select. If the menu item contains a further set of menu items as in the example below, repeat step 2. -
Page 60: Menu Icons
Menu Icons The following icons make it easy to identify the menu items at first glance. Menu Icon Description Main Menu Items/Context Sensitive Menu Appears above the Menu button if the main menu items/context sensitive menu are active. Messages • Send status messages, •... -
Page 61: List Of Menu Items
List of Menu Items Messages New Message Inbox Outbox Templates Predefined Send Status Contacts New Contact Exist Contacts Security PIN Protect Change Code Setup Set Ring Ring Style Set Volume Language Data Setup Group Audio Tones Display Battery Clock Group Setup More... -
Page 62: Messages
Messages Refer to “Messages” on page 89 for details. Contacts General Contacts stores Private, Phone, and PABX numbers. Each Contacts entry can store several numbers. A Contacts entry contains: • A name – A name is required if you are storing more than one number to the entry;... -
Page 63: Selecting A Contact
Contact Icon Description Work Phone Number PABX Number Other Phone Number Pickers Indicate more than one number is stored with the contact. Selecting a Contact To select a contact, use Up Arrow and Down Arrow keys. In addition, number keys can also be used. For example, the cursor is moved to the contact name that begins with an “A”... -
Page 64: Editing A Contact
2. Enter name. Press Ok to confirm. 3. Scroll left or right and select the type of stored number (such as Private). 4. Enter number (#). Press Ok. 5. Scroll up and down the entries. Continue to enter other types and numbers, as you may keep several numbers (Private, Mobile, Home, Work, PABX, Other, Speed Dial number) for the same person under the same contact name. -
Page 65: Deleting A Contact
5. Press Yes to confirm. If an entry contains only one number, deleting the number deletes the entry. Deleting a Contact 1. From the contact list, scroll to the entry you want to delete. 2. Press the Menu button. 3. To delete the entire entry, select Delete Contact. 4. -
Page 66: Security
From a contact detail display, press the Menu button 2. Select Capacity. 3. Select from the following options: • Private – shows Private numbers capacity • Phone/PABX – shows Phone/PABX numbers capacity • Contact – shows contacts capacity 4. Select Back to exit. Security From the main menu, select >... -
Page 67: Change Code
Unit Locked – you entered the correct code. The display returns to the Security sub-menu and shows the active setting: On To unlock the CM5000 before powering off: 1. From the main menu, select > Security > PIN Protect. 2. Select Off and press Select. 3. -
Page 68: Remote Control
Remote Control This feature can change SDS Remote Control functionality on the Controlled MT side. Locking/Unlocking the Keypad To prevent accidental key/button presses, press the Menu button and then To unlock the keypad, press the Menu button, and then When there is an incoming call and the keypad is locked, you can still use the PTT, Off Hook and On Hook key. -
Page 69: Setting The Ring Style
Setting the Ring Style This sub-menu allows you to set the incoming call ring style. From the main menu, select Setup > Ring Style. Upon entry into this sub-menu, the display shows the current ring style used. To set the ring style scroll to the desired style and press Select. -
Page 70: Setting The Display's Working Language
Setting the Display’s Working Language From the main menu, select Setup > Language The display shows the current language used. You can customize your CM5000 to operate in English, German, French, Spanish, Dutch, Swedish, Norwegian or in a language defined by your Service Provider. -
Page 71: Setting Tones
Setting Tones From the main menu, select Setup > Tones. This sub-menu allows you to activate/deactivate the CM5000 tones. For a detailed list of tones, see Tones section. Setting Keypad Tone To activate/deactivate keypad tone at every key press: 1. From the main menu, select Setup >... -
Page 72: Display Features
To change your Talk Permit Tone settings: 1. From the main menu, select Setup > Tones > Talk Permit. 2. Scroll through the settings. 3. Choose required setting, and press Select. Press Back to exit. Setting Car Horn Tone To activate/deactivate car horn notification about receiving individual call while the ignition is off: 1. - Page 73 Setting the Text Size 1. .From the main menu, select Setup > Display > Text Size. 2. Press Change. Select Standard or Zoom to see the text on the display in two sizes. Screen Saver 1. From the main menu, select Setup > Display >...
-
Page 74: Battery Level
off automatically. Manual – The backlight remains on. To turn the back- light on/off press the Clear key. • Brightness – you can set the brightness to High or Low. Setting the Wallpaper 1. From the main menu, select Setup > Display Wallpaper >... - Page 75 The display shows the current time and date. Setting Time and Date To set time manually: 1. From the main menu, select Setup > Clock > Set Time. 2. In Auto Time Set display select Off. 3. Enter time and date using the navigation key and press Ok. 4.
-
Page 76: More
Setting Book on Setup Any radio (if the Book On is enabled by the Service Provider) can be assigned by the service provider to one person. You are going to see only screen with your login and the full service is granted from this point. From the main menu, select Book On Setup Menu >... -
Page 77: Group Scan
Group Scan From the main menu, select More > Group Setup > Scan This sub-menu allows you to activate/deactivate scanning, view the active scan list, and edit the scan lists. Scanning This sub-menu allows you to activate/deactivate the scanning of a list of pre-defined groups programmed in the CM5000. - Page 78 Scan Lists 1. From the main menu, select More > Group Setup > Scan > Scan Lists 2. Scroll to the required scan list. Press View to see the groups used in the scan list. Press Back to return to the previous display.
-
Page 79: My Groups
• Edit the scan list groups. > Scroll to the group you wish to remove from the selected scan list, and press Delete You will be prompted to remove the selected group. After a few seconds, the display shows the updated scan list. Priority >... -
Page 80: Viewing Personal Information
Adding a Group to My Groups 1. From the main menu, select More > Group Setup > My Groups > Edit List > [New Group]. 2. Select a group by folder search (“TMO/DMO by Folder”). Select the folder and select the group. The group is added to the “My Groups”... -
Page 81: Viewing Otg Configuration
name, TEI number, ISSI number, GSSI number, radio (terminal) software version, panel (control head) software version, and OPTA data if SIM function is supported). You can scroll through the information using the up/down navigation keys. Viewing OTG Configuration Use this feature to view group information assigned to the One Touch Group (OTG) button. -
Page 82: Shortcuts
You can make a Phone, PABX, or Private Call from the entry, depending on the entry you are selecting in the list. Shortcuts Use shortcuts to access frequently used menu items. From the main menu, select More > Shortcuts. The display shows the shortcut list. -
Page 83: Networks
Deleting a Shortcut 1. From the main menu, select More > Shortcuts. 2. Scroll to the shortcut you wish to delete. 3. Press the Menu button and select Delete. Press Yes to delete a shortcut. Press No to cancel. Deleting All Shortcuts 1. - Page 84 A network may have an alias. Press the Menu button to view the network ID. Then press Select 3. Return to the Home display. The display shows the network ID or alias. Selecting Trunked Mode This sub-menu allows you to select the mode your CM5000 will be operating on.
- Page 85 Selecting Repeater Mode This sub-menu allows you to select the mode your CM5000 will be operating on. To set up your operating mode: 1. From the main menu, select More > Networks > Repeater Mode 2. The CM5000 switches to Repeater Mode. Setting Transmit Inhibit (TXI) Mode This mode should always be set before entering areas where...
-
Page 86: Location
Location To enter the location sub-menu, press the Menu button and select More... > Location: Position – provides the actual position information: This displays the following information about the last time your location was calculated (if available): • The time the location was last calculated •... -
Page 87: Packet Data
• Satellites > The satellite number > The satellite status > The satellite signal strength • Version > The GPS module software version. Scroll to your selection and press Select to access the next display. This estimate of accuracy of the calculated location is only a very rough estimate and may vary substantially from the actual accuracy of the approximate location information reported. - Page 88 Viewing Sent Data Statistics To view sent data statistics select Sent Data in the Packet Data sub-menu. The number of KBytes sent since current packet data activation is displayed. Additionally the throughput is shown: 9 kbps (e.g.) active packet data session. –...
-
Page 89: Crypto Menu
Your Service Provider has set the maximal number of time slots to allocate to 1, 2, 3, or 4. The bandwidth percentage refers to the possible number of slots (1, 2, 3, or 4) as 100%. Example: 50% is displayed, if 2 of 4 possible slots are allocated. 100% is displayed, if 4 of 4 possible slots are allocated. - Page 90 Setting Alarm Tone The Alarm Tone notifies about any clear transmission. 1. From the main menu, select More > Crypto Menu > Clear Call Alarm. 2. Select Alarm Tone On to enable or Alarm Tone Off to disable the alarm tone and press Select.
- Page 91 Crypto Registration 1. From the main menu, select More > Crypto Menu > Crypto Register. 2. Select Start Register to start the registration and press Select. You cannot start the registration if the terminal is in a call or in DMO. Audio Settings This menu changes the audio output for a group call when the...
-
Page 92: Pnc Mode
SDS Encryption Keys This menu changes the encryption keys for Group and Individual SDS messages. 1. From the main menu, select More > Crypto Menu > SDS Encr Keys. 2. Select Group SDS or Individual SDS as relevant and press Select. 3. -
Page 93: Rua/Rui Settings
Password Change If you are logged to the PNC server, you can change your password for the currently used Login ID. To enter the history menu: 1. From the login display press the Menu button and select Chg Password. 2. Type in your current password and press OK. 3. -
Page 94: Timeout Pending Warning
When the User PIN is highlighted press Select and type your User PIN on the next screen then press Ok. 3. Logging From this point the request to logon is sent. You can stop the logging process by pressing Cancel. When the logging process ends the display is changed to idle screen. -
Page 95: Log Off
Log Off You can change the state that you are logged on by pressing Menu button > More... > RUI > Log Off from the idle screen. The radio prompts to accept log off state or to deny it (if you selected it by mistake). -
Page 97: Messages
Messages General The messaging feature lets you: • send short text messages (free text or according to user defined or predefined templates), • send status messages, • receive messages. A status is a number corresponding to a pre-programmed message in a list your group recognises. A text message is a short text containing up to 140 characters. -
Page 98: Sending The Message
2. Type/edit your message using the keypad. Press the Menu button Select Store to add your message to the template list. The number assigned to the message is the lowest free number. When character format is set to “8 bit” with the Native Programmer and number of input character is more than 141 characters, inputted text is sent as concatenated text messages automatically. -
Page 99: Inbox Icons
Inbox Icons The following icons indicate the status of messages in the Inbox. Inbox Icon Description Unread (New) Message Indicates that you have not read the message yet. Corrupted Concatenated Message Indicates that the concatenated message was not received completely. Read (Old) Message Indicates that you have read the message. -
Page 100: New Message Received
New Message Received If you press Back, you dismiss the message. You can access the message later from the inbox. 1. Select Read to read the entire message. Reading a new text message changes its state from New to Old The read message is kept in the Inbox. -
Page 101: User Defined Templates
• Select Forward. This invokes the edit screen. The old message body serves as the default message. Press Ok to forward the message to selected target. See “Sending the Message” on page 90. • Press Back to return to the previous display. User Defined Templates The user defined mail templates are received, new, sent or... -
Page 102: Predefined Templates
Predefined Templates Predefined mail templates are templates that are programmed into your CM5000 by your Service Provider. You are allowed to perform limited edit operations of the predefined template and to send it, but you will not be able to store the edited template or erase it from the predefined template list. - Page 103 2. In this example, Status 3 is the last sent status. If you wish to send a different status, scroll to your selection in the list of pre- programmed statuses, or key the status number. 3. Press Menu button and then select View to view the status message.
-
Page 105: Writing Text
Writing Text Selecting the Text Entry Mode Text entry modes make it easy for you to enter names, numbers, and messages. In the text entry screen, select the Menu button > Entry Mode, and then select one of the following modes: •... -
Page 106: Keys Usage
Symbolic Icon Description Enter punctuation and symbols. Keys Usage • Except for keys 0 and 1, the top line for each key shows numbers and uppercase characters, and the lower line shows numbers and lowercase characters. • Press and hold any numeric key to enter Numeric mode. List of Keys and Characters in Alphanumeric Mode: Alphanumeric Mode (TAP) Press to cycle through lowercase, uppercase,... - Page 107 List of Keys and Characters in Numeric Mode: Numeric Mode • Press to enter digit at insertion point. List of Keys and Characters in Symbol Mode: Symbol Mode + - * / \ [ ] = > < # § .
-
Page 108: Writing In Numeric Mode
Description • Press once to cycle through all entry modes (symbolic, numeric, primary). • Press and hold to return to the default entry mode. Select Press to select the highlighted choice and place it in the main text area. Delete •... -
Page 109: What To Do If
What to do if... Your CM5000 flashes the following messages: Messages Message Description ...-Rcvd Call received but not answered, or rejected Attachment The CM5000 could not perform talkgroup attachment. Failed The CM5000 keeps on trying. If it does not succeed, try another talkgroup. - Page 110 Messages Message Description Faulty Unit Self-test failed. An operational fault has been detected Error... with your CM5000. Record the error number. Turn your CM5000 off and contact service. Group already The group you are attempting to add already exists in exists the My Groups folder.
- Page 111 Messages Message Description My Groups is full You are not allowed to add a group to the My Groups folder as it already contains the maximum allowed number of groups. Network Network problems. Please try again later. Trouble No Answer The called party does not answer.
- Page 112 Messages Message Description Party Busy The called CM5000 is busy. Party Not • The called CM5000 is out-of-range. Please try again later. Available • The called CM5000 is turned off. Please try again later. Please Try The CM5000 could not place the call. Again Please Wait A message during startup.
- Page 113 Messages Message Description TG ... cannot be You cannot delete this group from the favourite deleted talkgroup folder. Your Service Provider has set this group to non-deletable. Try Again Later The requested service is temporarily unavailable. Unit Check with Service Provider. Disabled Unencrypted The message appears on any clear call occurrence...
-
Page 115: Tones
Tones = High Tone; = Low Tone Description Type Repeated Idle • Back to Home display Once • Back to Rotary volume use when Rotary scroll timer expires • Back to coverage • Back to full service Clear to send Once •... - Page 116 = High Tone; = Low Tone Description Type Repeated • Talk Prohibit Until you release • System busy the PTT • Called terminal not available or busy. • Call disconnected or Once failed due to network • Wrong number dialled. DMO Entering Once DMO Exiting...
- Page 117 = High Tone; = Low Tone Description Type Repeated Phone ring (reception) According to the Ring Until you answer Duplex Private Call Style sub-menu setting. or the call is rejected. Private Call received Until the call is answered Private Call ringing to Until the call is the caller answered...
- Page 118 = High Tone; = Low Tone Description Type Repeated GPS in coverage Once GPS out of coverage Once...
-
Page 119: Index
Index entering exiting alias emergency operation analogue/digital gateway mode entering gateway mode entering repeater mode backlight setup bandwidth favourite group buttons folder emergency favourite group selection cleaning your unit clock gateway code changing gateway mode contact list entering contrast setup global positioning system (GPS) GPS (global positioning system) date... - Page 120 emergency messages sub-menu gateway mode missed call history more... sub-menu inbox my info sub-menu menu new message arrived networks sub-menu new message(s) in inbox notations no speaker repeater mode scan open group signal strength (TMO) ignition sense PABX (private automatic branch inbox use exchange) InterMNI call...
- Page 121 rotary knob trunked mode operation (TMO) TXI (transmit inhibit) scan list scan setup unlocking the terminal scanning selection user defined template screen saver setup wallpaper setup text writing text security sub-menu shortcuts sub-menu silent emergency mode SIM card authentication powering on soft keys status message sending...